I ruined three batches of Halloween sugar cookies before I finally understood what I was doing wrong. Not the flavor—that was always fine. The shape. I kept cutting bat-wing cookies that spread into sad, bloated blobs in the oven. They looked less like spooky silhouettes and more like puffy clouds that had seen some things. It took me an embarrassingly long time to figure out that the dough needed to be colder, the butter needed to be firmer, and my patience needed a serious adjustment. But once I cracked the code? These cookies became the highlight of every October gathering I bring them to. The royal icing bats aren’t just decoration—they’re the whole point. Something about that glossy black icing against a soft vanilla cookie makes people stop and stare. (And then grab three.)
I’m not a professional baker by any stretch. I’m the person who burns toast and forgets ingredients in the pantry. But these cookies? They made me look like I knew what I was doing. And honestly, that’s the kind of magic Halloween is all about.
Why You’ll Love This Recipe
These Halloween sugar cookies aren’t just another cutout recipe. I’ve tested this dough more times than I care to admit, and here’s what makes it different—it holds its shape. No spreading, no blurry edges, no disappointed faces when your bats look like potatoes. The royal icing sets up firm enough to stack and ship, but stays soft enough to bite through without cracking your teeth.
- No Spread Guaranteed : This dough is built to hold sharp edges. Chilling isn’t optional—it’s the secret weapon. Your bats will look like bats, not blobs.
- Simple Pantry Ingredients : Butter, sugar, flour, eggs, vanilla. Nothing weird. No specialty extracts or hard-to-find flours. You probably have everything except maybe the black gel food coloring.
- Perfect for Halloween Parties : These cookies disappear fast. I’ve brought them to pumpkin carving nights, costume parties, and school events. Adults grab them just as fast as kids.
- Royal Icing That Actually Works : No raw egg whites, no guessing consistency. This meringue powder version is forgiving and dries glossy. You can prep the bats a day ahead and assemble when you’re ready.
- Customizable Without Stress : Don’t want bats? Use any Halloween cutter. Pumpkins, ghosts, cats. The icing technique stays the same, and the dough works for any shape.
I’ll be real with you—this recipe takes some time. The chilling, the rolling, the icing. But it’s the kind of project you put on a podcast and lose yourself in. And when you pull that first perfectly shaped bat off the parchment? Worth every minute.
What Ingredients You Will Need
This recipe uses straightforward ingredients. No surprises. But a few specific choices make a real difference in the final cookie.
For the Sugar Cookies
- Unsalted butter , softened to room temperature (1 cup / 226g). Not melted, not microwaved. Soft enough to leave a dent when pressed, but still cool to the touch. I use Challenge or Kerrygold for the flavor.
- Granulated sugar (1 cup / 200g). Regular white sugar. No substitutes here—brown sugar changes the spread and color.
- Large egg , room temperature (1). Cold eggs seize the butter. Leave it on the counter for 30 minutes or float it in warm water for 5.
- Vanilla extract (2 teaspoons). Pure vanilla, not imitation. The flavor comes through even in a sweet cookie.
- Almond extract (1/2 teaspoon, optional but recommended). This is my secret. It doesn’t taste like almonds—it makes the vanilla taste more vanilla-y. Trust me on this.
- All-purpose flour (2 and 1/2 cups / 312g). Spoon and level. Scooping directly from the bag packs in too much flour and makes dry cookies.
- Baking powder (1 teaspoon). Helps with slight lift without spreading.
- Salt (1/2 teaspoon). Balances sweetness. Don’t skip it.
For the Royal Icing
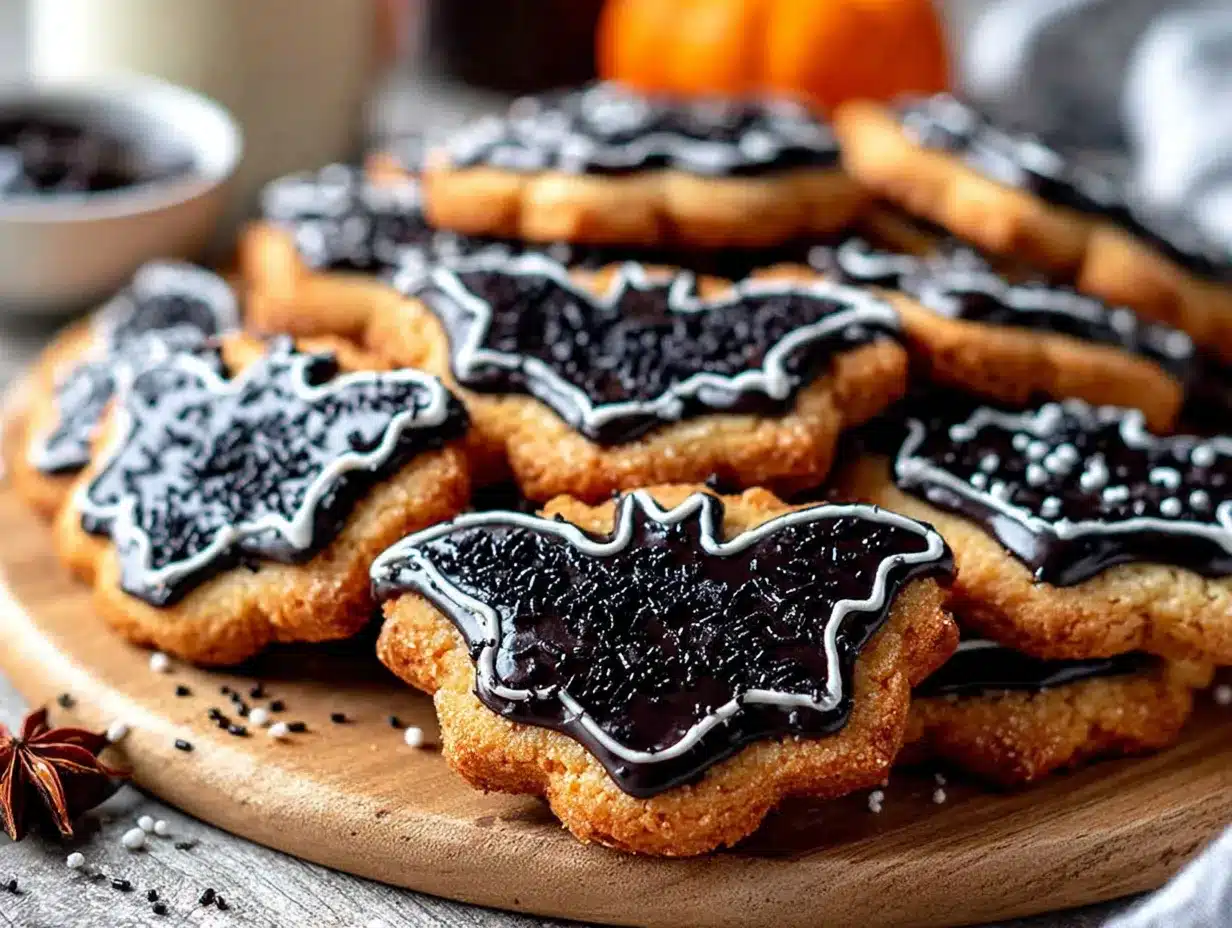
- Meringue powder (3 tablespoons). This replaces raw egg whites. Safe, stable, and available at craft stores or online. Wilton brand works fine.
- Powdered sugar (4 cups / 480g). Sift it if it’s lumpy. Unsifted sugar makes lumpy icing that clogs piping tips.
- Warm water (6-8 tablespoons). Add slowly. Humidity affects how much you need.
- Black gel food coloring (1-2 teaspoons). Liquid coloring won’t give you true black—you’ll get gray. Americolor Super Black or Wilton Black Gel are my go-to brands. (Pro tip: let the colored icing sit for 30 minutes. The color deepens as it rests.)
- Silver or white luster dust (optional, for finishing). Gives the bats a subtle shimmer. Totally optional but very fun.
Ingredient Selection Tips
For the butter, European-style brands have higher butterfat content, which means less water and less spread. If you use standard American butter, just make sure it’s not margarine or spreadable tub butter. Those have added water and will wreck your dough structure. For the gel coloring, buy two bottles if you’re making a lot of cookies. Black takes more coloring than you think, and running out mid-batch is frustrating.
Equipment Needed
- Stand mixer or hand mixer . You can cream butter and sugar by hand, but your arm will hate you. A stand mixer with paddle attachment is ideal.
- Rolling pin . Adjustable rolling pins with thickness rings are worth the investment. I use a wooden one with removable rings. Keeps dough thickness consistent.
- Bat-shaped cookie cutter (2-3 inch size). Amazon has sets. I prefer the ones with defined wing shapes—they ice better.
- Parchment paper or silicone baking mats . Parchment is cheaper. Silicone mats are reusable and non-stick. Both work.
- Baking sheets . Light-colored metal sheets bake more evenly. Dark sheets can over-brown the bottoms.
- Cooling racks . Essential for letting cookies cool completely before icing. Warm cookies melt royal icing instantly.
- Piping bags or squeeze bottles . I use disposable piping bags with a small round tip (Wilton #2 or #3). Squeeze bottles work for flooding but are harder to control for detail work.
- Toothpicks . For popping air bubbles and spreading icing into small spaces.
- Small offset spatula . Handy for lifting cookies and smoothing edges.
If you don’t have a bat cutter, you can use a sharp knife and a template printed on cardstock. Trace around it with a knife tip. It takes longer but works in a pinch.
Preparation Method
Step 1: Make the Dough
Cream the softened butter and granulated sugar together in your mixer on medium speed until light and fluffy, about 2-3 minutes. Scrape the bowl once. Add the egg, vanilla extract, and almond extract. Beat until combined, about 1 minute. In a separate bowl, whisk together the flour, baking powder, and salt. With the mixer on low, gradually add the dry ingredients to the wet. Mix until just combined—stop when you no longer see dry flour. Overmixing develops gluten and makes tough cookies.
Step 2: Chill the Dough
Divide the dough in half. Flatten each half into a disc about 1-inch thick. Wrap tightly in plastic wrap. Refrigerate for at least 2 hours, or overnight. This step is non-negotiable. Warm dough spreads. Chilled dough holds edges. I’ve tested 30-minute chills versus 2-hour chills. The difference is dramatic. If you’re in a rush, pop the discs in the freezer for 45 minutes.
Step 3: Roll and Cut
Preheat your oven to 350°F (175°C). Line your baking sheets with parchment. Lightly flour your work surface and rolling pin. Roll one disc of dough to 1/4-inch thickness. (Use those rolling pin rings if you have them.) Cut out your bat shapes. Re-roll scraps once—the second roll tends to produce slightly tougher cookies, so keep them separate if you care about texture. Place cutouts 2 inches apart on prepared sheets. Chill the cut cookies on the sheet for 10 minutes before baking. (See a pattern? Chilling is everything.)
Step 4: Bake
Bake for 8-10 minutes. The edges should be just barely golden. The centers will look set but not brown. Rotate the pan halfway through for even baking. Let cookies cool on the baking sheet for 5 minutes—they’re fragile hot. Then transfer to a wire rack to cool completely. Do not even think about icing warm cookies. The icing will slide right off and pool into a sad puddle.
Step 5: Make the Royal Icing
In a clean mixer bowl, combine meringue powder and powdered sugar. Add 6 tablespoons warm water. Beat on low until combined, then increase to medium-high and beat for 5-7 minutes. The icing should be glossy and thick enough to hold a ribbon trail when you lift the beater. Add more water a teaspoon at a time if it’s too stiff. You want a “15-second consistency”—drizzle a spoonful back into the bowl and count how long it takes to smooth out. 15 seconds is perfect for flooding. Add the black gel coloring. Beat until uniform. Let the icing rest for 30 minutes—the color darkens as it sits.
Step 6: Pipe the Bats
Transfer icing to a piping bag fitted with a #2 tip. Outline each bat cookie first—trace the edge of the wings, body, and ears. Let the outline dry for 5-10 minutes. Then flood the inside by piping zigzags across the surface. Use a toothpick to guide icing into corners and pop any air bubbles. Work in batches. Let flooded cookies dry uncovered for 4-6 hours, or overnight. The icing should be completely hard to the touch, not tacky.
Step 7: Add Details (Optional)
Once the black icing is dry, mix a small batch of white royal icing (same recipe, skip the coloring). Use a #1 tip to pipe tiny eyes and fangs on each bat. If you’re using luster dust, mix a pinch with a drop of vanilla extract and paint it onto the wings with a small brush. The shimmer catches light beautifully.
Cooking Tips & Techniques
I learned most of these lessons the hard way. My first Halloween cookie batch looked like a crime scene. My second batch was edible but ugly. By batch three, I started figuring things out. Here’s what I wish someone had told me:
Temperature is everything. If your butter is too soft, your dough will be sticky and your cookies will spread. If your dough is too warm when it goes in the oven, same problem. I keep a baking sheet in the freezer specifically for chilling cut cookies. Pop them on there for 10 minutes while the oven preheats. It makes a visible difference in edge sharpness.
Don’t skip the almond extract. I know it’s optional. But it adds a subtle depth that makes people ask, “What’s in these? They taste different—in a good way.” It’s not almond-forward. It’s a background note that rounds out the vanilla.
Royal icing consistency is tricky. Too thick and it won’t smooth out. Too thin and it runs off the edges. The 15-second test is your friend. If you’re unsure, err on the thicker side—you can always add water. You can’t take it out. I’ve ruined entire batches by adding too much water at once.
Work in an assembly line. Outline all the cookies first. Then flood them all. Then add details. Switching between tasks slows you down and the icing starts to set before you’re done.
Let the cookies speak for themselves. You don’t need elaborate piping skills. Simple bat silhouettes with tiny white eyes are spooky and elegant. Less is more. Overcomplicating the design makes it look messy.
One more thing—if you’re baking with kids, double the recipe. Little hands eat more dough than they cut. And honestly? That’s part of the fun.
Variations & Adaptations
Gluten-Free Version
Substitute the all-purpose flour with a 1:1 gluten-free baking flour blend (I use King Arthur Measure for Measure). Add 1/4 teaspoon xanthan gum if your blend doesn’t include it. The dough will be slightly more fragile, so chill it longer—3 hours minimum. Bake time stays the same. The texture is slightly crumblier but still delicious.
Vegan Royal Icing
Replace meringue powder with 3 tablespoons aquafaba (chickpea brine) and a pinch of cream of tartar. Beat until stiff peaks form, then add powdered sugar. The consistency is similar, though the drying time is longer—about 8-10 hours. The flavor is neutral. No one will know it’s vegan.
Different Shapes and Themes
The dough works for any Halloween shape. Pumpkins, ghosts, cats, skulls. For pumpkins, use orange gel coloring and pipe green stems. For ghosts, leave the icing white and pipe black eyes. For cats, use black icing and pipe green or yellow eyes. The same royal icing recipe works for all of them—just change the color.
Spiced Version
Add 1 teaspoon pumpkin pie spice and 1/2 teaspoon cinnamon to the dry ingredients. The cookies take on a warm, autumnal flavor that pairs beautifully with the black icing. I made these for a fall harvest party and they were gone in 20 minutes. The spice doesn’t overpower—it just makes the cookie feel cozier.
Gluten-Free + Vegan Combo
Use the gluten-free flour blend and the aquafaba royal icing. The dough will be delicate, so handle it gently. Chill for 3+ hours. Bake at 325°F for 10-12 minutes. The cookies won’t be as sturdy as the original, but they’re still delicious and inclusive for dietary restrictions.
Serving & Storage Suggestions
These cookies are best served at room temperature. The royal icing should be fully set—hard to the touch but still soft when bitten. I like to arrange them on a black or orange platter for Halloween parties. A dusting of powdered sugar around the edges (not on the cookies) looks like cobwebs and adds drama.
For drink pairings, these cookies love a cold glass of milk. For adults, they go surprisingly well with a dark stout or a spiced cider. I’ve also served them alongside a hot chocolate bar—guests dip the cookies into the chocolate and it’s ridiculous in the best way. If you’re planning a full Halloween spread, these cookies pair beautifully with salted caramel apple crisp for a dessert table that covers all the fall cravings.
Storage: Store decorated cookies in an airtight container at room temperature. Layer them between sheets of parchment or wax paper. They’ll stay fresh for up to 2 weeks—though honestly, they never last that long. Do not refrigerate. The fridge adds moisture that softens the royal icing and makes it tacky.
Freezing: You can freeze undecorated baked cookies for up to 3 months. Wrap them tightly in plastic wrap, then foil. Thaw at room temperature, then ice as directed. Do not freeze decorated cookies—the icing can crack and absorb moisture during thawing.
Make-Ahead Tips: The dough can be refrigerated for up to 3 days or frozen for 3 months. The royal icing can be made up to 5 days ahead and stored in an airtight container in the fridge. Let it come to room temperature and re-whip before using. The color may lighten slightly—add a drop more black gel if needed.
Flavors actually improve after a day or two. The cookies soften slightly and the vanilla-almond combination melds together. If you can stand to wait, bake them a day before your event. Your future self will thank you.
Nutritional Information & Benefits
Let’s be real—these are sugar cookies with icing. They’re a treat, not a health food. But here’s the breakdown for one cookie (based on a 2-inch bat, using the full recipe yielding about 36 cookies):
- Calories: 145
- Total Fat: 5g
- Saturated Fat: 3g
- Carbohydrates: 24g
- Sugar: 16g
- Protein: 1.5g
- Sodium: 55mg
On the plus side, these cookies are free from artificial preservatives and high-fructose corn syrup. The butter provides a small amount of vitamin A. The egg adds a touch of protein. Mostly, though, they’re about joy. And sometimes that’s exactly what you need.
For dietary considerations: This recipe contains wheat, dairy, and eggs. The royal icing uses meringue powder (pasteurized egg whites), so it’s not suitable for those with egg allergies unless you use the aquafaba version. The gluten-free variation works well for celiac-friendly baking if you use certified gluten-free flour.
If you’re watching sugar intake, consider making smaller cookies (1-inch bats) and using a thinner layer of icing. The flavor is still there, just in a smaller package. I’ve also made these with a 50/50 blend of all-purpose and whole wheat pastry flour—they’re slightly denser but still tasty.
Frequently Asked Questions
Can I use liquid food coloring instead of gel?
You can, but you won’t get true black. Liquid coloring adds too much water to the icing, which thins it out and makes it runny. You’ll end up with dark gray at best. Gel coloring is concentrated and doesn’t affect consistency. It’s worth the extra dollar.
My royal icing is too thick. How do I fix it?
Add water one teaspoon at a time and stir gently. Test the consistency after each addition. If you add too much water and the icing becomes too thin, you can’t thicken it back up without adding more powdered sugar—which changes the yield. Go slow. Patience here saves frustration.
Why did my cookies spread in the oven?
Your dough wasn’t cold enough. Chill the dough for at least 2 hours before rolling. Chill the cut cookies on the baking sheet for 10 minutes before baking. If your kitchen is warm, chill the baking sheet itself. Also check that your butter was properly softened—not melted or greasy.
Can I freeze decorated cookies?
I don’t recommend it. The royal icing can crack during freezing and thawing, and condensation can make the icing tacky. Freeze undecorated cookies instead, then ice them after thawing. It takes an extra step but the results are much better.
How far in advance can I make these cookies?
You can make the dough up to 3 days ahead and refrigerate it. Baked undecorated cookies keep for 2 weeks in an airtight container. Decorated cookies are best within 5-7 days. The royal icing can be made up to 5 days ahead and stored in the fridge. Plan your timeline backward from your event and you’ll be fine.
Conclusion
These Halloween sugar cookies with royal icing bats are the recipe I come back to every October. They’re not complicated—they just ask for a little patience. A little chilling. A little attention to detail. And in return, they give you something genuinely impressive that makes people light up when they see it.
I’ve brought these to pumpkin carving parties, classroom celebrations, and casual get-togethers. Every time, someone asks for the recipe. Every time, someone takes a photo before eating. And every time, I watch a kid (or an adult) pick up a bat cookie, examine it, and then take a bite with a look of pure satisfaction. That’s the moment that makes all the chilling and piping worth it.
You don’t have to be a professional baker to pull these off. You just need to follow the steps, trust the process, and give yourself grace if your first few bats look a little wonky. (Mine did. They still tasted amazing.)
If you try these cookies, I’d love to hear how they turn out. Drop a comment below, tag me in your photos, or tell me about your own Halloween baking traditions. And if you’re looking for more fall baking inspiration, don’t miss my brown butter pumpkin snickerdoodle cookies—they’re another seasonal favorite that disappears fast. Happy Halloween, and happy baking!
Pin This Recipe!
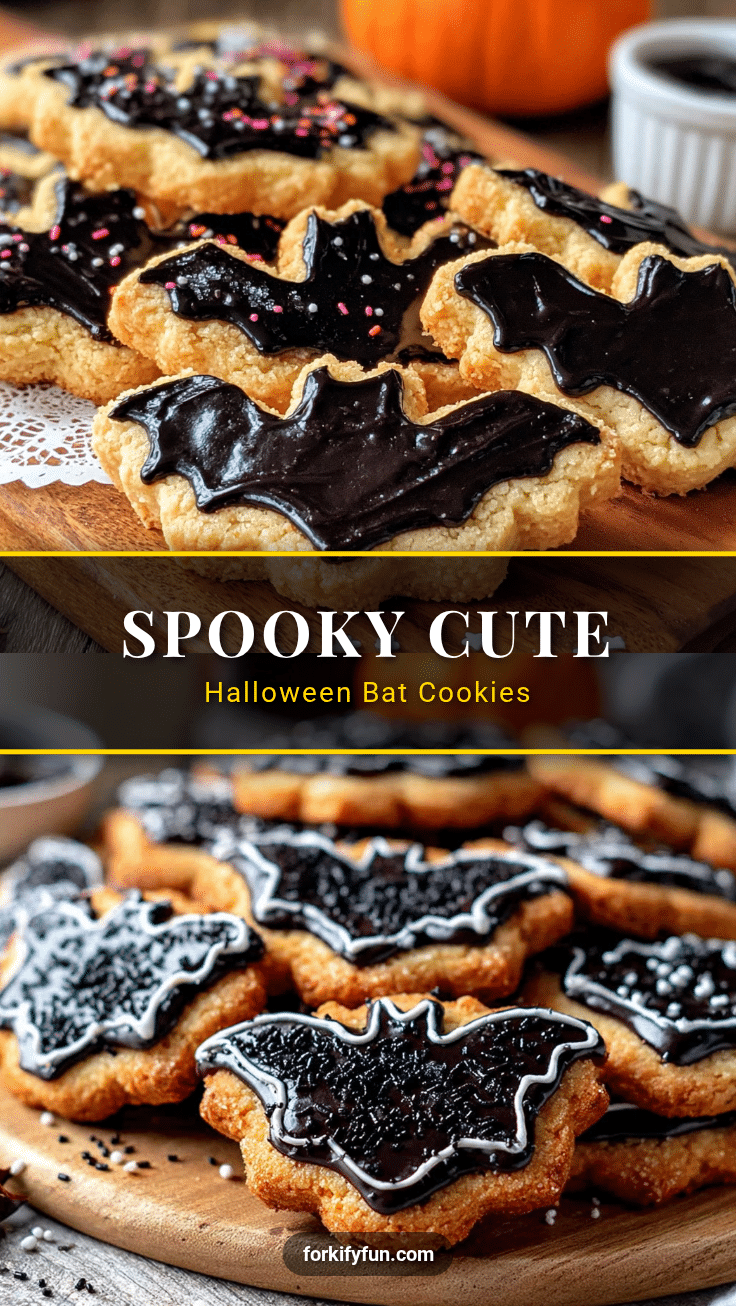
Best Halloween Sugar Cookies with Royal Icing Bats
These spooky sugar cookies hold their shape perfectly and are topped with glossy black royal icing bats. A foolproof recipe that makes you look like a pro, even if you’re a beginner.
- Prep Time: 30 minutes
- Cook Time: 10 minutes
- Total Time: 2 hours 40 minutes (includes chilling and drying time)
- Yield: 36 cookies 1x
- Category: Dessert
- Cuisine: American
Ingredients
- 1 cup (226g) unsalted butter, softened to room temperature
- 1 cup (200g) granulated sugar
- 1 large egg, room temperature
- 2 teaspoons pure vanilla extract
- 1/2 teaspoon almond extract (optional but recommended)
- 2 and 1/2 cups (312g) all-purpose flour, spooned and leveled
- 1 teaspoon baking powder
- 1/2 teaspoon salt
- 3 tablespoons meringue powder
- 4 cups (480g) powdered sugar, sifted if lumpy
- 6–8 tablespoons warm water
- 1–2 teaspoons black gel food coloring
- Silver or white luster dust (optional, for finishing)
Instructions
- Cream the softened butter and granulated sugar together in a mixer on medium speed until light and fluffy, about 2-3 minutes. Scrape the bowl once.
- Add the egg, vanilla extract, and almond extract. Beat until combined, about 1 minute.
- In a separate bowl, whisk together the flour, baking powder, and salt. With the mixer on low, gradually add the dry ingredients to the wet. Mix until just combined—stop when you no longer see dry flour.
- Divide the dough in half. Flatten each half into a disc about 1-inch thick. Wrap tightly in plastic wrap. Refrigerate for at least 2 hours, or overnight.
- Preheat oven to 350°F (175°C). Line baking sheets with parchment paper.
- Lightly flour your work surface and rolling pin. Roll one disc of dough to 1/4-inch thickness. Cut out bat shapes. Re-roll scraps once. Place cutouts 2 inches apart on prepared sheets. Chill the cut cookies on the sheet for 10 minutes before baking.
- Bake for 8-10 minutes. The edges should be just barely golden. Rotate the pan halfway through. Let cookies cool on the baking sheet for 5 minutes, then transfer to a wire rack to cool completely.
- Make the royal icing: In a clean mixer bowl, combine meringue powder and powdered sugar. Add 6 tablespoons warm water. Beat on low until combined, then increase to medium-high and beat for 5-7 minutes. The icing should be glossy and thick enough to hold a ribbon trail. Add more water a teaspoon at a time if too stiff. Aim for a ’15-second consistency.’ Add black gel coloring and beat until uniform. Let the icing rest for 30 minutes—the color darkens as it sits.
- Transfer icing to a piping bag fitted with a #2 tip. Outline each bat cookie first—trace the edge of the wings, body, and ears. Let the outline dry for 5-10 minutes. Then flood the inside by piping zigzags across the surface. Use a toothpick to guide icing into corners and pop air bubbles. Let flooded cookies dry uncovered for 4-6 hours, or overnight.
- Optional: Once the black icing is dry, mix a small batch of white royal icing (same recipe, skip the coloring). Use a #1 tip to pipe tiny eyes and fangs on each bat. If using luster dust, mix a pinch with a drop of vanilla extract and paint it onto the wings with a small brush.
Notes
Temperature is everything. Keep dough and cut cookies chilled to prevent spreading. The almond extract adds a subtle depth that enhances the vanilla. Royal icing consistency is key—use the 15-second test. Work in an assembly line: outline all cookies, then flood them all, then add details. Let the cookies speak for themselves; simple bat silhouettes with tiny white eyes are spooky and elegant.
Nutrition
- Serving Size: 1 cookie
- Calories: 145
- Sugar: 16
- Sodium: 55
- Fat: 5
- Saturated Fat: 3
- Carbohydrates: 24
- Protein: 1.5
Keywords: Halloween sugar cookies, royal icing bats, no spread sugar cookies, bat cookies, Halloween baking, cutout cookies, royal icing recipe


