My nephew, Leo, who is six and has never met a vegetable he didn’t suspect was a trap, looked at the cooling rack on my counter and said, “Auntie, these look like they might bite me back.” And he didn’t reach for one. He just stared. That’s the moment I knew the Halloween baking had officially paid off. I had been fiddling with a thumbprint cookie recipe for weeks, trying to get the texture right—something that wouldn’t crumble when you pressed the center—and then it hit me. Nutella. And little chocolate legs. The combination was ridiculous and perfect, and watching a cautious kid size them up like they were actual spiders was honestly the best review I could have asked for. These aren’t just cookies; they’re a whole little scene on a plate.
The cookie base is soft, almost shortbread-like, but sturdy enough to hold a generous dollop of Nutella without falling apart. And the legs? Just a few pretzel sticks or chocolate wafers, depending on how crunchy you want them. I’ve made versions with candy eyes too, but honestly, the simplest version—just the chocolate legs and the glossy hazelnut center—is the most effective. They look spooky but taste like pure comfort. That’s the sweet spot for Halloween treats, right? Something that looks like it crawled out of a cauldron but tastes like a warm hug. These spooky spider cookies with Nutella thumbprint are exactly that. They’re the kind of thing you make for a Halloween party and watch disappear before the punch bowl is even set up. I think you’re going to love how easy they are to put together.
Why You’ll Love This Recipe
I’ve tested a lot of Halloween cookies over the years, and most of them fall into one of two camps: they look amazing but taste like cardboard, or they taste great but look like a toddler assembled them. These spider cookies are the rare unicorn that nails both. Here’s why they work so well.
- Super Simple Ingredients: You need basic baking staples—butter, sugar, flour, vanilla—and a jar of Nutella. No weird food coloring, no specialty candy melts. You probably have 90% of this in your pantry right now.
- Comes Together Fast: The dough mixes in one bowl, and the chilling time is minimal. From start to finish, you can have a batch ready in under an hour. Perfect for those “I forgot about the school Halloween party” moments.
- Kid-Friendly to Make: This is a great recipe for little hands. They can help roll the dough balls, press the thumbprint, and stick the legs in. It’s a fun activity that ends with a delicious reward.
- Customizable for Dietary Needs: I’ve made a gluten-free version using a 1:1 flour blend, and it worked beautifully. You can also swap the Nutella for a dairy-free chocolate-hazelnut spread if needed.
- They Actually Look Impressive: People will think you spent hours on these. The spider legs make them instantly recognizable and festive, but the technique is almost foolproof. You get maximum visual impact for minimal effort.
Honestly, the best part is watching someone’s face when they realize the cookie they just bit into has a gooey Nutella center. It’s a little moment of surprise and delight. And isn’t that what Halloween baking is all about?
What Ingredients You Will Need
This recipe uses simple, wholesome ingredients to create a cookie that’s both sturdy and tender. The Nutella is the star, so don’t skimp on quality. Here’s what you’ll need to gather.
For the Cookie Dough
- Unsalted butter, softened: 1 cup (2 sticks or 226 grams). Make sure it’s truly softened to room temperature—if it’s too cold, the dough won’t cream properly. I like using a good European-style butter for extra richness, but standard unsalted works perfectly.
- Granulated sugar: ½ cup (100 grams). This gives the cookies a nice, clean sweetness without being overpowering.
- Large egg yolk: 1. Just the yolk, not the whole egg. This adds richness and tenderness without making the dough too wet.
- Vanilla extract: 1 teaspoon. Pure vanilla makes a difference here. I always reach for the real stuff, not imitation.
- All-purpose flour: 1 ½ cups (180 grams). Spoon and level your flour—don’t scoop directly from the bag or you’ll end up with dry cookies.
- Salt: ¼ teaspoon. Balances the sweetness and brings out the chocolate flavor.
For the Topping & Decoration
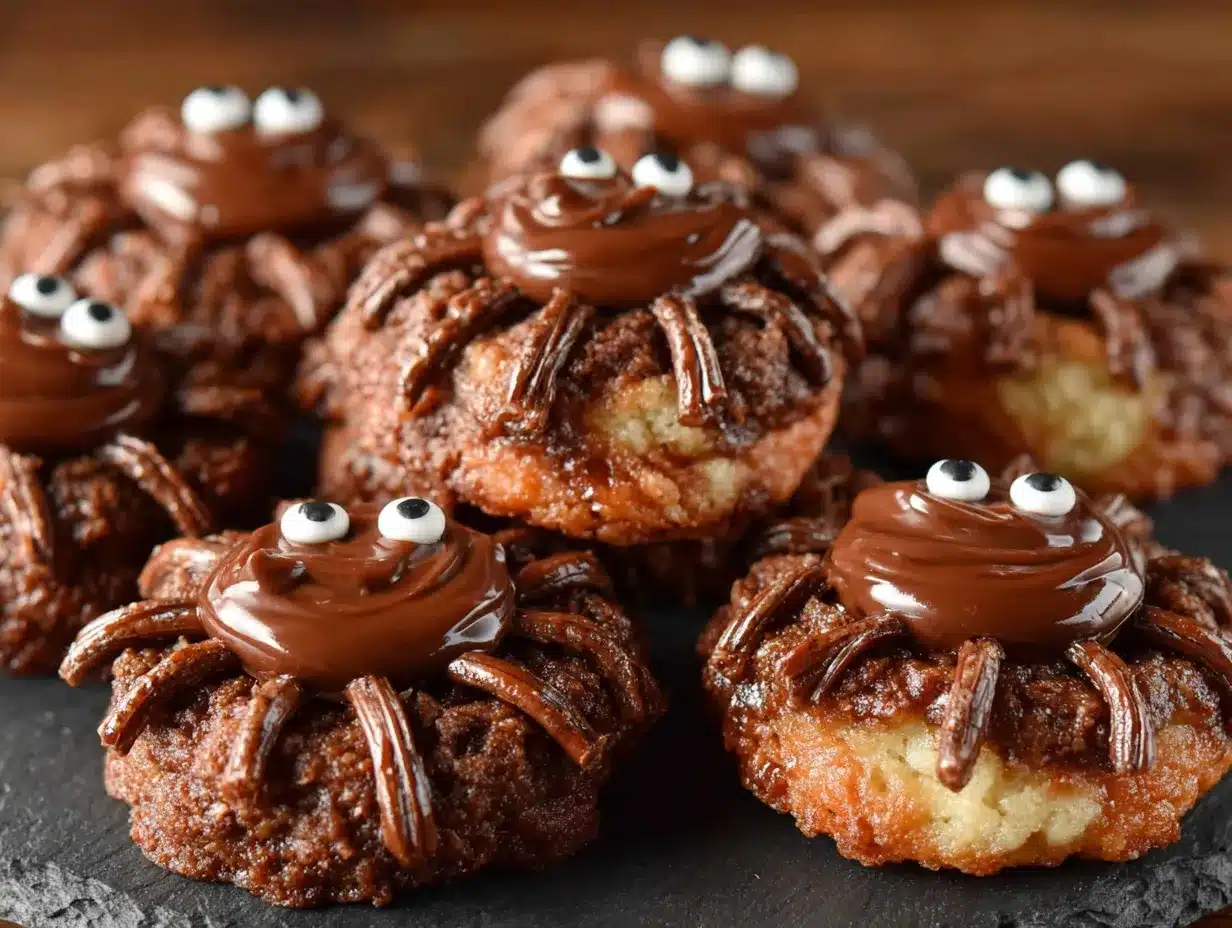
- Nutella: About ½ cup (150 grams). You’ll need a generous teaspoon per cookie. I’ve tried other chocolate-hazelnut spreads, but Nutella has that perfect consistency—not too runny, not too thick.
- Pretzel sticks: About 24, broken in half. These make the spider legs. You want the thin, crunchy pretzel sticks, not the thick sourdough ones. If you prefer a sweeter leg, you can use chocolate wafer sticks or even licorice strings.
- Candy eyes (optional): A small handful. Totally optional, but they do make the spiders look extra cute-and-creepy. I found a bag at the grocery store in the baking aisle.
One quick note on the Nutella: If your jar has been sitting in a cold pantry, it might be too thick to press a thumbprint into without cracking the cookie. Let it sit at room temperature for about 15 minutes before you start assembling. Or, give it a quick stir to loosen it up.
Also, if you’re feeling adventurous, you can swap the Nutella for a homemade chocolate ganache or even a caramel sauce. But honestly, the convenience and flavor of Nutella is hard to beat for this recipe.
Equipment Needed
You don’t need a lot of fancy tools for these cookies, which is part of why I love making them. Here’s what you’ll need.
- Mixing bowls: One medium bowl for the dough. I prefer glass or stainless steel.
- Electric hand mixer or stand mixer: You can cream the butter and sugar by hand if you’re feeling strong, but a mixer makes it so much easier and faster.
- Measuring cups and spoons: For accurate ingredient amounts. A kitchen scale is even better for the flour.
- Baking sheets: Two standard half-sheet pans. Line them with parchment paper for easy cleanup.
- Cooling rack: A wire rack is essential for letting the cookies cool completely before adding the Nutella and legs.
- Small cookie scoop or tablespoon: For portioning the dough evenly. I use a #40 scoop (about 1.5 tablespoons).
- Thumb or the back of a teaspoon: For making the indentations. I’ve used both, and honestly, my thumb works best.
If you don’t have a cookie scoop, just use a regular tablespoon and roll the dough into balls with your hands. It’s a little more work, but the cookies will still turn out great. And if you don’t have parchment paper, a silicone baking mat is a perfect substitute.
Preparation Method
Alright, let’s get to the fun part. Here’s how to make these spooky spider cookies with Nutella thumbprint, step by step. Take your time with the first few steps—the dough needs to be just right.
- Cream the butter and sugar. In your mixing bowl, beat the softened butter and granulated sugar together on medium speed until light and fluffy, about 2-3 minutes. You’re looking for a pale, creamy texture. Scrape down the sides of the bowl once halfway through.
- Add the egg yolk and vanilla. Drop in the egg yolk and the vanilla extract. Beat on low speed until just combined. Don’t overmix here—you just want it incorporated. The mixture might look a little curdled for a second, but it will come together.
- Mix in the dry ingredients. In a separate small bowl, whisk together the flour and salt. Gradually add this to the wet mixture, mixing on low speed until a soft dough forms. It should pull away from the sides of the bowl but still feel slightly tender. If it feels too sticky, add another tablespoon of flour. If it feels too dry, add a teaspoon of milk or water.
- Chill the dough. This is a crucial step. Wrap the dough in plastic wrap and refrigerate for at least 30 minutes. Chilling prevents the cookies from spreading too much in the oven and helps them hold their shape when you press the thumbprint. I’ve skipped this step before out of impatience, and the cookies turned into flat, sad discs. Learn from my mistake.
- Preheat and prepare. While the dough chills, preheat your oven to 350°F (175°C). Line your baking sheets with parchment paper.
- Shape the cookies. Roll the chilled dough into 1-inch balls (about 1.5 tablespoons each). Place them on the prepared baking sheets, spacing them about 2 inches apart. You should get about 20-24 cookies.
- Make the thumbprints. Using your thumb or the back of a rounded teaspoon, press a deep indentation into the center of each dough ball. Don’t press all the way through to the baking sheet—you want a nice little well. If the edges crack a bit, just gently pinch them back together.
- Bake. Bake for 10-12 minutes, until the edges are just barely golden brown. The centers will still look a little soft and puffy. That’s perfect. They will continue to set as they cool.
- Reshape the indentations (optional but recommended). As soon as the cookies come out of the oven, use the back of a teaspoon to gently re-press the indentations. The cookies puff up a little during baking, so this ensures you still have a deep well for the Nutella. Let the cookies cool on the baking sheet for 5 minutes, then transfer them to a wire rack to cool completely.
- Fill with Nutella. Once the cookies are completely cool, spoon about ½ to 1 teaspoon of Nutella into each indentation. Don’t overfill—you want it to sit nicely in the well, not spill over the edges.
- Add the spider legs. Break the pretzel sticks in half. Gently insert four pieces into each side of the cookie, angling them slightly to look like spider legs. Press them in just enough so they stay put. If you’re using candy eyes, press two small dots into the Nutella before it sets.
And that’s it. You’ve just made a batch of the cutest, spookiest Halloween cookies on the block. The whole process takes about 45 minutes from start to finish, including the chilling time.
Cooking Tips & Techniques
I’ve made these cookies about half a dozen times now, and I’ve learned a few things along the way. Here are my best tips to make sure yours turn out perfect.
Don’t skip the chill. I know I said this already, but it’s worth repeating. Warm dough spreads. Chilled dough holds its shape. If you’re in a hurry, you can pop the dough in the freezer for 15 minutes instead of the fridge for 30. It works in a pinch.
Watch the bake time. These cookies are better slightly underbaked than overbaked. If you wait until they’re golden brown all over, they’ll be too crunchy. Take them out when the edges are just set and the centers look slightly soft. They’ll firm up as they cool.
Use a gentle hand with the pretzels. The cookies are tender, so if you jam the pretzel legs in too aggressively, the cookie might crack. I like to make a small pilot hole with a toothpick first, then gently insert the pretzel piece. It’s an extra step, but it prevents breakage.
Let the Nutella warm up. Cold Nutella is thick and hard to spoon into a tiny well. Let your jar sit out for 15-20 minutes before you start filling the cookies. If you forget, you can microwave it in a small bowl for 10 seconds, just to loosen it up.
Make ahead for parties. You can bake the cookies and store them unfilled for up to 3 days in an airtight container. Then, on the day of your party, just fill them with Nutella and add the legs. They’ll look fresh and the pretzels will stay crunchy.
One time, I tried to speed things up by not chilling the dough, and the cookies spread so much that the thumbprints completely disappeared. I ended up with flat discs that looked more like pancakes than spiders. It was a good reminder that some steps just can’t be rushed.
Variations & Adaptations
One of the best things about this recipe is how easy it is to change it up. Here are a few variations I’ve tried and loved.
Gluten-Free Spider Cookies: Swap the all-purpose flour for a good 1:1 gluten-free baking flour blend. I’ve used King Arthur Measure for Measure with great results. The texture is a little more delicate, so be extra gentle when inserting the pretzel legs.
Peanut Butter Spider Cookies: Instead of Nutella, use a creamy peanut butter (or a peanut butter-chocolate spread) for the center. The salty-sweet combo is incredible. Just make sure the peanut butter is at room temperature so it’s easy to spoon.
White Chocolate “Ghost” Spiders: For a less chocolate-heavy version, fill the thumbprints with melted white chocolate and top with a tiny ghost-shaped marshmallow. Skip the pretzel legs and use black licorice strings instead for a different look.
Spicy Chocolate Spiders: Add a pinch of cayenne pepper or a dash of cinnamon to the cookie dough. It gives the cookies a warm, unexpected kick that pairs beautifully with the sweet Nutella. I tried this last year for a Halloween party and got a lot of surprised compliments.
Vegan Spider Cookies: Use a vegan butter substitute (like Miyoko’s) and a flax egg (1 tablespoon ground flaxseed mixed with 3 tablespoons water). Most chocolate-hazelnut spreads are accidentally vegan, so you’re good there. The cookies will be a little less tender, but they’ll still be delicious.
If you’re a fan of other Halloween treats, you might also enjoy these easy no-bake s’mores icebox cake for a completely different kind of spooky dessert. Or, if you’re looking for something savory to balance out all the sugar, these crockpot bacon ranch chicken sliders are perfect for a Halloween party spread.
Serving & Storage Suggestions
These cookies are best served at room temperature, which is convenient because that’s how they’ll be after you assemble them. Arrange them on a platter with a few extra pretzel sticks scattered around for a “spider web” effect. They’re perfect for Halloween parties, classroom treats, or just a fun weekend baking project.
For drinks, a glass of cold milk is the classic pairing. But if you’re serving adults, a hot cup of coffee or a spiced apple cider is lovely. The bitterness of the coffee balances the sweetness of the Nutella beautifully. You could even serve them alongside a caramel apple cider sangria for a festive Halloween cocktail hour.
Storage: Store the assembled cookies in an airtight container at room temperature for up to 3 days. The pretzel legs will start to soften after a day or two, so they’re best enjoyed within 24 hours of assembly. If you want to keep them longer, store the unfilled cookies and pretzels separately, then assemble just before serving.
Freezing: You can freeze the baked, unfilled cookies for up to 3 months. Place them in a single layer in a freezer-safe bag or container. When you’re ready to serve, thaw them at room temperature, then fill and decorate. The Nutella and pretzels do not freeze well, so don’t assemble them before freezing.
One thing I love about these cookies is that the flavors actually get a little better after a day. The Nutella sets slightly and the cookie softens just a touch. It’s a different texture than fresh, but still really good.
Nutritional Information & Benefits
Let’s be real—these are a treat. They’re not health food, and that’s okay. But here’s a rough estimate of what you’re looking at per cookie (based on 24 cookies).
| Nutrient | Amount per Cookie |
|---|---|
| Calories | ~150 |
| Total Fat | 8g |
| Saturated Fat | 4g |
| Carbohydrates | 18g |
| Sugar | 10g |
| Protein | 2g |
The hazelnuts in Nutella do provide a small amount of healthy fats and vitamin E, and the butter gives you a little vitamin A. But honestly, the main benefit here is joy. These cookies make people smile. They turn a regular October afternoon into a mini celebration. And if you’re using dark chocolate Nutella, you get a tiny dose of antioxidants. So there’s that.
If you’re watching your sugar intake, you can reduce the sugar in the dough by a tablespoon or two. The Nutella is sweet enough that you won’t miss it. And for anyone with nut allergies, obviously skip the Nutella and use a seed-based chocolate spread like WowButter chocolate spread instead.
Conclusion
These spooky spider cookies with Nutella thumbprint are the kind of recipe that makes you look like a Halloween hero without spending hours in the kitchen. They’re fun to make, fun to eat, and fun to share. The cookie base is buttery and tender, the Nutella center is rich and gooey, and the pretzel legs add that perfect salty crunch. It’s a combination that works on every level.
I love that this recipe is so adaptable. You can make it gluten-free, swap the filling, or change up the decorations. It’s a blank canvas for your Halloween creativity. And honestly, the best part is watching someone’s face light up when they see a plate of these little guys. It’s pure Halloween magic.
I’d love to hear how yours turn out. Did you add candy eyes? Did you try a different filling? Let me know in the comments below. And if you share a photo on social media, tag me—I want to see your spooky creations. Happy Halloween baking, friends. You’ve got this.
Frequently Asked Questions
Can I use a different chocolate spread instead of Nutella?
Absolutely. Any chocolate-hazelnut spread will work. You can also use a chocolate peanut butter spread or even a homemade chocolate ganache. Just make sure whatever you use is thick enough to hold its shape in the thumbprint.
How do I keep the pretzel legs from falling off?
The Nutella acts like glue, so as long as you press the pretzel pieces in gently, they should stay put. If you’re worried, you can add a tiny dab of melted chocolate to the end of each pretzel before inserting it. That will definitely hold them in place.
Can I make these cookies ahead of time for a party?
Yes, but with one caveat. You can bake the cookies and store them unfilled for up to 3 days. Then, on the day of your party, fill them with Nutella and add the legs. This keeps the pretzels crunchy and the Nutella fresh. Assembled cookies are best eaten within 24 hours.
My cookie dough is too sticky. What did I do wrong?
This usually happens if the butter was too soft or if you added too much liquid. Try chilling the dough for an extra 15-20 minutes. If it’s still sticky after that, sprinkle in a little more flour, one tablespoon at a time, until it feels manageable.
Can I use whole wheat flour instead of all-purpose?
You can, but the cookies will be denser and a little less tender. I’d recommend using half whole wheat and half all-purpose for the best texture. You might also need to add an extra tablespoon of butter or milk to compensate for the whole wheat flour’s absorbency.
Pin This Recipe!
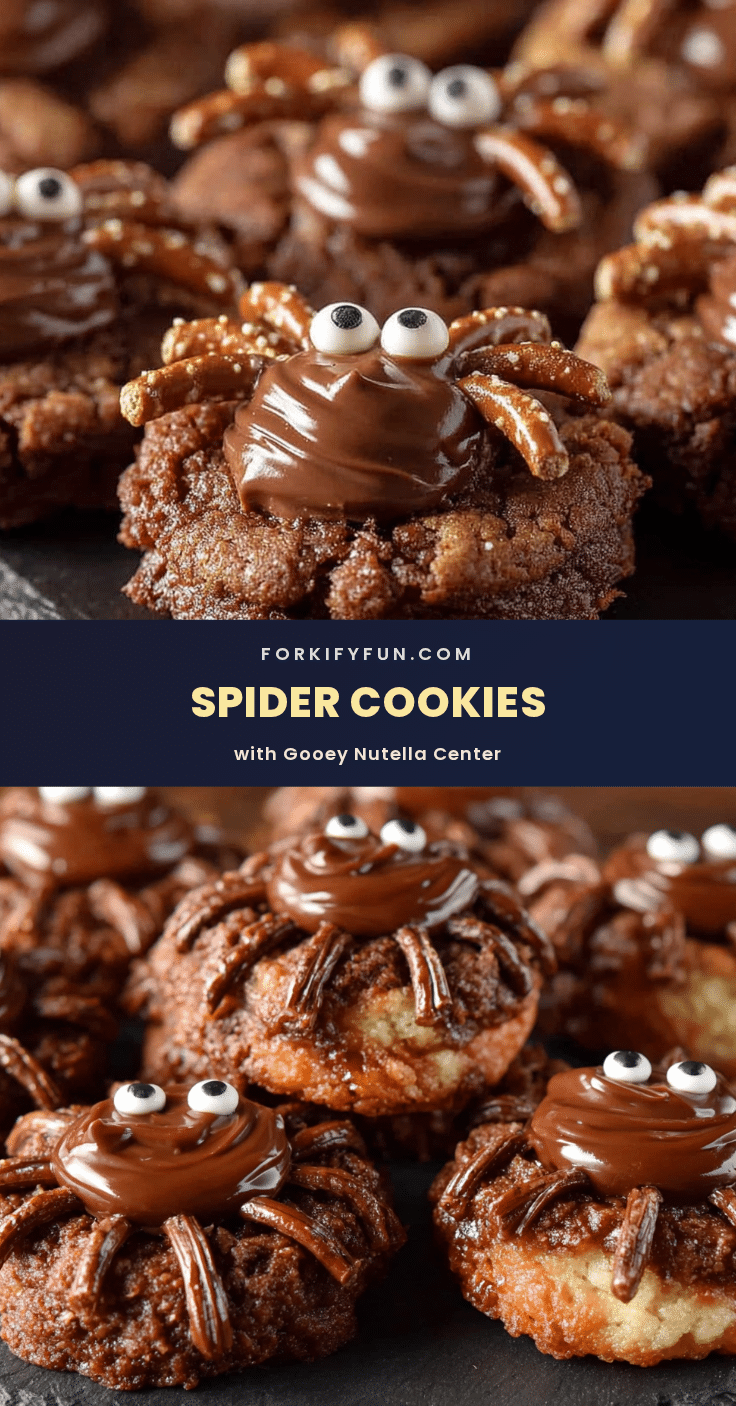
Spooky Spider Cookies with Easy Nutella Thumbprint
These spooky spider cookies feature a soft, buttery shortbread-like base with a gooey Nutella center and pretzel stick legs. They’re easy to make, kid-friendly, and perfect for Halloween parties.
- Prep Time: 15 minutes
- Cook Time: 12 minutes
- Total Time: 45 minutes
- Yield: 20-24 cookies 1x
- Category: Dessert
- Cuisine: American
Ingredients
- 1 cup (2 sticks or 226 grams) unsalted butter, softened
- ½ cup (100 grams) granulated sugar
- 1 large egg yolk
- 1 teaspoon vanilla extract
- 1 ½ cups (180 grams) all-purpose flour
- ¼ teaspoon salt
- About ½ cup (150 grams) Nutella
- About 24 pretzel sticks, broken in half
- Candy eyes (optional)
Instructions
- Cream the butter and sugar together on medium speed until light and fluffy, about 2-3 minutes.
- Add the egg yolk and vanilla extract; beat on low speed until just combined.
- In a separate bowl, whisk together flour and salt. Gradually add to the wet mixture, mixing on low speed until a soft dough forms.
- Wrap the dough in plastic wrap and refrigerate for at least 30 minutes.
- Preheat oven to 350°F (175°C). Line baking sheets with parchment paper.
- Roll chilled dough into 1-inch balls (about 1.5 tablespoons each). Place on prepared baking sheets, spacing 2 inches apart.
- Press a deep indentation into the center of each dough ball using your thumb or the back of a rounded teaspoon.
- Bake for 10-12 minutes, until edges are just barely golden brown. Centers will still look soft.
- Immediately after baking, re-press the indentations with the back of a teaspoon. Cool on baking sheet for 5 minutes, then transfer to a wire rack to cool completely.
- Once cookies are completely cool, spoon about ½ to 1 teaspoon of Nutella into each indentation.
- Break pretzel sticks in half. Gently insert four pieces into each side of the cookie to form spider legs. If using, press candy eyes into the Nutella.
Notes
Chill the dough for at least 30 minutes to prevent spreading. Let Nutella come to room temperature for easier filling. For best results, bake until edges are just set; centers will firm up as they cool. Store assembled cookies in an airtight container at room temperature for up to 3 days, but pretzel legs soften after a day. Unfilled cookies can be frozen for up to 3 months.
Nutrition
- Serving Size: 1 cookie
- Calories: 150
- Sugar: 10
- Fat: 8
- Saturated Fat: 4
- Carbohydrates: 18
- Protein: 2
Keywords: Halloween cookies, spider cookies, Nutella thumbprint, easy Halloween treats, kid-friendly baking


