The way the chocolate cookie softens just enough against the whipped cream, how the marshmallow fluff gets all tangled up with graham cracker crumbs — that texture hits me before I even take a second bite. It’s the kind of dessert that doesn’t need an oven or any real skill. Just patience. And maybe a little self-control, because honestly, you’ll want to eat the whole thing before it sets.
I first made this Easy No-Bake S’mores Icebox Cake on a sweltering July afternoon when turning on the oven felt like a personal attack. My kids were bouncing off the walls, asking for s’mores, and I just couldn’t face the heat. So I grabbed a box of chocolate wafers, a tub of Cool Whip (don’t judge), and some marshmallow fluff from the back of the pantry. I figured, how bad could it be?
Turns out, not bad at all. It was better. The layers got all cozy in the fridge overnight, and by morning, it had turned into something that tasted like campfire memories but required zero flames. No sticky fingers from roasting marshmallows, no smoke in your eyes. Just pure, unapologetic s’mores flavor in a sliceable form.
That first bite made me realize something — sometimes the best recipes aren’t the ones you plan. They’re the ones you throw together when you’re too hot to care, and they end up becoming the thing everyone asks for at every gathering. This cake has that energy. It’s humble, it’s messy, and it’s absolutely perfect.
Why You’ll Love This Recipe
- No Oven Required — Not even for toasting. This whole thing comes together on your countertop, which is a lifesaver during those sticky summer months or when you’re just too tired to deal with preheating.
- 10 Minutes of Active Prep — I’m serious. You can have this layered and chilling in the time it takes to find a clean spatula. The hardest part is waiting for it to set.
- Simple Pantry Ingredients — Chocolate wafers, marshmallow fluff, heavy cream or Cool Whip, and graham crackers. That’s it. No fancy extracts or hard-to-find chocolate bars.
- Make-Ahead Dream — This cake actually gets better after a day in the fridge. The cookies soften into cake-like layers, and the flavors meld together like they were meant to be.
- Crowd-Pleaser Guaranteed — Kids devour it. Adults sneak seconds. Even my mother-in-law, who “doesn’t do processed desserts,” asked for the recipe. It’s that good.
What makes this different from every other no-bake dessert out there? It’s the texture. The way the chocolate wafers absorb the cream and turn into something almost fudgy, while the marshmallow layer stays light and fluffy. And that graham cracker crumble on top? It adds just enough crunch to keep every bite interesting. This isn’t just another icebox cake — it’s the one that’ll make you forget about actual campfire s’mores.
I’ve tested this recipe more times than I want to admit. First with Cool Whip, then with homemade whipped cream, then with a mix of both. I’ve tried different chocolate wafers, different marshmallow brands, even different layering techniques. And this version? It’s the one that works every single time. No cracking, no sliding layers, no weird separation. Just pure, nostalgic goodness.
What Ingredients You Will Need
This recipe keeps things simple, using ingredients that are probably already hanging out in your pantry or fridge. The beauty of an icebox cake is that it relies on texture and layering, not complicated techniques. Here’s what you’ll need:
- Chocolate wafer cookies (about 30-35 cookies) — I use Nabisco Famous Chocolate Wafers because they have that perfect snap and deep chocolate flavor. If you can’t find them, chocolate graham crackers or even Oreos (filling scraped off) work in a pinch.
- Marshmallow fluff (1 jar, about 7 ounces) — Jet-Puffed is my go-to. It’s stable, sweet, and spreads like a dream. You could use homemade marshmallow cream if you’re feeling ambitious, but honestly, the jarred stuff works perfectly here.
- Heavy whipping cream (2 cups) — This gets whipped into soft peaks and folded into the marshmallow fluff. If you’re short on time, a 16-ounce tub of Cool Whip (thawed) works beautifully too. I’ve done both, and they both deliver.
- Graham crackers (about 4-5 full sheets) — These get crushed into coarse crumbs for the topping. Honey or cinnamon flavor both work, but I prefer honey for that classic s’mores taste.
- Milk chocolate bar (1 large bar, about 4 ounces) — Shaved or chopped for garnish. This is optional but highly recommended. It makes the cake look fancy without any effort.
- Vanilla extract (1 teaspoon) — Adds warmth and depth to the cream mixture. Pure extract is best, but imitation works fine too.
- Pinch of salt — Don’t skip this. It balances the sweetness and makes the chocolate flavor pop.
One thing I’ve learned from making this cake more times than I can count — the quality of your chocolate wafers matters. Cheap ones can taste waxy or bland. Stick with a brand you trust, and your cake will thank you. Also, make sure your cream is cold before whipping. Warm cream won’t hold its shape, and nobody wants a runny icebox cake.
Equipment Needed
You don’t need much for this recipe, which is part of its charm. Here’s what I use:
- 8-inch springform pan — This is my preferred pan because it makes unmolding the cake so easy. If you don’t have one, a regular 8-inch cake pan lined with plastic wrap works too.
- Electric hand mixer or stand mixer — For whipping the cream. You can do it by hand with a whisk, but your arm will definitely feel it.
- Large mixing bowl — For combining the cream and marshmallow fluff.
- Spatula — A rubber spatula is best for folding and spreading layers evenly.
- Rolling pin or food processor — For crushing graham crackers into crumbs. A zip-top bag and your fists work too, if you need to release some aggression.
- Plastic wrap — To cover the pan while it chills.
- Microplane or vegetable peeler — For shaving chocolate on top. A knife works too, but shaved chocolate looks prettier.
If you don’t have a springform pan, don’t stress. I’ve made this in a loaf pan before, and it turned out great — just slice it directly from the pan. The presentation is a little less dramatic, but the taste is exactly the same.
Preparation Method
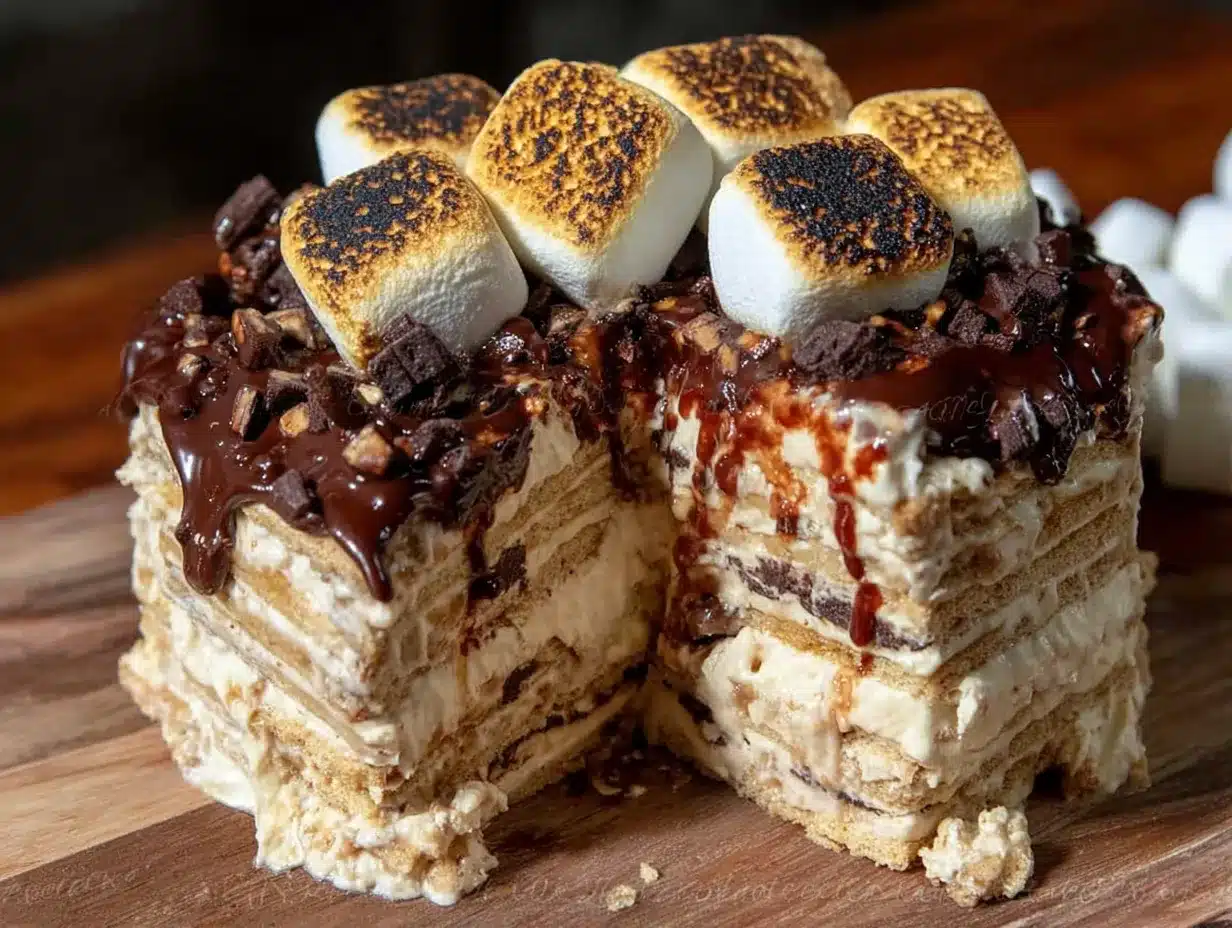
- Whip the cream — Pour 2 cups of cold heavy whipping cream into a large mixing bowl. Add 1 teaspoon of vanilla extract and a pinch of salt. Beat on medium-high speed until soft peaks form. You’re looking for peaks that hold their shape but still look creamy, not stiff. This usually takes about 3-4 minutes with an electric mixer.
- Fold in the marshmallow fluff — Scoop the entire jar of marshmallow fluff into the bowl with the whipped cream. Use a rubber spatula to gently fold them together. Don’t stir vigorously — you want to keep the air in the cream so the filling stays light. Fold until you don’t see any white streaks. The mixture should look like fluffy clouds.
- Prepare your pan — Line the bottom of your 8-inch springform pan with a circle of parchment paper. This isn’t strictly necessary, but it makes unmolding so much easier. If you’re using a regular cake pan, line it with plastic wrap, leaving some overhang for lifting.
- Start layering — Spread a thin layer of the marshmallow-cream mixture on the bottom of the pan. This helps the cookies stick. Then arrange a single layer of chocolate wafer cookies on top, covering the entire surface. Break cookies as needed to fill gaps — don’t leave any empty spaces.
- Repeat the layers — Spread about 1/2 cup of the cream mixture over the cookies, smoothing it out evenly. Add another layer of cookies. Repeat this process until you’ve used all your cookies. You should end up with about 5-6 layers of cookies, depending on your pan size. The top layer should be the cream mixture.
- Make the graham cracker topping — Place 4-5 full sheets of graham crackers in a zip-top bag and crush them with a rolling pin until you have coarse crumbs. Don’t grind them too fine — you want some texture. Sprinkle the crumbs evenly over the top of the cake.
- Chill the cake — Cover the pan with plastic wrap and refrigerate for at least 6 hours, but overnight is best. The cookies need time to soften and absorb the cream. I know it’s tempting to dig in early, but trust me — patience pays off here.
- Unmold and garnish — When you’re ready to serve, run a knife around the edge of the pan to loosen the cake. Release the springform ring and carefully lift it off. Use a microplane to shave some milk chocolate over the top, or use a vegetable peeler for bigger curls.
- Slice and serve — Use a sharp knife dipped in hot water for clean slices. Wipe the knife between cuts for the prettiest presentation. Serve cold, straight from the fridge.
A few things I’ve learned the hard way: Don’t skip the chilling time. If you cut into this cake too early, the cookies will still be crunchy, and the layers will slide everywhere. Also, be gentle when spreading the cream over the cookies — you don’t want to push them around and mess up your layers. And if your marshmallow fluff is being stubborn and won’t fold in smoothly, microwave it for 10 seconds to loosen it up. Game changer.
Cooking Tips & Techniques
I’ve messed up this recipe more times than I’d like to admit, so let me save you the trouble. Here’s what I’ve learned:
Temperature matters. Make sure your cream is really cold before you whip it. If it’s even slightly warm, it won’t whip properly, and you’ll end up with a soupy mess. Stick your bowl and beaters in the freezer for 10 minutes before you start — it makes a difference.
Don’t overmix the cream. Soft peaks are what you’re after. If you whip until stiff, the cream can separate when you fold in the marshmallow fluff. You want it light and billowy, not stiff and buttery.
Layer evenly. Take the time to spread each layer of cream evenly. If one side is thicker than the other, your cake will tilt when you unmold it. Ask me how I know. Use an offset spatula if you have one — it makes the job so much easier.
Press the cookies gently. When you add each layer of cookies, press them down just a little to make sure they’re sitting flat. This helps the layers stay uniform and prevents gaps.
Plan ahead. This cake needs at least 6 hours in the fridge, but it’s honestly better after 24 hours. The cookies soften into something that’s almost cake-like, and the flavors meld together in a way that’s hard to describe. Make it the day before you need it, and you’ll thank yourself.
One of my biggest failures — I once tried to speed things up by putting the cake in the freezer for 2 hours instead of the fridge. Big mistake. The cream got icy, and the cookies never softened properly. Just let it do its thing in the fridge. Good things take time.
Variations & Adaptations
This recipe is incredibly forgiving, so feel free to play around with it. Here are some variations I’ve tried and loved:
- Peanut Butter S’mores Cake — Add 1/2 cup of creamy peanut butter to the marshmallow-cream mixture before folding. Swirl in a little extra on top for good measure. It’s like a Reese’s s’mores situation, and it’s dangerous.
- Mint Chocolate Version — Swap the vanilla extract for 1/2 teaspoon of peppermint extract. Use chocolate wafer cookies with mint filling if you can find them. Top with crushed peppermint candies instead of graham crackers for a holiday twist.
- Gluten-Free Option — Use gluten-free chocolate wafer cookies and gluten-free graham crackers. Most marshmallow fluff is naturally gluten-free, but double-check the label. The texture is slightly different, but the taste is still amazing.
- Vegan Adaptation — Use coconut cream (chilled and whipped) instead of heavy cream, and look for vegan marshmallow fluff. There are some good options out there now. The texture is a little lighter, but it works.
- Berry S’mores Cake — Add a layer of fresh raspberries or sliced strawberries between the cookie layers. The tartness cuts through the sweetness beautifully. I did this for a summer barbecue, and it was gone in 10 minutes.
My personal favorite variation? I add a layer of brown butter snickerdoodle blondies crumbs between the cookie layers. It sounds weird, but the cinnamon and brown butter flavors play so well with the chocolate and marshmallow. I stumbled on this combo by accident when I had leftover blondies, and now I do it on purpose.
Serving & Storage Suggestions
This cake is best served cold, straight from the fridge. The texture is firm but creamy, and the cookies have softened into something almost fudgy. Let it sit at room temperature for more than 10 minutes, and it starts to get a little too soft for my liking.
For presentation, I like to run a knife under hot water before slicing. It gives you clean, sharp edges. Wipe the knife between cuts, and your slices will look like they came from a bakery. Serve each slice with a little extra shaved chocolate on top — it makes people feel special.
This cake pairs beautifully with a cup of coffee or a cold glass of milk. If you’re feeling fancy, a drizzle of warm chocolate sauce over each slice takes it to another level. I’ve also served it alongside creamy pumpkin cold foam iced lattes for a fall-themed dessert spread, and it was a hit.
Storage: Cover the cake tightly with plastic wrap and keep it in the refrigerator for up to 5 days. The texture actually improves after the first day as the cookies continue to soften. I don’t recommend freezing this cake — the cream can become grainy when thawed, and the texture just isn’t the same.
Leftovers: If you have any (unlikely), you can crumble leftover slices over vanilla ice cream for a kind of s’mores sundae situation. It’s a great way to use up those last few bites.
Nutritional Information & Benefits
Let’s be real — this is a dessert, not a health food. But here’s the breakdown if you’re curious. Per slice (based on 12 servings):
- Calories: Approximately 320-350
- Fat: 18g (mostly from cream)
- Carbohydrates: 40g
- Protein: 3g
- Sugar: 28g
- Sodium: 180mg
The heavy cream does provide some calcium and vitamin A, and the dark chocolate wafers offer a small amount of antioxidants. But honestly, this is a treat. It’s meant to be enjoyed in moderation, shared with people you love, and maybe saved for special occasions.
If you’re watching your sugar intake, you can use sugar-free marshmallow fluff and sugar-free chocolate wafers. The texture will be slightly different, but it’s a decent alternative. I’ve also made this with coconut cream for a dairy-free version, and it worked surprisingly well.
One thing I appreciate about this recipe is that it’s naturally egg-free and nut-free (depending on your chocolate wafer brand), which makes it a safe option for many dietary restrictions. Always check labels if you’re serving someone with allergies.
Conclusion
This Easy No-Bake S’mores Icebox Cake is one of those recipes that feels almost too good to be true. Ten minutes of work, no oven, and you get a dessert that looks like you spent hours on it. The layers are dramatic, the flavor is nostalgic, and every bite brings back those campfire memories without the smoke smell.
What I love most about this cake is how it brings people together. I’ve made it for birthday parties, summer cookouts, and lazy Sunday dinners. Every time, someone asks for the recipe. Every time, someone takes a second slice. It’s that kind of dessert — the one that doesn’t try to be fancy, but ends up being the star of the show anyway.
I’d love to hear how yours turns out. Did you try a variation? Add something unexpected? Leave a comment below and let me know. And if you’re looking for more easy desserts, check out my cozy brown sugar peach cobbler or these cinnamon sugar zucchini cookies — they’re both perfect for when you want something sweet without spending all day in the kitchen.
Happy no-baking, friends. And remember — the best desserts are the ones you share.
Frequently Asked Questions
Can I use Cool Whip instead of whipped cream?
Absolutely. A 16-ounce tub of thawed Cool Whip works perfectly here. Just fold it directly into the marshmallow fluff without whipping. It’s a little sweeter than homemade whipped cream, but it’s stable and easy to work with.
How long does this cake need to chill?
At least 6 hours, but overnight is best. The cookies need time to absorb moisture from the cream and soften into cake-like layers. If you cut into it too early, the cookies will still be crunchy, and the layers won’t hold together.
Can I make this cake in a different pan?
Yes! An 8-inch square pan or a 9×5 loaf pan both work well. Just adjust the number of layers based on the pan size. A loaf pan will give you taller, narrower slices — perfect for individual servings.
How should I store leftovers?
Cover the cake tightly with plastic wrap and keep it in the refrigerator for up to 5 days. The texture actually improves after the first day. I don’t recommend freezing, as the cream can become grainy when thawed.
Can I use homemade marshmallow cream?
You can, but I don’t recommend it for this recipe. Homemade marshmallow cream is less stable than the jarred stuff and can separate or deflate when folded into the whipped cream. Stick with Jet-Puffed or another commercial brand for the best results.
Pin This Recipe!
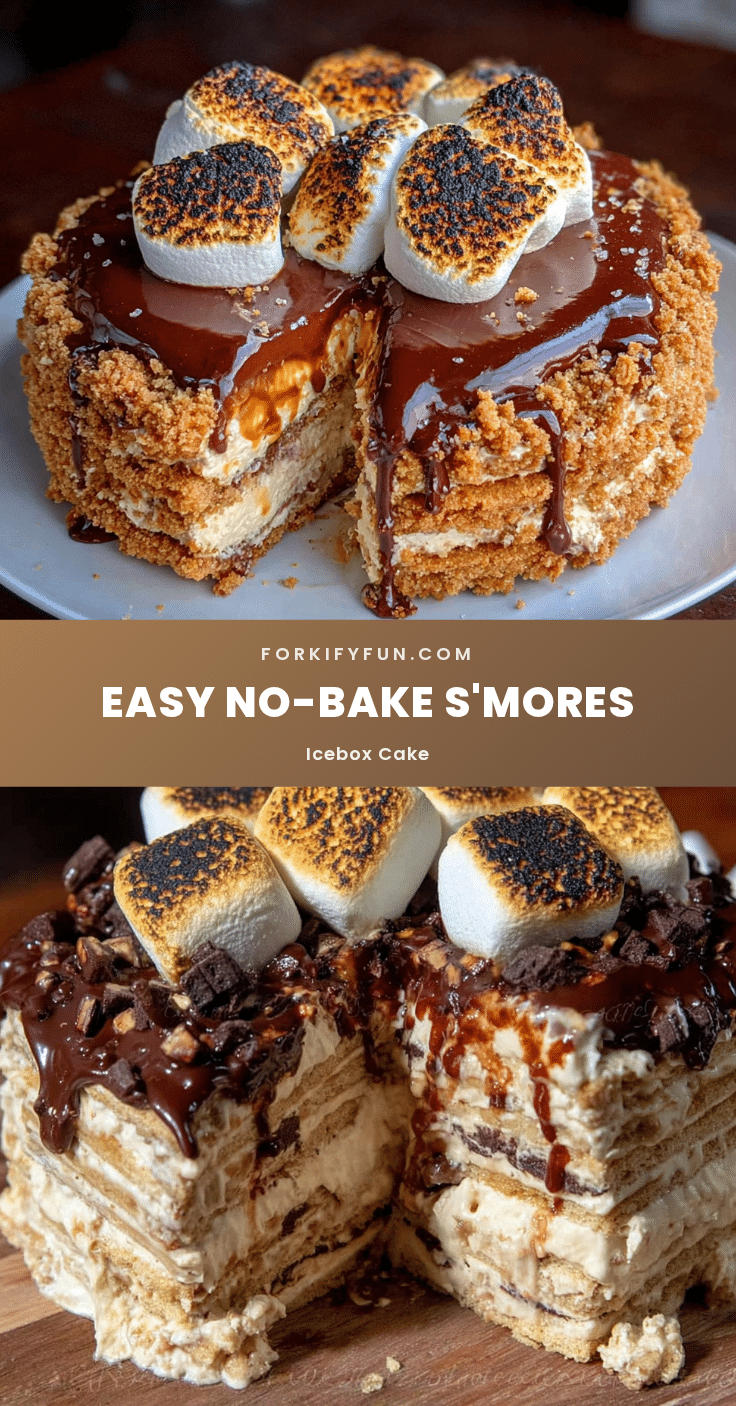
Easy No-Bake S’mores Icebox Cake: Best 10-Minute Dessert
A quick and easy no-bake dessert that layers chocolate wafer cookies with a fluffy marshmallow-cream mixture, topped with graham cracker crumbs and shaved chocolate. Perfect for hot days when you don’t want to turn on the oven.
- Prep Time: 10 minutes
- Cook Time: 0 minutes
- Total Time: 6 hours 10 minutes (includes chilling)
- Yield: 12 servings 1x
- Category: Dessert
- Cuisine: American
Ingredients
- 30–35 chocolate wafer cookies (e.g., Nabisco Famous Chocolate Wafers)
- 1 jar (7 ounces) marshmallow fluff (e.g., Jet-Puffed)
- 2 cups heavy whipping cream
- 4–5 full sheets graham crackers (honey or cinnamon flavor)
- 1 large milk chocolate bar (about 4 ounces), for garnish
- 1 teaspoon vanilla extract
- Pinch of salt
Instructions
- Whip the cream: Pour 2 cups of cold heavy whipping cream into a large mixing bowl. Add 1 teaspoon of vanilla extract and a pinch of salt. Beat on medium-high speed until soft peaks form (about 3-4 minutes).
- Fold in the marshmallow fluff: Scoop the entire jar of marshmallow fluff into the bowl with the whipped cream. Gently fold together with a rubber spatula until no white streaks remain.
- Prepare your pan: Line the bottom of an 8-inch springform pan with a circle of parchment paper. If using a regular cake pan, line with plastic wrap, leaving some overhang.
- Start layering: Spread a thin layer of the marshmallow-cream mixture on the bottom of the pan. Arrange a single layer of chocolate wafer cookies on top, covering the entire surface. Break cookies as needed to fill gaps.
- Repeat the layers: Spread about 1/2 cup of the cream mixture over the cookies. Add another layer of cookies. Repeat until all cookies are used (about 5-6 layers). The top layer should be the cream mixture.
- Make the graham cracker topping: Place 4-5 full sheets of graham crackers in a zip-top bag and crush with a rolling pin into coarse crumbs. Sprinkle evenly over the top of the cake.
- Chill the cake: Cover the pan with plastic wrap and refrigerate for at least 6 hours, preferably overnight.
- Unmold and garnish: Run a knife around the edge of the pan to loosen the cake. Release the springform ring and lift it off. Shave milk chocolate over the top using a microplane or vegetable peeler.
- Slice and serve: Use a sharp knife dipped in hot water for clean slices. Wipe the knife between cuts. Serve cold.
Notes
Chill for at least 6 hours, but overnight is best for the cookies to soften properly. Do not freeze. For clean slices, dip knife in hot water between cuts. If using Cool Whip instead of whipped cream, use a 16-ounce tub, thawed, and fold directly into marshmallow fluff without whipping.
Nutrition
- Serving Size: 1 slice
- Calories: 335
- Sugar: 28
- Sodium: 180
- Fat: 18
- Saturated Fat: 11
- Carbohydrates: 40
- Fiber: 1
- Protein: 3
Keywords: no-bake, s'mores, icebox cake, easy dessert, summer dessert, chocolate, marshmallow, graham cracker


