I pulled a baking sheet out of the oven and just stood there, staring at six perfectly cracked, cinnamon-sugar-dusted cookies. My husband walked by, grabbed one while it was still warm, and mumbled something unintelligible that I’m pretty sure meant “don’t you dare share these.” That moment—the quiet, slightly possessive reaction—told me I had finally cracked the code. This wasn’t a fluke batch; this was the small-batch pumpkin snickerdoodle recipe I had been chasing for two autumns straight.
It started, as most of my baking obsessions do, with a craving that hit on a rainy Tuesday afternoon. I wanted the soft, buttery chew of a classic snickerdoodle, but I wanted that warm, cozy whisper of pumpkin and spice. The problem? Every recipe I found made two dozen cookies. I live in a two-person household. A full batch of cookies is a dangerous, delicious commitment. So I started tinkering, reducing, failing, and finally succeeding. I learned that pumpkin puree adds moisture but can make cookies cakey if you aren’t careful. I learned that cream of tartar is non-negotiable for that signature tang. And I learned that a slightly smaller batch, baked with intention, tastes better than any massive, rushed batch ever could.
These cookies aren’t trying to be a showstopper at a party. They’re the cookies you make for yourself on a quiet Sunday, the ones that make your kitchen smell like a candle shop but better. They’re the recipe you text to your sister because she asked, and you know she’ll appreciate the perfect ratio of pumpkin to cinnamon. Honestly, I think that’s why this recipe stuck. It’s not complicated. It’s just right.
Why You’ll Love This Recipe
Let me tell you why these little cookies have earned a permanent spot in my fall baking rotation. I’ve tested this recipe more times than I care to admit—some batches were flat, some were puffy, and one was honestly just sad. But this version? It’s the winner.
- Perfectly Sized Batch: This recipe makes exactly 6-8 cookies. No leftovers that go stale, no temptation to eat a dozen in one sitting. Just enough for a cozy treat.
- Soft & Chewy, Not Cakey: Pumpkin puree is notorious for making baked goods dense and cake-like. I adjusted the fat and flour ratios to give you a cookie that is soft in the center with slightly crisp edges—the true snickerdoodle texture.
- Real Pumpkin Flavor: We’re not talking about a whisper of spice. The pumpkin puree adds a subtle earthy sweetness that pairs beautifully with the cinnamon-sugar coating.
- Simple Pantry Ingredients: No weird extracts or specialty flours. You probably have everything except maybe the pumpkin puree, which is worth picking up.
- Quick & Satisfying: From mixing bowl to cooling rack in under 30 minutes. That’s faster than ordering delivery.
What sets these apart from other pumpkin cookies is the technique. I use a small cookie scoop for consistency, and I chill the dough for just 15 minutes—long enough to prevent spreading, short enough that you’re not waiting around. The cream of tartar does the heavy lifting here, giving that classic snickerdoodle tang that balances the sweetness of the pumpkin. It’s the kind of cookie that makes you close your eyes after the first bite, not because it’s fancy, but because it tastes like a hug. Perfect for a quiet afternoon with a cup of coffee, or for when you want to impress someone without a ton of effort.
What Ingredients You Will Need
This recipe uses simple, humble ingredients to create something genuinely special. No fancy grocery store trips required—just a few staples and a can of pumpkin puree. Here’s what you need and why each one matters.
For the Cookie Dough
- Unsalted Butter (4 tablespoons, softened): I always use unsalted butter so I can control the salt level. Let it sit out for about 30 minutes before starting. If you’re in a rush, you can microwave it for 10 seconds at a time, but be careful not to melt it.
- Granulated Sugar (1/4 cup + 2 tablespoons): This provides the sweetness and helps create that slightly crisp edge. I’ve tried using brown sugar, and while it adds moisture, it changes the texture too much. Stick with white sugar here.
- Pumpkin Puree (3 tablespoons): Not pumpkin pie filling—make sure you grab 100% pure pumpkin puree. I like Libby’s brand for its consistent thickness. Pat the puree with a paper towel before measuring to remove excess moisture. Trust me, this step is crucial.
- Large Egg Yolk (1): Just the yolk. The white would make the cookies too wet and cakey. Save the egg white for a scramble tomorrow morning.
- Vanilla Extract (1/2 teaspoon): Pure vanilla extract adds warmth. Imitation works, but pure is better.
- All-Purpose Flour (3/4 cup): Spoon and level your flour—don’t scoop directly from the bag. Packed flour will give you dry, crumbly cookies.
- Cream of Tartar (1/2 teaspoon): This is the secret ingredient for that signature snickerdoodle tang. Don’t skip it. If you don’t have it, you can substitute with 1 teaspoon of lemon juice, but the texture won’t be quite the same.
- Baking Soda (1/4 teaspoon): Helps the cookies rise just a bit.
- Salt (1/4 teaspoon): Balances the sweetness and enhances the pumpkin flavor.
- Ground Cinnamon (1/2 teaspoon): Adds warmth and depth. I use Saigon cinnamon for a stronger flavor, but regular works fine.
- Pumpkin Pie Spice (1/4 teaspoon): A little extra warmth. You can use a mix of cinnamon, nutmeg, and ginger if you don’t have the blend.
For the Cinnamon-Sugar Coating
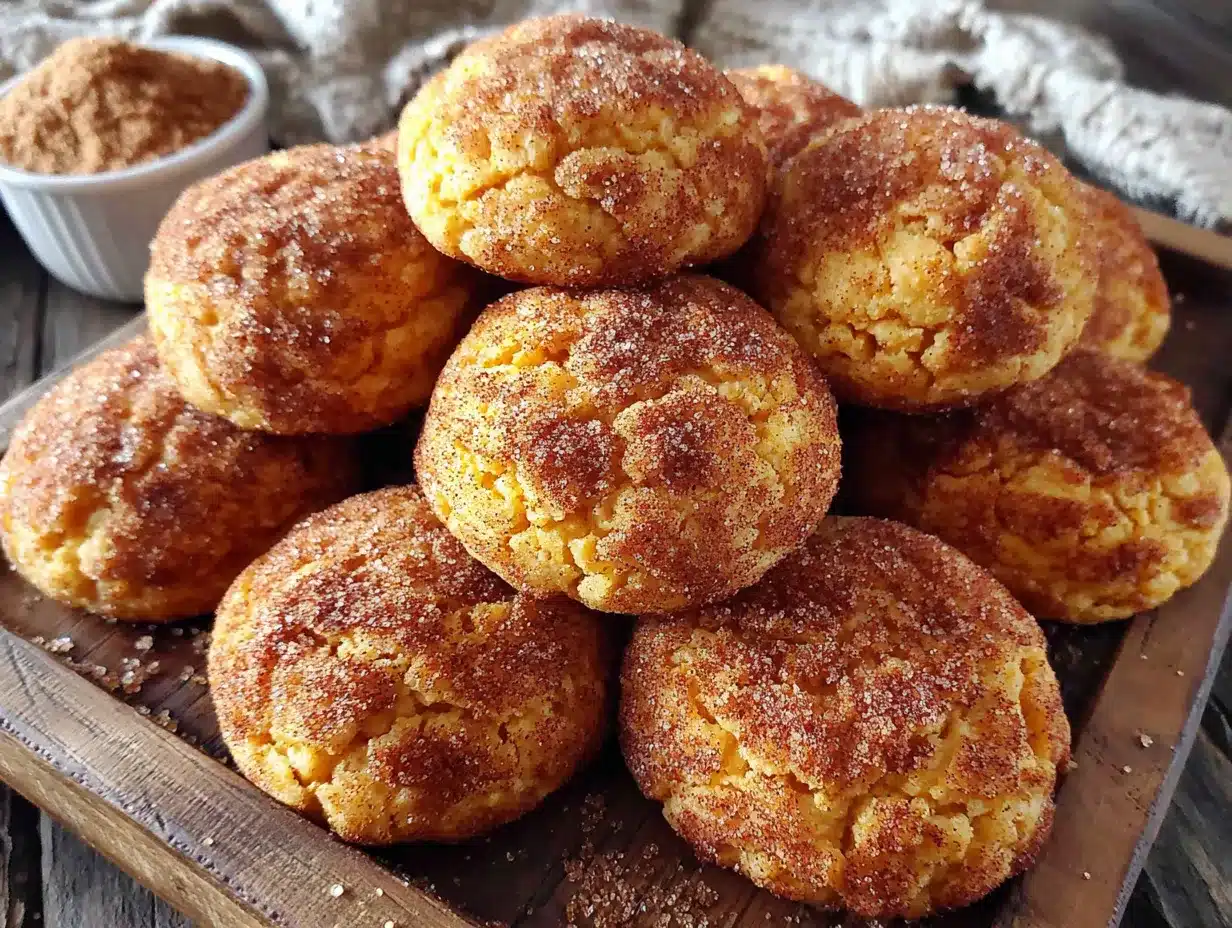
- Granulated Sugar (2 tablespoons): For that sparkly, crunchy exterior.
- Ground Cinnamon (1 teaspoon): I like a generous coating. Adjust to your taste.
One quick note on substitutions: If you’re out of cream of tartar, you can use 1 teaspoon of white vinegar or lemon juice mixed into the wet ingredients. It’s not ideal, but it works in a pinch. For a dairy-free version, use vegan butter—just make sure it’s a block style, not the spreadable kind.
Equipment Needed
You don’t need a professional bakery setup for these cookies. Here’s what I use and what you can swap in.
- Mixing Bowls: One medium bowl for the dry ingredients, one large bowl for the wet ingredients. I prefer glass or stainless steel because they don’t hold odors.
- Hand Mixer or Stand Mixer: A hand mixer works perfectly here. You can also cream the butter and sugar by hand with a wooden spoon, but it takes some elbow grease.
- Baking Sheet: A standard half-sheet pan works great. Line it with parchment paper or a silicone baking mat for easy cleanup.
- Cookie Scoop (1.5 tablespoon size): This is my favorite tool for consistent cookie sizes. If you don’t have one, use a regular tablespoon measure.
- Cooling Rack: Lets air circulate so the bottoms don’t get soggy.
- Small Bowl: For mixing the cinnamon-sugar coating.
- Plastic Wrap: For chilling the dough. You can also use a covered bowl.
I’ve made these cookies with a cheap baking sheet and a fork—they still turned out great. The cookie scoop is nice to have, but not essential. If you’re on a budget, just use two spoons to portion the dough.
Preparation Method
Okay, let’s get baking. I’ll walk you through every step so you get perfectly soft, chewy cookies every time.
- Preheat and Prep: Preheat your oven to 350°F (175°C). Line a baking sheet with parchment paper. In a small bowl, mix the 2 tablespoons of sugar and 1 teaspoon of cinnamon for the coating. Set aside.
- Cream Butter and Sugar: In a large bowl, beat the softened butter and 1/4 cup plus 2 tablespoons of granulated sugar together with a hand mixer on medium speed for about 2 minutes. You want it light and fluffy—this incorporates air for a tender cookie. Scrape down the sides of the bowl with a spatula.
- Add Wet Ingredients: Add the pumpkin puree, egg yolk, and vanilla extract. Beat on low speed until just combined. The mixture might look a little curdled—that’s okay. Don’t overmix.
- Mix Dry Ingredients: In a separate bowl, whisk together the flour, cream of tartar, baking soda, salt, cinnamon, and pumpkin pie spice. Whisking ensures the leavening agents are evenly distributed.
- Combine Wet and Dry: Gradually add the dry ingredients to the wet mixture, mixing on low speed. Stop as soon as the flour disappears. Overmixing develops gluten, which makes cookies tough. The dough will be soft and slightly sticky—that’s normal.
- Chill the Dough: Cover the bowl with plastic wrap and refrigerate for 15 minutes. This is non-negotiable. Chilling solidifies the butter, which prevents the cookies from spreading too much in the oven. While it chills, wash your hands and get your coating bowl ready.
- Portion and Coat: Use a 1.5-tablespoon cookie scoop to portion the dough. Roll each portion into a ball between your palms. Drop the ball into the cinnamon-sugar mixture and roll to coat generously. Place on the prepared baking sheet, spacing them about 2 inches apart. You should get 6 to 8 cookies.
- Bake: Bake for 10-12 minutes. At 10 minutes, the edges will be set and lightly golden, but the centers will look slightly underdone and puffy. That’s exactly what you want. For softer cookies, pull them at 10 minutes. For slightly crisper edges, go to 12.
- Cool: Let the cookies rest on the baking sheet for 5 minutes. They will continue to set as they cool. Then transfer them to a wire rack to cool completely. The cracks that form on top are a beautiful sign of a well-made snickerdoodle.
Pro Tip: If your cookies spread too much, your butter was too soft or you didn’t chill the dough long enough. If they’re too puffy, your flour was packed too tightly. It’s all a learning process—I’ve made both mistakes!
Cooking Tips & Techniques
I’ve baked a lot of cookies in my time, and I’ve learned a few things the hard way. Here are my best tips for nailing these pumpkin snickerdoodles.
Don’t Skip the Chill: I know it’s tempting to skip this step, especially when you’re hungry. But those 15 minutes in the fridge are what give you that perfect thick, chewy texture. Without it, your cookies will turn into flat, sad discs. I learned this the day I was impatient and ended up with pumpkin-flavored lace cookies.
Pat the Pumpkin: Pumpkin puree has a lot of water. If you don’t pat it dry with a paper towel, your dough will be too wet, and the cookies will be cakey instead of chewy. Just press a paper towel gently on top of the measured puree to absorb the excess liquid. It makes a real difference.
Use a Cookie Scoop: Consistent size means consistent baking. If one cookie is bigger than the other, one will be underdone while the other is overdone. A small scoop saves time and frustration.
Watch the Oven: Every oven runs a little differently. My old oven baked these in exactly 10 minutes. My new one takes 11. Start checking at the 9-minute mark. The cookies are done when the edges are set and the centers are just barely puffed. They will look underdone—that’s the goal.
Let Them Rest: The 5-minute rest on the baking sheet is crucial. It allows the cookies to finish setting without over-baking. If you move them too soon, they’ll fall apart. Patience pays off here.
Multitasking Tip: While the dough chills, make your cinnamon-sugar coating and line your baking sheet. That way, everything is ready to go when you pull the dough out.
Variations & Adaptations
One of the best things about this recipe is how easy it is to tweak. Here are a few variations I’ve tried and loved.
- Gluten-Free Version: Swap the all-purpose flour for a 1:1 gluten-free baking flour blend. I’ve used Bob’s Red Mill with great results. The texture is slightly more delicate, but the flavor is spot on.
- Vegan Adaptation: Use vegan butter (I like Miyoko’s) and a flax egg (1 tablespoon ground flaxseed mixed with 3 tablespoons water, let sit for 5 minutes). The cookies will be a bit flatter, but still delicious.
- Spice It Up: Add 1/4 teaspoon of ground ginger or a pinch of cloves to the dough for a more complex spice profile. I did this one year for Thanksgiving, and they disappeared before the turkey was carved.
- Add Mix-Ins: Fold in 1/4 cup of white chocolate chips or chopped pecans after combining the wet and dry ingredients. The white chocolate adds a creamy sweetness that pairs beautifully with the pumpkin.
- Double the Batch: If you’re feeding a crowd, simply double all the ingredients. The baking time stays the same, but you might need to bake in batches.
I personally love the version with a pinch of cardamom in the cinnamon-sugar coating. It adds a floral, slightly citrusy note that makes the cookies feel extra special. Give it a try if you’re feeling adventurous.
Serving & Storage Suggestions
These cookies are best enjoyed warm, when the edges are still slightly crisp and the center is soft and gooey. But they’re also fantastic at room temperature the next day—if they last that long.
Serving Temperature: Serve at room temperature or slightly warm. If you’re reheating, pop them in a 300°F oven for 3-4 minutes. The microwave works too, but it can make them rubbery.
What to Serve With: A cold glass of milk is the classic pairing. For a fall twist, try them with a warm cup of chai tea or a creamy pumpkin cold foam iced latte. They also pair beautifully with a scoop of vanilla ice cream for an impromptu dessert.
Storage Instructions: Store leftover cookies in an airtight container at room temperature for up to 3 days. To keep them soft, add a slice of bread to the container—the cookies will absorb the moisture from the bread. Just replace the bread slice every day.
Freezer Instructions: You can freeze the baked cookies for up to 2 months. Place them in a single layer in a freezer-safe bag or container. Thaw at room temperature for about 30 minutes. You can also freeze the unbaked dough balls. Roll them, coat them in cinnamon sugar, and place them on a baking sheet in the freezer until solid. Then transfer to a freezer bag. Bake from frozen, adding 2-3 minutes to the baking time.
Flavor Development: These cookies actually taste better the next day. The flavors meld together, and the texture becomes even more tender. If you can resist eating them all on day one, you’re in for a treat on day two.
Nutritional Information & Benefits
Let’s be real—these are cookies, not health food. But they do have a few redeeming qualities worth mentioning.
Estimated Nutritional Values (per cookie, based on 8 cookies):
- Calories: 180
- Fat: 8g
- Carbohydrates: 26g
- Protein: 2g
- Fiber: 1g
- Sugar: 16g
Health Highlights: Pumpkin puree is rich in vitamin A and fiber, which supports eye health and digestion. Cinnamon has anti-inflammatory properties and can help regulate blood sugar levels. The butter provides a small amount of vitamin A and healthy fats.
Dietary Considerations: This recipe is vegetarian. For gluten-free or vegan options, see the variations section above. The cookies contain dairy (butter) and eggs, so they’re not suitable for those with allergies to those ingredients.
My Take: I don’t believe in demonizing treats. These cookies are a small joy, and life needs those. I make them when I want something special without going overboard. The small batch size helps with portion control, which I appreciate.
FAQs
Can I use pumpkin pie filling instead of pumpkin puree?
No, please don’t. Pumpkin pie filling is pre-sweetened and spiced, which will throw off the sugar and spice ratios in the recipe. Stick with 100% pure pumpkin puree for the best results.
Why are my cookies flat?
Flat cookies usually mean the butter was too soft or the dough wasn’t chilled long enough. Make sure your butter is softened but not melted, and don’t skip the 15-minute chill. Also, check that your baking soda is fresh—old baking soda loses its leavening power.
Can I make these cookies without cream of tartar?
You can, but they won’t have that signature tangy flavor. Substitute with 1 teaspoon of white vinegar or lemon juice added to the wet ingredients. The texture will be slightly different, but they’ll still be tasty.
How do I know when the cookies are done?
The edges should be set and lightly golden, while the centers still look slightly puffy and underdone. They will continue to bake on the hot baking sheet as they cool. If the centers look fully set in the oven, they’re overbaked.
Can I double this recipe?
Absolutely. Simply double all the ingredients. The baking time remains the same, but you may need to bake in batches. The dough can be refrigerated for up to 24 hours if you need to spread out the baking.
Conclusion
These perfect small-batch pumpkin snickerdoodle cookies are exactly what they claim to be—a simple, satisfying treat that captures the essence of fall without overwhelming your kitchen or your waistline. I love this recipe because it respects my time and my cravings. It’s not a project; it’s a moment of joy that takes less than 30 minutes from start to finish.
I hope you give these a try. Play around with the spices, add some white chocolate chips if you’re feeling fancy, or just enjoy them exactly as written. They’re forgiving and adaptable, just like a good recipe should be. If you make them, I’d love to hear how they turned out. Drop a comment below or tag me in your photos—I genuinely get excited seeing other people enjoy something I created in my own tiny kitchen. And if you’re looking for another cozy fall treat, you might enjoy my brown butter snickerdoodle blondies for when you want a bar instead of a cookie. Happy baking, friends!
Pin This Recipe!

Perfect Small-Batch Pumpkin Snickerdoodle Cookies
Soft, chewy pumpkin snickerdoodle cookies made in a small batch of 6-8. Perfectly spiced with a cinnamon-sugar coating, these cookies deliver real pumpkin flavor without being cakey. Ready in under 30 minutes.
- Prep Time: 15 minutes
- Cook Time: 10-12 minutes
- Total Time: 25-27 minutes
- Yield: 6-8 cookies 1x
- Category: Dessert
- Cuisine: American
Ingredients
- 4 tablespoons unsalted butter, softened
- 1/4 cup + 2 tablespoons granulated sugar
- 3 tablespoons pumpkin puree (100% pure, patted dry)
- 1 large egg yolk
- 1/2 teaspoon vanilla extract
- 3/4 cup all-purpose flour (spooned and leveled)
- 1/2 teaspoon cream of tartar
- 1/4 teaspoon baking soda
- 1/4 teaspoon salt
- 1/2 teaspoon ground cinnamon
- 1/4 teaspoon pumpkin pie spice
- 2 tablespoons granulated sugar (for coating)
- 1 teaspoon ground cinnamon (for coating)
Instructions
- Preheat oven to 350°F (175°C). Line a baking sheet with parchment paper. In a small bowl, mix 2 tablespoons sugar and 1 teaspoon cinnamon for coating; set aside.
- In a large bowl, beat softened butter and 1/4 cup plus 2 tablespoons granulated sugar with a hand mixer on medium speed until light and fluffy, about 2 minutes. Scrape down sides.
- Add pumpkin puree, egg yolk, and vanilla extract. Beat on low speed until just combined (mixture may look slightly curdled).
- In a separate bowl, whisk together flour, cream of tartar, baking soda, salt, cinnamon, and pumpkin pie spice.
- Gradually add dry ingredients to wet mixture, mixing on low speed until just combined. Do not overmix. Dough will be soft and slightly sticky.
- Cover bowl with plastic wrap and refrigerate for 15 minutes.
- Using a 1.5-tablespoon cookie scoop, portion dough and roll into balls. Roll each ball in cinnamon-sugar mixture to coat generously. Place on prepared baking sheet, spacing 2 inches apart (6-8 cookies).
- Bake for 10-12 minutes. Edges should be set and lightly golden; centers will look slightly underdone and puffy.
- Let cookies rest on baking sheet for 5 minutes, then transfer to a wire rack to cool completely.
Notes
Pat pumpkin puree dry with a paper towel to remove excess moisture. Chilling dough for 15 minutes is essential to prevent spreading. For softer cookies, bake 10 minutes; for crisper edges, bake 12 minutes. Cookies taste even better the next day. Store in an airtight container at room temperature for up to 3 days. Freeze baked cookies for up to 2 months or unbaked dough balls for later use.
Nutrition
- Serving Size: 1 cookie
- Calories: 180
- Sugar: 16
- Fat: 8
- Carbohydrates: 26
- Fiber: 1
- Protein: 2
Keywords: pumpkin snickerdoodle, small batch cookies, pumpkin cookies, snickerdoodle recipe, fall cookies, soft chewy cookies