Homemade Elderberry Gummies: Best Immune-Boosting Recipe
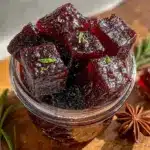
These homemade elderberry immune-boosting gummies are a practical, delicious way to support your immune system during cold season. With the right balance of tart and sweet, a bouncy, satisfying texture, and simple ingredients, they’re way better than any store-bought version.
- Prep Time: 15 minutes
- Cook Time: 25 minutes
- Total Time: 2 hours 40 minutes (includes 2 hours setting time)
- Yield: Approximately 60 gummies (30 servings of 2 gummies each) 1x
- Category: Snack, Supplement
- Cuisine: American
Ingredients
Scale
- ½ cup dried elderberries
- 3 cups water
- ½ cup unsweetened tart cherry juice
- 3 tablespoons raw honey
- ¼ cup grass-fed gelatin
- 1-inch piece fresh ginger, sliced
- 1 cinnamon stick
- 3 whole cloves (optional)
- ½ teaspoon vitamin C powder (optional)
Instructions
- Simmer the elderberry base: In a medium saucepan, combine the dried elderberries, water, sliced ginger, cinnamon stick, and cloves. Bring to a boil over medium-high heat, then reduce to a simmer. Let it bubble gently for 20-25 minutes, or until the liquid has reduced by about half.
- Strain the mixture: Pour the liquid through a fine-mesh strainer or cheesecloth into a liquid measuring cup. Press down on the berries with the back of a spoon to extract every last drop. Discard the solids. You should have about 1 cup of concentrated elderberry liquid.
- Cool slightly and add juice: Let the liquid cool for 5 minutes. Stir in the tart cherry juice and honey until fully dissolved.
- Bloom the gelatin: Pour the gelatin powder into a small bowl. Add ¼ cup of the warm elderberry mixture and whisk immediately to prevent clumps. Let it sit for 2-3 minutes until it becomes thick and jelly-like.
- Combine and warm: Pour the bloomed gelatin mixture back into the saucepan with the remaining elderberry liquid. Warm over low heat, whisking constantly, for 2-3 minutes until the gelatin is fully dissolved and the mixture is smooth. Do not let it boil.
- Add vitamin C (optional): If using vitamin C powder, whisk it in now until completely dissolved.
- Fill the molds: Carefully pour the mixture into a liquid measuring cup with a spout. Fill your silicone molds using the spout, a dropper, or a small funnel. Work quickly but carefully.
- Set and unmold: Place the filled molds on a small baking sheet and refrigerate for at least 2 hours, or until firm. To unmold, gently push from the bottom of the mold.
Notes
Don’t skip the blooming step for smooth texture. Temperature matters: liquid should be warm but not hot (around 110°F). Work quickly when filling molds. Grease molds lightly with coconut oil if needed. Store in refrigerator for 2-3 weeks or freeze for up to 3 months. Flavor deepens after a day or two.
Nutrition
- Serving Size: 2 gummies
- Calories: 35
- Sugar: 5
- Sodium: 5
- Carbohydrates: 7
- Protein: 2
Keywords: elderberry gummies, immune boosting, homemade gummies, elderberry recipe, cold season remedy, healthy snacks, kid-friendly, gelatin gummies