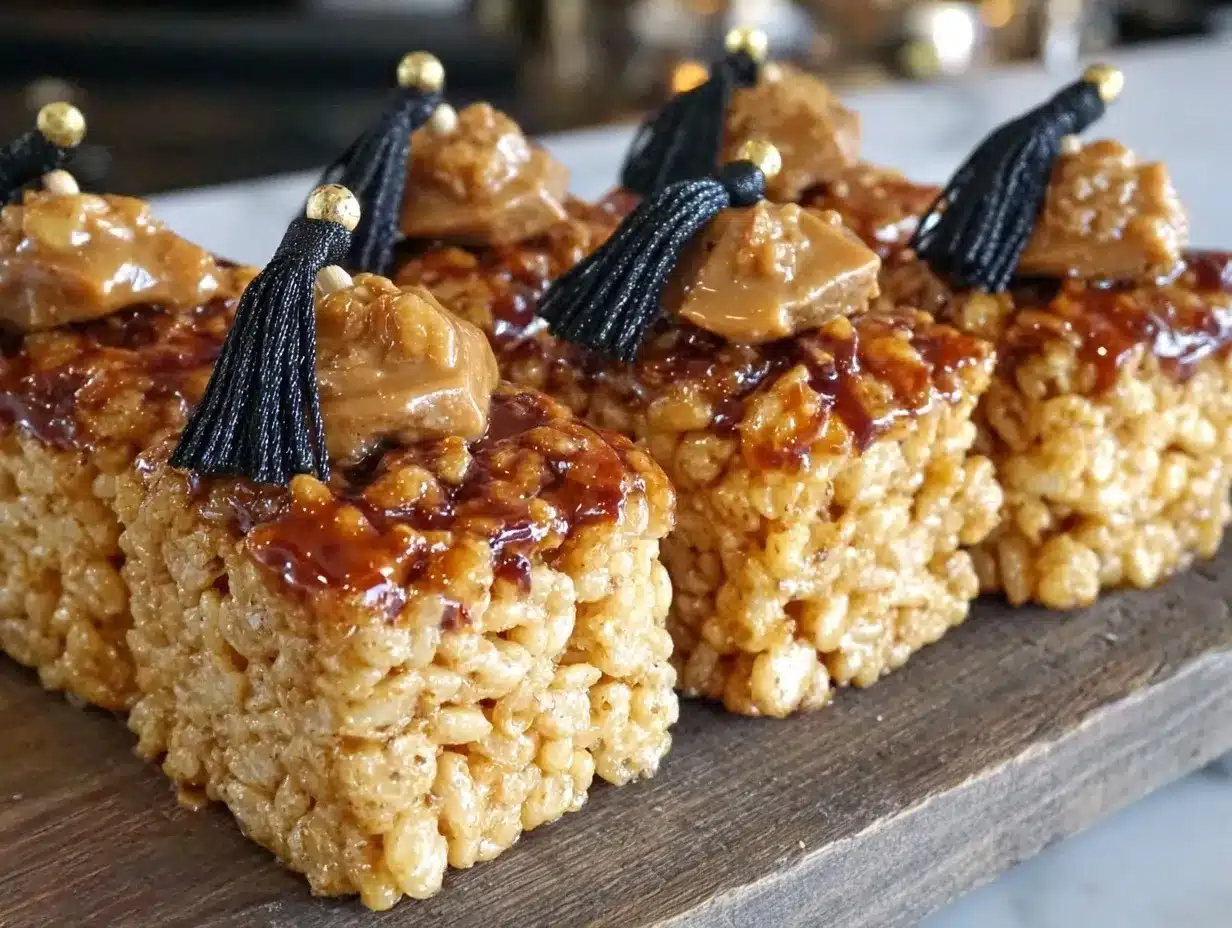
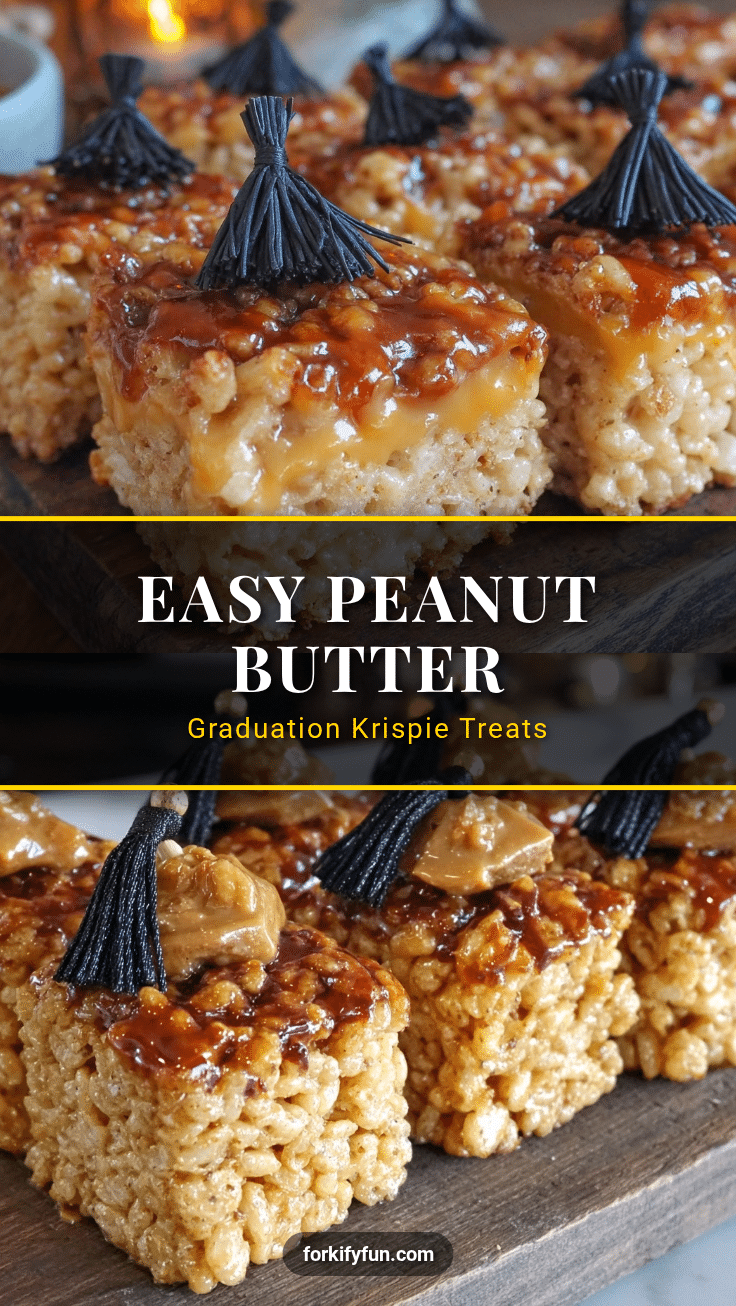
“You got the snacks, right?” my sister texted me just hours before my nephew’s graduation party. Honestly, my brain was scrambled that day — juggling work deadlines and a kitchen that looked like a tornado had passed through. I had zero time and even less energy to bake anything complicated. But then I spotted a nearly empty jar of peanut butter and a box of Rice Krispies in the pantry. That’s when the idea struck: why not make these Easy Peanut Butter Graduation Cap Rice Krispie Treats on Sticks? I was skeptical at first—could something so simple really be festive enough for a graduation bash?
Mixing peanut butter into the classic marshmallow and cereal combo was a game-changer. The treats came together fast, and decorating them with little graduation caps made from black fondant and a tiny tassel of yellow icing was honestly a lot of fun (and less stressful than I imagined). The kids loved holding their treats on sticks, and the adults kept asking for the recipe afterward. It wasn’t just a snack; it ended up being a conversation starter and a sweet little celebration on its own.
That day, I realized sometimes the best recipes come from a pinch of desperation and what you already have on hand. This recipe stuck with me because it’s approachable, yet festive enough to make any graduation party feel special. Plus, it lets you channel your creativity without needing to be a professional baker or spend hours in the kitchen. It’s kind of the perfect sweet treat when time’s tight but the occasion is huge—like graduation.
Honestly, it’s those simple, joyful moments I remember most — watching the kids’ eyes light up as they bit into their peanut butter Rice Krispie treats, all on a stick, sporting their tiny edible graduation caps. It’s a recipe that’s as much about the memories as the taste.
Why You’ll Love This Easy Peanut Butter Graduation Cap Rice Krispie Treats Recipe
Having whipped up this recipe more times than I can count—especially during graduation season—it’s safe to say these treats have earned their spot as a party staple. Here’s why this recipe stands out and why it might soon become your go-to for celebrations:
- Quick & Easy: These treats come together in just about 20 minutes, perfect for those last-minute snack needs or when you’re juggling a million things and need a win fast.
- Simple Ingredients: No need to hunt for specialty items. You probably already have everything in your pantry—marshmallows, peanut butter, Rice Krispies, and a few decorating basics.
- Perfect for Graduation Parties and More: The graduation cap design adds a festive touch that’s ideal for celebrations but simple enough to adapt for birthdays or any fun gathering.
- Crowd-Pleaser: The peanut butter twist gives these treats a rich, nutty flavor that’s a hit with kids and adults alike—trust me, they vanish fast.
- Creative and Customizable: The little caps are made with easy fondant or even cookie pieces, so you can get playful with colors or shapes without stress.
What makes this recipe different? It’s not just about mixing peanut butter into Rice Krispie treats (which you can find variations of everywhere). The magic is in the texture—the peanut butter adds a creamy depth, balancing the sweet marshmallow and crunchy cereal perfectly. Plus, assembling them on sticks makes them neat, portable, and festive.
When I serve these, I often pair them with savory snacks like the blackened shrimp tacos with zesty mango slaw for a party spread that hits all the right notes. It’s this mix of sweet and savory, simple and special, that keeps people coming back for more.
What Ingredients You Will Need
This recipe uses simple, wholesome ingredients to deliver bold flavor and satisfying texture without the fuss. These pantry staples come together to create a nostalgic yet fresh take on a classic treat. Here’s what you’ll need:
- For the Treat Base:
- 4 cups (100 g) Rice Krispies cereal (or any crispy rice cereal)
- 3 tablespoons (45 g) unsalted butter, softened (I love using Land O’Lakes for smooth melting)
- 1 package (10 oz / 280 g) mini marshmallows
- 1/2 cup (125 g) creamy peanut butter (natural or regular works fine; I prefer Skippy for consistent flavor)
- For the Graduation Caps:
- Black fondant (about 4 ounces) or black candy melts for shaping caps
- Yellow icing or edible gel for tassels
- Wooden lollipop sticks or sturdy skewers (about 6 inches long)
- Optional Decoration:
- Sprinkles or edible glitter for a celebratory touch
- White icing for writing names or messages
For a gluten-free option, just verify your Rice Krispies are certified gluten-free (some brands vary). Also, you can swap regular peanut butter with almond butter if allergies are a concern, though the flavor will shift a bit.
In summer, I sometimes add mini chocolate chips or swap in rainbow sprinkles under the caps for a pop of color, making these treats perfect for other celebrations too.
Equipment Needed
- Large saucepan: for melting butter, marshmallows, and peanut butter together smoothly.
- Mixing spoon or heat-resistant spatula: essential for stirring without burning your hand.
- Large mixing bowl: to combine the melted mix with Rice Krispies cereal.
- Wax paper or silicone baking mat: for pressing and cooling the treats without sticking.
- Lollipop sticks or wooden skewers: sturdy enough to hold the treats without breaking.
- Small rolling pin or fondant tools (optional): helpful if shaping fondant caps by hand.
If you don’t have fondant tools, no worries; you can shape caps with your fingers or use cookie cutters for uniform shapes. For budget-friendly ideas, chopsticks can substitute for skewers in a pinch.
Personally, I like using a silicone spatula because it scrapes every bit of the sticky mixture off the pan without melting or bending. It’s little things like that which make this recipe smoother, trust me.
Preparation Method
- Prepare your workspace: Line a large baking sheet with wax paper or a silicone baking mat. Have your lollipop sticks or skewers ready nearby. This step saves you from sticky fingers later! (About 5 minutes)
- Melt the butter, marshmallows, and peanut butter: In a large saucepan over low heat, melt 3 tablespoons of butter. Once melted, add 10 oz of mini marshmallows and 1/2 cup of creamy peanut butter. Stir gently but constantly until the mixture is smooth and glossy. Watch carefully to avoid scorching. The smell of warm peanut butter and marshmallow melting together is a good sign you’re on the right track. (5-7 minutes)
- Mix in the Rice Krispies: Remove the pan from heat and immediately fold in 4 cups of Rice Krispies cereal. Use a spatula to coat every piece evenly with the peanut butter marshmallow goo. The mixture should be sticky but not runny. If it feels too dry, add a teaspoon of melted butter or peanut butter to help bind. (2-3 minutes)
- Form the treats on sticks: Working quickly (the mixture sets fast), scoop about 1/4 cup portions onto the lined baking sheet. Press firmly around the base of each lollipop stick, shaping the treat into a rounded square or rectangle about 2.5 inches (6 cm) wide and 1 inch (2.5 cm) thick. Use a buttered spatula or wet fingers to smooth edges if needed. (10 minutes)
- Chill and firm up: Place the tray in the refrigerator for at least 30 minutes to let the treats set firmly on the sticks. This step helps prevent them from sliding or falling apart during decoration.
- Create the graduation caps: While treats chill, roll out the black fondant to about 1/8 inch (3 mm) thickness. Cut squares about 1.5 inches (4 cm) wide for the top of the caps. For the base (the part that sits on the treat), cut small rectangles or circles to fit snugly. Attach caps to treats using a dab of water or edible glue. Pipe a tiny yellow icing tassel on each cap using a small piping tip or toothpick. (10-15 minutes)
- Final touches: Add sprinkles or write names on the treats with white icing if desired. Keep them chilled until serving for best texture and freshness.
Pro tip: If you find the mixture sticking to your hands too much while shaping, lightly grease your palms with butter or spray with non-stick spray to make it easier and less messy.
It might feel fiddly the first time, but after a couple of treats, you’ll find a rhythm. The key is to work quickly before the mixture cools and hardens.
Cooking Tips & Techniques
Honestly, making these Easy Peanut Butter Graduation Cap Rice Krispie Treats on Sticks is forgiving, but a few tricks make the process smoother:
- Low and slow melting: Melt butter, marshmallows, and peanut butter over low heat. Rushing with high heat can burn the marshmallows or peanut butter, giving a bitter taste.
- Don’t skip the chilling step: Cooling the treats on sticks firms them up, making decorating much easier and preventing breakage.
- Use creamy peanut butter: Chunky varieties can make the mixture uneven and harder to shape.
- Grease your hands or tools: Sticky mixtures can be frustrating, but a little butter on your hands or spatula keeps things manageable.
- Shape size consistency: Try to keep treats roughly the same size for even setting and a neat party display.
- Fondant handling: Keep fondant covered when not working with it to prevent drying out. If it gets too stiff, knead a bit of shortening into it.
- Multitasking tip: While the treats chill, prepare your fondant caps and decorations to save time.
I once tried skipping the fondant caps and just piping icing on top. It was a mess! So I learned hands-on that simple shapes made from fondant really make the difference for that polished look.
Variations & Adaptations
Want to tweak this recipe? Here are some fun ways to make it your own:
- Flavor swaps: Substitute peanut butter with almond or sunflower seed butter for a nut-free version. You can also add a teaspoon of vanilla extract or cinnamon to the melted mix for a subtle flavor twist.
- Chocolate lovers: Drizzle melted dark or white chocolate over the treats before adding the graduation caps for extra indulgence.
- Diet-friendly options: Use gluten-free crispy rice cereal and dairy-free butter and marshmallows to accommodate allergies or dietary restrictions.
- Different celebration themes: Swap the black fondant caps for other shapes and colors—like stars or hearts—for birthdays, baby showers, or holidays.
- Mini versions: Make bite-sized treats by using smaller portions and shorter sticks, perfect for kids’ parties or dessert buffets.
One time, I swapped the peanut butter for cookie butter and topped the treats with crushed speculoos cookies instead of fondant. It was a hit with a little added crunch and spice. The possibilities are endless!
Serving & Storage Suggestions
These treats are best enjoyed fresh but can hold up well if stored properly:
- Serving: Serve at room temperature for the best chewy texture. The sticks make them perfect for passing around at parties or laying out on a dessert table.
- Pairings: They go surprisingly well with savory options like the spinach and feta egg muffin cups or alongside fresh fruit for balance.
- Storage: Store in an airtight container at room temperature for up to 3 days. If your house is warm, refrigeration can help but may make the treats firmer.
- Freezing: Wrap individually in plastic wrap and freeze for up to 1 month. Thaw at room temperature before serving.
- Reheating: These treats don’t need reheating, but if you like them a bit softer, a few seconds in the microwave can do the trick—just don’t overdo it!
- Flavor development: The peanut butter flavor tends to mellow and blend more with the marshmallow sweetness after a day or two, which some folks prefer.
Nutritional Information & Benefits
While these treats are definitely a sweet indulgence, they do pack a bit of protein and healthy fats thanks to the peanut butter. Here’s a rough estimate per treat (based on about 12 servings):
| Nutrient | Amount |
|---|---|
| Calories | 180-200 |
| Fat | 7-9 g |
| Carbohydrates | 28-30 g |
| Protein | 4-5 g |
| Sugar | 15-18 g |
Key ingredients like peanut butter provide a decent dose of protein and heart-healthy fats, while the Rice Krispies add that satisfying crunch without too many calories. Keep in mind, marshmallows contribute most of the sugar here, so these are best enjoyed as a treat.
If you’re watching allergens, peanut butter is a common one—consider alternatives like sunflower seed butter or soy nut butter to keep the recipe inclusive.
From my experience, these treats hit the perfect balance of comfort and fun, especially when you want a festive snack that’s quick to make and easy to share.
Conclusion
These Easy Peanut Butter Graduation Cap Rice Krispie Treats on Sticks have become my secret weapon for quick, festive party snacks that look impressive without the fuss. Whether you’re scrambling last minute or planning ahead, they’re a sweet way to celebrate milestones with minimal stress.
I love how customizable they are, letting you play with flavors and decorations to suit any party vibe. Plus, the nostalgic peanut butter and marshmallow combo feels like a warm hug on a stick—simple, satisfying, and totally crowd-pleasing.
Give this recipe a try and make it your own. I’d love to hear how you personalize these treats or if you have any fun graduation party ideas to share. Drop a comment below and let’s keep the celebration going!
FAQs About Easy Peanut Butter Graduation Cap Rice Krispie Treats on Sticks
Can I make these treats without peanut butter?
Yes! You can omit peanut butter or substitute with almond butter, sunflower seed butter, or even cookie butter. Each will change the flavor slightly but keep the treat delicious.
How do I store these treats to keep them fresh?
Store them in an airtight container at room temperature for up to 3 days. For warmer climates, refrigeration helps but might make them a bit firmer.
Can I prepare these treats a day ahead?
Absolutely! Prepare and decorate them a day before your event. Just keep them covered and refrigerated if your kitchen is warm, then bring to room temperature before serving.
What if I don’t have fondant for the graduation caps?
You can use black candy melts, mini cookies, or even cut-out pieces of black construction paper to create fun toppers. Yellow icing or edible gel still works great for tassels.
Are these treats gluten-free?
Traditional Rice Krispies contain malt flavoring which has gluten, but you can use certified gluten-free crispy rice cereal to keep the recipe gluten-free.
Pin This Recipe!
Easy Peanut Butter Graduation Cap Rice Krispie Treats Recipe for Perfect Party Snacks
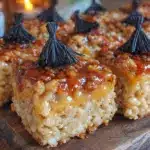
These easy peanut butter Rice Krispie treats on sticks are a quick, festive snack perfect for graduation parties. The peanut butter adds a creamy depth to the classic marshmallow and cereal combo, topped with fun edible graduation caps.
- Prep Time: 10 minutes
- Cook Time: 10 minutes
- Total Time: 50 minutes
- Yield: 12 servings 1x
- Category: Dessert
- Cuisine: American
Ingredients
- 4 cups (100 g) Rice Krispies cereal (or any crispy rice cereal)
- 3 tablespoons (45 g) unsalted butter, softened
- 1 package (10 oz / 280 g) mini marshmallows
- 1/2 cup (125 g) creamy peanut butter
- Black fondant (about 4 ounces) or black candy melts for shaping caps
- Yellow icing or edible gel for tassels
- Wooden lollipop sticks or sturdy skewers (about 6 inches long)
- Optional: Sprinkles or edible glitter for decoration
- Optional: White icing for writing names or messages
Instructions
- Prepare your workspace by lining a large baking sheet with wax paper or a silicone baking mat. Have your lollipop sticks or skewers ready nearby.
- In a large saucepan over low heat, melt 3 tablespoons of butter. Once melted, add 10 oz of mini marshmallows and 1/2 cup of creamy peanut butter. Stir gently but constantly until the mixture is smooth and glossy, avoiding scorching.
- Remove the pan from heat and immediately fold in 4 cups of Rice Krispies cereal. Use a spatula to coat every piece evenly with the peanut butter marshmallow mixture. If too dry, add a teaspoon of melted butter or peanut butter to help bind.
- Working quickly, scoop about 1/4 cup portions onto the lined baking sheet. Press firmly around the base of each lollipop stick, shaping the treat into a rounded square or rectangle about 2.5 inches wide and 1 inch thick. Smooth edges with a buttered spatula or wet fingers.
- Place the tray in the refrigerator for at least 30 minutes to let the treats set firmly on the sticks.
- While treats chill, roll out the black fondant to about 1/8 inch thickness. Cut squares about 1.5 inches wide for the top of the caps and small rectangles or circles for the base. Attach caps to treats using a dab of water or edible glue. Pipe a tiny yellow icing tassel on each cap.
- Add sprinkles or write names on the treats with white icing if desired. Keep chilled until serving.
Notes
Melt ingredients over low heat to avoid burning. Chill treats on sticks before decorating to prevent breakage. Use creamy peanut butter for smooth texture. Grease hands or tools to handle sticky mixture easily. Fondant caps can be shaped by hand or with cookie cutters. Store treats in airtight container at room temperature for up to 3 days or freeze individually for up to 1 month.
Nutrition
- Serving Size: 1 treat on a stick
- Calories: 190
- Sugar: 16
- Sodium: 90
- Fat: 8
- Saturated Fat: 4
- Carbohydrates: 29
- Fiber: 1
- Protein: 4.5
Keywords: peanut butter, Rice Krispie treats, graduation party snacks, easy dessert, party treats, marshmallow treats, edible graduation caps