My afternoon was hijacked by an unexpected phone call: “Can you watch Jamie after school? I’m stuck at work.” Panic hit because the fridge was nearly empty—just a handful of oats and a jar of honey staring back at me. No time for a grocery run or a complicated recipe. That’s when the idea of these easy no-bake school bus granola bars popped up, literally out of desperation and a sprinkle of creativity. I grabbed what I had, and soon enough, this fun, kid-friendly snack started taking shape on my countertop.
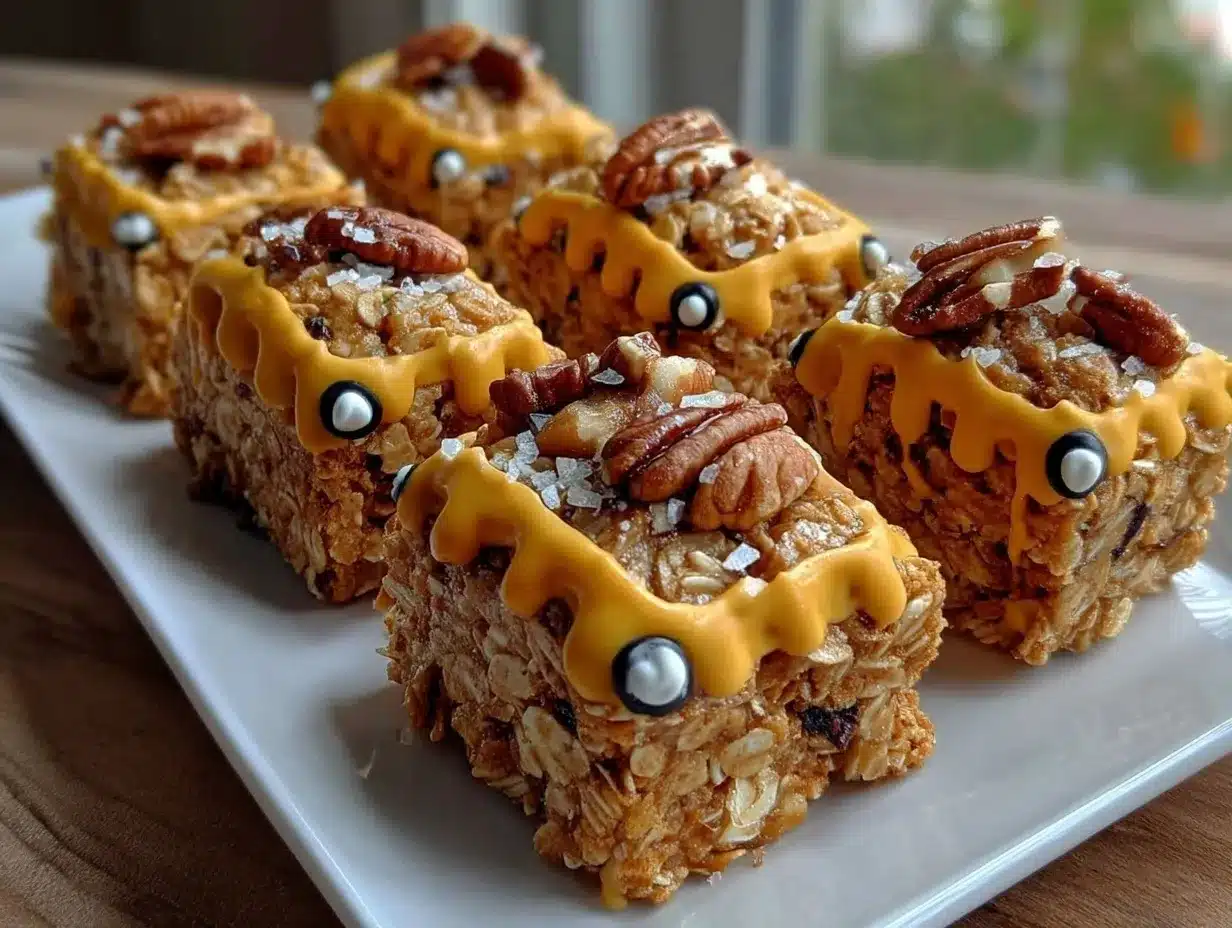
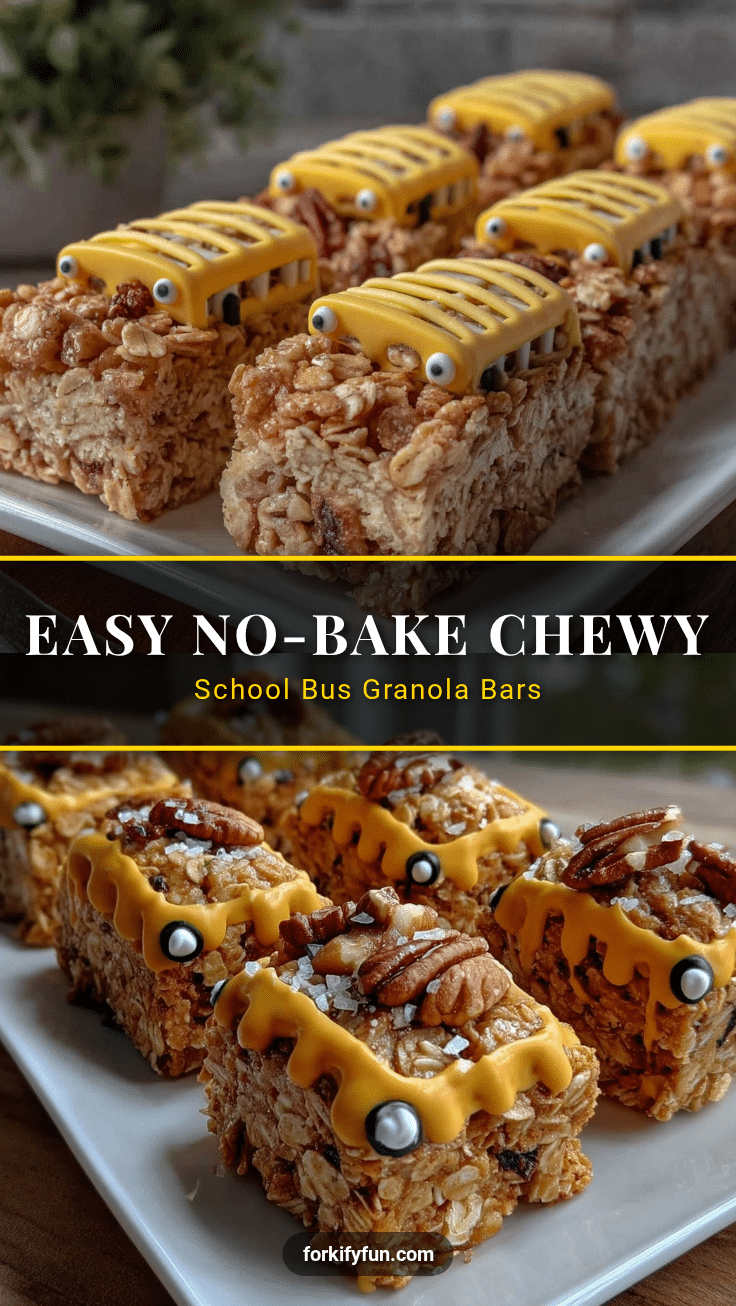
The kitchen smelled like toasted oats mixed with the sweet hint of honey, and the sight of those bright yellow bars shaped like little school buses brought an unexpected grin to Jamie’s face. Honestly, it was a relief to whip up something wholesome and playful without turning the oven on or hunting for hidden ingredients. What started as a mad scramble turned into a quiet moment of pride—snacks made from nothing but simple pantry staples that actually made snack time special.
Since then, these no-bake school bus granola bars have become my go-to for busy days when I want something quick, healthy, and kid-approved. There’s just something about them that sticks with both kids and adults alike, making afternoons a little sweeter and less stressful. This recipe isn’t polished or fancy, but it’s real, reliable, and crafted from those chaotic moments all parents know too well.
Why You’ll Love This Recipe
These easy no-bake school bus granola bars aren’t just another snack—they’re a lifesaver for busy parents and a treat kids genuinely enjoy. Here’s why this recipe has carved out a permanent spot in my snack arsenal:
- Quick & Easy: You can put these together in under 20 minutes, no baking required—ideal for those last-minute snack cravings or unexpected guests.
- Simple Ingredients: No fancy stuff here. Just oats, honey, peanut butter, and a few extras you probably already keep in your pantry.
- Perfect for School Snacks: These bars are sturdy enough to pack in lunchboxes and gentle enough for little hands to hold without a mess.
- Crowd-Pleaser: Jamie’s classmates always ask for more, and honestly, these bars vanish faster than I can make them.
- Unbelievably Delicious: The combo of nutty oats and sweet honey is a classic, but the texture—chewy with just the right crunch—makes these bars feel like a treat, not just a snack.
This recipe stands out because of the no-bake method, which keeps things simple and energy-efficient. Plus, shaping the bars into school buses adds a playful touch that kids love, making snack time fun and engaging. It’s not just about the taste; it’s about creating memories and little moments of joy in the chaos of everyday life. Honestly, it’s the kind of recipe that makes you feel like you’ve got this parenting thing handled, even when everything else feels unpredictable.
What Ingredients You Will Need
This recipe uses simple, wholesome ingredients that work together to create a chewy, tasty, and kid-approved snack without much fuss. Most of these are pantry staples, and substitutions can be made to cater to allergies or preferences.
- Old-fashioned rolled oats (2 cups / 180g): The base of the granola bars, providing bulk and chewiness. I prefer Bob’s Red Mill for consistent texture.
- Natural peanut butter (1 cup / 250g): Acts as the binder and adds rich flavor. Use creamy for easier mixing; almond or sunflower butter works too for nut-free options.
- Honey (½ cup / 170g): The natural sweetener and sticky agent that holds everything together.
- Mini chocolate chips (½ cup / 90g): Adds a fun, melty sweet surprise in every bite. Optional but highly recommended for extra kid appeal.
- Vanilla extract (1 tsp): Enhances the flavor without overpowering the bars.
- Ground cinnamon (½ tsp): Adds a warm, comforting note that rounds out the flavors.
- Salt (a pinch): Balances the sweetness.
- Yellow food coloring or natural turmeric powder (optional): To get that signature school bus color. You can skip this or use natural coloring for a healthier twist.
If you want to swap ingredients for dietary needs, try coconut sugar instead of honey for a less sticky version, or gluten-free oats if needed. For a nut-free alternative, sunflower seed butter is a great choice, and the bars hold together just as well.
Equipment Needed
- Mixing bowl: A large one to combine all the ingredients without making a mess.
- Wooden spoon or silicone spatula: For stirring the sticky peanut butter and honey mixture into the oats.
- 8×8-inch baking pan (20×20 cm): To press the granola mixture into bars. If you don’t have this size, a similar square or rectangular pan works fine.
- Parchment paper: Essential to line the pan for easy removal of the bars without sticking.
- Plastic wrap or a flat-bottom glass: Helpful for firmly pressing the mixture into the pan evenly.
For shaping the bars like school buses, you’ll need a small bus-shaped cookie cutter or a sharp knife to cut out rectangles to mimic the shape. I found a bus cutter online, but you can also freehand the shapes with a knife, which kids sometimes find fun to help with. If you don’t want to fuss with shapes, just cut into regular bars—still delicious and snack-ready.
Preparation Method
- Line your pan: Line an 8×8-inch (20×20 cm) pan with parchment paper, leaving some overhang on the sides to easily lift the bars out later. This step saves you from sticky fingers and pan scrubbing later.
- Mix peanut butter and honey: In a large mixing bowl, combine 1 cup (250g) of creamy natural peanut butter with ½ cup (170g) of honey. Stir together until smooth and well blended—about 2-3 minutes. If the mixture feels too stiff, a quick 15-second zap in the microwave softens it nicely.
- Add vanilla and spices: Stir in 1 teaspoon vanilla extract, ½ teaspoon ground cinnamon, and a pinch of salt. Mix well to evenly distribute the flavors.
- Incorporate oats and chocolate chips: Add 2 cups (180g) of old-fashioned rolled oats and ½ cup (90g) mini chocolate chips to the bowl. Fold everything together gently but thoroughly until all the oats are coated and the mixture sticks together. It should feel thick yet pliable.
- Add color (optional): If you want that cheerful yellow school bus look, mix in a small pinch of turmeric powder or a few drops of yellow food coloring and stir until the color is even. Just a little goes a long way!
- Press mixture into the pan: Transfer the granola mixture into your prepared pan. Using a piece of plastic wrap or a flat-bottom glass, press the mixture firmly and evenly into the pan. This helps the bars stick together and keeps them from crumbling later.
- Chill to set: Pop the pan into the fridge for at least 1 hour. This step is crucial—it lets the bars firm up so they hold their shape when cut.
- Cut into school bus shapes: Once chilled, lift the granola slab out using the parchment paper overhang. Use a school bus cookie cutter to cut out shapes, or slice into rectangles and add simple details with a knife to mimic buses. This is the fun part where kids can get involved!
- Store and serve: Store bars in an airtight container in the fridge for up to a week. They’re perfect for grabbing on busy mornings or packing into lunchboxes.
If your mixture feels too crumbly before chilling, add a splash more honey or peanut butter. If it’s too sticky, a bit more oats will balance it out. The bars should hold together but not be overly dense.
Cooking Tips & Techniques
Making no-bake granola bars might seem straightforward, but a few tricks can make all the difference in texture and flavor.
- Use creamy nut butter: Chunky peanut butter can cause the bars to crumble. Creamy spreads bind better without losing that nutty taste.
- Don’t skip chilling: The fridge time firms up the bars, so they don’t fall apart when cutting or packing. Patience here pays off.
- Press firmly: When pressing the mixture into the pan, use a flat-bottom glass or your hands (covered with plastic wrap) and apply firm, even pressure. This helps compact the oats and nut butter, creating sturdier bars.
- Mix-ins matter: Mini chocolate chips melt just enough to add gooey pockets of sweetness without turning the bars into a chocolate mess. Avoid large chips or chunks unless you prefer a crunchier bite.
- Watch the sweetness: Honey is sticky and sweet, but if your kids prefer less sugar, reduce it slightly or swap half for unsweetened applesauce to keep moisture.
- Customize carefully: Adding dried fruits or seeds can add flavor and nutrition but toss them in last and in small amounts to keep bars intact.
Over the years, I’ve learned to make these bars just right by trial and error. One time, rushing the chilling step resulted in a crumbly mess—lesson learned! Now, I always block off that hour in the fridge and even prep the night before when life is extra hectic.
Variations & Adaptations
This easy no-bake granola bars recipe is a blank canvas for all sorts of fun twists. Here are a few ways to switch things up:
- Nut-Free Version: Replace peanut butter with sunflower seed butter or tahini. Use allergy-friendly chocolate chips or omit them entirely.
- Seasonal Additions: Stir in dried cranberries or chopped dried apricots during fall and winter. For summer, fresh blueberries folded in right before chilling add a juicy surprise.
- Flavor Twists: Add a teaspoon of pumpkin pie spice or swap cinnamon for ginger for a spicy kick. You can also mix in a tablespoon of cocoa powder for chocolate-flavored bars.
- Protein Boost: Toss in a scoop of your favorite protein powder or add chia seeds and flaxseeds for extra nutrition.
- Different Shapes: Instead of school buses, use star or heart cookie cutters for different occasions—perfect for holiday-themed snacks like the star-shaped cinnamon sugar donuts I tried from this recipe.
One time, I added shredded coconut and swapped half the oats for puffed rice for a lighter texture. Jamie loved the crunch and begged for more. Feel free to experiment and find your family’s favorite combination.
Serving & Storage Suggestions
These granola bars are best served chilled or at room temperature. They make a perfect grab-and-go snack for school, after sports, or busy afternoons.
- Presentation: Pack the bars in colorful lunchbox compartments or wrap individually in parchment paper for easy transport.
- Pairings: Serve alongside fresh fruit slices or a small container of yogurt for a balanced snack. They also pair wonderfully with a cold glass of milk or a warm cup of tea for grown-ups.
- Storage: Store in an airtight container in the refrigerator for up to one week. For longer storage, freeze the bars in a zip-top bag for up to 3 months—just thaw at room temperature before eating.
- Reheating: These bars don’t need reheating but a few seconds in the microwave softens them nicely if preferred.
- Flavor Development: The flavors meld beautifully after a day in the fridge, making the bars taste even better the next day.
Keeping a batch of these on hand means you’re always ready for those unexpected snack emergencies, just like the time I had to whip up a quick treat for a last-minute playdate. They’ve become a staple alongside other favorites like the homemade granola parfaits I make for weekend breakfasts.
Nutritional Information & Benefits
Each easy no-bake school bus granola bar is roughly 150 calories, packed with energy-boosting oats and protein-rich peanut butter. These bars offer a good balance of healthy fats, fiber, and natural sugars, making them a wholesome snack option over processed alternatives.
The oats provide essential whole grains that support digestion, while the peanut butter adds heart-healthy fats and protein to keep kids fueled during their busy days. Using natural honey as a sweetener avoids refined sugars and adds antioxidants.
This recipe can be adapted to be gluten-free by using certified gluten-free oats. If nut allergies are a concern, swapping peanut butter with seed butters keeps the bars safe without sacrificing flavor or texture. Just note that the bars contain peanuts or tree nuts unless modified.
From a wellness perspective, these granola bars offer a quick source of sustained energy without the sugar crash, making them a great alternative to many store-bought snacks loaded with artificial ingredients.
Conclusion
Easy no-bake school bus granola bars are the kind of recipe that turns a chaotic moment into a small victory. They’re quick, wholesome, and kid-friendly, crafted from everyday ingredients and a little bit of on-the-fly thinking. Whether you’re juggling work calls or weekend activities, these bars come together with minimal effort and maximum smiles.
Feel free to tweak the flavors and mix-ins to suit your family’s tastes—the best part is how forgiving and flexible this recipe is. I still remember the relief of having these on hand during that hectic afternoon, and it’s why I keep the ingredients stocked and the pan ready.
If you try making these, I’d love to hear how your kids enjoyed them or what creative shapes you came up with! Sharing your take inspires me and others to keep snack time fun and easy.
FAQs About Easy No-Bake School Bus Granola Bars
Can I make these granola bars vegan?
Yes! Swap honey for maple syrup or agave nectar and use a vegan-friendly nut butter. Just keep in mind the texture might be slightly softer.
How long do these bars last?
Stored in an airtight container in the fridge, they last about one week. For longer storage, freeze them for up to three months.
Can I use quick oats instead of rolled oats?
Quick oats tend to make the bars mushy and less chewy. Rolled oats are best for texture and structure.
What if I don’t have a cookie cutter for the school bus shape?
No worries! You can cut the bars into rectangles or squares and use a knife to add simple details. Kids often enjoy decorating the bars with edible markers or icing too.
Are these granola bars suitable for lunchboxes?
Absolutely. They hold up well in lunchboxes and are less messy than many other snacks, making them perfect for school days.
Pin This Recipe!
Easy No-Bake School Bus Granola Bars Recipe Perfect for Kids Snacks
Quick, wholesome, and kid-friendly no-bake granola bars shaped like school buses, made from simple pantry staples. Perfect for busy parents needing a healthy snack that kids love.
- Prep Time: 10 minutes
- Cook Time: 0 minutes
- Total Time: 1 hour 10 minutes
- Yield: 12 bars 1x
- Category: Snack
- Cuisine: American
Ingredients
- 2 cups (180g) old-fashioned rolled oats
- 1 cup (250g) natural creamy peanut butter (or almond/sunflower butter for nut-free)
- ½ cup (170g) honey
- ½ cup (90g) mini chocolate chips (optional)
- 1 teaspoon vanilla extract
- ½ teaspoon ground cinnamon
- Pinch of salt
- Yellow food coloring or natural turmeric powder (optional)
Instructions
- Line an 8×8-inch (20×20 cm) pan with parchment paper, leaving overhang for easy removal.
- In a large mixing bowl, combine peanut butter and honey. Stir until smooth and well blended, about 2-3 minutes. Microwave for 15 seconds if mixture is too stiff.
- Add vanilla extract, ground cinnamon, and a pinch of salt. Mix well.
- Fold in rolled oats and mini chocolate chips until oats are fully coated and mixture is thick and pliable.
- If desired, add a pinch of turmeric powder or a few drops of yellow food coloring and stir until color is even.
- Transfer mixture to the prepared pan and press firmly and evenly using plastic wrap or a flat-bottom glass.
- Chill in the refrigerator for at least 1 hour to set.
- Lift the granola slab out using parchment paper and cut into school bus shapes with a cookie cutter or slice into rectangles and add details with a knife.
- Store bars in an airtight container in the refrigerator for up to one week.
Notes
Use creamy nut butter for better binding. Chill bars for at least 1 hour to prevent crumbling. Adjust honey or oats if mixture is too sticky or crumbly. Optional mini chocolate chips add sweetness and appeal. For nut-free, substitute sunflower seed butter and allergy-friendly chocolate chips. Bars can be frozen up to 3 months.
Nutrition
- Serving Size: 1 bar (approximate)
- Calories: 150
- Sugar: 10
- Sodium: 50
- Fat: 8
- Saturated Fat: 1.5
- Carbohydrates: 18
- Fiber: 2
- Protein: 4
Keywords: no-bake granola bars, kids snacks, school bus granola bars, healthy snacks, peanut butter granola bars, easy granola bars, lunchbox snacks


