My husband claimed he hated Rice Krispie treats for thirty-seven years. Thirty-seven years of side-eyeing every pan of them at bake sales, potlucks, and school parties. He’d say they were “too sticky” or “tasted like sweetened packing peanuts” or, my personal favorite, “the texture makes my teeth feel weird.” I stopped making them entirely. Then, last December, I was testing Christmas recipes for a cookie swap and made a batch of these peppermint white chocolate versions just for myself—I needed something quick to photograph, and honestly, I figured he’d ignore them like always. I turned around from washing the mixer bowl and caught him standing at the counter, three inches from the pan, eating one with the guilty expression of a man caught doing something he’d loudly sworn he’d never do. “These are different,” he said, mouth half-full. “These are actually good.”
And that’s the thing, isn’t it? Sometimes it’s not the food itself we hate—it’s the version we’ve always had. The plain, buttery, slightly-too-sweet slab that’s been sitting on plastic platters since the 1950s. But add a little white chocolate, a crackle of peppermint, a drizzle that makes the whole thing look like a winter wonderland, and suddenly the guy who swore off Rice Krispie treats is asking if there’s more for his lunch tomorrow. I mean, I wasn’t trying to convert anyone. I was just trying to make something pretty for my blog photos. But that’s how the best recipe accidents happen, right? You’re not even trying to prove a point, and then there it is—proof, standing at your counter with crumbs on his sweater.
These treats are the kind of thing you bring to a holiday party and watch disappear before the cookies do. They’re festive without being fussy, sweet without being cloying, and crunchy in that perfect way that makes you reach for another one before you’ve finished the first. Maybe you’ve been there—needing a dessert that looks like you spent hours on it but actually comes together in fifteen minutes flat. That’s this recipe. It’s the one that converts skeptics, impresses your mother-in-law, and makes you look like a kitchen hero when really, you just melted butter and marshmallows. Let me show you how it’s done.
Why You’ll Love This Recipe
Look, I’ve made a lot of Rice Krispie treats in my life—for classroom parties, for neighbors, for those moments when you need dessert now. But this peppermint white chocolate version is the one that gets asked for by name. Here’s why it’s different from every other recipe you’ve seen:
- Ready in 15 Minutes : From start to finish, you’re looking at about fifteen minutes of active work. The hardest part is waiting for the chocolate to set, and honestly, you can speed that up in the fridge if you’re impatient like me.
- No Fancy Ingredients : You probably already have butter, marshmallows, and Rice Krispies in your pantry. The white chocolate and peppermint are easy holiday finds—no special trips to gourmet stores required.
- Perfect for Holiday Gatherings : These things are showstoppers on a dessert table. The red and white swirls, the peppermint crunch—they scream “Christmas” without screaming “I spent all day in the kitchen.”
- Crowd-Pleaser for All Ages : Kids love the sweetness and crunch. Adults love the peppermint kick. Even my husband, the official Rice Krispie hater, now asks for these specifically.
- Next-Level Texture : The white chocolate adds a creaminess that balances the marshmallow chew, and the crushed peppermint gives a little snap that keeps every bite interesting. It’s not just sweet—it’s complex sweet.
What makes this recipe stand out from the dozens of similar ones online? It’s the technique. Most recipes just melt everything together and call it done. But I’ve found that adding the white chocolate in two ways—melted into the base and drizzled on top—creates a depth of flavor that makes people say “wow” instead of “oh, more Rice Krispie treats.” Plus, I use a specific ratio of marshmallows to butter that keeps them soft for days instead of turning into bricks by morning. Trust me, I’ve tested this about eight times. My neighbors have been very happy test subjects.
Honestly, this recipe is the kind that makes you close your eyes after the first bite. It’s comfort food reimagined—faster, prettier, but with the same soul-soothing satisfaction of something you’ve loved since childhood. Perfect for impressing guests without stress, or turning a simple Tuesday night into something that feels like a celebration.
What Ingredients You Will Need
This recipe uses simple, mostly pantry-staple ingredients to deliver that perfect holiday flavor. Nothing obscure, nothing that requires a special trip to three different stores. Here’s what you’ll need:
For the Treat Base
- 3 tablespoons unsalted butter (salted works in a pinch, just reduce any added salt)—I use Land O’Lakes because it’s consistent, but any brand works fine
- 1 bag (10 ounces) mini marshmallows (about 4 cups)—the mini ones melt faster and more evenly than the big ones, so stick with mini if you can
- 6 cups Rice Krispies cereal (or any crispy rice cereal)—name brand gives the best crunch, but store brands work too
- 1/4 teaspoon salt (if using unsalted butter)—this balances the sweetness, don’t skip it
- 1/2 cup white chocolate chips (melted into the base)—I prefer Ghirardelli or Guittard for smooth melting, but Nestle Toll House works in a pinch
- 1/2 teaspoon peppermint extract (not mint—peppermint has that cooler, cleaner flavor)—a little goes a long way, so measure carefully
For the Topping
- 1/2 cup white chocolate chips (for drizzling)—same brand as above for consistency
- 1 tablespoon coconut oil or vegetable shortening (helps the chocolate drizzle smoothly)—coconut oil adds a subtle flavor that works with peppermint, but shortening is neutral
- 1/3 cup crushed peppermint candies or candy canes (about 4-5 full-size candy canes)—crush them yourself for the best texture; pre-crushed can be too powdery
Ingredient Tips from My Kitchen
For the peppermint extract, look for pure peppermint extract rather than “peppermint flavoring.” The pure stuff has a brighter, cleaner taste that doesn’t get that artificial cough-drop vibe. I personally recommend Nielsen-Massey or Simply Organic—they’re worth the few extra dollars because one bottle lasts forever.
When it comes to the white chocolate chips, I’ve learned the hard way that not all white chocolate melts equally. Some brands (I’m looking at you, generic store brands) seize up into a grainy mess. If you can find white chocolate baking bars or wafers, they melt more smoothly than chips. But in a pinch, good-quality chips with a little coconut oil work beautifully.
For the crushed peppermint, here’s a pro tip: put the candy canes in a zip-top bag, wrap it in a kitchen towel, and go to town with a rolling pin or heavy skillet. You want a mix of fine powder and small chunks—the powder melts into the chocolate drizzle, and the chunks give you that satisfying crunch. Don’t pulverize everything into dust, or you’ll lose the visual pop.
Substitutions That Work
- Dairy-free : Use vegan butter and dairy-free white chocolate (Enjoy Life makes a good one). The texture will be slightly different but still delicious.
- Gluten-free : Rice Krispies are naturally gluten-free, but check the label—some store brands add malt flavoring that contains gluten. Look for certified gluten-free cereal.
- No peppermint extract : You can crush extra candy canes and stir them into the base, but you’ll need about 1/2 cup crushed to get enough flavor. The texture will be crunchier.
Equipment Needed
You don’t need a fancy kitchen for these treats. Here’s what you’ll need:
- 9×13-inch baking pan —glass or metal both work, but glass gives you cleaner edges. If you only have an 8×8 pan, the treats will be thicker—just increase the setting time by 15 minutes.
- Large pot or Dutch oven —you need room to stir everything without marshmallow flying everywhere. I use my 5-quart Le Creuset, but any heavy-bottomed pot works.
- Silicone spatula —the rubber kind, not the metal one. Trust me, metal will scratch your pan and make cleanup miserable. I’ve learned this the hard way.
- Parchment paper —for lining the pan. This is non-negotiable unless you enjoy chiseling hardened marshmallow off your bakeware.
- Microwave-safe bowl —for melting the drizzle chocolate. A glass measuring cup works perfectly because the spout makes drizzling easier.
- Rolling pin or heavy skillet —for crushing candy canes. A meat mallet also works if that’s what you have.
- Zip-top bag —for containing the candy cane chaos while you crush it.
If you don’t have a 9×13 pan, you can use a 9×9 square pan for thicker treats (just press them down a little less firmly), or even a 10-inch cast iron skillet for a rustic look. I’ve made these in a disposable foil pan for holiday parties, and they turned out perfectly. The key is just making sure you have room to spread everything evenly.
One thing I wish someone had told me early on: spray your spatula with non-stick spray before you start stirring. It makes the whole process so much less frustrating. Same goes for your hands if you’re pressing the mixture into the pan—grease them up first, or the marshmallow will stick to everything it touches.
Preparation Method
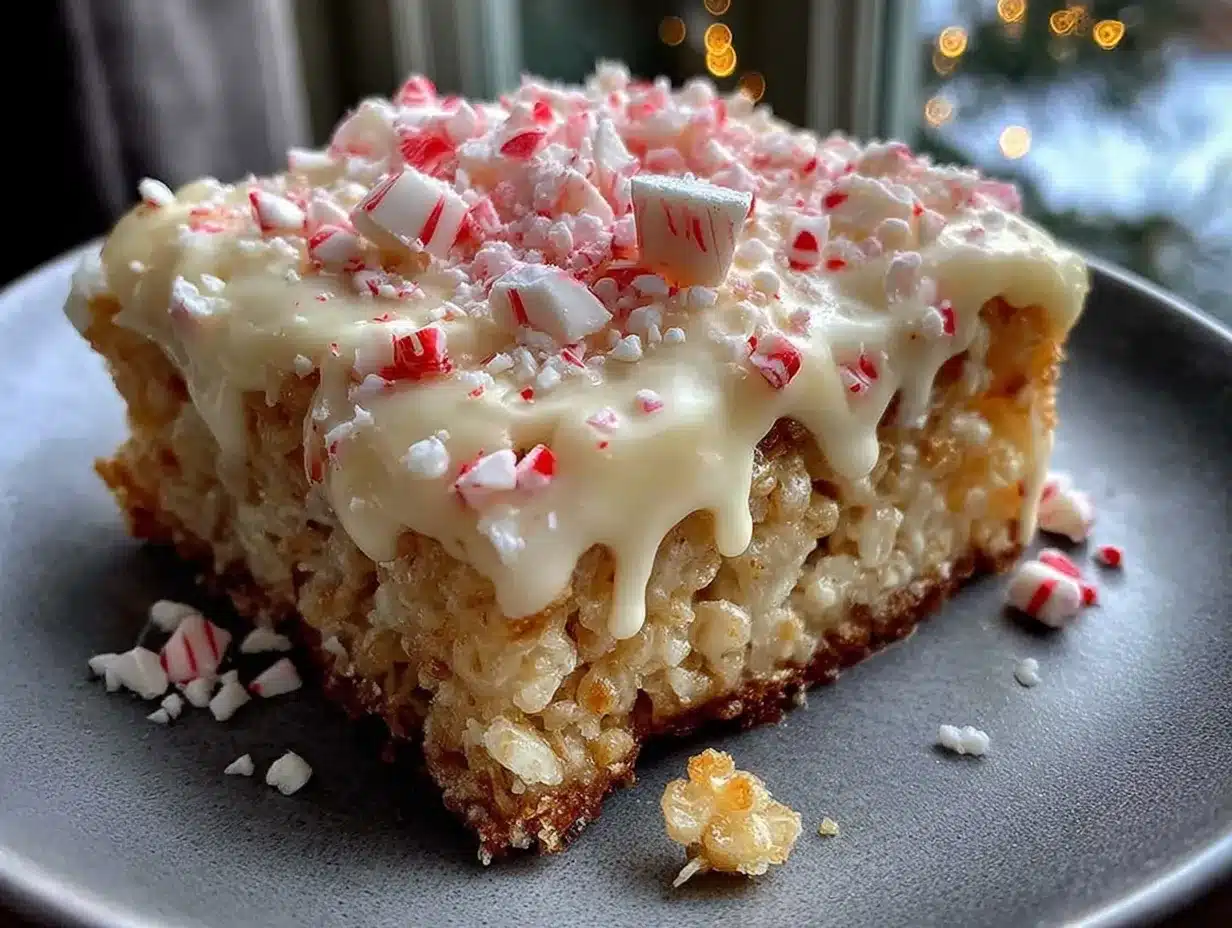
Alright, let’s make these treats. I’ll walk you through every step so you don’t end up with a sticky mess like I did my first time. (Pro tip: don’t answer the phone while you’re stirring melted marshmallows. I learned that one the hard way.)
Step 1: Prepare Your Pan
Line a 9×13-inch baking pan with parchment paper, leaving about 2 inches of overhang on two opposite sides. These overhangs become handles later for lifting the whole block out. Lightly spray the parchment with non-stick cooking spray. Set the pan aside. This takes about 2 minutes and saves you 20 minutes of scrubbing later.
Step 2: Melt the Butter and Marshmallows
In a large pot over medium-low heat, melt the 3 tablespoons of unsalted butter. Once it’s fully melted (you’ll see it start to bubble slightly), add the entire bag of mini marshmallows. Stir constantly with your silicone spatula until the marshmallows are about 75% melted—you should still see some white lumps. This takes about 3-4 minutes. Don’t walk away during this part; marshmallows go from melted to burnt very quickly.
Step 3: Add the Flavorings
Remove the pot from the heat. Immediately stir in the 1/2 cup white chocolate chips, the 1/2 teaspoon peppermint extract, and the 1/4 teaspoon salt (if using unsalted butter). Keep stirring until the white chocolate is fully melted and the mixture is smooth and glossy. This should take about 1 minute. The mixture will look a little thinner than regular Rice Krispie treat mixture—that’s normal. The white chocolate adds creaminess.
Step 4: Add the Cereal
Pour the 6 cups of Rice Krispies cereal into the pot. Fold everything together gently but thoroughly. You want every piece of cereal coated, but you don’t want to crush the cereal into dust. Fold from the bottom up, turning the mixture over onto itself. This takes about 2 minutes of gentle folding. You’ll know it’s ready when you can’t see any dry cereal and the mixture looks evenly speckled with white chocolate.
Step 5: Press Into the Pan
Scrape the mixture into your prepared pan. Spray your hands lightly with non-stick spray (or rub a little butter on them) and press the mixture into an even layer. Don’t press too hard—you want them tender, not compacted like a brick. I press just until the top is flat and even, about 30 seconds of gentle pressing. If the mixture is sticking to your hands, spray them again.
Step 6: Make the Drizzle
In a microwave-safe bowl, combine the remaining 1/2 cup white chocolate chips with 1 tablespoon coconut oil. Microwave in 20-second intervals, stirring between each, until the chocolate is smooth and fully melted. This usually takes 3-4 intervals, about 1 minute total. Be careful not to overheat—white chocolate seizes easily and turns into a grainy mess.
Step 7: Decorate
Using a spoon or a small whisk, drizzle the melted white chocolate over the pressed treats. I like to do zigzag patterns back and forth across the pan. While the chocolate is still wet, sprinkle the crushed peppermint candies evenly over the top. Don’t wait—if the chocolate sets, the peppermint won’t stick and will just roll off.
Step 8: Let Them Set
Let the treats sit at room temperature for about 30-45 minutes, until the drizzle is firm to the touch. If you’re in a hurry (I usually am), pop the pan in the refrigerator for 15-20 minutes. Once set, use the parchment overhangs to lift the whole block out of the pan. Place it on a cutting board and slice into squares with a sharp knife. I get 12 large squares or 24 smaller ones, depending on what I’m serving.
Sensory Cues
When the marshmallow mixture is ready, it should look glossy and stretchy—when you lift the spatula, the mixture should pull into a thin ribbon that slowly settles back into the pot. The cereal mixture should feel warm and pliable when you press it into the pan, not stiff or hard. The finished treats should have a slight give when you press them—they should be chewy, not crunchy like stale cereal.
Cooking Tips & Techniques
I’ve made these treats about a dozen times now, and I’ve made every mistake in the book so you don’t have to. Here’s what I’ve learned:
Don’t Overheat the Marshmallows
This is the number one mistake. If you cook the marshmallows too long or over too high heat, the sugar starts to crystallize, and your treats turn out hard and brittle instead of soft and chewy. Keep the heat on medium-low, stir constantly, and remove the pot from the heat as soon as the marshmallows are mostly melted. The residual heat will finish the job.
Use Room Temperature Ingredients
I know, I know—who plans ahead for Rice Krispie treats? But if your butter is cold, it takes longer to melt, and the marshmallows can scorch while you’re waiting. Same goes for the white chocolate chips—if they’re cold from the fridge, they’ll seize up when you add them to the hot marshmallow mixture. Let everything sit out for 15 minutes before you start.
The Coconut Oil Trick
Adding a little coconut oil to your drizzle chocolate isn’t just for smoothness—it also prevents the chocolate from blooming (those white streaks that happen when chocolate gets too warm or too cold). Plus, it makes the drizzle thinner and easier to control. If you don’t have coconut oil, vegetable shortening works exactly the same way.
Crush Candy Canes the Right Way
I used to crush candy canes with a hammer on my driveway (don’t ask), but I’ve found a better method. Unwrap the candy canes, put them in a zip-top bag, and use a rolling pin to gently crush them. You want a mix of fine powder and small chunks. If you crush them too fine, they’ll dissolve into the chocolate and you’ll lose that satisfying crunch. If you leave them too big, they’ll be hard to bite through.
Timing Your Work
Here’s my multitasking strategy: while the marshmallows are melting, I crush the candy canes and line the pan. While the treats are setting, I make the drizzle. This way, everything is ready when I need it, and I’m not scrambling at the last minute with sticky hands.
What to Do If Things Go Wrong
If your marshmallow mixture seizes up (gets hard and grainy), add a tablespoon of water and stir over low heat. This can sometimes save it. If your white chocolate drizzle seizes, add another teaspoon of coconut oil and stir gently—don’t microwave it again, or it’ll get worse. And if you press the treats too hard and they come out like hockey pucks, crumble them up and use them as an ice cream topping. No waste, and honestly, it’s delicious.
Variations & Adaptations
One of the best things about this recipe is how easy it is to change up. Here are some variations I’ve tried and loved:
Dark Chocolate Peppermint
Swap the white chocolate for dark chocolate chips (60-70% cacao). The bitterness of the dark chocolate balances the sweetness of the marshmallows beautifully. Use the same amount—1/2 cup in the base and 1/2 cup for the drizzle. This version feels a little more grown-up, if that makes sense.
Mint Chocolate Chip
Add 1/2 cup mini chocolate chips to the mixture along with the cereal. Use mint extract instead of peppermint for a slightly different flavor profile. The chocolate chips stay whole and give you little pockets of chocolate in every bite. My kids go crazy for this version.
Vegan Version
Use vegan butter (I like Miyoko’s or Earth Balance), vegan marshmallows (Dandies are the best), and dairy-free white chocolate. The texture is slightly less chewy, but the flavor is still spot-on. I’ve brought these to parties where no one knew they were vegan until I told them.
Gluten-Free Version
As I mentioned earlier, most Rice Krispies are gluten-free, but double-check the label. You can also use any crispy rice cereal that’s certified gluten-free. Everything else in the recipe is naturally gluten-free, so this is an easy swap.
Holiday Color Variations
For Valentine’s Day, use pink candy melts instead of white chocolate and add freeze-dried raspberry powder. For Easter, use pastel-colored candy melts and sprinkle with mini pastel eggs. For Christmas, you can even add a few drops of red food coloring to the marshmallow mixture for a festive pink tint. The possibilities are endless.
My Favorite Personal Variation
I once made these with crushed gingerbread cookies folded into the mixture along with the cereal. The spices from the gingerbread (cinnamon, ginger, cloves) paired amazingly with the peppermint. I called them “Gingerbread Peppermint Treats,” and they were gone in twenty minutes at a holiday party. If you try one variation, make it this one.
Serving & Storage Suggestions
These treats are best served at room temperature—the texture is softest and the flavors are most pronounced. If you’ve refrigerated them, let them sit out for about 15 minutes before serving. The white chocolate drizzle will be slightly softer at room temperature, which makes it easier to bite through.
Presentation Tips for Hosting
When I’m bringing these to a party, I like to arrange them on a white platter with a few extra crushed candy canes sprinkled around the edges. Sometimes I’ll add a sprig of fresh mint or a few sugared cranberries for color. If you’re stacking them on a dessert table, put parchment paper between the layers so the drizzle doesn’t stick together.
What to Serve Alongside
These treats pair beautifully with hot cocoa, peppermint mochas, or even a simple cup of black coffee (the bitterness balances the sweetness). If you’re serving them at a holiday brunch, they go well with fluffy pancakes or a creamy eggnog French toast for a full festive spread. For a dessert table, I like to serve them alongside classic sugar cookies and fudgy brownies for variety.
Storage Instructions
Store these treats in an airtight container at room temperature for up to 5 days. Do not refrigerate them—the cold makes the marshmallow base hard and the cereal loses its crunch. If you live in a humid climate, add a piece of bread to the container (not touching the treats) to absorb excess moisture. Change the bread every day.
Freezer Instructions
These freeze beautifully. Wrap individual squares tightly in plastic wrap, then place them in a freezer-safe bag or container. They’ll keep for up to 3 months. To thaw, let them sit at room temperature for about 30 minutes. The texture will be slightly softer than fresh, but the flavor is still excellent. I often make a double batch and freeze half for last-minute holiday guests.
How Flavors Develop Over Time
Here’s something interesting: these treats actually taste better on day two. The peppermint flavor mellows and melds with the white chocolate, and the texture becomes more uniform. If you can resist eating them all on day one, you’ll be rewarded on day two. Not that I’ve ever managed to wait that long.
Nutritional Information & Benefits
Let’s be honest—these are a treat, not a health food. But here’s the nutritional breakdown for one serving (based on 12 servings per batch):
| Nutrient | Amount Per Serving |
|---|---|
| Calories | 285 |
| Total Fat | 11g |
| Saturated Fat | 7g |
| Cholesterol | 15mg |
| Sodium | 185mg |
| Total Carbohydrates | 45g |
| Dietary Fiber | 0g |
| Sugars | 30g |
| Protein | 2g |
Health Benefits of Key Ingredients
Despite being a sweet treat, there are a few redeeming qualities. The butter provides a small amount of vitamin A, and the white chocolate contains calcium from the milk solids. The peppermint—believe it or not—has been shown to aid digestion and can help soothe an upset stomach. So if you eat one of these after a big holiday meal, you’re basically doing your digestive system a favor. That’s my story, and I’m sticking to it.
Dietary Considerations
These treats contain dairy (butter, white chocolate) and are not suitable for vegans unless you use the substitutions listed above. They are naturally gluten-free if you use certified gluten-free cereal. They are not low-carb or keto-friendly due to the marshmallows and cereal. If you’re watching your sugar intake, this is definitely a “sometimes” treat.
Potential Allergens
This recipe contains dairy. White chocolate does not contain cocoa solids, so it’s safe for people with chocolate allergies, but it does contain milk solids. The cereal is typically made from rice, which is gluten-free, but check labels for cross-contamination warnings if you have celiac disease.
FAQs
Can I use regular-sized marshmallows instead of mini marshmallows?
Yes, but you’ll need about 4 cups of regular marshmallows (about 40 large marshmallows). They take slightly longer to melt, so be patient. I prefer mini marshmallows because they melt faster and more evenly, but regular ones work in a pinch.
Why did my white chocolate drizzle turn out grainy?
White chocolate is finicky—it seizes when exposed to too much heat or even a drop of water. To fix it, add a teaspoon of coconut oil or shortening and stir gently over low heat. If it’s already too far gone, you can save it by adding a tablespoon of heavy cream and whisking until smooth. Next time, melt it in shorter intervals and stir more frequently.
Can I make these treats ahead of time for a party?
Absolutely. I actually prefer making them a day ahead because the flavors meld together overnight. Store them in an airtight container at room temperature, and they’ll be perfect for up to 5 days. Just don’t refrigerate them, or the texture will suffer.
How do I crush candy canes without making a huge mess?
The zip-top bag method is your best friend. Put the candy canes in a sturdy bag, wrap it in a kitchen towel (this muffles the sound and contains any leaks), and go to town with a rolling pin. If you don’t have a rolling pin, a heavy skillet or even a wine bottle works. Just be careful not to puncture the bag.
Can I freeze these treats?
Yes, and they freeze surprisingly well. Wrap individual squares in plastic wrap, then place them in a freezer bag. They’ll keep for up to 3 months. To thaw, let them sit at room temperature for about 30 minutes. I’ve even eaten them slightly frozen on a hot day, and they’re delicious that way too.
Conclusion
These Easy Peppermint White Chocolate Rice Krispie Treats are the kind of recipe that becomes a holiday tradition. They’re quick enough to make on a busy December night, pretty enough to bring to any party, and delicious enough to convert even the most stubborn Rice Krispie skeptic—trust me, I have the proof living in my house. My husband now asks for these specifically every Christmas, and I’ve caught him sneaking them from the kitchen counter more times than I can count.
What I love most about this recipe is how adaptable it is. You can make it your own—swap the chocolate, change the extract, add different toppings. The base recipe is forgiving and always turns out well. Don’t be afraid to experiment and find your perfect version. Maybe you’ll add crushed Oreos instead of peppermint, or use dark chocolate for a more sophisticated twist. The possibilities are endless.
I’d love to hear how these turn out for you. Did you try a variation? Did your family love them? Did you, like my husband, discover that you actually do like Rice Krispie treats after all? Drop a comment below and let me know. And if you’re looking for more holiday dessert inspiration, don’t miss my no-bake chocolate peanut butter bars or my cranberry orange shortbread cookies. Happy baking, friends—and remember, the best recipes are the ones you share with the people you love.
Pin This Recipe!

Best Easy Peppermint White Chocolate Rice Krispie Treats

These festive Rice Krispie treats combine creamy white chocolate and cool peppermint for a quick, no-fuss holiday dessert that converts even the biggest skeptics. Ready in 15 minutes, they’re perfect for parties and gift-giving.
- Prep Time: 15 minutes
- Cook Time: 5 minutes
- Total Time: 20 minutes (plus 30-45 minutes setting time)
- Yield: 12 servings 1x
- Category: Dessert
- Cuisine: American
Ingredients
- 3 tablespoons unsalted butter
- 1 bag (10 ounces) mini marshmallows (about 4 cups)
- 6 cups Rice Krispies cereal
- 1/4 teaspoon salt (if using unsalted butter)
- 1/2 cup white chocolate chips (melted into the base)
- 1/2 teaspoon peppermint extract
- 1/2 cup white chocolate chips (for drizzling)
- 1 tablespoon coconut oil or vegetable shortening
- 1/3 cup crushed peppermint candies or candy canes (about 4–5 full-size candy canes)
Instructions
- Line a 9×13-inch baking pan with parchment paper, leaving about 2 inches of overhang on two opposite sides. Lightly spray the parchment with non-stick cooking spray. Set aside.
- In a large pot over medium-low heat, melt the 3 tablespoons of unsalted butter. Once fully melted, add the entire bag of mini marshmallows. Stir constantly with a silicone spatula until the marshmallows are about 75% melted (still some white lumps), about 3-4 minutes.
- Remove the pot from the heat. Immediately stir in the 1/2 cup white chocolate chips, 1/2 teaspoon peppermint extract, and 1/4 teaspoon salt (if using unsalted butter). Stir until the white chocolate is fully melted and the mixture is smooth and glossy, about 1 minute.
- Pour the 6 cups of Rice Krispies cereal into the pot. Fold gently but thoroughly until every piece of cereal is coated, about 2 minutes.
- Scrape the mixture into the prepared pan. Spray your hands lightly with non-stick spray and press the mixture into an even layer. Press gently—do not compact.
- In a microwave-safe bowl, combine the remaining 1/2 cup white chocolate chips with 1 tablespoon coconut oil. Microwave in 20-second intervals, stirring between each, until smooth and fully melted (about 1 minute total).
- Using a spoon or small whisk, drizzle the melted white chocolate over the pressed treats in a zigzag pattern. While the chocolate is still wet, sprinkle the crushed peppermint candies evenly over the top.
- Let the treats sit at room temperature for 30-45 minutes until the drizzle is firm. For faster setting, refrigerate for 15-20 minutes. Once set, lift the block out using the parchment overhangs, place on a cutting board, and slice into squares.
Notes
For best results, use pure peppermint extract (not mint extract) and good-quality white chocolate chips. Crush candy canes in a zip-top bag with a rolling pin for a mix of fine powder and small chunks. Treats taste even better on day two. Store in an airtight container at room temperature for up to 5 days. Do not refrigerate.
Nutrition
- Serving Size: 1 square
- Calories: 285
- Sugar: 30
- Sodium: 185
- Fat: 11
- Saturated Fat: 7
- Carbohydrates: 45
- Protein: 2
Keywords: Rice Krispie treats, peppermint, white chocolate, Christmas, holiday, no-bake, easy dessert


