My niece Lily showed up at my door, face painted like a cat, already hyped on candy corn, and announced she wanted to make “something witchy” for her school Halloween party. The only problem? I had completely forgotten about the request. My fridge held butter, an egg, and some cream cheese that was about to turn. The pantry had flour and sugar, but no spooky cake mix, no pre-made frosting, no time for a grocery run. I stared at my ingredients, and Lily stared at me with those expectant eight-year-old eyes. That’s when I remembered a trick from an old baking magazine—cut-out cookies that look like they’re melting. We could make a witch, but a witch who’s having a very bad (or very good, depending on how you see it) day. The kind of witch who’s slowly puddling into a sugary puddle on the baking sheet. It was ridiculous, it was last-minute, and honestly? It was the most fun I’ve ever had with a batch of Easy Melting Witch Halloween Sugar Cookies. The kitchen smelled like vanilla and butter, Lily giggled every time a witch face slumped to the side, and we ended up with cookies that looked like they belonged in a Tim Burton movie. They were imperfect, lopsided, and absolutely perfect.
These cookies have become our official Halloween tradition ever since. They’re the kind of recipe that doesn’t take itself too seriously—and that’s exactly why they work. You get the buttery, tender crumb of a classic sugar cookie, but with a playful, spooky twist that makes everyone smile. The witch’s hat droops, her face smushes, and every single cookie comes out looking slightly different. It’s controlled chaos on a baking sheet, and it’s impossible to mess up. That’s the beauty of this recipe—it embraces the imperfections.
Why You’ll Love This Recipe
Let me tell you why these cookies have earned a permanent spot in my Halloween rotation. I’ve tested this recipe at least six times (Lily is a very demanding taste-tester), and each batch confirmed what I suspected from that first frantic afternoon.
- No Special Equipment Needed: You don’t need a witch-shaped cookie cutter or fancy piping tips. A simple round cutter, a knife, and some melted chocolate do all the work. I’ve made these with kids as young as four, and they can handle the assembly.
- Buttery, Not Too Sweet: The base cookie is my go-to sugar cookie recipe—crisp edges, soft centers, and a flavor that’s rich but not cloying. It holds its shape during baking (well, sort of—that’s the point) and pairs beautifully with the dark chocolate witch hat.
- Perfect for Halloween Parties: I brought a batch to my neighbor’s annual Halloween potluck last year, and they disappeared faster than the store-bought cupcakes. Kids love the goofy faces, and adults appreciate the clever concept. They’re a conversation starter on any dessert table.
- Endless Customization: Once you master the melting witch technique, you can adapt it for other holidays. I’ve made melting snowmen for Christmas and melting ghosts for, well, any time. The template is the same—just change the face and hat color.
- Kid-Approved and Adult-Adored: My friend Sarah, who claims she “can’t bake,” made these for her daughter’s Halloween sleepover and texted me at 10 PM: “They actually worked. I’m a witch cookie genius.” That’s the energy this recipe brings.
What really sets these apart is the texture contrast. The cookie itself is soft and tender, while the melted chocolate hat adds a satisfying snap. The candy eyes give a little chew, and the royal icing smile (if you’re fancy) or the simple piped chocolate grin adds just enough sweetness. Every bite has something different happening, and honestly, that’s what a Halloween cookie should do—surprise you.
What Ingredients You Will Need
This recipe uses simple, pantry-friendly ingredients to create something truly magical. Here’s what you’ll need and why each one matters:
For the Sugar Cookie Base
- 2 ¾ cups (345g) all-purpose flour – I use King Arthur Flour for consistent results. Spoon and level your flour—don’t scoop directly from the bag, or your cookies will be dense. Too much flour makes them tough, and nobody wants a tough witch.
- 1 cup (226g) unsalted butter, softened – Butter gives these cookies their rich flavor and tender crumb. I prefer unsalted so I can control the salt level. Leave it on the counter for about an hour before starting—it should be soft enough to leave a dent when you press it.
- 1 cup (200g) granulated sugar – Standard white sugar. Don’t substitute brown sugar here; it would make the cookies too soft and they wouldn’t hold their shape during the melting process.
- 1 large egg, room temperature – Cold egg will seize your butter mixture. If you forgot to take it out early, place the egg in a bowl of warm water for 5 minutes.
- 1 teaspoon vanilla extract – Pure vanilla, not imitation. It makes a noticeable difference in flavor depth.
- ½ teaspoon baking powder – This gives the cookies a slight lift without making them puff up too much. We want them to spread, not rise.
- ½ teaspoon salt – Balances the sweetness and enhances the butter flavor. I use fine sea salt.
For the Witch Decorations

- 1 cup (170g) dark chocolate chips or melting wafers – Dark chocolate creates the best witch hat color. I recommend Ghirardelli melting wafers for smooth, easy dipping. Regular chocolate chips work too, but you’ll need to add a teaspoon of coconut oil to thin them out.
- 48 candy eyeballs – You can find these at any craft store or grocery store in the baking aisle. I like the ones with black pupils—they look more expressive.
- Black decorating icing or melted chocolate for faces – I use a tube of black decorating icing for simplicity, but you can also melt more dark chocolate and pipe it. For smiles, I sometimes use orange or green icing for a fun twist.
- Optional: Purple or green sanding sugar – Sprinkle this on the witch’s face before the chocolate sets for a warty, witchy texture. My niece insists on this step.
Ingredient Substitutions
- Gluten-free option: Use a 1:1 gluten-free flour blend that contains xanthan gum. I’ve tested this with Bob’s Red Mill 1:1 and the cookies spread slightly more but still taste fantastic.
- Dairy-free option: Substitute the butter with a high-quality vegan butter stick (not tub margarine). I like Miyoko’s or Country Crock Plant Butter. The texture will be slightly softer, so chill the dough an extra 30 minutes.
- Egg-free option: Use a flax egg (1 tablespoon ground flaxseed + 3 tablespoons water, let sit for 5 minutes). The cookies will be a bit more fragile, so handle them gently.
Equipment Needed
You don’t need a professional bakery setup for these cookies. Here’s what I use and what you can substitute if you’re improvising:
- Electric mixer – A stand mixer with the paddle attachment is ideal, but a hand mixer works perfectly too. I’ve even made the dough by hand with a wooden spoon—it’s a good arm workout.
- Rolling pin – I have a French rolling pin (the tapered kind), but any rolling pin works. If you don’t have one, use a wine bottle. Just chill the dough extra if you go that route.
- 2-inch round cookie cutter – This is the perfect size for witch faces. A drinking glass works if you don’t have a cutter—just make sure the rim is thin.
- Baking sheets – I use light-colored aluminum sheets for even baking. Dark sheets can cause the bottoms to brown too quickly.
- Parchment paper or silicone baking mats – Essential for easy cleanup and preventing spread. Silicone mats are my preference because they’re reusable and provide consistent heat distribution.
- Small knife or pizza cutter – For cutting the witch hats from the chocolate. A sharp paring knife works best.
- Piping bag or small zip-top bag – For the melted chocolate. A zip-top bag with a tiny corner snipped off is my go-to—no fancy equipment needed.
- Cooling rack – Wire racks allow air to circulate so your cookies cool evenly. If you don’t have one, a clean cutting board works in a pinch.
Budget-Friendly Tip: Skip the specialty cookie cutters and piping tips. A round cutter (or glass) and a zip-top bag are all you truly need. I’ve made these cookies at my sister’s house with her dollar-store supplies and they turned out just as cute.
Preparation Method
This process has a few steps, but I’ve broken it down so it feels manageable. Take your time with the chilling—it’s the secret to cookies that spread exactly the right amount.
Step 1: Make the Sugar Cookie Dough (10 minutes)
In a medium bowl, whisk together the flour, baking powder, and salt. Set aside. In a large bowl (or the bowl of your stand mixer), beat the softened butter and sugar together on medium speed until light and fluffy—about 3 minutes. Scrape down the sides of the bowl. Add the egg and vanilla extract, then beat until combined. The mixture should look smooth and creamy, not greasy.
Gradually add the dry ingredients to the wet ingredients, mixing on low speed until just combined. Stop as soon as you don’t see any more flour streaks—overmixing develops gluten and makes tough cookies. The dough will be soft but not sticky. If it feels too sticky to handle, add an extra tablespoon of flour.
Step 2: Chill the Dough (2 hours minimum)
Divide the dough in half, flatten each half into a disk about 1-inch thick, and wrap tightly in plastic wrap. Refrigerate for at least 2 hours, or up to 3 days. This step is non-negotiable—chilled dough spreads less and holds its shape better. I’ve rushed this step before, and my witches melted into unrecognizable blobs. Learn from my mistakes.
Step 3: Cut and Bake the Cookies (15 minutes per batch)
Preheat your oven to 350°F (175°C). Line two baking sheets with parchment paper or silicone mats.
Remove one disk of dough from the fridge. On a lightly floured surface, roll the dough to ¼-inch thickness. Use your round cutter to cut out circles, re-rolling the scraps once. Place the circles on the prepared baking sheets, leaving about 2 inches between each—they will spread.
Bake for 8-10 minutes, rotating the pans halfway through. The edges should be just barely golden, and the centers should look set but not browned. Let the cookies cool on the baking sheet for 5 minutes, then transfer to a wire rack to cool completely. Repeat with the remaining dough.
Step 4: Create the Witch Hats (20 minutes)
While the cookies cool, make the witch hats. Melt the dark chocolate chips in a microwave-safe bowl in 30-second intervals, stirring between each, until smooth. If using chocolate chips, add 1 teaspoon of coconut oil to thin the chocolate for easier dipping.
Line a small baking sheet with parchment paper. Using a small spoon, drop dollops of melted chocolate onto the parchment—each dollop should be about the size of a quarter. Immediately use the back of the spoon to spread each dollop into a rough triangle shape (pointy at one end, wide at the base). You’re making a witch hat silhouette. Don’t worry about perfection—the charm is in the irregularity.
Place the baking sheet with the chocolate hats in the fridge for 10 minutes to set completely. Once firm, use a small knife to gently lift each hat off the parchment.
Step 5: Assemble the Melting Witches (15 minutes)
Now for the fun part. Take a cooled cookie and place it on your work surface. Using a small amount of melted chocolate (or black decorating icing) as “glue,” attach a chocolate witch hat to the top of the cookie. But here’s the trick—don’t attach it straight. Tilt it slightly to one side, as if the witch is melting and her hat is sliding off. Press gently to secure.
Next, attach the candy eyeballs using a tiny dab of chocolate. Place them slightly unevenly for a goofy, disoriented look. One eye higher than the other? Perfect. That’s a witch who’s been through something.
Finally, pipe a wobbly smile using the black icing or melted chocolate. Make it crooked. Make it lopsided. The more imperfect, the better. If you’re using sanding sugar, sprinkle it on the witch’s face now, before the chocolate sets.
Step 6: Let Everything Set (30 minutes)
Place the assembled cookies on a clean baking sheet and refrigerate for 30 minutes to allow all the chocolate to set completely. This ensures the hats stay attached when you package or serve them.
I learned this the hard way—I once served these at a party and the hats started sliding off onto people’s fingers. Still delicious, but less visually impressive.
Cooking Tips & Techniques
I’ve made these cookies at least a dozen times, and I’ve collected some hard-won wisdom along the way. Here’s what I wish someone had told me before my first batch.
Chill between batches: If you’re rolling out the second disk of dough and it feels soft, pop it back in the fridge for 15 minutes. Warm dough sticks to the rolling pin and spreads too much during baking. I keep a timer on my phone for this exact reason.
Don’t overbake: These cookies continue to cook on the hot baking sheet after you pull them from the oven. If they look perfectly golden in the oven, they’ll be overdone by the time they cool. Pull them when the edges are just barely golden and the centers look slightly underdone. Trust me on this.
Work in an assembly line: When decorating, melt all your chocolate at once, prepare all your candy eyes, and have your icing tubes ready. Then assemble cookie by cookie. This saves time and keeps your chocolate from hardening mid-project.
My biggest failure: I once tried to make these with store-bought sugar cookie dough to save time. The cookies spread into flat, shapeless discs that looked more like melting ghosts than melting witches. The homemade dough is worth the extra effort—it holds its shape better and tastes infinitely better.
Temperature matters: If your kitchen is warm (above 75°F), the chocolate hats might not set properly. Work in a cool room or pop the hats in the fridge between steps. I’ve been known to work on my kitchen counter with the window open in October just to keep things cool.
Double the batch: These cookies freeze beautifully (see storage notes below), so I always make a double batch. One for the party, one for the freezer for those random Halloween cravings in November.
Variations & Adaptations
Once you’ve mastered the basic melting witch, the possibilities are endless. Here are some variations I’ve tested and loved:
Ghostly Melting Spirits
Skip the witch hat and use white chocolate to make ghost shapes instead. Pipe a simple ghost silhouette onto parchment (a rounded top with a wavy bottom), let it set, and attach it to the cookie. Use black icing for eyes and a small “o” mouth. These are perfect for a non-witchy Halloween party.
Monster Mash Melting Faces
Use green candy melts for the hats and add multiple eyes (three or four) for a monster look. Pipe jagged teeth instead of a smile. My nephew Max requested these and they were hilariously creepy. I used green melting wafers from Wilton—they’re available at most craft stores.
Vegan-Friendly Version
As mentioned, use vegan butter and a flax egg. I’ve also used coconut oil in place of butter (use ¾ cup solid coconut oil), but the cookies are slightly more crumbly. The vegan version works best if you chill the dough for at least 3 hours. The taste is still fantastic—my vegan friend Rachel couldn’t tell the difference.
Spiced Pumpkin Witch
Add 1 teaspoon pumpkin pie spice and ¼ cup pumpkin puree to the dough (reduce the butter by 2 tablespoons to compensate). The cookies will be softer and more cake-like, but the pumpkin flavor pairs beautifully with the dark chocolate hats. I made these for a pumpkin carving party and they were a hit.
Mini Melting Witches
Use a 1-inch round cutter and mini chocolate chips for the eyes. These are perfect for Halloween party favors or lunchbox surprises. Reduce the baking time to 6-7 minutes. They’re bite-sized and adorable.
Serving & Storage Suggestions
These cookies are best enjoyed at room temperature, when the cookie is soft and the chocolate hat is snappy. Serve them on a Halloween-themed platter or arrange them on a stick for a witch-themed cake pop alternative.
Complementary Pairings: These cookies pair beautifully with a warm cup of creamy pumpkin cold foam iced latte for a cozy Halloween afternoon treat. For a more indulgent spread, serve alongside black velvet Halloween cupcakes for a truly spooky dessert table.
Storage Instructions: Store assembled cookies in an airtight container at room temperature for up to 5 days. Layer them between sheets of parchment paper to prevent the hats from sticking. Do not refrigerate assembled cookies long-term—the condensation can make the chocolate bloom (turn white and streaky).
Freezer Instructions: You can freeze the undecorated baked cookies for up to 3 months. Wrap them tightly in plastic wrap, then place in a freezer-safe bag. When ready to decorate, thaw at room temperature for 30 minutes, then proceed with the chocolate hats and assembly. I always keep a batch of undecorated cookies in my freezer for last-minute Halloween emergencies.
Reheating Note: These cookies don’t need reheating, but if you want a slightly warm cookie with a melty hat, microwave for 10 seconds. The chocolate will soften but won’t melt completely. It’s a different experience—more gooey—but equally delicious.
Flavor Development: Interestingly, these cookies taste even better on day two. The flavors meld together, and the cookie softens slightly. If you can resist eating them all immediately, you’ll be rewarded.
Nutritional Information & Benefits
Let’s be honest—these are Halloween cookies, not health food. But here’s what you should know:
Estimated Nutritional Values (per cookie, based on 24 cookies):
- Calories: 185
- Fat: 9g (5g saturated)
- Carbohydrates: 24g (12g sugar)
- Protein: 2g
- Fiber: 1g
- Sodium: 85mg
Health Highlights: Dark chocolate contains antioxidants and flavonoids that may support heart health. The butter provides vitamin A, and the egg contributes protein. But honestly? The biggest benefit here is the joy these cookies bring. Baking with family, sharing with friends, and creating something silly and fun—that’s the real nutritional value.
Dietary Considerations: These cookies contain gluten, dairy, and eggs. For allergen-friendly versions, see the substitution notes in the ingredient section. I’ve made a gluten-free batch for my friend’s celiac daughter, and she said they were “the best Halloween cookies ever.” High praise from a nine-year-old.
Portion Control Tip: These cookies are rich, so one or two is usually satisfying. I like to serve them alongside fruit or a light snack to balance the indulgence.
Conclusion
These Easy Melting Witch Halloween Sugar Cookies are more than just a recipe—they’re a memory in the making. From that chaotic afternoon with my niece to every Halloween party since, they’ve brought laughter, creativity, and a little bit of controlled chaos to our celebrations. The best part? They’re forgiving. If a hat slides too far, it’s “character.” If a face looks wonky, it’s “charm.” There’s no wrong way to make these cookies, and that’s exactly what makes them so special.
I’d love to see your melting witches! Tag me in your photos, leave a comment below with your variations, or share your favorite Halloween baking memory. Did your kids design a particularly hilarious face? Did you try the pumpkin spice version? I read every comment, and your stories make my day. Seriously—don’t be shy.
So preheat that oven, grab your butter, and get ready to make some cookies that are equal parts spooky and silly. Happy Halloween, friends. May your witches melt beautifully and your candy bowl stay full.
Frequently Asked Questions
Can I make these cookies ahead of time for a party?
Absolutely! You can bake the cookies up to 3 days in advance and store them undecorated in an airtight container. Decorate them the day of your party for the freshest look—the chocolate hats are most impressive when they’re shiny and freshly set.
My cookie dough is too sticky. What did I do wrong?
This usually happens if your butter was too soft or if you didn’t measure your flour correctly. Don’t panic—just chill the dough for an extra 30 minutes. If it’s still sticky after chilling, dust your work surface and rolling pin generously with flour. The dough should become manageable.
Can I use white chocolate instead of dark for the hats?
Yes, but white chocolate is more finicky. It can seize (become grainy) if overheated. Use high-quality white chocolate or melting wafers, and heat it in 15-second intervals, stirring thoroughly between each. White chocolate witches look like snow witches—perfect for a winter-themed twist.
How do I prevent the cookies from spreading too much?
Chill the dough thoroughly (2 hours minimum), use room temperature ingredients, and don’t overmix the dough. Also, make sure your baking sheets are cool before placing the next batch of cookie dough on them. Hot pans cause immediate spreading.
My chocolate hats keep breaking when I try to lift them off the parchment. Help!
This happens when the chocolate is too thin or hasn’t set long enough. Make sure your chocolate hats are completely firm—refrigerate for at least 15 minutes. If they’re still breaking, your chocolate might be too thin; add a bit more chocolate to thicken it next time. You can also use silicone molds for perfectly shaped hats (I found a witch hat mold at a craft store for $5).
Pin This Recipe!
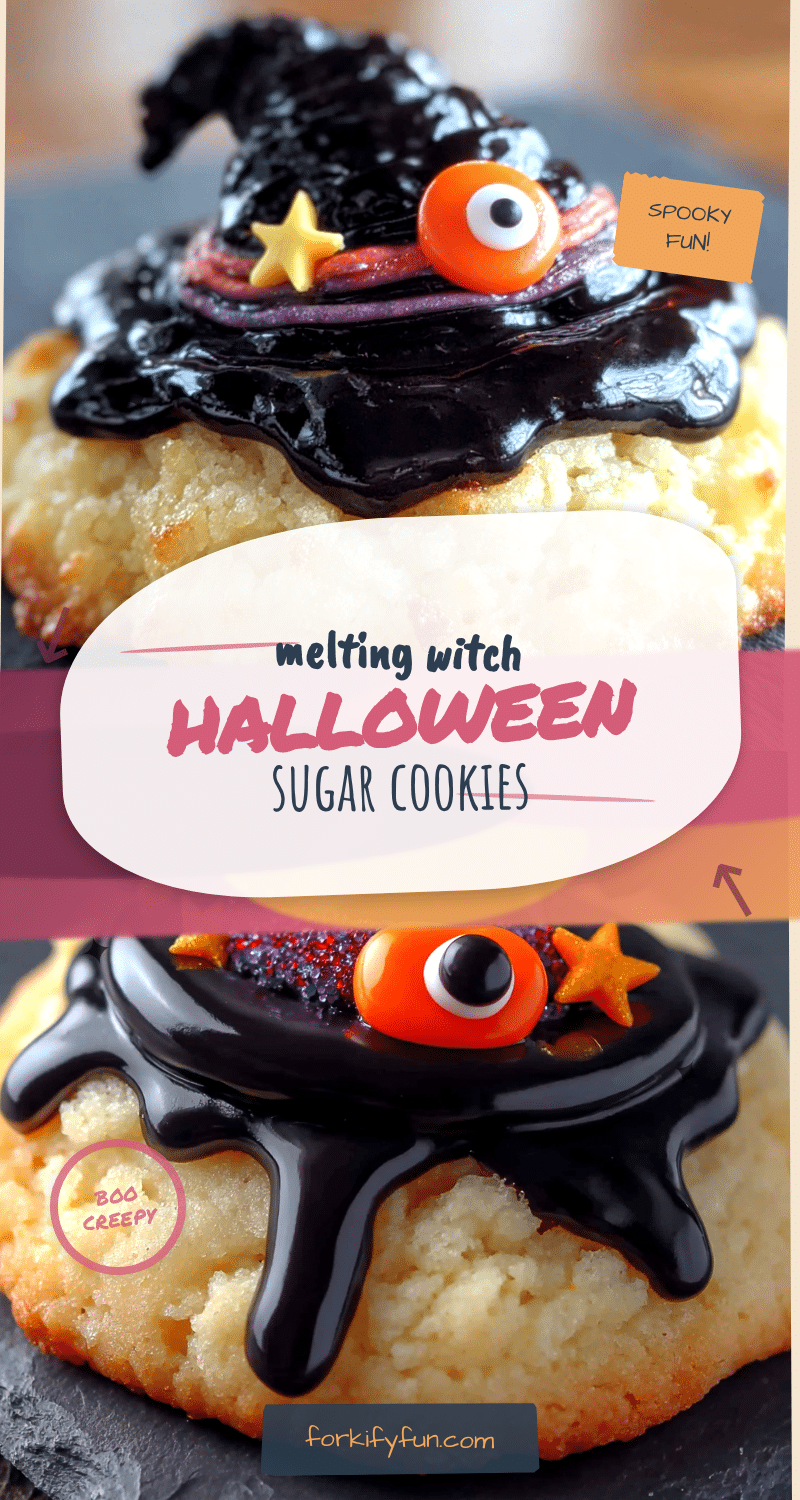
Best Easy Melting Witch Halloween Sugar Cookies

These buttery sugar cookies are topped with a melting chocolate witch hat and googly eyes for a fun, spooky Halloween treat that’s perfect for parties and baking with kids.
- Prep Time: 15 minutes
- Cook Time: 10 minutes
- Total Time: 2 hours 55 minutes
- Yield: 24 cookies 1x
- Category: Dessert
- Cuisine: American
Ingredients
- 2 ¾ cups (345g) all-purpose flour
- 1 cup (226g) unsalted butter, softened
- 1 cup (200g) granulated sugar
- 1 large egg, room temperature
- 1 teaspoon vanilla extract
- ½ teaspoon baking powder
- ½ teaspoon salt
- 1 cup (170g) dark chocolate chips or melting wafers
- 48 candy eyeballs
- Black decorating icing or melted chocolate for faces
- Optional: Purple or green sanding sugar
Instructions
- In a medium bowl, whisk together flour, baking powder, and salt. Set aside.
- In a large bowl, beat softened butter and sugar on medium speed until light and fluffy, about 3 minutes. Add egg and vanilla, beat until combined.
- Gradually add dry ingredients to wet, mixing on low until just combined. Do not overmix.
- Divide dough in half, flatten into disks, wrap in plastic, and refrigerate for at least 2 hours.
- Preheat oven to 350°F (175°C). Line baking sheets with parchment paper.
- On a lightly floured surface, roll dough to ¼-inch thickness. Cut into circles with a 2-inch round cutter.
- Place circles 2 inches apart on prepared sheets. Bake 8-10 minutes, rotating halfway. Cool on sheet 5 minutes, then transfer to wire rack.
- Melt dark chocolate in 30-second intervals. Drop dollops onto parchment, spread into rough triangle shapes for witch hats. Refrigerate 10 minutes to set.
- Using melted chocolate as glue, attach a hat to each cookie, tilting it slightly. Add candy eyeballs with tiny dabs of chocolate.
- Pipe a wobbly smile with black icing or melted chocolate. Sprinkle with sanding sugar if desired.
- Refrigerate assembled cookies 30 minutes to set chocolate completely.
Notes
Chill dough thoroughly for best results. Don’t overbake; edges should be just golden. Work in an assembly line when decorating. Cookies taste even better on day two.
Nutrition
- Serving Size: 1 cookie
- Calories: 185
- Sugar: 12
- Sodium: 85
- Fat: 9
- Saturated Fat: 5
- Carbohydrates: 24
- Fiber: 1
- Protein: 2
Keywords: Halloween cookies, sugar cookies, witch cookies, melting witch, easy Halloween recipe, kid-friendly baking


