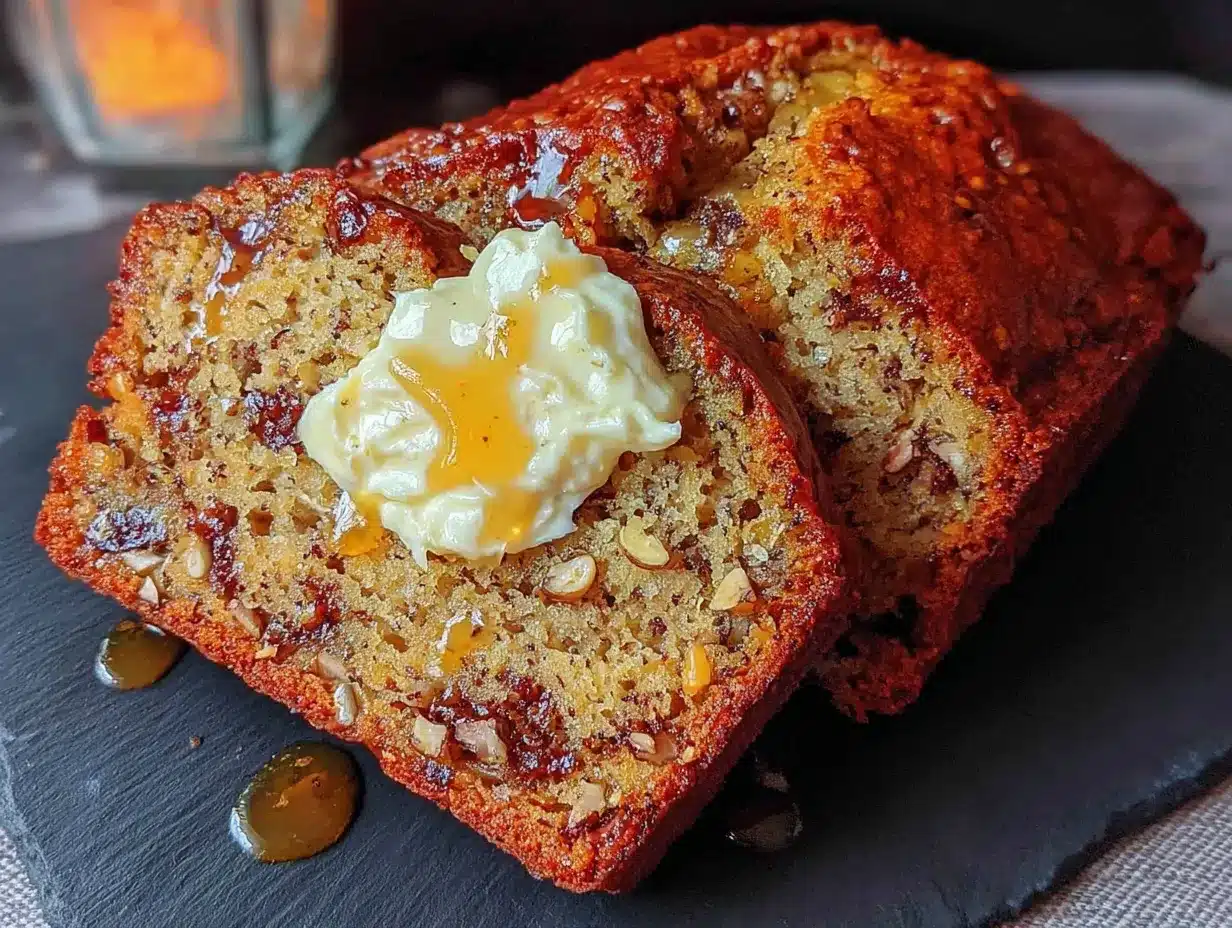
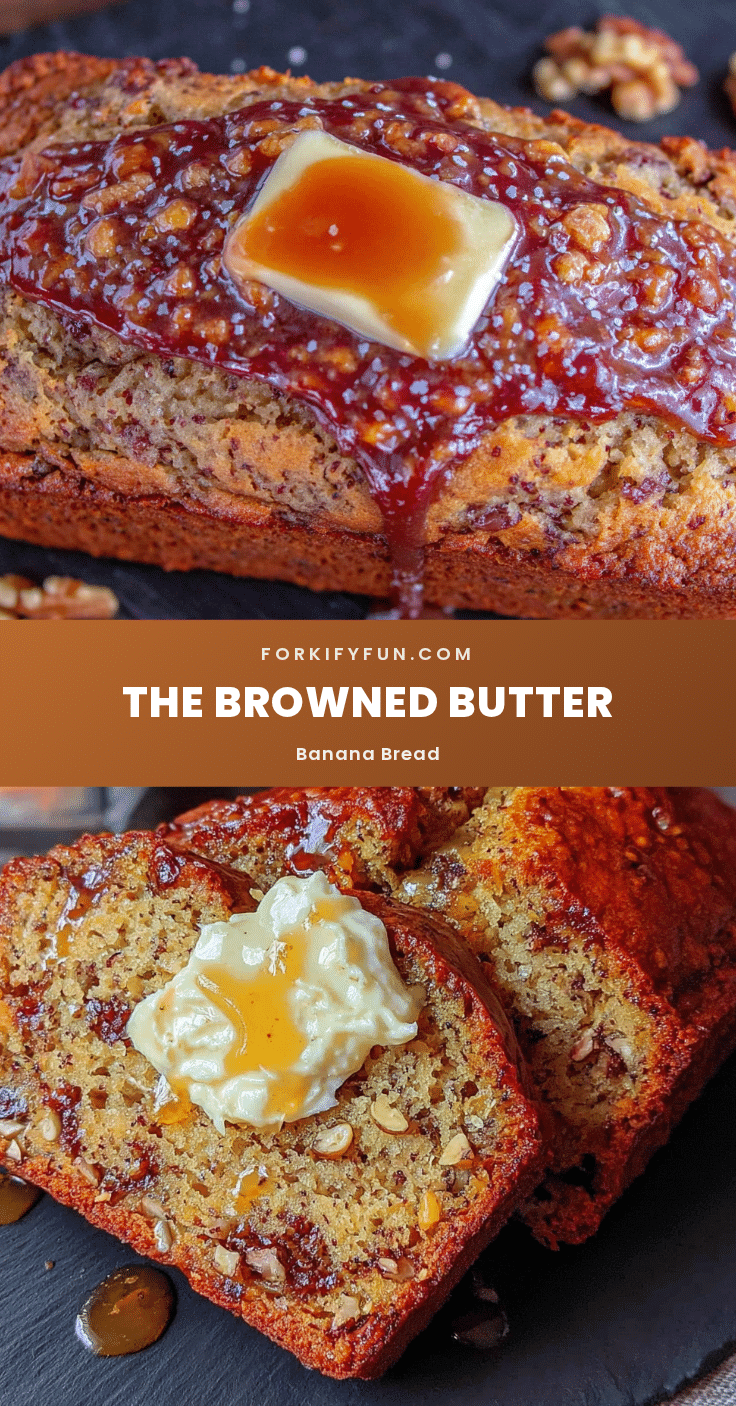
The crackled top, a landscape of fissures and peaks, dark and glossy against the pale crumb beneath — that’s the whole point of this loaf. I didn’t bake this banana bread for the taste first, if I’m being honest. I baked it for that crust, that brittle, sugary shell that shatters when you slice into it, revealing a crumb so tender it almost feels like a secret. Everything else — the nutty depth of the browned butter, the sweet pockets of overripe banana, the soft, almost custard-like center — that’s all just the payoff for getting that top right.
I’ve made a lot of banana bread in my life. The kind you throw together when the bananas on your counter start looking like they’ve seen better days, spotted and soft. And that bread is fine, it’s good, it does the job. But this version? This one demands a little more intention. You brown the butter first, which sounds like an extra step, and it is, but it’s the step that transforms the whole thing from a humble pantry clean-out into something you’d actually want to serve to company. Or, let’s be real, to yourself on a quiet Tuesday afternoon with a cup of coffee and no one to share it with.
The first time I made it, I stood over the stove watching the butter foam and sizzle, the milk solids turning from pale yellow to a deep, nutty amber. The smell alone — warm, toasty, almost hazelnut-like — told me I was onto something. I poured it into the batter, folded in the mashed bananas, and slid the pan into the oven. Forty-five minutes later, I pulled out a loaf that looked like it belonged in a bakery window. The top was perfectly domed and crackled, the edges were caramelized, and the whole kitchen smelled like a warm hug. I knew right then I’d never go back to plain banana bread again. And honestly, I think you’ll feel the same way.
Why You’ll Love This Recipe
This isn’t just another banana bread recipe you’ll bookmark and forget. This is the one you’ll come back to, again and again, because it solves all the little problems that other recipes leave hanging. Let me break it down for you.
- Deep, Nutty Flavor Without Nuts: The browned butter is the star here. It adds a toasty, almost caramel-like richness that plain melted butter just can’t touch. You get that complex flavor without adding a single nut to the batter.
- Perfectly Moist, Never Dense: The trick is using really ripe bananas and the right amount of fat. The browned butter keeps the crumb tender and soft, but the structure holds up beautifully. It’s moist without being gummy, which is a hard balance to strike.
- That Crackly Top, Every Time: I’ve tested this recipe more times than I care to count to nail that signature bakery-style top. The high oven temperature at the start, plus the right sugar-to-flour ratio, creates that beautiful, sugary crust that cracks as the loaf rises. It’s honestly the best part.
- Simple Ingredients, Big Impact: You probably have everything you need in your kitchen right now. Bananas, butter, sugar, eggs, flour — that’s it. No fancy extracts, no sour cream, no buttermilk. Just a simple technique that makes a huge difference.
- Freezes Like a Dream: This bread freezes beautifully. I often make two loaves at once — one for now, one for later. Just wrap it tightly in plastic wrap and foil, and you’ve got a homemade treat ready whenever you need it.
I’ve tested this recipe on my family, my neighbors, and even a few skeptical friends who swore they didn’t like banana bread. Every single one of them asked for the recipe. It’s that good. It’s the kind of bread that makes people close their eyes after the first bite, and that’s not something I say lightly.
What Ingredients You Will Need
This recipe uses simple, wholesome ingredients, but each one plays a specific role in creating that perfect texture and flavor. Here’s what you’ll need and why each ingredient matters.
- Unsalted Butter (½ cup / 1 stick / 113 grams): This is the heart of the recipe. You’ll brown it on the stove, which concentrates its flavor and adds that incredible nutty depth. I always use unsalted butter so I can control the salt level in the final bread. If you only have salted butter, just reduce the added salt by a pinch.
- Ripe Bananas (3 medium, about 1½ cups mashed / 340 grams): The riper, the better. You want bananas that are heavily spotted, almost black on the outside. They’re sweeter, softer, and have a much stronger banana flavor than yellow ones. If your bananas aren’t ripe enough, you can roast them in a 300°F oven for 15-20 minutes until they’re soft and fragrant.
- Granulated Sugar (¾ cup / 150 grams): White sugar gives the bread structure and helps create that crackly top. It also adds sweetness without any molasses flavor, letting the browned butter and banana shine through.
- Light Brown Sugar (¼ cup / 50 grams): A little brown sugar adds moisture and a touch of molasses depth that complements the browned butter perfectly. Don’t skip it — it makes the crumb more tender.
- Large Eggs (2, room temperature): Eggs bind everything together and add richness. Room temperature eggs incorporate into the batter more smoothly, creating a better emulsion and a lighter crumb. If you forget to take them out of the fridge, just place them in a bowl of warm water for 5 minutes.
- Vanilla Extract (1 teaspoon): Vanilla enhances the other flavors, especially the browned butter and banana. Use pure vanilla extract if you have it, but imitation works fine in a pinch.
- All-Purpose Flour (1½ cups / 190 grams): Standard all-purpose flour gives the bread structure without making it tough. I don’t recommend substituting whole wheat flour here, as it will make the bread denser. If you need a gluten-free option, use a 1:1 gluten-free baking flour blend.
- Baking Soda (1 teaspoon): This is the leavening agent. It reacts with the acidity in the bananas and brown sugar to help the bread rise. Make sure your baking soda is fresh — if it’s old, your bread won’t rise properly.
- Salt (½ teaspoon): Salt balances the sweetness and enhances all the flavors. Don’t skip it, even if you’re using salted butter. It makes a noticeable difference.
- Ground Cinnamon (1 teaspoon, optional but recommended): Cinnamon and banana are a classic pairing. It adds warmth and complexity without overpowering the other flavors. You can also add a pinch of nutmeg if you’re feeling adventurous.
Equipment Needed
You don’t need any fancy equipment for this recipe, which is part of its charm. Here’s what you’ll need:
- 9×5-inch Loaf Pan: A standard loaf pan is perfect. If you use an 8×4-inch pan, your bread will be taller and可能需要 a few extra minutes to bake. If you use a larger pan, the bread will be shallower and bake faster.
- Light-Colored Skillet or Saucepan: A light-colored pan makes it much easier to see when the butter is browning. Dark pans can hide the color change, making it easy to burn the butter. I use a stainless steel skillet, but a light-colored non-stick pan works too.
- Mixing Bowls: You’ll need one large bowl for the wet ingredients and one medium bowl for the dry ingredients. Nothing fancy.
- Whisk and Rubber Spatula: A whisk for combining the dry ingredients and a rubber spatula for folding everything together. A spatula is gentler than a mixer, which helps keep the bread tender.
- Parchment Paper: Lining the loaf pan with parchment paper makes it incredibly easy to lift the bread out after it cools. I leave an overhang on two sides to create “handles.”
- Cooling Rack: A wire rack allows air to circulate around the bread as it cools, preventing the bottom from getting soggy. If you don’t have one, you can use the overturned loaf pan, but a rack is better.
I’ve made this recipe with a cheap hand mixer and with a whisk alone — both work fine. The key is not to overmix, so honestly, a spatula is your best friend here. And if you don’t have a kitchen scale, don’t worry. Just make sure to spoon your flour into the measuring cup and level it off with a knife. Scooping directly from the bag can pack the flour and lead to a dry loaf.
Preparation Method
Alright, let’s get to the good part. Follow these steps closely, and you’ll have a loaf that looks and tastes like it came from a fancy bakery. I’ve included time estimates and sensory cues so you know exactly what to look for at each stage.
- Preheat and Prep (5 minutes): Preheat your oven to 350°F (175°C). Position a rack in the center of the oven. Grease a 9×5-inch loaf pan with butter or non-stick spray, then line it with a strip of parchment paper, leaving an overhang on the two long sides. This will make lifting the bread out a breeze later.
- Brown the Butter (5-7 minutes): Place the ½ cup (1 stick) of unsalted butter in a light-colored skillet or saucepan over medium heat. Let it melt completely, then continue cooking, swirling the pan occasionally. The butter will foam and sputter — that’s normal. After a few minutes, the foam will subside, and you’ll see tiny brown specks forming at the bottom of the pan. The butter will smell nutty and toasty. Once it’s a deep amber color, immediately remove the pan from the heat and pour the butter into a heatproof bowl to stop the cooking process. Don’t walk away during this step — browned butter can go from perfect to burnt in seconds. Let it cool for about 5 minutes while you prepare the other ingredients.
- Mash the Bananas (3 minutes): In a large mixing bowl, mash the three ripe bananas with a fork or potato masher until they’re mostly smooth with a few small lumps remaining. You want about 1½ cups of mashed banana. The lumps add nice texture to the finished bread, so don’t overdo it.
- Mix the Wet Ingredients (3 minutes): To the mashed bananas, add the ¾ cup granulated sugar, ¼ cup light brown sugar, the two room-temperature eggs, and 1 teaspoon of vanilla extract. Whisk until everything is well combined and smooth. Now, slowly pour in the slightly cooled browned butter (make sure it’s not still hot, or it could cook the eggs) and whisk until fully incorporated. The mixture will look glossy and smell incredible.
- Combine the Dry Ingredients (2 minutes): In a separate medium bowl, whisk together the 1½ cups all-purpose flour, 1 teaspoon baking soda, ½ teaspoon salt, and 1 teaspoon ground cinnamon (if using). Whisking aerates the flour and ensures the baking soda and salt are evenly distributed.
- Fold the Batter (1 minute): Pour the dry ingredients into the wet ingredients. Use a rubber spatula to gently fold everything together. The key word here is gently. Fold just until you see no more streaks of flour. A few small lumps are perfectly fine. Overmixing will develop the gluten and make your bread tough and dense. Trust me, I’ve learned this the hard way.
- Bake (50-60 minutes): Pour the batter into your prepared loaf pan and spread it into an even layer. Bake for 50-60 minutes, or until a toothpick inserted into the center comes out clean or with just a few moist crumbs attached. The top should be a deep golden brown and beautifully crackled. If the top is browning too quickly after 40 minutes, tent the loaf loosely with aluminum foil. Every oven is different, so start checking at the 50-minute mark.
- Cool (1 hour minimum): Place the pan on a wire cooling rack and let the bread cool in the pan for 10 minutes. Then, use the parchment paper overhang to lift the bread out of the pan and transfer it directly to the cooling rack. Let it cool completely before slicing — at least 1 hour. I know it’s tempting to cut into it while it’s warm, but the bread needs time to set its structure. Slicing too early will result in a crumbly, gummy mess.
Cooking Tips & Techniques
I’ve made this recipe more times than I can count, and I’ve learned a few things along the way. Here are my best tips to ensure your bread turns out perfect every time.
Master the Browned Butter: This is the most important step, and it’s also the easiest to mess up. Use a light-colored pan so you can see the color change. Swirl the pan constantly once the butter melts. The butter will go through phases — it’ll melt, foam, then foam subsides, and then you’ll see brown specks. The moment you see those specks and smell that nutty aroma, pull it off the heat. Don’t wait. The residual heat will continue to cook it slightly. If you burn it, the butter will taste bitter and you’ll have to start over. It’s a bummer, but it happens to everyone at least once.
Don’t Overmix the Batter: I cannot stress this enough. Mix until the flour just disappears. A few lumps are your friend. Overmixing develops gluten, which gives you a tough, rubbery bread instead of a tender, soft one. Use a spatula, not a hand mixer, for this step. It gives you more control.
Use a Kitchen Scale for Accuracy: If you have one, use it. Measuring flour by weight (190 grams) is much more accurate than scooping it. Scooping can give you anywhere from 120 to 150 grams per cup, which is a huge difference. If you don’t have a scale, spoon the flour into your measuring cup and level it off with a knife. This prevents packing.
Room Temperature Eggs are Key: Cold eggs can seize the browned butter and create a lumpy batter. If you forget to take them out ahead of time, place them in a bowl of warm (not hot) water for 5 minutes. They’ll come to room temperature quickly.
Check for Doneness Properly: A toothpick test is reliable, but also look for visual cues. The bread should be pulling away from the sides of the pan slightly. The top should be a deep golden brown and feel firm to the touch. If you press the center gently, it should spring back. If it leaves an indent, it needs more time.
Let It Cool Completely: I know the smell is intoxicating, but patience is a virtue here. Cooling allows the starches to set and the moisture to redistribute. If you slice too early, the bread will be gummy and fall apart. I usually bake mine in the evening and let it cool overnight on the counter. It’s worth the wait.
Variations & Adaptations
This recipe is a fantastic base, and I’ve played around with it quite a bit. Here are some of my favorite variations.
- Chocolate Chip Banana Bread: Fold in ¾ cup of semi-sweet or dark chocolate chips along with the flour. The little pockets of melted chocolate pair beautifully with the nutty browned butter flavor. I’ve also used white chocolate chips, which add a nice sweetness.
- Nutty Banana Bread: If you want a bit of crunch, fold in ½ cup of toasted walnuts or pecans. Toast them in a dry skillet over medium heat for 3-4 minutes until fragrant before adding them to the batter. The toasty nuts complement the browned butter perfectly.
- Gluten-Free Option: Substitute the all-purpose flour with a good 1:1 gluten-free baking blend that contains xanthan gum. I’ve used Bob’s Red Mill 1-to-1 Baking Flour with great results. The texture will be slightly more delicate, but the flavor is still amazing.
- Whole Wheat Version: For a heartier loaf, substitute half of the all-purpose flour with whole wheat flour. The bread will be denser and have a slightly nuttier flavor that works well with the browned butter. Add an extra tablespoon of milk or buttermilk to keep it from drying out.
- Vegan Adaptation: I haven’t tested this personally, but I’ve heard from readers that you can substitute the eggs with flax eggs (1 tablespoon ground flaxseed + 3 tablespoons water per egg) and use a vegan butter substitute. The texture will be a bit different, but the flavor should still be great.
- Add a Streusel Topping: For an extra-special treat, mix together ¼ cup flour, ¼ cup brown sugar, 2 tablespoons cold butter, and a pinch of cinnamon. Sprinkle this over the batter before baking. It creates a crunchy, buttery topping that’s absolutely divine.
Serving & Storage Suggestions
This banana bread is wonderful on its own, but here are a few ways to make it even more special.
Serving: Serve slices at room temperature for the best texture. If you want to warm it up, pop a slice in the toaster or microwave for about 15 seconds. It’s amazing with a pat of butter melting into the warm crumb. For a truly indulgent breakfast or dessert, serve it with a scoop of vanilla ice cream or a dollop of whipped cream. It also pairs beautifully with a cup of coffee, a glass of cold milk, or a warm mug of caramel apple cider sangria for a cozy fall treat.
Storage: Store leftover banana bread tightly wrapped in plastic wrap or in an airtight container at room temperature for up to 4 days. The bread actually gets more moist and flavorful on the second day as the flavors meld together. Do not refrigerate it — the cold air will dry it out and make the texture stale.
Freezing: This bread freezes beautifully. Wrap the completely cooled loaf (or individual slices) tightly in plastic wrap, then again in a layer of aluminum foil. Place it in a freezer-safe bag or container. It will keep for up to 3 months. To thaw, leave it on the counter for a few hours or overnight in the refrigerator. Individual slices can be toasted directly from frozen.
Reheating: For a quick fix, microwave a slice for 15-20 seconds. For a more even warm-up, place slices in a 300°F oven for about 5-7 minutes. The edges get slightly crisp, which is lovely.
Nutritional Information & Benefits
While this is definitely a treat, it does have some redeeming qualities. Here’s the estimated nutritional breakdown per slice (based on 10 slices):
| Nutrient | Amount Per Slice |
|---|---|
| Calories | 285 |
| Total Fat | 12g |
| Saturated Fat | 7g |
| Cholesterol | 60mg |
| Sodium | 220mg |
| Total Carbohydrates | 40g |
| Dietary Fiber | 2g |
| Sugars | 22g |
| Protein | 4g |
Health Benefits: Bananas are a great source of potassium, vitamin B6, and vitamin C. They also provide fiber, which aids digestion. The cinnamon adds antioxidants and may help regulate blood sugar. While this isn’t a health food, it’s a much better option than most store-bought baked goods, which are full of preservatives and artificial flavors. Plus, you know exactly what’s in it, which is a win in my book.
Dietary Considerations: This recipe is vegetarian. It can be made gluten-free and vegan with the substitutions mentioned above. It contains dairy (butter) and eggs. If you’re looking for a nut-free option, simply skip the nuts in the variation.
Conclusion
This Perfect Browned Butter Banana Bread is more than just a recipe — it’s a little moment of joy. It’s the smell of browned butter filling your kitchen, the satisfaction of pulling a perfectly domed loaf out of the oven, and the simple pleasure of a warm slice with a cup of coffee. It’s the kind of recipe that turns an ordinary day into something special, and it’s easy enough to make any day of the week.
I’ve shared this recipe with friends and family, and it’s become a staple in my kitchen. I love how forgiving it is, how adaptable, and how it always, always delivers. Whether you’re baking for a crowd or just for yourself, this bread is a winner.
I’d love to hear how yours turns out! Did you add chocolate chips? Did you try the streusel topping? Leave a comment below and let me know. And if you’re looking for more cozy baking inspiration, you might enjoy my pumpkin gnocchi in brown butter sage sauce or these brown butter pumpkin snickerdoodle cookies. Happy baking!
Frequently Asked Questions
Can I use frozen bananas for this recipe?
Absolutely! Frozen bananas work great. Thaw them completely, then drain off any excess liquid before mashing. The thawed bananas will be very soft and almost liquidy, which is perfect for this recipe. Just reduce the mashed banana measurement by a couple of tablespoons to account for the extra moisture.
Why did my banana bread sink in the middle?
A sunken middle is usually caused by one of two things: overmixing or underbaking. Overmixing develops too much gluten, which creates a structure that can’t support itself as it rises, causing it to collapse. Underbaking means the center wasn’t set enough to hold its shape. Make sure to test with a toothpick and bake until it comes out clean.
Can I make this into muffins instead of a loaf?
Yes! This batter makes about 12 standard muffins. Fill greased or lined muffin cups about ¾ full and bake at 350°F (175°C) for 18-22 minutes, or until a toothpick inserted into the center comes out clean. Muffins will have a slightly different texture — they’re a bit more tender and bake faster.
How do I know when the browned butter is done?
The visual cue is key. Watch for the butter to turn a deep amber color, with tiny brown specks forming at the bottom of the pan. The smell is also a great indicator — it should smell nutty and toasty, like toasted hazelnuts. The whole process takes about 5-7 minutes over medium heat. Don’t walk away!
Can I add other mix-ins like dried fruit or coconut?
Definitely! Dried cranberries, chopped dates, or shredded coconut would all be delicious additions. Fold in about ½ cup of your chosen mix-in along with the flour. Keep in mind that dried fruit will absorb some moisture from the batter, so the bread might be slightly denser. You can also add a tablespoon of orange zest for a bright, citrusy twist.
Pin This Recipe!
Perfect Browned Butter Banana Bread (Easy Recipe)
This banana bread features a crackled, sugary top and a tender, moist crumb with deep nutty flavor from browned butter. It’s an easy recipe that transforms simple ingredients into a bakery-worthy loaf.
- Prep Time: 15 minutes
- Cook Time: 55 minutes
- Total Time: 1 hour 10 minutes
- Yield: 10 servings 1x
- Category: Dessert
- Cuisine: American
Ingredients
- ½ cup (1 stick / 113 grams) unsalted butter
- 3 medium ripe bananas (about 1½ cups / 340 grams mashed)
- ¾ cup (150 grams) granulated sugar
- ¼ cup (50 grams) light brown sugar
- 2 large eggs, room temperature
- 1 teaspoon vanilla extract
- 1½ cups (190 grams) all-purpose flour
- 1 teaspoon baking soda
- ½ teaspoon salt
- 1 teaspoon ground cinnamon (optional but recommended)
Instructions
- Preheat oven to 350°F (175°C). Grease a 9×5-inch loaf pan and line with parchment paper, leaving overhang on two long sides.
- In a light-colored skillet or saucepan over medium heat, melt the butter. Continue cooking, swirling occasionally, until the butter foams, then the foam subsides and tiny brown specks appear and it smells nutty (5-7 minutes). Immediately remove from heat and pour into a heatproof bowl to cool for about 5 minutes.
- In a large bowl, mash the bananas with a fork until mostly smooth with a few lumps.
- Add granulated sugar, brown sugar, eggs, and vanilla to the mashed bananas. Whisk until well combined. Slowly pour in the slightly cooled browned butter and whisk until fully incorporated.
- In a separate medium bowl, whisk together flour, baking soda, salt, and cinnamon (if using).
- Pour the dry ingredients into the wet ingredients. Use a rubber spatula to gently fold until just combined (a few lumps are fine). Do not overmix.
- Pour the batter into the prepared loaf pan and spread evenly. Bake for 50-60 minutes, or until a toothpick inserted into the center comes out clean or with a few moist crumbs. If the top browns too quickly after 40 minutes, tent loosely with foil.
- Let the bread cool in the pan on a wire rack for 10 minutes. Then use the parchment overhang to lift the bread out and transfer to the rack to cool completely (at least 1 hour) before slicing.
Notes
Use a light-colored pan to easily see the butter browning. Do not overmix the batter to avoid a tough loaf. Let the bread cool completely before slicing to prevent a gummy texture. The bread can be stored at room temperature for up to 4 days or frozen for up to 3 months.
Nutrition
- Serving Size: 1 slice
- Calories: 285
- Sugar: 22
- Sodium: 220
- Fat: 12
- Saturated Fat: 7
- Carbohydrates: 40
- Fiber: 2
- Protein: 4
Keywords: banana bread, browned butter, easy banana bread, crackly top banana bread, moist banana bread