My brother-in-law Mark asked why I couldn’t just skip the whole fussy roux and dump everything in one pan. I started to explain why that wouldn’t work—then stopped. He had a point. I was exhausted from a long week of recipe testing, and the kitchen looked like a flour bomb had gone off. The idea of standing over a hot stove, whisking butter and flour for ten more minutes, honestly made me want to cry. So I told him, “Fine. We’re doing it your way.”
And you know what? It was the best chicken pot pie I’d ever made. The filling was just as creamy, the crust baked up perfectly flaky, and I saved myself about fifteen minutes of active cooking time. I mean, let’s be real—I was humbled. Here I was, the one who writes recipes for a living, and a guy who mostly just grills burgers on weekends had cracked the code for a quicker weeknight dinner.
That night, we ate this Quick Creamy Chicken Pot Pie with Flaky Crust straight out of the skillet, none of us bothering with plates. The crust shattered under my fork, and the filling was so rich and velvety, I almost dropped my fork. Mark just smiled and said, “Told you.” Maybe you’ve been there—stuck in your ways, convinced a recipe has to be complicated to be good. Let me tell you, this one proves otherwise. It’s the kind of dinner that makes you feel like you’ve cheated the system, and honestly, that’s a pretty great feeling on a Tuesday night.
Why You’ll Love This Recipe
This isn’t just another chicken pot pie recipe. I’ve tested this one at least a dozen times, tweaking the shortcut method until it was foolproof. It’s the kind of dish that makes you look like a hero without actually working that hard.
- Quick & Easy: From start to table in under 45 minutes. No standing over a roux, no complicated pastry work. This is real weeknight magic.
- Simple Ingredients: Everything comes from a standard grocery store. No cream sherry, no leeks, no trips to a specialty market. You probably have most of it already.
- Perfect for Weeknights: This is the definition of comfort food on a schedule. It feels like a Sunday supper but fits into a Tuesday schedule.
- Crowd-Pleaser: I’ve served this to my picky kids, my in-laws, and a group of friends who are notoriously hard to impress. Empty bowls every single time.
- Unbelievably Delicious: The filling is impossibly creamy without being heavy, and that flaky crust on top? It’s buttery, golden, and shatters when you tap it with a fork.
What makes this recipe different is the technique. Instead of making a traditional roux, we use a combination of a quick slurry and heavy cream to get that velvety texture. It’s faster, it’s easier, and honestly, I think it tastes better. No raw flour taste, no lumps, and no stress. This is comfort food reimagined—faster, simpler, but with all the soul-soothing satisfaction of the original. It’s the kind of meal that makes you close your eyes after the first bite and just breathe for a second.
What Ingredients You Will Need
This recipe relies on simple, wholesome ingredients that work together to create that classic pot pie flavor without any fuss. Most of these are pantry and fridge staples, which is exactly what you want on a busy weeknight.
For the Filling
- 2 tablespoons unsalted butter – I prefer using butter over oil here for the flavor. It adds a richness that really makes the filling sing.
- 1 medium yellow onion, diced – About one cup. Yellow onions are my go-to for savory dishes because they have a good balance of sweetness and bite.
- 2 medium carrots, peeled and diced – About one cup. I like to cut them into small, even pieces so they cook quickly.
- 2 celery stalks, diced – About half a cup. Celery adds that subtle savory note that you can’t quite identify but would miss if it weren’t there.
- 3 cloves garlic, minced – Fresh garlic is non-negotiable here. Don’t use the jarred stuff—it just doesn’t have the same punch.
- 3 cups cooked chicken, shredded or diced – This is perfect for using up leftover rotisserie chicken. In fact, I recommend it. It saves you a step and adds great flavor.
- 1 cup frozen peas and carrots mix – No need to thaw them. They’ll cook perfectly in the filling and add a pop of color and sweetness.
- 1/4 cup all-purpose flour – This is for the slurry. It thickens the filling without the fuss of a traditional roux.
- 2 cups chicken broth – Use a good quality broth here. I like Swanson or Kitchen Basics. The flavor of the broth really matters since it’s the base of the sauce.
- 1 cup heavy cream – This is what makes the filling so luxuriously creamy. You can substitute half-and-half, but it won’t be quite as rich.
- 1 teaspoon dried thyme – Thyme and chicken are a classic pairing. It adds an earthy, slightly floral note.
- 1/2 teaspoon dried sage – Sage gives that warm, comforting flavor that pot pie is known for.
- Salt and black pepper to taste – I usually start with 1 teaspoon of salt and 1/2 teaspoon of pepper, then adjust at the end.
For the Topping
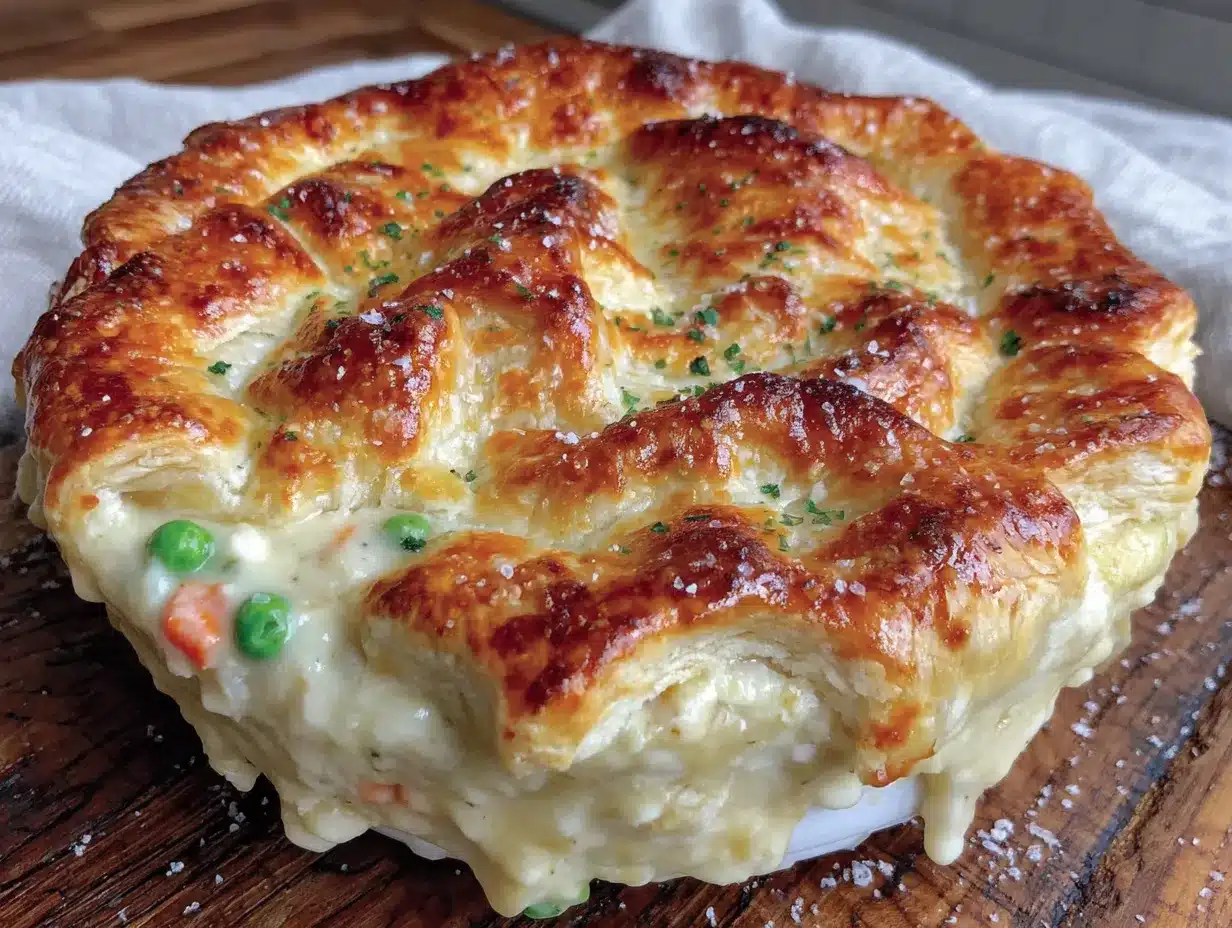
- 1 sheet frozen puff pastry, thawed – This is my secret weapon. Pepperidge Farm is my go-to brand. It’s buttery, flaky, and requires almost no effort. (If you’re feeling ambitious, you can use homemade pie crust, but why would you?)
- 1 large egg, beaten – For an egg wash that gives the crust that gorgeous golden-brown color.
- Flaky sea salt, for sprinkling – Optional, but I love the little bursts of saltiness on the crust.
Equipment Needed
You don’t need a lot of fancy equipment for this recipe, which is part of what makes it so great for a busy weeknight. Here’s what you’ll need:
- Large oven-safe skillet or Dutch oven – A 10 to 12-inch cast iron skillet is ideal. It goes from stovetop to oven without any fuss. If you don’t have one, use a regular skillet and transfer the filling to a baking dish before adding the pastry.
- Sharp chef’s knife and cutting board – For dicing the veggies. A good knife makes prep so much faster.
- Wooden spoon or silicone spatula – For stirring the filling. A wooden spoon is great because it won’t scratch your pan.
- Small bowl – For making the slurry. A cereal bowl works perfectly.
- Pastry brush – For the egg wash. If you don’t have one, you can use a paper towel.
- Rolling pin – Only needed if you’re rolling out the puff pastry. Most store-bought puff pastry comes pre-rolled, so you might not even need this.
Preparation Method
- Preheat your oven to 400°F (200°C). This is important—you want the oven nice and hot so the puff pastry puffs up and gets golden. Position a rack in the center of the oven.
- Start the filling. Place your large oven-safe skillet over medium heat and add the 2 tablespoons of butter. Let it melt and foam slightly. Add the diced onion, carrots, and celery. Cook, stirring occasionally, for about 5-7 minutes until the vegetables have softened. The onions should look translucent, and the carrots should be starting to get tender. Don’t rush this step—sweating the vegetables brings out their natural sweetness and builds the base flavor.
- Add the garlic. Stir in the minced garlic and cook for another 30 seconds until it’s fragrant. Garlic burns quickly, so keep stirring and don’t walk away.
- Make the slurry. While the vegetables are cooking, whisk the 1/4 cup of flour with 1/2 cup of the chicken broth in a small bowl until smooth. This is your thickening agent. No lumps allowed here—whisk it well.
- Build the sauce. Pour the slurry into the skillet with the vegetables and stir constantly for about 1 minute. The mixture will thicken almost immediately. Then slowly pour in the remaining 1.5 cups of chicken broth, stirring continuously. Bring the mixture to a gentle simmer. You’ll see it start to thicken after about 2-3 minutes.
- Add the cream and seasonings. Reduce the heat to low and stir in the heavy cream, dried thyme, and dried sage. Let the sauce simmer gently for another 2-3 minutes until it’s thickened enough to coat the back of a spoon. Taste it and add salt and pepper. I usually add about 1 teaspoon of salt and 1/2 teaspoon of pepper, but this depends on your broth, so taste and adjust.
- Add the chicken and peas. Stir in the cooked chicken and the frozen peas and carrots mix. Cook for 2-3 minutes until everything is heated through. The filling should be thick and creamy, not soupy. If it seems too thick, add a splash more broth. If it’s too thin, let it simmer for another minute or two.
- Top with the pastry. Remove the skillet from the heat. If you’re using a pre-rolled puff pastry sheet, unroll it and place it directly over the filling. If you’re using a block of puff pastry, roll it out on a lightly floured surface to about 1/8-inch thickness, then drape it over the skillet. Tuck the edges of the pastry inside the skillet, pressing them gently against the sides. Don’t worry if it’s not perfect—rustic is charming.
- Cut vents and apply egg wash. Using a sharp knife, cut 4-5 slits in the top of the pastry to allow steam to escape. This prevents the crust from getting soggy. Brush the beaten egg evenly over the entire surface of the pastry. Sprinkle with flaky sea salt if you’re using it.
- Bake. Place the skillet in the preheated oven and bake for 18-22 minutes, until the pastry is puffed up and deep golden brown. The filling should be bubbling up through the vents. Let it cool on a wire rack for at least 5-10 minutes before serving. This is the hardest part—your kitchen will smell incredible—but it’s important so the filling sets up and doesn’t run all over your plate.
Cooking Tips & Techniques
I’ve made this recipe more times than I can count, and I’ve learned a few things along the way. Here are my best tips for getting it right every time.
Don’t skip the slurry step. I know it seems fussy, but whisking the flour with cold broth before adding it to the pan is the secret to a lump-free sauce. If you add dry flour directly to the hot pan, you’ll end up with clumps that never fully dissolve. I learned this the hard way—my first attempt at this shortcut method resulted in a filling that looked like it had little dumplings in it. Not in a good way.
Use a hot oven. 400°F is the sweet spot for puff pastry. It’s hot enough to make the butter in the pastry create steam, which is what gives you those beautiful, flaky layers. If your oven runs cool, bump it up to 425°F and check the pastry a few minutes early.
Let it rest. I know you’re hungry, but letting the pot pie sit for 5-10 minutes after it comes out of the oven is crucial. The filling needs time to set up. If you cut into it immediately, you’ll end up with a soupy mess. Trust me on this—I’ve done it, and it’s disappointing.
Don’t overwork the pastry. If you’re rolling out your own puff pastry, handle it as little as possible. The warmth of your hands can melt the butter, which will make the pastry less flaky. If it starts to feel sticky or soft, pop it in the fridge for 10 minutes to firm up.
Multitask wisely. While the vegetables are cooking, make your slurry and measure out your broth and cream. This way, when it’s time to build the sauce, everything is ready to go. It makes the process feel much smoother and less frantic.
Variations & Adaptations
One of the best things about this recipe is how adaptable it is. Here are some of my favorite variations.
Vegetarian Version: Swap the chicken for a can of drained and rinsed chickpeas or a bag of frozen mixed vegetables. Use vegetable broth instead of chicken broth. It’s still creamy and satisfying, and it comes together just as quickly.
Dairy-Free Adaptation: Use olive oil or a plant-based butter instead of regular butter. Replace the heavy cream with full-fat coconut milk or a barista-style oat milk. The coconut milk adds a slight sweetness that works surprisingly well with the thyme and sage.
Gluten-Free Option: Use a gluten-free all-purpose flour blend (like King Arthur Measure for Measure) for the slurry. For the topping, look for a gluten-free puff pastry. Schär makes a good one, or you can use a gluten-free biscuit topping instead.
Herb Swap: If you don’t have thyme and sage, try using 1 teaspoon of dried rosemary and 1/2 teaspoon of dried marjoram. Or use 1 tablespoon of fresh chopped parsley stirred in at the end for a brighter flavor.
Make it a Pot Pie Casserole: Double the recipe and bake it in a 9×13-inch baking dish. You’ll need two sheets of puff pastry to cover the top. This is great for feeding a crowd or for meal prep.
I once made a version with leftover Thanksgiving turkey and a splash of white wine instead of the cream. It was absolutely fantastic—a great way to use up holiday leftovers without feeling like you’re eating the same meal again.
Serving & Storage Suggestions
This pot pie is best served warm, straight from the skillet. The contrast between the hot, creamy filling and the cool, flaky crust is pure magic. I like to serve it in shallow bowls with a simple green salad on the side dressed with a lemony vinaigrette. The acidity of the dressing cuts through the richness of the pot pie perfectly.
If you’re feeding a crowd, this pairs beautifully with roasted green beans or a steamed vegetable like broccoli. For a truly cozy meal, serve it with a glass of crisp white wine like a Sauvignon Blanc or a light Pinot Noir.
Storage: Leftovers can be stored in an airtight container in the refrigerator for up to 3 days. The crust will lose its crispness, but the flavor will still be excellent. To reheat, place a portion in a small oven-safe dish and warm it in a 350°F oven for about 10-15 minutes, or until heated through. You can also microwave it, but the crust will be soft.
Freezer Instructions: You can freeze the filling (without the pastry) for up to 3 months. Let it cool completely, then transfer it to a freezer-safe container. To serve, thaw it in the refrigerator overnight, then reheat it in a skillet. Make the puff pastry topping fresh and bake as directed. The filling actually develops more flavor after being frozen, so this is a great make-ahead option.
The flavors of this pot pie actually deepen overnight in the fridge. The herbs meld together, and the chicken absorbs more of the creamy sauce. I honestly think leftovers are even better than the first serving.
Nutritional Information & Benefits
Here’s an approximate nutritional breakdown per serving (based on 6 servings):
- Calories: 485
- Fat: 28g
- Saturated Fat: 14g
- Carbohydrates: 30g
- Fiber: 3g
- Sugar: 5g
- Protein: 28g
- Sodium: 680mg
This recipe is a good source of protein from the chicken, which helps keep you full and satisfied. The carrots and peas provide fiber, vitamin A, and antioxidants. Using rotisserie chicken adds flavor without extra effort, and the heavy cream gives the dish a rich texture that makes it feel indulgent.
If you’re watching your sodium, use a low-sodium chicken broth and go easy on the added salt. You can also swap the heavy cream for half-and-half to reduce the fat content, though the filling won’t be quite as velvety.
This pot pie is a balanced meal on its own—protein, vegetables, and carbs all in one dish. It’s comfort food that actually has some nutritional merit, which is always a win in my book.
Conclusion
This Quick Creamy Chicken Pot Pie with Flaky Crust has become a staple in my kitchen for one simple reason: it delivers on its promises. It’s fast, it’s easy, and it tastes like you spent hours in the kitchen. That’s a hard combination to beat, especially on a busy weeknight.
I love that this recipe proves you don’t have to sacrifice flavor for speed. The shortcut method with the slurry works just as well as a traditional roux, and the puff pastry topping is genuinely foolproof. It’s the kind of recipe that makes you feel like a brilliant cook, even when you’re tired and just want dinner on the table.
I’d love to hear how this turns out for you. Did you try any variations? Did your family love it as much as mine does? Leave a comment below and let me know. And if you share a photo on Pinterest, tag me—I love seeing your creations. Happy cooking, and remember: sometimes the best recipes come from letting someone else take the lead.
Frequently Asked Questions
Can I use leftover turkey instead of chicken?
Absolutely! This is a fantastic way to use up leftover Thanksgiving turkey. Just swap the chicken for an equal amount of cooked turkey. The recipe works exactly the same way.
Can I make this in a regular baking dish instead of a skillet?
Yes, you can. Prepare the filling in a regular skillet or saucepan, then transfer it to a 9-inch pie plate or an 8×8-inch baking dish. Top with the puff pastry and bake as directed. You might need to add a few minutes to the baking time since the dish won’t hold heat the same way a cast iron skillet does.
My puff pastry didn’t puff up. What went wrong?
This usually happens for one of two reasons: the oven wasn’t hot enough, or the pastry was too warm when it went in. Make sure your oven is fully preheated to 400°F. If your puff pastry feels soft or sticky, pop it in the fridge for 10-15 minutes before baking. Cold pastry puffs better.
Can I use pie crust instead of puff pastry?
Of course! If you prefer a traditional top crust, use a single pie crust instead of puff pastry. Roll it out to about 1/8-inch thickness, place it over the filling, cut vents, and bake at 375°F for about 25-30 minutes until golden brown. The texture will be different—more like a classic pot pie—but it’s still delicious.
How do I prevent the bottom of the crust from getting soggy?
Since the puff pastry goes on top of the filling, sogginess isn’t usually an issue. However, if you’re using a bottom crust, blind bake it first for about 10 minutes at 400°F before adding the filling. This helps create a barrier that keeps the crust crisp. For this recipe, the top crust method is actually better for avoiding sogginess altogether.
Pin This Recipe!

Quick Creamy Chicken Pot Pie with Flaky Crust
A quick and easy chicken pot pie with a creamy, velvety filling and a flaky puff pastry crust. Ready in under 45 minutes, this shortcut method skips the traditional roux for a simpler, faster weeknight dinner that tastes like you spent hours in the kitchen.
- Prep Time: 15 minutes
- Cook Time: 30 minutes
- Total Time: 45 minutes
- Yield: 6 servings 1x
- Category: Main Course
- Cuisine: American
Ingredients
- 2 tablespoons unsalted butter
- 1 medium yellow onion, diced
- 2 medium carrots, peeled and diced
- 2 celery stalks, diced
- 3 cloves garlic, minced
- 3 cups cooked chicken, shredded or diced
- 1 cup frozen peas and carrots mix
- 1/4 cup all-purpose flour
- 2 cups chicken broth
- 1 cup heavy cream
- 1 teaspoon dried thyme
- 1/2 teaspoon dried sage
- Salt and black pepper to taste
- 1 sheet frozen puff pastry, thawed
- 1 large egg, beaten
- Flaky sea salt, for sprinkling (optional)
Instructions
- Preheat your oven to 400°F (200°C). Position a rack in the center of the oven.
- Place a large oven-safe skillet over medium heat and add the butter. Let it melt and foam slightly. Add the diced onion, carrots, and celery. Cook, stirring occasionally, for about 5-7 minutes until the vegetables have softened.
- Stir in the minced garlic and cook for another 30 seconds until fragrant.
- While the vegetables are cooking, whisk the flour with 1/2 cup of the chicken broth in a small bowl until smooth to make a slurry.
- Pour the slurry into the skillet with the vegetables and stir constantly for about 1 minute. Then slowly pour in the remaining 1.5 cups of chicken broth, stirring continuously. Bring the mixture to a gentle simmer and cook for 2-3 minutes until thickened.
- Reduce the heat to low and stir in the heavy cream, dried thyme, and dried sage. Let the sauce simmer gently for another 2-3 minutes until thickened enough to coat the back of a spoon. Season with salt and pepper to taste.
- Stir in the cooked chicken and frozen peas and carrots mix. Cook for 2-3 minutes until everything is heated through.
- Remove the skillet from the heat. Place the puff pastry sheet over the filling, tucking the edges inside the skillet.
- Cut 4-5 slits in the top of the pastry to allow steam to escape. Brush the beaten egg evenly over the entire surface of the pastry. Sprinkle with flaky sea salt if desired.
- Bake for 18-22 minutes, until the pastry is puffed up and deep golden brown and the filling is bubbling. Let cool on a wire rack for at least 5-10 minutes before serving.
Notes
Don’t skip the slurry step to avoid lumps. Use a hot oven (400°F) for best puff pastry results. Let the pot pie rest for 5-10 minutes after baking to allow the filling to set. For a vegetarian version, swap chicken for chickpeas and use vegetable broth. For dairy-free, use plant-based butter and coconut milk or oat milk. For gluten-free, use gluten-free flour blend and gluten-free puff pastry.
Nutrition
- Serving Size: 1 serving
- Calories: 485
- Sugar: 5
- Sodium: 680
- Fat: 28
- Saturated Fat: 14
- Carbohydrates: 30
- Fiber: 3
- Protein: 28
Keywords: chicken pot pie, quick chicken pot pie, creamy chicken pot pie, easy chicken pot pie, weeknight dinner, comfort food, puff pastry chicken pot pie


