I was trying to make a pumpkin roll. You know, one of those classic fall desserts that looks all fancy and rolled up with cream cheese filling inside. I had the eggs separated, the powdered sugar ready for dusting the kitchen towel, the whole deal. But somewhere between folding in the flour and trying not to overbeat the egg whites, I got distracted. My phone rang—my sister asking about Thanksgiving plans—and by the time I came back to the batter, I’d overmixed it. The cake was dense before it even hit the oven. I knew it wasn’t going to roll. It was going to crack. Honestly, I stood there staring at the bowl, feeling that familiar kitchen frustration creep in.
So I did what any reasonable person would do. I poured the batter into a square pan, baked it anyway, and figured I’d eat the evidence with a spoon. But then I had this leftover cream cheese filling sitting there, and a whole lot of graham cracker crust I’d already pressed into another pan for a different plan that also fell apart. So I just—and I mean this literally—dumped the cheesecake layer on top of the pumpkin layer, threw it back in the oven, and prayed. What came out was nothing like the plan. It was better. These pumpkin pie cheesecake bars were born from a moment of pure, chaotic desperation. And now I can’t stop making them.
Maybe you’ve been there. Standing in your kitchen, something goes wrong, and you have to pivot fast. That’s where this recipe lives. It’s the happy accident that turned into my most-requested fall dessert. The layers set perfectly, the flavors melt together like pumpkin pie and cheesecake were always meant to be best friends, and the best part? No rolling, no stress, no fancy techniques. Just a pan, some patience, and the kind of dessert that makes people close their eyes after the first bite. Let me tell you, that first failed pumpkin roll was worth every cracked edge.
Why You’ll Love This Recipe
These pumpkin pie cheesecake bars aren’t just another fall dessert. They’re the kind of recipe that makes you look like a hero without breaking a sweat. Here’s why they’ve earned a permanent spot in my fall baking rotation.
- Quick & Easy : Comes together in about 30 minutes of active prep time. The oven does the rest of the work while you sip your coffee or set the table.
- Simple Ingredients : No fancy grocery trips needed. You likely already have canned pumpkin, cream cheese, eggs, and basic pantry staples in your kitchen right now.
- Perfect for Fall Gatherings : Great for Thanksgiving dessert tables, Friendsgiving potlucks, or cozy Sunday afternoons when you want something that tastes like autumn in a pan.
- Crowd-Pleaser : Always gets rave reviews from pumpkin lovers and cheesecake skeptics alike. I’ve watched people go back for thirds.
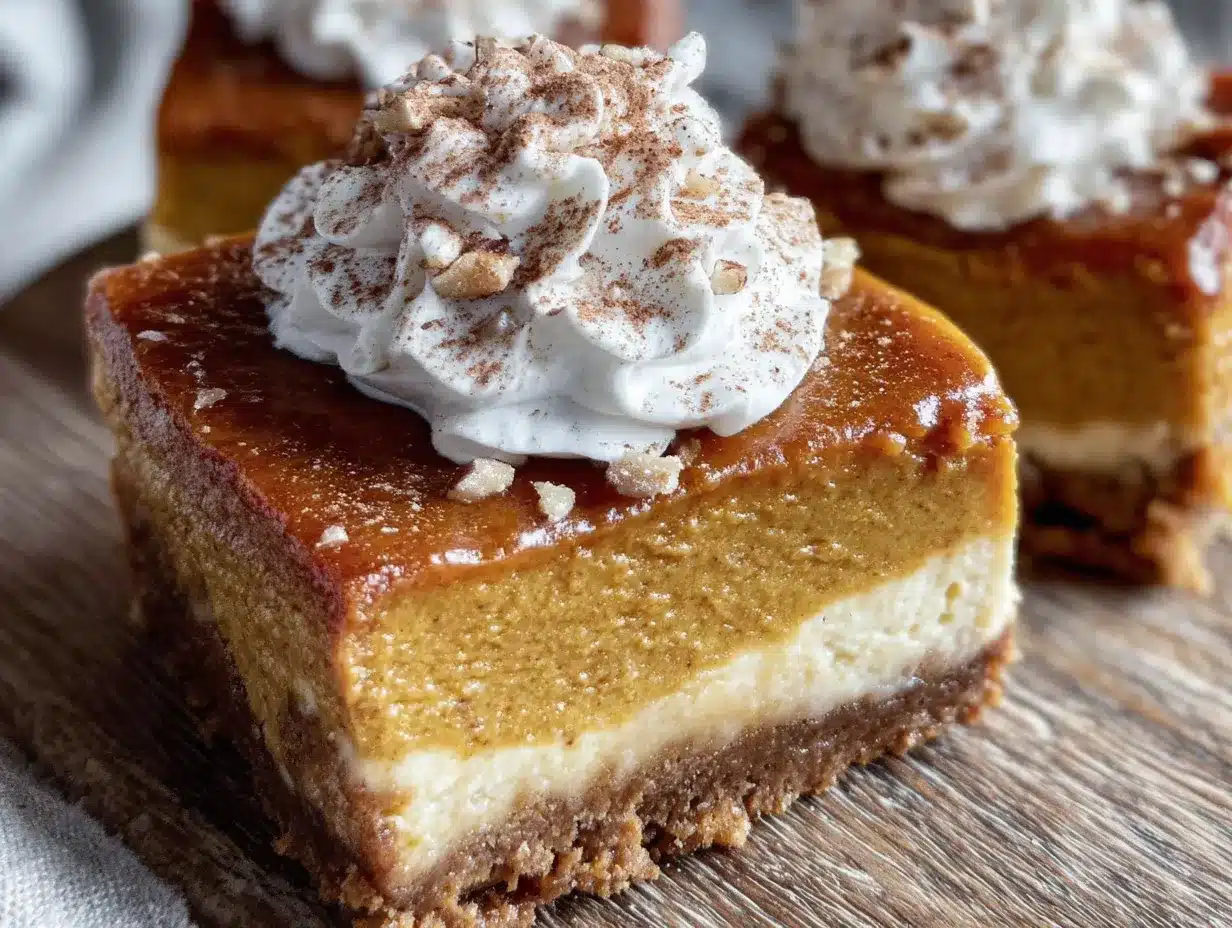
- Unbelievably Delicious : The texture is pure magic—creamy cheesecake layered over spiced pumpkin filling, all sitting on a buttery graham cracker crust. It’s next-level comfort food.
What makes these pumpkin cheesecake bars different from the rest? It’s the technique. Instead of swirled layers that can get muddy, these bars have distinct, clean layers that show off each component. The pumpkin layer is spiced just right—not too heavy on the cinnamon, with a hint of ginger and clove that tastes like fall. The cheesecake layer is tangy and smooth, thanks to room-temperature ingredients and a gentle water bath method I’ll share later. This isn’t just another pumpkin bar recipe. It’s the best version.
This recipe isn’t just good—it is the kind that makes you close your eyes after the first bite. It’s comfort food reimagined: a little bit indulgent, totally doable on a weeknight, and packed with the soul-soothing satisfaction of autumn baking. Perfect for impressing guests without stress, or turning a simple Tuesday into something memorable.
What Ingredients You Will Need
This recipe uses simple, wholesome ingredients to deliver bold flavor and satisfying texture without the fuss. Most of these are fall pantry staples, so you probably have them on hand already. Let’s break down what you’ll need for each layer.
For the Graham Cracker Crust
- 1 ½ cups graham cracker crumbs (about 12 full sheets, crushed finely)
- ¼ cup granulated sugar
- 6 tablespoons unsalted butter, melted (I prefer Land O’Lakes for consistent richness)
- Pinch of salt (optional, but it balances the sweetness)
For the Pumpkin Layer
- 1 can (15 oz) pumpkin puree (not pumpkin pie filling—make sure it’s 100% pure pumpkin)
- ½ cup granulated sugar
- ¼ cup light brown sugar, packed
- 2 large eggs, room temperature
- ½ cup heavy cream (adds richness; half-and-half works in a pinch)
- 1 teaspoon vanilla extract
- 1 ½ teaspoons pumpkin pie spice (I use McCormick or make my own blend)
- ½ teaspoon ground cinnamon
- ¼ teaspoon salt
For the Cheesecake Layer
- 16 oz cream cheese, softened to room temperature (two 8-oz blocks, full-fat for best texture)
- ½ cup granulated sugar
- 2 large eggs, room temperature
- 1 teaspoon vanilla extract
- 2 tablespoons all-purpose flour (helps stabilize the cheesecake and prevent cracking)
Ingredient Tips & Substitutions
For the graham cracker crust, you can substitute crushed digestive biscuits or vanilla wafers if you’re in a pinch. I’ve also used gluten-free graham crackers with great results—just make sure they’re finely crushed. For the pumpkin layer, don’t skip the heavy cream. It gives the pumpkin filling a silky texture that sets beautifully. If you’re dairy-free, use canned coconut cream instead, but note the flavor will shift slightly. For the cheesecake layer, room temperature cream cheese is non-negotiable. Cold cream cheese creates lumps that won’t smooth out, and nobody wants lumpy cheesecake. I recommend Philadelphia brand for the creamiest results, but any full-fat block cream cheese works. If you need a lower-fat option, Neufchâtel cheese works—just expect a slightly less rich texture.
For a deeper spice flavor, toast your own spices: lightly warm cinnamon, ginger, nutmeg, and cloves in a dry pan for 30 seconds before adding to the pumpkin mixture. It wakes up the oils and makes the whole kitchen smell like a fall candle.
Equipment Needed
You don’t need a fancy kitchen setup to make these pumpkin cheesecake bars. Here’s what you’ll need:
- 9×9-inch square baking pan (metal or glass both work; I prefer metal for even browning)
- Parchment paper (for easy removal and cleanup)
- Large mixing bowls (at least two—one for pumpkin layer, one for cheesecake)
- Hand mixer or stand mixer (a whisk and some elbow grease work too, but a mixer makes the cheesecake smoother)
- Food processor or rolling pin (for crushing graham crackers; a zip-top bag and a heavy pan work in a pinch)
- Rubber spatula (for scraping every last bit of batter—don’t waste any!)
- Measuring cups and spoons
- Sharp knife (for clean slices; run it under hot water between cuts)
If you don’t have a 9×9 pan, an 8×8 pan works—just increase the baking time by 5-8 minutes. For the crust, I’ve used a store-bought graham cracker crust in a pinch, but homemade is so much better. And honestly, crushing crackers in a bag is kind of therapeutic. Just sayin’.
Preparation Method
Let’s get baking. I’ll walk you through each step so you feel confident, even if it’s your first time making layered bars. Take your time—good things come to those who wait.
Step 1: Prep the Pan and Preheat
Preheat your oven to 325°F (163°C). Line your 9×9-inch pan with parchment paper, leaving a 2-inch overhang on two opposite sides. This creates handles for lifting the bars out later. Lightly grease the parchment with butter or nonstick spray.
Step 2: Make the Crust
In a medium bowl, combine the graham cracker crumbs, ¼ cup sugar, and a pinch of salt. Pour in the melted butter and stir with a fork until the mixture looks like wet sand. Press the mixture firmly into the bottom of the prepared pan. Use the bottom of a measuring cup to get it even and compact. Bake for 10 minutes, then set aside to cool slightly while you make the fillings.
Step 3: Make the Pumpkin Layer
In a large bowl, whisk together the pumpkin puree, granulated sugar, and brown sugar until smooth. Add the eggs one at a time, whisking well after each. Stir in the heavy cream and vanilla. Sprinkle the pumpkin pie spice, cinnamon, and salt over the mixture, then whisk until fully combined. The batter should be thick but pourable. Set aside.
Step 4: Make the Cheesecake Layer
In another large bowl, beat the softened cream cheese with an electric mixer on medium speed until smooth and creamy—about 2 minutes. Scrape down the sides of the bowl. Add the ½ cup sugar and beat until fluffy, about 1 minute more. Add the eggs one at a time, beating on low after each just until incorporated. Overbeating at this stage adds too much air, which can cause cracks. Stir in the vanilla and flour by hand with a rubber spatula until just combined. The batter should be smooth and thick.
Step 5: Assemble the Layers
Pour the pumpkin mixture over the pre-baked crust and spread it into an even layer. Then, carefully spoon the cheesecake mixture over the pumpkin layer. Use a spatula to gently spread it to the edges, being careful not to mix the two layers together. It’s okay if they touch a little—that’s the beauty of these bars.
Step 6: The Water Bath Trick
Place the pan inside a larger baking dish (like a 9×13-inch pan). Pour hot water into the larger dish until it reaches about halfway up the sides of the 9×9 pan. This gentle heat prevents the cheesecake from cracking and keeps the texture silky. Carefully transfer the whole setup to the oven. Bake for 50-60 minutes, or until the edges are set and the center jiggles slightly when you gently shake the pan. The top should look pale golden, not brown.
Step 7: Cool and Chill
Remove the pan from the water bath and place it on a wire rack. Let it cool completely at room temperature—about 1-2 hours. Then, cover the pan with plastic wrap and refrigerate for at least 4 hours, or overnight. This is the hardest part, I know. But the chilling step is what gives these bars their clean, sliceable layers. Don’t rush it.
Step 8: Slice and Serve
Once fully chilled, use the parchment handles to lift the entire block out of the pan. Place it on a cutting board. Use a sharp knife to slice into 16 squares (or 9 if you want bigger portions). For clean cuts, wipe the knife clean between slices. Serve cold or at room temperature—both are amazing.
Cooking Tips & Techniques
After making these pumpkin cheesecake bars more times than I can count, I’ve learned a few things the hard way. Here’s what I wish someone had told me.
Room Temperature is Your Friend
I know it’s tempting to use cold cream cheese straight from the fridge. Don’t do it. Cold cream cheese creates lumps that never fully smooth out, no matter how long you beat it. Let your cream cheese, eggs, and even the pumpkin sit on the counter for 30 minutes before you start. Your cheesecake layer will be silky smooth.
Don’t Overmix the Cheesecake
I learned this one after a batch of cracked bars that looked like a dried-up riverbed. Overmixing incorporates too much air, which expands in the oven and then collapses, causing cracks. Mix just until the ingredients come together—no more. And always scrape down the bowl to ensure even blending.
The Water Bath is Worth It
I used to skip the water bath because it felt like extra work. Big mistake. Without it, the edges of the cheesecake layer cook faster than the center, leading to cracks and a dry texture. The water bath creates a humid environment that cooks the cheesecake gently and evenly. If you’re worried about water seeping in, wrap the bottom of your pan in a double layer of aluminum foil before adding the crust.
Patience with Chilling
I get it—you want to eat these now. But cutting into warm cheesecake bars is like cutting into a puddle. The layers haven’t set, and you’ll end up with a delicious but messy situation. Give them the full chill time. I promise it’s worth the wait.
Watch the Oven
Ovens vary wildly. My old oven ran hot, and I’d end up with overbaked edges. Start checking at the 45-minute mark. The center should jiggle like Jell-O when you shake the pan, not like liquid. If the top starts browning too fast, tent the pan loosely with foil for the last 10 minutes.
Variations & Adaptations
One of the best things about this recipe is how flexible it is. Here are some ways to make it your own.
Gluten-Free Version
Swap the graham cracker crust for gluten-free graham crackers or crushed gluten-free shortbread cookies. The cheesecake layer already uses just 2 tablespoons of flour, which you can replace with an equal amount of cornstarch or a gluten-free all-purpose blend. I’ve tested this with King Arthur’s gluten-free flour, and the texture was spot-on.
Dairy-Free Adaptation
Use dairy-free cream cheese (like Kite Hill or Violife) and coconut cream in place of heavy cream. The crust can be made with melted coconut oil or vegan butter. The texture will be slightly less creamy, but the flavor is still amazing. My dairy-free friend devoured an entire pan, so that’s a win in my book.
Spice It Up
If you love a bold pumpkin spice flavor, add an extra ½ teaspoon of ginger and a pinch of cardamom to the pumpkin layer. I once added a teaspoon of bourbon vanilla extract instead of regular—the subtle warmth was incredible. For a savory twist, try adding a pinch of black pepper to the pumpkin layer. It sounds weird, but it actually enhances the sweetness.
Chocolate Lover’s Version
Melt 4 ounces of dark chocolate and drizzle it over the baked cheesecake layer before chilling. Or, add ¼ cup of mini chocolate chips to the pumpkin layer for little pockets of melted chocolate. I tried this one Thanksgiving, and it was gone before the turkey hit the table.
Individual Servings
Make these in a muffin tin for portable, single-serving bars. Line a 12-cup muffin tin with paper liners, press the crust into each cup, and fill with the pumpkin and cheesecake mixtures. Bake for 18-22 minutes. Perfect for parties or lunchbox treats.
Serving & Storage Suggestions
These pumpkin cheesecake bars are versatile enough for almost any occasion. Here’s how to serve and store them like a pro.
Serving Temperature
I prefer them cold straight from the fridge—the layers are firm, and the flavors are clean and bright. But they’re also delicious at room temperature, especially if you’re serving them after a warm meal. Let them sit out for 15-20 minutes before serving for a softer texture.
Presentation Ideas
Dust the tops with a light sprinkle of cinnamon or pumpkin pie spice before serving. Add a dollop of whipped cream and a drizzle of caramel sauce for an extra-indulgent touch. For a fall-themed platter, arrange the bars on a wooden board with candied pecans and dried apple slices. It looks gorgeous and tastes even better.
Complementary Dishes
These bars pair beautifully with a hot cup of spiced chai, black coffee, or a warm apple cider. For a full fall dessert spread, serve alongside my crispy garlic chicken—wait, no, that’s for dinner. For dessert, try them with a scoop of vanilla bean ice cream or a drizzle of salted caramel. The salty-sweet combo is unbeatable.
Storage Instructions
Store leftover bars in an airtight container in the refrigerator for up to 5 days. Place a layer of parchment paper between stacked bars to prevent sticking. For longer storage, freeze the bars for up to 3 months. Wrap each bar individually in plastic wrap, then place them in a freezer-safe bag. Thaw overnight in the refrigerator before serving.
Flavor Development
Here’s a little secret: these bars taste even better on day two. The flavors meld together overnight, creating a deeper, more cohesive pumpkin and cheesecake experience. So if you can resist eating them all on day one, you’re in for a treat.
Nutritional Information & Benefits
Let’s be real: these pumpkin cheesecake bars are a dessert, not a health food. But they do have some redeeming qualities worth mentioning.
Estimated Nutritional Values (per bar, based on 16 servings)
- Calories: 285
- Total Fat: 18g
- Saturated Fat: 10g
- Cholesterol: 85mg
- Sodium: 220mg
- Total Carbohydrates: 28g
- Dietary Fiber: 1g
- Sugars: 20g
- Protein: 5g
Health Highlights
Pumpkin is packed with vitamin A (from beta-carotene), which supports eye health and immune function. It’s also a good source of fiber, which helps with digestion. The cream cheese provides calcium and protein, while the eggs add high-quality protein and B vitamins. Of course, there’s sugar and butter in here too—it’s a dessert, after all. But compared to many store-bought fall treats, these bars are made with real, whole ingredients you can feel good about.
Dietary Considerations
This recipe contains gluten (from graham crackers and flour), dairy (from cream cheese and butter), and eggs. For gluten-free and dairy-free options, see the variations section above. These bars are naturally nut-free, but check your graham cracker brand to be sure.
Conclusion
These pumpkin pie cheesecake bars are everything I love about fall baking. They’re forgiving, adaptable, and absolutely delicious. Whether you’re a seasoned baker or someone who’s still learning to trust the process, this recipe will work for you. It came from a moment of kitchen chaos, but it turned into something I’m genuinely proud of. And honestly, that’s the best kind of recipe—the one that feels like a happy accident but tastes like you planned it all along.
I’d love to hear how your bars turn out. Did you add a twist? Did they disappear faster than you expected? Drop a comment below and share your experience. And if you loved this recipe, please share it with a friend who needs a little fall comfort in their life. Until next time, happy baking—and don’t be afraid to let things go wrong. You never know what deliciousness might come out of it.
Frequently Asked Questions
Can I use canned pumpkin pie filling instead of pure pumpkin?
No, I don’t recommend it. Canned pumpkin pie filling already contains sugar and spices, which will throw off the balance of this recipe. Stick with 100% pure pumpkin puree for the best results. If you only have pumpkin pie filling, reduce the sugar in the pumpkin layer by half and skip the added spices.
Why did my cheesecake layer crack?
Cracks usually happen from overmixing or overbaking. Make sure your cream cheese is at room temperature, and mix just until smooth. Also, the water bath is crucial—it prevents the edges from cooking faster than the center. If you skip it, you’re more likely to see cracks. Don’t worry, though; a little whipped cream hides a multitude of sins.
Can I make these bars ahead of time?
Absolutely! In fact, they taste better the next day. You can make them up to 3 days in advance and store them in the refrigerator. They also freeze beautifully for up to 3 months. Just wrap them tightly and thaw overnight in the fridge before serving.
How do I get clean, neat slices?
Patience is key. Make sure the bars are fully chilled—at least 4 hours, but overnight is better. Use a sharp knife and run it under hot water between each cut. Wipe the blade clean with a paper towel after each slice. This prevents the layers from smearing and gives you those picture-perfect squares.
Can I use a different crust?
Yes! This recipe is flexible. Try crushed vanilla wafers, shortbread cookies, or even ginger snaps for a spicier twist. If you’re gluten-free, use gluten-free graham crackers or crushed gluten-free cookies. Just keep the ratio of crumbs to butter the same—1 ½ cups crumbs to 6 tablespoons butter—for a crust that holds together.
Pin This Recipe!
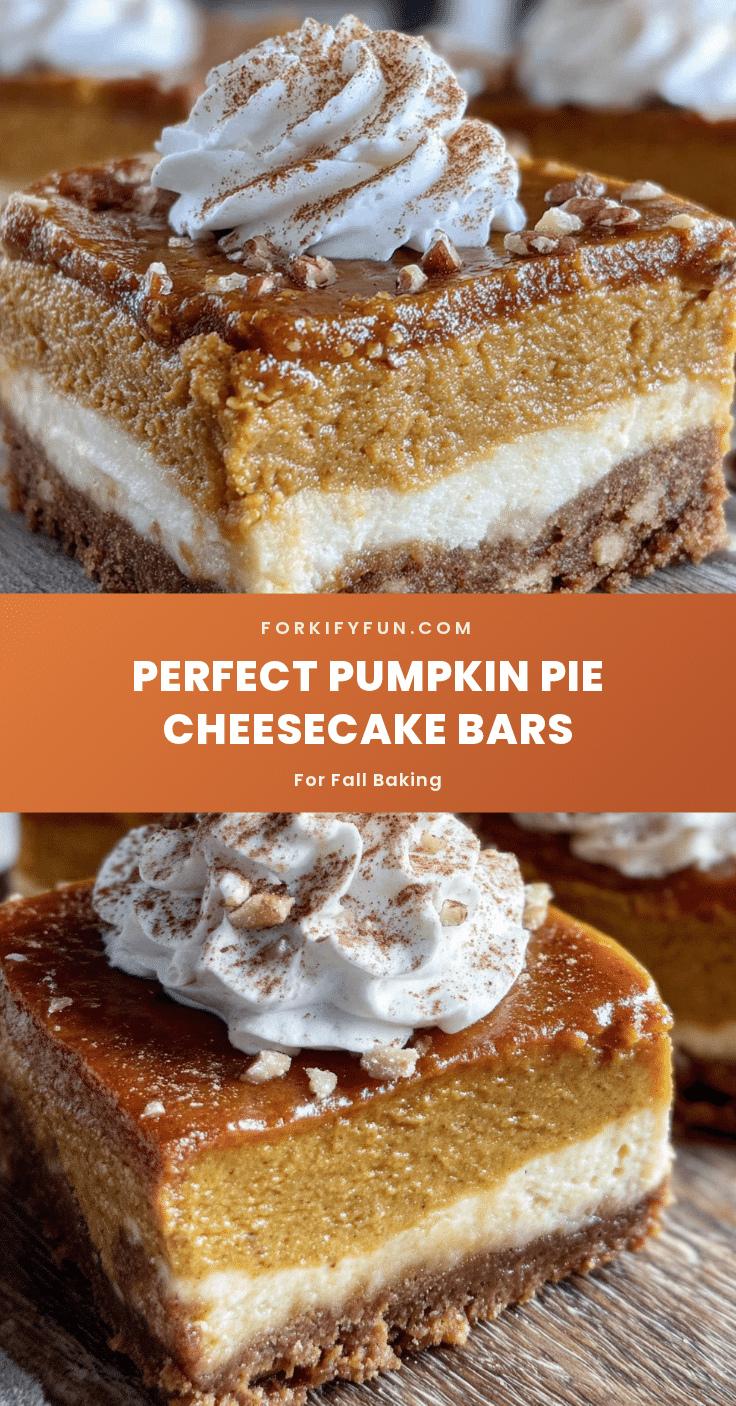
Perfect Pumpkin Cheesecake Bars: Easy Fall Dessert
These pumpkin cheesecake bars feature a buttery graham cracker crust, a spiced pumpkin layer, and a creamy cheesecake topping. They’re an easy, no-roll fall dessert that’s perfect for Thanksgiving or any autumn gathering.
- Prep Time: 30 minutes
- Cook Time: 50-60 minutes
- Total Time: 1 hour 30 minutes (plus 4 hours chilling)
- Yield: 16 servings 1x
- Category: Dessert
- Cuisine: American
Ingredients
- 1 ½ cups graham cracker crumbs (about 12 full sheets, crushed finely)
- ¼ cup granulated sugar
- 6 tablespoons unsalted butter, melted
- Pinch of salt (optional)
- 1 can (15 oz) pumpkin puree (not pumpkin pie filling)
- ½ cup granulated sugar
- ¼ cup light brown sugar, packed
- 2 large eggs, room temperature
- ½ cup heavy cream
- 1 teaspoon vanilla extract
- 1 ½ teaspoons pumpkin pie spice
- ½ teaspoon ground cinnamon
- ¼ teaspoon salt
- 16 oz cream cheese, softened to room temperature (two 8-oz blocks, full-fat)
- ½ cup granulated sugar
- 2 large eggs, room temperature
- 1 teaspoon vanilla extract
- 2 tablespoons all-purpose flour
Instructions
- Preheat your oven to 325°F (163°C). Line a 9×9-inch pan with parchment paper, leaving a 2-inch overhang on two opposite sides. Lightly grease the parchment with butter or nonstick spray.
- In a medium bowl, combine graham cracker crumbs, ¼ cup sugar, and a pinch of salt. Pour in melted butter and stir with a fork until the mixture looks like wet sand. Press firmly into the bottom of the prepared pan. Bake for 10 minutes, then set aside to cool slightly.
- In a large bowl, whisk together pumpkin puree, granulated sugar, and brown sugar until smooth. Add eggs one at a time, whisking well after each. Stir in heavy cream and vanilla. Sprinkle pumpkin pie spice, cinnamon, and salt over the mixture, then whisk until fully combined.
- In another large bowl, beat softened cream cheese with an electric mixer on medium speed until smooth and creamy—about 2 minutes. Scrape down the sides. Add ½ cup sugar and beat until fluffy, about 1 minute. Add eggs one at a time, beating on low after each just until incorporated. Stir in vanilla and flour by hand with a rubber spatula until just combined.
- Pour the pumpkin mixture over the pre-baked crust and spread into an even layer. Carefully spoon the cheesecake mixture over the pumpkin layer and gently spread to the edges, being careful not to mix the layers.
- Place the pan inside a larger baking dish. Pour hot water into the larger dish until it reaches about halfway up the sides of the 9×9 pan. Carefully transfer to the oven and bake for 50-60 minutes, until edges are set and center jiggles slightly when shaken.
- Remove the pan from the water bath and place on a wire rack. Cool completely at room temperature (1-2 hours). Then cover with plastic wrap and refrigerate for at least 4 hours, or overnight.
- Once fully chilled, use the parchment handles to lift the block out of the pan. Place on a cutting board and slice into 16 squares using a sharp knife. Wipe the knife clean between cuts. Serve cold or at room temperature.
Notes
Room temperature ingredients are crucial for a smooth cheesecake layer. The water bath helps prevent cracking. For clean slices, chill thoroughly and run the knife under hot water between cuts. These bars taste even better on day two.
Nutrition
- Serving Size: 1 bar
- Calories: 285
- Sugar: 20
- Sodium: 220
- Fat: 18
- Saturated Fat: 10
- Carbohydrates: 28
- Fiber: 1
- Protein: 5
Keywords: pumpkin cheesecake bars, fall dessert, pumpkin bars, cheesecake bars, Thanksgiving dessert, easy pumpkin dessert