Third batch of deviled eggs this week and I finally stopped peeling them under running water—which, honestly, changed my whole outlook on the project. The first dozen came out looking like tiny, lumpy moonscapes. The second batch had filling that was a little too loose, sliding around on the platter like something out of a horror movie. Which, I guess, was the point.
I wanted spooky Halloween deviled eggs that actually looked creepy, not just sad. You know those Pinterest-perfect Halloween appetizers where everything looks meticulously staged? That wasn’t happening in my kitchen. But these? These came together after I stopped overthinking and just let the olives do the talking.
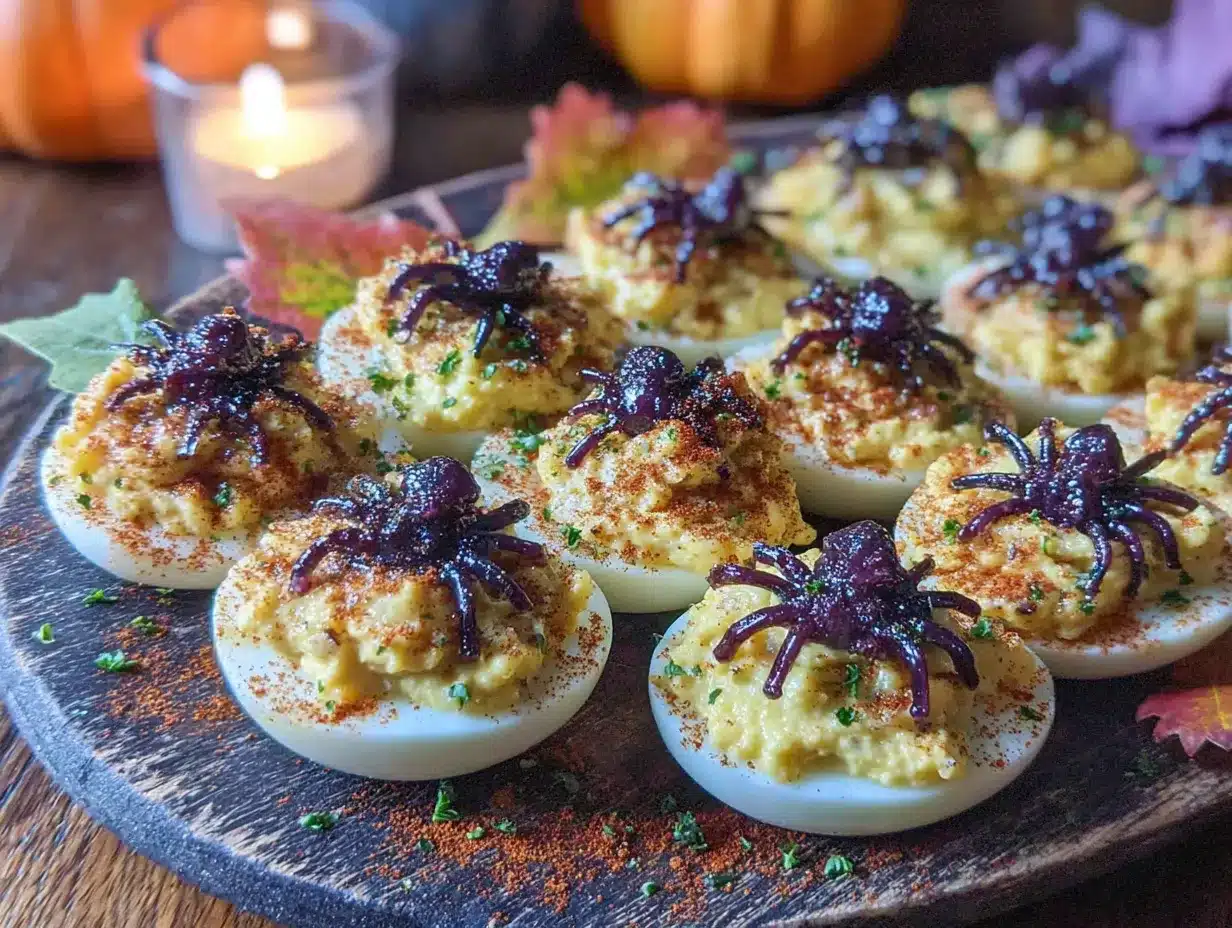
The olive spiders are the trick. Black olives sliced just right, legs arranged just so, perched on top of a perfectly creamy yolk filling. It’s the kind of thing that makes people do a double-take before laughing and grabbing one. And honestly? They taste even better than they look. The briny olive against the rich, tangy yolk filling is a combination I didn’t see coming.
There’s something quietly satisfying about watching someone’s face shift from “ew, what is that?” to “wait, can I have another?” These deviled eggs have become my go-to for Halloween parties, not because they’re fancy, but because they’re genuinely fun. And they taste like something you’d actually want to eat, not just photograph.
Why You’ll Love This Recipe
I’ve tested this recipe more times than I care to admit—through grainy yolks, over-boiled whites, and at least one olive spider that looked more like a confused ant. Here’s why this version actually works:
- Spooky Without Being Complicated : These look like they took serious effort, but the olive spiders come together in seconds. No fondant, no food coloring, no special tools.
- Actually Healthy : These are healthy Halloween deviled eggs packed with protein and good fats. No guilt, just creepy fun.
- Kid-Approved Creepiness : My niece called them “disgusting” in the best possible way and ate four. That’s a win.
- Make-Ahead Friendly : Prep the eggs and filling a day ahead, then assemble the spiders right before serving. Less stress, more spooky.
- Always a Conversation Starter : People can’t resist the olive spiders. They’re weird, they’re fun, and they taste amazing.
What makes these different from every other deviled egg recipe out there? It’s the texture. I blend the yolks with just enough mayo and a splash of pickle juice (trust me) until it’s silky but still holds its shape. No watery filling, no grainy mouthfeel. Just creamy, tangy perfection under a creepy crawly spider.
This is the kind of recipe that makes you feel like you pulled off something impressive, even though it took maybe twenty minutes of actual work. Perfect for Halloween parties, spooky movie nights, or just surprising your kids with something delightfully gross-looking for lunch. Pair them with black velvet Halloween cupcakes for a full spooky spread.
What Ingredients You Will Need
This recipe uses simple, everyday ingredients to create something that looks straight out of a haunted kitchen. Most of these are probably in your fridge and pantry right now.
- Large eggs (6-12) – The foundation of everything. Use eggs that are at least a week old for easier peeling. Fresh eggs are a nightmare to peel, and nobody needs that stress.
- Mayonnaise (1/4 cup for 6 eggs, 1/2 cup for 12) – I prefer Duke’s or Hellmann’s for that perfect creamy tang. Avoid Miracle Whip unless you want sweet deviled eggs.
- Dijon mustard (1 teaspoon) – Adds a subtle sharpness that cuts through the richness. Yellow mustard works in a pinch, but Dijon is better.
- Pickle juice (1 tablespoon) – This is my secret weapon. A splash of brine from your pickle jar adds acidity and brightness that balances the creamy yolks. Don’t skip it.
- Salt and black pepper (to taste) – Simple seasonings that let the other flavors shine.
- Paprika (for garnish) – Smoked paprika adds a deeper flavor, but regular works fine. A light dusting makes the spiders pop visually.
- Canned black olives (1 can, whole) – These become your spiders. Look for large, firm olives that are easy to slice. I’ve tried smaller ones, and the legs just don’t look right.
For the olive spiders: You’ll need whole black olives. Slice one olive in half lengthwise for the body, then slice the other crosswise into thin rings for the legs. It sounds tedious, but once you get the rhythm, it takes maybe two minutes per spider.
Ingredient tips from my kitchen: Use room temperature eggs for more consistent cooking. If you’re short on time, let them sit in warm water for five minutes before boiling. For the mayo, full-fat works best here—low-fat versions can make the filling watery. And please, please use a good quality olive. The cheap ones sometimes fall apart when you try to slice them.
Equipment Needed
You don’t need fancy gadgets for these spooky Halloween deviled eggs. Here’s what I used:
- Medium saucepan – For boiling the eggs. Any pot works, but make sure it’s big enough that the eggs aren’t crowded.
- Sharp knife and cutting board – For slicing olives and halving eggs. A dull knife will crush the olives and make sad, squished spiders.
- Mixing bowl and fork (or food processor) – I prefer mashing by hand for more control over texture. A food processor makes it too smooth, almost paste-like.
- Piping bag or zip-top bag – For filling the eggs neatly. Snip a small corner off a zip-top bag if you don’t have a piping bag.
- Serving platter – Something dark or Halloween-themed makes the spiders pop. I use a black slate board.
Budget-friendly alternatives: No piping bag? Use a spoon. Seriously, just spoon the filling in and smooth it with the back of the spoon. It takes an extra minute but works perfectly. No food processor? A fork and some elbow grease do the job.
Preparation Method
Let’s make these creepy little things. I’ve broken it down so you don’t end up with green yolks or sad-looking spiders.
- Boil the eggs. Place eggs in a single layer in your saucepan. Cover with cold water by about an inch. Bring to a rolling boil over high heat, then immediately cover the pot, remove from heat, and let sit for exactly 10 minutes. This gives you fully cooked yolks without that weird green ring. (I learned the hard way that 12 minutes is too long—those yolks turn gray and taste like sulfur.)
- Ice bath. While the eggs cook, fill a bowl with ice and water. Transfer the eggs to the ice bath immediately after the 10 minutes are up. Let them chill for at least 5 minutes. This stops the cooking and makes peeling way easier.
- Peel carefully. Gently tap each egg on the counter to crack the shell, then roll it between your palms to loosen. Start peeling from the wider end where the air pocket is. If you struggle, try peeling under running water—it helps separate the shell from the egg white. (I still do this sometimes, even though I said I stopped earlier. Old habits.)
- Halve the eggs. Slice each egg lengthwise with a sharp knife. Wipe the knife clean between cuts for neat edges. Gently pop the yolks into a mixing bowl. Arrange the whites on your serving platter.
- Make the filling. Mash the yolks with a fork until they’re crumbly. Add the mayo, Dijon, pickle juice, salt, and pepper. Mix until smooth and creamy. Taste and adjust seasoning—I usually add a pinch more salt and another splash of pickle juice. The filling should be thick enough to hold its shape but soft enough to pipe.
- Pipe the filling. Spoon the filling into a piping bag or zip-top bag. Snip off a small corner. Pipe a generous swirl into each egg white half. Don’t overfill—you want room for the spider to sit on top without everything sliding off.
- Make the olive spiders. This is the fun part. For each spider, take one whole olive and slice it in half lengthwise. One half becomes the body. Take another olive and slice it crosswise into thin rings—these become the legs. Arrange 4-6 rings on each side of the body to look like spider legs. Place the spider gently on top of the deviled egg filling. Press down just enough so it stays put.
- Garnish and serve. Dust lightly with paprika. I like to add a tiny sprinkle of black pepper on the spiders for extra detail. Serve immediately or refrigerate until ready.
Cooking Tips & Techniques
I’ve made enough mistakes with deviled eggs to fill a small cookbook. Here’s what I wish someone had told me:
The peeling problem. If your eggs won’t peel cleanly, you probably boiled them too fresh. Eggs need to be at least a week old for easy peeling. Also, shocking them in an ice bath is non-negotiable. I once skipped it and spent fifteen minutes picking shell fragments out of egg whites. Never again.
Texture trouble. If your filling is too stiff, add a tiny splash of pickle juice or milk. If it’s too loose, add a bit more mashed yolk. The perfect texture should hold a peak when you pipe it but still feel creamy on your tongue. I’ve had batches that were too runny, and the spiders just slid right off. Not a good look.
Olive spider assembly. Use a toothpick to arrange the legs if your fingers feel clumsy. The olive rings are slippery little things. Also, don’t make the spiders too big—they should look cute-creepy, not like they’re about to crawl off the plate. I made one that looked genuinely menacing, and my husband refused to eat it.
Timing is everything. Boil the eggs and make the filling a day ahead. Keep the whites and filling separate in the fridge. Assemble the spiders and fill the eggs right before serving. This keeps the whites from getting watery and the spiders from sliding around. For a Halloween party, I usually assemble everything about an hour before guests arrive and keep the platter chilled until showtime.
A note on paprika: Smoked paprika adds a subtle depth that regular paprika doesn’t. But if you only have the regular stuff, it’s fine. The visual effect is the same—a light dusting that makes the spiders look like they’re crawling through ash. Very on-brand for Halloween.
Variations & Adaptations
These spooky Halloween deviled eggs are surprisingly flexible. Here are some twists I’ve tried:
- Guacamole deviled eggs. Swap half the mayo with mashed avocado. Add a squeeze of lime and a pinch of cumin. The green filling looks extra creepy under the black olive spiders. My kids called these “alien eggs.”
- Spicy sriracha version. Add a teaspoon of sriracha to the yolk mixture and top with a tiny slice of jalapeño. The heat pairs beautifully with the briny olives. Great for adult Halloween parties.
- Bacon-wrapped spiders. Cook a few strips of bacon until crispy, then crumble over the filling before adding the olive spider. The salty crunch is incredible. Not exactly healthy, but Halloween is one day, right?
- Herb-infused filling. Mix in a tablespoon of finely chopped fresh dill or chives. The green flecks look surprisingly spooky against the yellow filling, like something growing in a haunted garden.
- Dairy-free adaptation. Use vegan mayo and skip the pickle juice (or use vinegar instead). The texture won’t be quite as rich, but it still works. I’ve served these to dairy-free friends with zero complaints.
If you’re hosting a Halloween party, these pair beautifully with buffalo chicken dip stuffed pretzel bites for a full savory spread. The spicy, cheesy pretzel bites balance the cool, creamy deviled eggs perfectly.
Serving & Storage Suggestions
These spooky Halloween deviled eggs are best served chilled, straight from the fridge. The cold filling holds its shape better, and the olive spiders stay put. Arrange them on a dark platter or a bed of black rice for maximum creep factor. I like to scatter a few extra olive rings around the platter like scattered spider legs—it adds to the haunted vibe.
Complementary dishes: Serve alongside creamy pumpkin cold foam iced lattes for a Halloween brunch, or with a bowl of roasted tomato basil soup for a cozy dinner. The smoky, tangy soup complements the creamy deviled eggs beautifully.
Storage: Store leftover deviled eggs in an airtight container in the refrigerator for up to 2 days. The filling may soften slightly, and the olive spiders might shift, but they’re still delicious. I don’t recommend freezing—the texture gets weird and watery upon thawing.
Reheating: Don’t. Deviled eggs are served cold. If you’ve refrigerated them, just let them sit at room temperature for 10 minutes before serving to take the chill off. The flavors actually deepen overnight, so leftovers taste even better the next day.
Nutritional Information & Benefits
These healthy Halloween deviled eggs are surprisingly good for you. Each deviled egg half (with filling and olive spider) contains approximately:
- Calories: 70-80
- Protein: 6g
- Fat: 5g (mostly healthy fats from egg yolks and olive oil)
- Carbohydrates: 1g
- Fiber: 0g
- Vitamin D: 10% of daily value
- Choline: 25% of daily value (great for brain health)
Eggs are a complete protein source, meaning they contain all nine essential amino acids. The olive spiders add healthy monounsaturated fats and a touch of iron. This recipe is naturally gluten-free, low-carb, and keto-friendly. If you’re watching sodium, use low-sodium olives and go easy on the salt in the filling.
I love that I can serve these at a Halloween party without feeling like I’m feeding everyone pure sugar. They’re fun, festive, and actually nutritious. My personal rule? If I’m going to eat creepy food, it should at least be good for me.
Conclusion
These spooky Halloween deviled eggs with creepy olive spiders are proof that Halloween food doesn’t have to be all candy and processed snacks. They’re fun to make, even more fun to serve, and genuinely delicious. The combination of creamy, tangy filling with briny olive spiders is unexpected in the best way.
I love watching people’s reactions when they see these on the table. The initial hesitation, the curious lean-in, the eventual smile and reach. It’s the kind of recipe that brings people together—over a shared laugh and a really good deviled egg.
Feel free to customize the spiders, play with the filling flavors, or go wild with the presentation. Halloween is about creativity, after all. If you make these, I’d love to hear how they turned out. Drop a comment below, tag me in your photos, or share your own creepy variations. Happy Halloween, and happy cooking!
FAQs
Can I make these spooky Halloween deviled eggs ahead of time?
Yes! Boil the eggs and prepare the filling up to 24 hours in advance. Store the whites and filling separately in the fridge. Assemble the spiders and fill the eggs no more than 2 hours before serving for best results.
How do I prevent the olive spiders from sliding off?
Make sure your filling is thick enough to hold its shape. Pipe a generous swirl, then gently press the olive spider into the filling so it sticks. If the filling is too loose, the spiders will slide. Also, keep the eggs chilled until serving.
Can I use a different type of olive for the spiders?
Large black olives work best because they’re firm and easy to slice. Green olives can work, but they’re usually smaller and the legs won’t look as dramatic. Kalamata olives are too soft and tend to fall apart.
Are these healthy Halloween deviled eggs suitable for kids?
Absolutely! My niece and nephew love them. The olive spiders look creepy but taste mild. Kids enjoy the fun presentation, and eggs are a healthy snack. Just make sure the olives are sliced small enough to avoid choking hazards for very young children.
What if my deviled egg filling is too runny?
Add more mashed yolk, a tablespoon at a time, until the filling thickens. If you’ve already used all the yolks, add a teaspoon of breadcrumbs or almond flour to absorb excess moisture. Next time, use less mayo and more yolk for a firmer texture.
Pin This Recipe!
Healthy Halloween Deviled Eggs with Creepy Olive Spiders
These spooky Halloween deviled eggs feature creamy, tangy yolk filling topped with creepy olive spiders. They’re fun, healthy, and perfect for Halloween parties.
- Prep Time: 20 minutes
- Cook Time: 10 minutes
- Total Time: 30 minutes
- Yield: 12 servings (1 deviled egg half per serving) 1x
- Category: Appetizer
- Cuisine: American
Ingredients
- 6–12 large eggs
- 1/4 cup mayonnaise (for 6 eggs) or 1/2 cup (for 12 eggs)
- 1 teaspoon Dijon mustard
- 1 tablespoon pickle juice
- Salt and black pepper to taste
- Paprika for garnish
- 1 can whole black olives
Instructions
- Boil the eggs: Place eggs in a single layer in a saucepan, cover with cold water by an inch, bring to a rolling boil, cover, remove from heat, and let sit for exactly 10 minutes.
- Ice bath: Transfer eggs to an ice bath and chill for at least 5 minutes.
- Peel carefully: Tap each egg to crack the shell, roll between palms, and peel starting from the wider end.
- Halve the eggs: Slice each egg lengthwise and pop yolks into a mixing bowl. Arrange whites on a serving platter.
- Make the filling: Mash yolks with a fork, then add mayo, Dijon, pickle juice, salt, and pepper. Mix until smooth and creamy.
- Pipe the filling: Spoon filling into a piping bag or zip-top bag, snip a corner, and pipe a generous swirl into each egg white half.
- Make the olive spiders: Slice one olive in half lengthwise for the body. Slice another olive crosswise into thin rings for legs. Arrange 4-6 rings on each side of the body and place on the filling.
- Garnish and serve: Dust with paprika and serve immediately or refrigerate.
Notes
Use eggs at least a week old for easier peeling. For best results, boil eggs and make filling a day ahead; assemble spiders and fill eggs up to 2 hours before serving. If filling is too runny, add more mashed yolk or a teaspoon of breadcrumbs.
Nutrition
- Serving Size: 1 deviled egg half
- Calories: 7080
- Sodium: 150
- Fat: 5
- Saturated Fat: 1.5
- Carbohydrates: 1
- Protein: 6
Keywords: Halloween deviled eggs, olive spiders, healthy appetizer, spooky snacks, deviled eggs recipe


