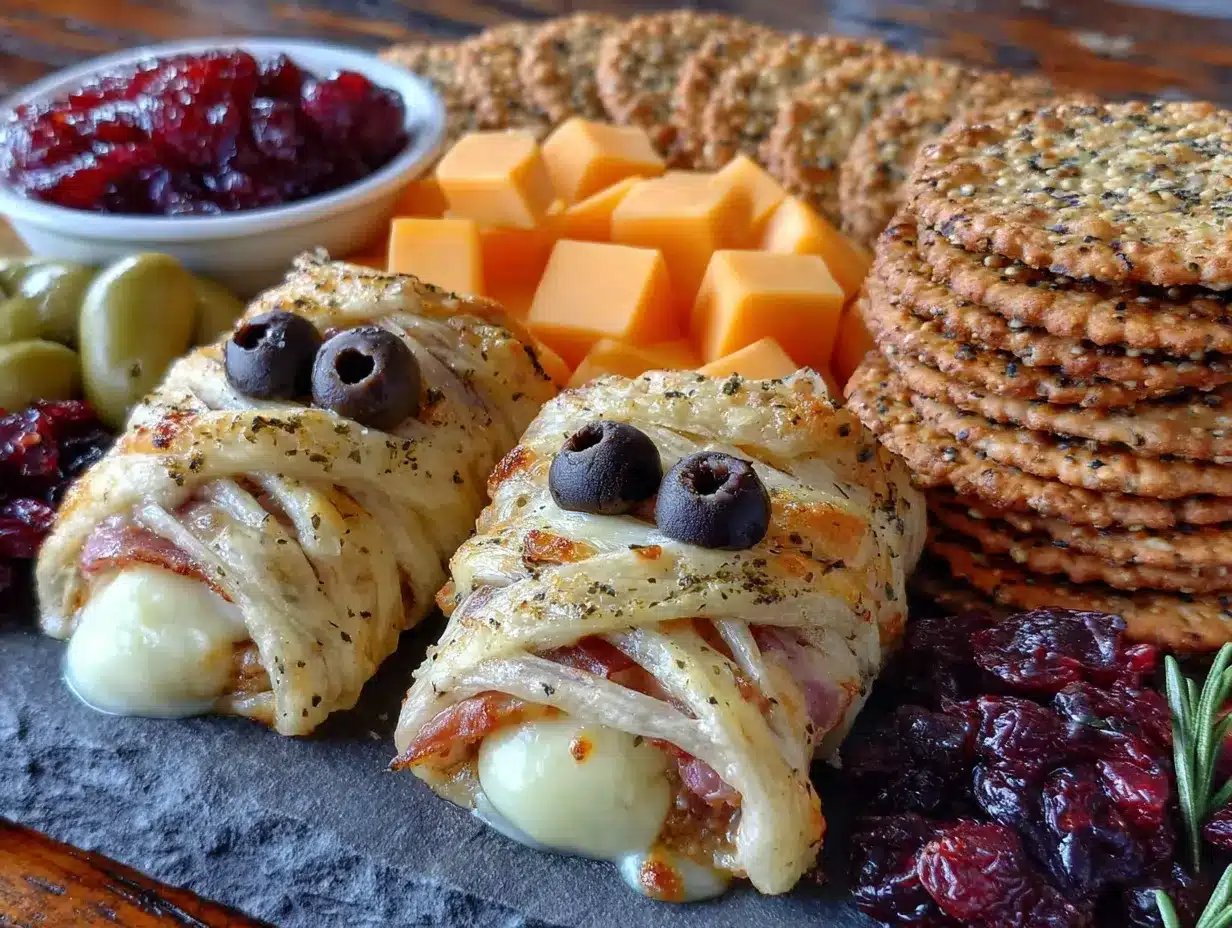
“Mom, can we just eat dinner off a board again?” — my seven-year-old asked this last October, eyeing the Pinterest-perfect Halloween spread I was assembling for a party. And that was it. I scrapped the planned dinner and turned the whole thing into a mummy-themed charcuterie board instead. Honestly, it was the best decision I made all month.
The idea hit me while I was staring at a block of mozzarella, trying to figure out how to make it look spooky without a lot of fuss. Wrapping cheese in prosciutto like a mummy felt obvious, obvious in the best way. My kids went wild for it, and the adults kept sneaking back for “one more piece” of that wrapped cheddar. It was one of those rare moments where the snack actually stole the show from the candy.
This Easy Halloween Mummy Charcuterie Board with Cheese and Crackers is exactly what you need for a stress-free Halloween gathering. It looks like you spent hours on it, but between us? It comes together in about fifteen minutes. The best part is how customizable it is — you can swap in whatever cheese and crackers you already have in the pantry. No fancy ingredients, no complicated steps. Just a fun, delicious board that makes everyone smile.
And honestly, isn’t that what Halloween snacking should be about? A little spooky, a lot of tasty, and zero kitchen stress.
Why You’ll Love This Recipe
Let me tell you why this board has become my go-to for every Halloween party, movie night, and even classroom treat. I’ve tested it on picky kids, hungry teenagers, and adults who claim they’re “not into themed food” — and every single one of them went back for seconds.
- Quick & Easy : You can put this together in under 15 minutes. No cooking, no baking, no complicated steps. Just unwrap, arrange, and serve.
- Simple Ingredients : I bet you already have most of these in your fridge and pantry. Cheese, crackers, deli meat, and a few fun extras. No special grocery runs required.
- Perfect for Halloween Parties : Whether it’s a school party, a neighborhood gathering, or a cozy family movie night, this board fits right in. It’s festive without being fussy.
- Crowd-Pleaser : Kids love the mummy shapes, and adults appreciate the quality ingredients. I’ve never seen leftovers from this board — not once.
- Unbelievably Delicious : The combination of creamy cheese, salty prosciutto, crunchy crackers, and sweet fruit is just perfect. It’s comfort food that feels a little fancy.
What makes this recipe different from all the other charcuterie boards out there? It’s the mummy wrapping technique. Instead of just arranging cheese on a platter, you’re creating little edible characters that tell a story. The prosciutto or salami wraps around the cheese like bandages, and a tiny dot of mustard or a mini chocolate chip becomes the eye. It’s simple, but it transforms the whole board into something magical.
This is the kind of snack that makes you feel like a Halloween hero without any of the stress. Perfect for impressing guests, keeping kids entertained, and making sure everyone leaves full and happy.
What Ingredients You Will Need
This recipe uses simple, everyday ingredients to create something that looks like it came straight out of a Halloween magazine. Most of these are pantry staples or easy to find at any grocery store.
- Cheese (your choice of 2-3 types):
- Mozzarella string cheese — the best for mummy shapes (easy to cut and wrap)
- Cheddar block — cut into rectangles for sturdy mummies
- Gouda or provolone slices — great for layering
- Brie wheel — perfect for a soft, spreadable option
- Deli Meat (for wrapping):
- Prosciutto — thin, salty, wraps beautifully
- Salami slices — adds a peppery kick
- Turkey or ham — mild flavor, kid-friendly
- Crackers (3-4 varieties):
- Butter crackers (like Ritz) — buttery and crisp
- Wheat crackers — sturdy and savory
- Pretzel sticks or twists — adds crunch and saltiness
- Breadsticks — great for dipping and mummy arms
- Fruits and Vegetables:
- Red grapes — sweet, juicy, adds color
- Apple slices — tart and crisp (toss in lemon water to prevent browning)
- Cherry tomatoes — pop of red, looks like little pumpkins
- Baby carrots — crunchy and healthy
- Spooky Decorations:
- Edible eyes (candy eyeballs) — the classic mummy touch
- Mustard or sriracha — for dotting eyes on cheese (if no candy eyes)
- Black olives — sliced into “spider” shapes
- Red bell pepper strips — looks like tongues or blood drips
- Dips and Spreads:
- Honey mustard — sweet and tangy, great with prosciutto
- Ranch dip — classic, kid-approved
- Hummus — adds a healthy, creamy element
- Optional Extras:
- Nuts (almonds, cashews) — adds crunch
- Dried apricots or figs — chewy sweetness
- Dark chocolate squares — for a sweet surprise
- Fresh herbs (rosemary, thyme) — for garnish and aroma
I personally recommend using BelGioioso mozzarella string cheese for the mummies — it holds its shape perfectly and doesn’t get too soft at room temperature. For crackers, I’m partial to Milton’s Craft Bakers because they’re sturdy enough to hold toppings without breaking.
If you’re looking for a dairy-free option, swap the cheese with Violife or Miyoko’s plant-based cheeses. They wrap just as well and taste surprisingly good.
Equipment Needed
You don’t need anything fancy for this board. Here’s what I use every time:
- Large wooden or slate board — any size works, but bigger means more room for creativity. I use a 12×18 inch board from IKEA (budget-friendly, about $15).
- Small bowls or ramekins — for dips, olives, and candy eyes. I love these little Anchor Hocking glass bowls.
- Cheese knife or small paring knife — for cutting cheese into shapes. A sharp knife makes clean cuts.
- Cutting board — for prepping ingredients before arranging.
- Toothpicks or small skewers — for securing mummy wraps and making little food picks.
- Measuring spoons — for portioning dips evenly.
- Parchment paper — optional, but helps with cleanup and keeps the board looking fresh.
If you don’t have a charcuterie board, a large baking sheet or even a clean cutting board works perfectly. I’ve used a pizza pan in a pinch, and it looked adorable.
Preparation Method
Okay, let’s get to the fun part — building your mummy board! I’ll walk you through every step so it’s easy and stress-free.
- Prep Your Cheese Mummies (10 minutes):
- Cut mozzarella string cheese into 2-inch pieces. Each piece will be one mummy.
- Cut cheddar into small rectangles, about 1×2 inches. These make sturdy mummies.
- If using brie, leave it in a small wheel shape — you can wrap it partially for a “peeking mummy” effect.
- Wrap each cheese piece with a strip of prosciutto or salami. Leave a small gap for the eyes — about 1/4 inch uncovered.
- Secure the wrap with a toothpick if it’s loose. Don’t worry about perfection; mummies are supposed to look messy!
- Add eyes: press a candy eyeball into the uncovered cheese, or dot with mustard using a toothpick. For a spookier look, use two dots of sriracha.
- Arrange the Board (5 minutes):
- Place your small bowls of dips, olives, and candy eyes around the board first. This anchors the layout.
- Position the cheese mummies in clusters — I like to group them in twos or threes, like they’re having a conversation.
- Add crackers in small piles around the mummies. I use three different types, spread out so there’s variety in every bite.
- Fill in gaps with grapes, apple slices, cherry tomatoes, and baby carrots. This adds color and freshness.
- Scatter nuts and dried fruit in the remaining spaces. Don’t overcrowd — leave a little breathing room so it looks intentional.
- Add Spooky Details (5 minutes):
- Slice black olives in half and arrange them like little spiders on the board.
- Cut red bell pepper into thin strips and drape them over the edge of the board — they look like tongues or blood drips.
- Place a few extra candy eyeballs around the board, peeking out from under crackers or grapes.
- If you have fresh rosemary, tuck a few sprigs around the edges for a creepy, overgrown look.
- Final Touches (2 minutes):
- Drizzle honey over the brie or goat cheese for a sweet-savory contrast.
- Sprinkle a little flaky sea salt over the prosciutto wraps — it enhances the flavor.
- Step back and look at your board. Add a few more crackers or fruit if it looks sparse.
- Serve immediately, or cover with plastic wrap and refrigerate for up to 2 hours. Take it out 15 minutes before serving to let the cheese come to room temperature.
Pro tip: If your prosciutto is sticking to itself, lay it flat on the cutting board for a minute before wrapping. The warmth helps it separate easily.
Sensory cue: When you’re wrapping the mummies, you should feel the prosciutto cling to the cheese like a soft, salty blanket. The cheese should feel firm but slightly yielding — that’s when you know it’s the perfect texture.
Cooking Tips & Techniques
I’ve made this board about a dozen times now, and I’ve learned a few things the hard way. Here are my best tips:
- Don’t overthink the wrapping. Mummies are supposed to look a little raggedy. If the prosciutto is uneven or the cheese peeks through, that’s actually better. It looks more authentic.
- Use room temperature cheese. Cold cheese is harder to wrap and doesn’t have the same creamy texture. Take your cheese out of the fridge 20 minutes before you start.
- Balance textures. You want a mix of soft (brie, goat cheese), hard (cheddar, gouda), and crunchy (crackers, nuts). This keeps every bite interesting.
- Don’t forget the sweet element. Grapes, dried apricots, or a drizzle of honey balance the saltiness of the meat and cheese. It’s a game-changer.
- Make extra mummies. They always go fast. I usually double the cheese wraps because people eat them like candy.
- Prep ahead. You can wrap the cheese mummies the night before and store them in an airtight container in the fridge. Assemble the board right before serving.
One mistake I made early on was using too much prosciutto. It overwhelmed the cheese and made the mummies hard to bite through. Now I use one thin strip per mummy, and it’s perfect.
Another lesson: don’t put the board together more than 2 hours before serving. The crackers get soft, and the fruit starts to weep. Fresh is best here.
Variations & Adaptations
This board is endlessly customizable. Here are some of my favorite variations:
- Vegetarian Version: Skip the deli meat and wrap the cheese in thinly sliced cucumber or roasted red pepper strips. Use a little cream cheese to help it stick. I tried this for a vegetarian friend, and she loved it.
- Gluten-Free Option: Use gluten-free crackers (I like Crunchmaster or Simple Mills) and double up on the fruits and vegetables. The mummies themselves are naturally gluten-free.
- Dairy-Free Version: Swap all cheese with plant-based alternatives. Wrap them in dairy-free meat alternatives or roasted vegetables. Add extra hummus and guacamole for creamy dips.
- Spicy Twist: Use pepper jack cheese and spicy salami for the mummies. Add jalapeño slices and a sriracha ranch dip on the side. My husband’s favorite version.
- Sweet Mummy Board: Replace all savory items with sweet ones. Wrap marshmallows in fruit leather strips, use chocolate-covered pretzels, and add candy corn, gummy worms, and chocolate-dipped strawberries. Perfect for kids.
- Breakfast Mummy Board: Wrap cheese sticks in bacon (cook it first), add hard-boiled eggs, mini pancakes, and fruit. Serve with maple syrup for dipping. Weekend brunch, anyone?
I personally love the spicy twist version for adult parties. The pepper jack adds a kick that pairs beautifully with a cold beer or a crisp cider.
Serving & Storage Suggestions
This board is best served at room temperature, so take it out of the fridge about 15-20 minutes before you’re ready to eat. The flavors really bloom when the cheese isn’t ice-cold.
Presentation tips:
- Arrange everything in small clusters rather than straight lines. It looks more organic and inviting.
- Use a mix of colors — red grapes, green apples, orange cheddar, white mozzarella. It’s visually stunning.
- Add a few sprigs of fresh rosemary or thyme for a creepy, overgrown vibe. It smells amazing too.
- Place the board on a bed of parchment paper or a festive Halloween napkin for easy cleanup.
What to serve alongside:
- This board pairs beautifully with a crisp white wine like Sauvignon Blanc or a light Pinot Grigio.
- For non-alcoholic options, try sparkling apple cider or a pumpkin spice latte.
- If you’re serving this as a main dish, add a side of slow-roasted tomato soup or a simple green salad.
Storage instructions:
- Leftover cheese mummies can be stored in an airtight container in the fridge for up to 3 days.
- Crackers and nuts should be kept in separate containers to maintain their crunch.
- Fruit and vegetables will last 1-2 days in the fridge, but they’re best eaten fresh.
- Don’t freeze this board — the texture of the cheese and fruit will suffer.
Reheating tips:
- This board is served cold or at room temperature, so no reheating needed.
- If you want warm cheese, pop the brie in the oven at 350°F for 5 minutes before adding it to the board.
The flavors actually develop a bit overnight — the prosciutto infuses the cheese with its salty goodness. So leftovers the next day are still delicious, just a little softer.
Nutritional Information & Benefits
Here’s an approximate nutritional breakdown for a serving of this board (about 1/8 of the board, assuming 8 servings):
| Nutrient | Amount Per Serving |
|---|---|
| Calories | 350-400 |
| Protein | 15-20g |
| Fat | 22-28g |
| Carbohydrates | 25-30g |
| Fiber | 3-5g |
| Sugar | 12-15g (from fruit) |
| Sodium | 600-800mg |
Health benefits:
- Cheese is a great source of calcium and protein, which supports bone health and muscle function.
- Nuts and seeds provide healthy fats and vitamin E, which is good for your skin and heart.
- Grapes and apples are packed with antioxidants and fiber, aiding digestion and immune health.
- Prosciutto and salami offer iron and B vitamins, which help with energy levels.
Dietary considerations:
- This recipe is naturally low-carb and keto-friendly if you skip the crackers.
- It’s not suitable for vegans (unless using plant-based alternatives).
- Contains dairy, gluten (from crackers), and potentially nuts — check your ingredients for allergens.
- For a lower-sodium version, use low-sodium cheese and turkey instead of prosciutto.
I love that this board feels indulgent but actually has a good balance of protein, fat, and carbs. It keeps you full without feeling heavy.
Conclusion
This Easy Halloween Mummy Charcuterie Board with Cheese and Crackers has become a tradition in our house, and I hope it becomes one in yours too. It’s the kind of recipe that proves you don’t need to be a professional chef or spend hours in the kitchen to create something magical.
The best part? You can make it your own. Swap in your favorite cheeses, experiment with different meats, add your kids’ favorite snacks. The mummy theme is just a starting point — the real fun is in the creativity. I’ve seen boards with ghost-shaped cheese, spiderweb cracker arrangements, and even little graveyard scenes made from olives and rosemary.
I’d love to hear how your board turns out! Drop a comment below with your favorite mummy variations, or tag me in your photos if you share them online. Did you try the spicy twist? The sweet version? Something totally new? Let me know — I’m always looking for fresh ideas.
Until next time, happy snacking and Happy Halloween! Remember, the best treats are the ones you share with the people you love.
Frequently Asked Questions
Can I make this board ahead of time?
Yes! You can wrap the cheese mummies up to 24 hours in advance and store them in an airtight container in the fridge. Assemble the board with crackers and fruit no more than 2 hours before serving for the best texture.
What if I can’t find candy eyeballs?
No problem! Use a toothpick to dot mustard, sriracha, or even black sesame seeds onto the cheese. You can also use mini chocolate chips or black peppercorns for a spooky look.
Can I make this board dairy-free?
Absolutely. Swap the cheese with plant-based alternatives like Violife or Miyoko’s. Use dairy-free meat alternatives or roasted vegetables for wrapping. Add extra hummus and guacamole for creamy dips.
How many people does this board serve?
This recipe serves about 6-8 people as a snack or appetizer. If you’re serving it as a main dish for a party, I’d double the recipe. Trust me, it goes fast.
What’s the best way to keep the crackers from getting soggy?
Keep crackers in a separate bowl or add them to the board right before serving. If you’re making the board ahead, store crackers in an airtight container and add them at the last minute.
Pin This Recipe!
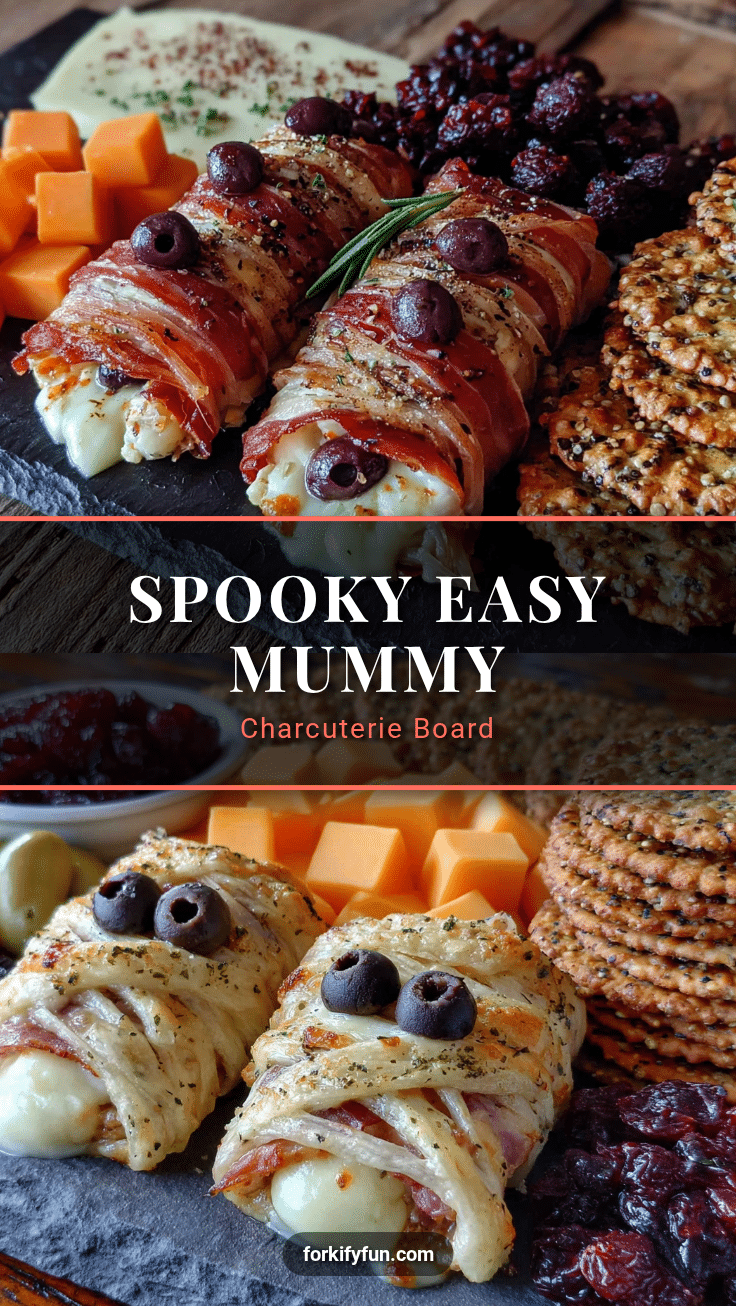
Easy Halloween Mummy Charcuterie Board: Best Cheesy Snack Idea

A fun and festive Halloween charcuterie board featuring cheese wrapped in prosciutto like mummies, served with crackers, fruits, and spooky decorations. It comes together in about 15 minutes and is perfect for parties, movie nights, or classroom treats.
- Prep Time: 15 minutes
- Cook Time: 0 minutes
- Total Time: 15 minutes
- Yield: 6-8 servings
- Category: Appetizer
- Cuisine: American
Ingredients
- Cheese (your choice of 2-3 types): mozzarella string cheese, cheddar block, gouda or provolone slices, brie wheel
- Deli Meat (for wrapping): prosciutto, salami slices, turkey or ham
- Crackers (3-4 varieties): butter crackers (like Ritz), wheat crackers, pretzel sticks or twists, breadsticks
- Fruits and Vegetables: red grapes, apple slices, cherry tomatoes, baby carrots
- Spooky Decorations: edible eyes (candy eyeballs), mustard or sriracha, black olives, red bell pepper strips
- Dips and Spreads: honey mustard, ranch dip, hummus
- Optional Extras: nuts (almonds, cashews), dried apricots or figs, dark chocolate squares, fresh herbs (rosemary, thyme)
Instructions
- Prep Your Cheese Mummies (10 minutes): Cut mozzarella string cheese into 2-inch pieces. Cut cheddar into small rectangles, about 1×2 inches. If using brie, leave it in a small wheel shape. Wrap each cheese piece with a strip of prosciutto or salami, leaving a small gap for the eyes. Secure with a toothpick if needed. Add eyes: press a candy eyeball into the uncovered cheese, or dot with mustard using a toothpick.
- Arrange the Board (5 minutes): Place small bowls of dips, olives, and candy eyes around the board. Position the cheese mummies in clusters. Add crackers in small piles around the mummies. Fill in gaps with grapes, apple slices, cherry tomatoes, and baby carrots. Scatter nuts and dried fruit in remaining spaces.
- Add Spooky Details (5 minutes): Slice black olives in half and arrange like spiders. Cut red bell pepper into thin strips and drape over the edge. Place extra candy eyeballs around the board. Tuck fresh rosemary sprigs around the edges.
- Final Touches (2 minutes): Drizzle honey over brie or goat cheese. Sprinkle flaky sea salt over prosciutto wraps. Step back and adjust if needed. Serve immediately, or cover with plastic wrap and refrigerate for up to 2 hours. Take out 15 minutes before serving.
Notes
Mummies are supposed to look raggedy, so don’t overthink the wrapping. Use room temperature cheese for easier wrapping. Balance textures with soft, hard, and crunchy elements. Don’t forget a sweet element like grapes or honey. Make extra mummies as they go fast. Prep cheese mummies the night before and assemble the board right before serving. Keep crackers separate until serving to prevent sogginess.
Nutrition
- Serving Size: 1/8 of the board
- Calories: 350400
- Sugar: 1215
- Sodium: 600800
- Fat: 2228
- Saturated Fat: 1015
- Carbohydrates: 2530
- Fiber: 35
- Protein: 1520
Keywords: Halloween charcuterie board, mummy cheese, easy Halloween snack, cheese board, party appetizer, spooky snack