I wasn’t trying to throw a Halloween party. Honestly, I was just trying to use up the three egg whites sitting in my fridge from a custard experiment that went sideways. But when my neighbor, a retired pastry chef named Carol, saw me lugging a bag of powdered sugar into the house, she just laughed. “You’re making those ghost cookies, aren’t you?” I had no idea what she was talking about. She pulled me into her kitchen, which smelled faintly of vanilla and something clean, like winter air. She wasn’t making a big deal of it. She just grabbed a bowl, a whisk, and started talking about stiff peaks like it was the weather. The whole thing took her maybe twenty minutes, and the result—little piped ghosts staring back at me from a baking sheet—was so absurdly charming that I forgot about my original egg white problem entirely.
That’s the thing about these spooky ghost meringue cookies for Halloween. They look like they require a steady hand and some kind of culinary degree, but honestly? They’re almost comically easy. The hardest part is waiting for them to bake, and maybe not eating them all before the trick-or-treaters show up. I mean, let’s face it—Halloween treats are usually a sugar bomb of candy corn and chocolate bars. These are light, airy, and just a little bit spooky. They melt on your tongue, and they make you feel like you actually *made* something, even if you spent most of the time just watching your stand mixer do the work. Maybe you’ve been there—wanting to bring something homemade to a Halloween party but dreading the mess of cake pops or the precision of sugar cookies. This is your answer.
The first time I made them, I forgot to wipe down my bowl with vinegar. The meringue deflated, and I ended up with sad, flat little blobs that looked more like deflated ghosts than anything spooky. Carol would have been mortified. But that failure taught me the one rule you absolutely cannot break: your bowl must be perfectly clean and grease-free. Now, these ghost meringue cookies are my go-to for every Halloween gathering. They’re the recipe that keeps on giving—literally, because they last for weeks in an airtight container. So, if you’re looking for a Halloween treat that’s more charming than terrifying, and more impressive than a store-bought bag, you’ve found it.
Why You’ll Love This Recipe
Let me tell you why this recipe has become a staple in my kitchen every October. It’s not just because they’re cute—though, honestly, the first time I piped a ghost shape and it actually *looked* like a ghost, I did a little dance. It’s because these cookies deliver on every level without making you want to pull your hair out.
- Quick & Easy: The active prep time is about 15 minutes. Seriously. The mixer does all the heavy lifting, and you just pipe and bake. Perfect for a last-minute Halloween craving or when you realize the school party is tomorrow.
- Simple Ingredients: You likely have everything in your pantry right now. Egg whites, sugar, vanilla, and a pinch of cream of tartar. No special trip to the store for black food coloring or obscure spices.
- Perfect for Halloween: These are the star of any Halloween spread. They look spooky and fun on a cake stand, and kids absolutely lose their minds over them. They’re also great for classroom parties because they’re nut-free and gluten-free.
- Crowd-Pleaser: I’ve brought these to three different Halloween parties, and they always get the same reaction: “Wait, you *made* these?” They’re light and airy, not overly sweet, and everyone loves the texture.
- Unbelievably Delicious: The outside is crisp and delicate, and the inside is soft and marshmallowy. The vanilla flavor is pure and simple. It’s the kind of cookie that makes you close your eyes after the first bite.
What makes *my* version different from the rest? It’s the technique. I learned the hard way that a perfectly clean bowl is non-negotiable, and I’ve refined the sugar-adding process to ensure a glossy, stable meringue every single time. Plus, I’ve tested the baking time and temperature to give you that perfect ghost shape—puffy and round, not cracked and sad. This isn’t just another meringue cookie recipe. It’s your best version of a Halloween classic, tested and perfected so you don’t have to learn the hard way like I did.
What Ingredients You Will Need
This recipe uses simple, wholesome ingredients to create a treat that’s light, airy, and perfectly spooky. The magic is in the technique, not the grocery list. Here’s everything you’ll need, with a few notes from my own kitchen trials.
- Egg Whites (3 large, room temperature): This is the backbone of your meringue. Make sure your eggs are at room temperature—cold egg whites don’t whip up as well. I usually take mine out of the fridge about 30 minutes before I start. Separate them carefully; even a tiny bit of yolk will ruin your meringue. I recommend cracking each egg into a small bowl first, then adding the white to your mixing bowl. It saves you from a yolk disaster.
- Granulated Sugar (¾ cup / 150g): Regular white sugar is what you need. Don’t use powdered sugar or brown sugar—they’ll change the texture and stability. The sugar needs to dissolve completely into the egg whites, which is why we add it slowly. I’ve tried using superfine sugar (caster sugar) and it works beautifully, but regular granulated is just fine.
- Cream of Tartar (½ teaspoon): This is your secret weapon. It stabilizes the egg whites and helps them hold their shape. It also gives the meringue a slightly tangy flavor that balances the sweetness. If you don’t have cream of tartar, you can substitute with 1 teaspoon of lemon juice or white vinegar. But honestly, cream of tartar is cheap and works best.
- Vanilla Extract (1 teaspoon): Pure vanilla extract gives the cookies a warm, comforting flavor. I prefer Nielsen-Massey for its rich taste, but any pure vanilla will do. Avoid imitation vanilla if you can—it has a chemical aftertaste that doesn’t play well with the delicate meringue.
- Salt (a pinch): Just a tiny pinch of salt enhances the vanilla flavor and balances the sweetness. Don’t skip it—it makes a real difference.
- Black Gel Food Coloring (optional, for faces): To turn your ghosts into spooky little spirits, you’ll need black gel food coloring and a small paintbrush or a toothpick. Gel food coloring is better than liquid because it won’t water down the meringue. I use Wilton brand, and it works perfectly.
Ingredient Selection Tips: For the best results, use fresh eggs. Older egg whites are thinner and don’t whip up as well. If you’re unsure about your eggs’ freshness, do the float test—fresh eggs sink in water, old eggs float. Also, make sure your sugar is fresh and not clumpy. If your sugar has been sitting in a humid pantry, it might have absorbed moisture, which can affect the meringue.
Substitution Guidance: This recipe is naturally gluten-free and nut-free, making it safe for most allergies. If you need a vegan option, you can try aquafaba (the liquid from a can of chickpeas) as a substitute for egg whites. Use 3 tablespoons of aquafaba per egg white. It works surprisingly well, though the texture is slightly different. For a flavor twist, you can replace the vanilla with almond extract or peppermint extract. Just be careful—a little goes a long way.
Equipment Needed
You don’t need a fancy kitchen to make these ghost meringue cookies. Here’s what you’ll need, along with a few tips from my own experience.
- Stand Mixer or Hand Mixer: A stand mixer with a whisk attachment is ideal because it frees up your hands and whips the meringue evenly. But a hand mixer works just fine—you’ll just need to hold it for a few minutes. I’ve used both, and the stand mixer is definitely easier, but don’t let a lack of one stop you.
- Large Mixing Bowl: Make sure it’s glass, metal, or ceramic. Plastic bowls can retain grease, which is the enemy of meringue. I have a dedicated glass bowl I use only for meringues, and it’s a game-changer. Before you start, wipe the bowl and the whisk attachment with a paper towel dipped in a little white vinegar or lemon juice to remove any trace of grease.
- Piping Bag and Tip: A piping bag with a round tip (like a Wilton 1A or 12) is perfect for creating ghost shapes. If you don’t have a piping bag, you can use a sturdy zip-top bag with the corner snipped off. It won’t be as precise, but it’ll work in a pinch. I’ve done it, and the ghosts still looked cute—just a little more “abstract.”
- Baking Sheets and Parchment Paper: Line your baking sheets with parchment paper. Do not use wax paper or silicone mats—the meringue can stick. Parchment paper ensures easy release and cleanup.
- Small Paintbrush or Toothpick: For painting on the ghost faces. A fine-tipped paintbrush gives you more control, but a toothpick dipped in food coloring works great too. I keep a set of cheap craft paintbrushes just for food projects.
- Cooling Rack: Meringues need to cool completely on the baking sheet before you move them. A cooling rack is helpful for the final cooling, but it’s not strictly necessary.
Budget-Friendly Options: If you’re just starting out, don’t rush out to buy a stand mixer. A $10 hand mixer will do the job. And instead of a piping bag, use a zip-top bag. The ghosts might look a little more “rustic,” but that’s part of the charm. I’ve made these cookies in a tiny apartment kitchen with the most basic tools, and they still turned out beautifully.
Preparation Method
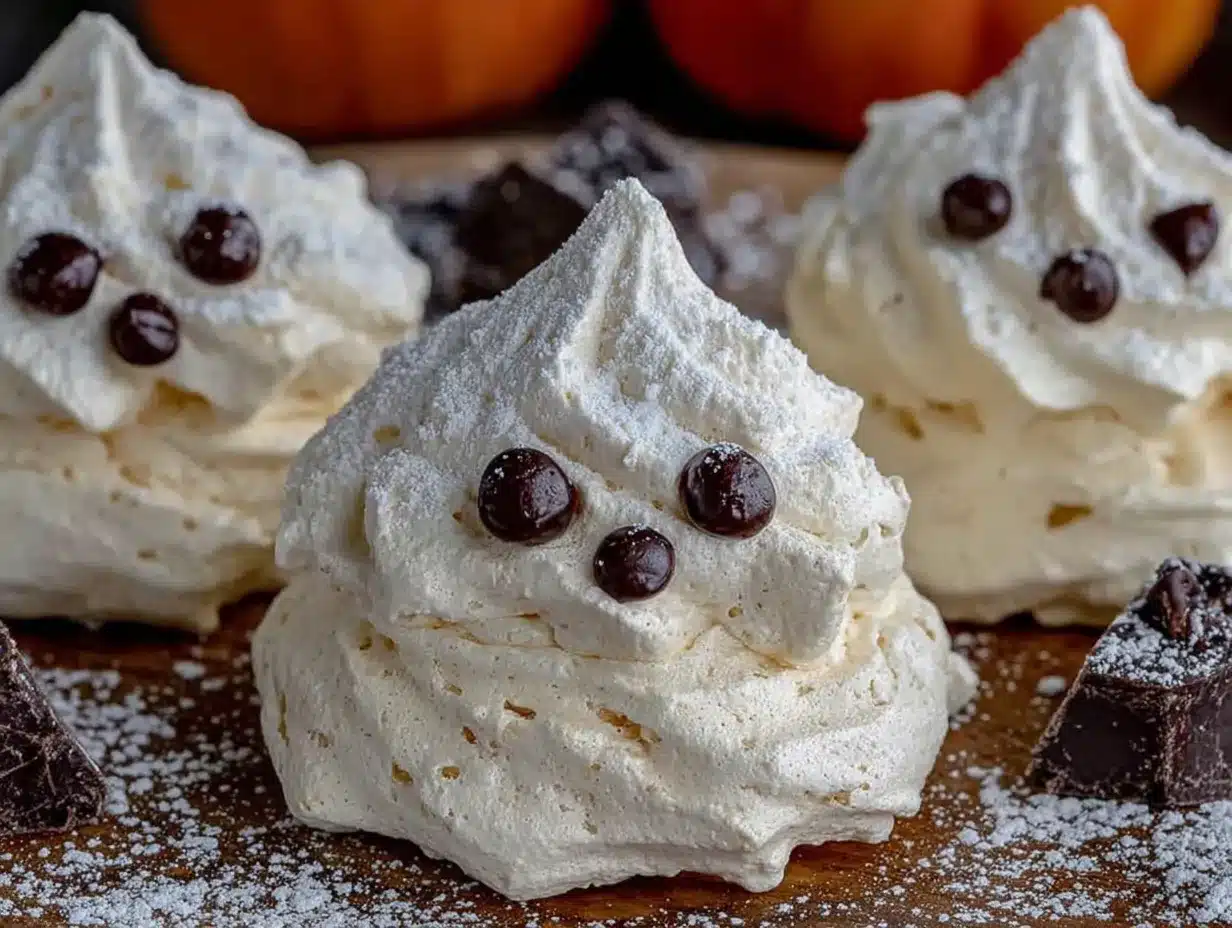
Follow these steps carefully, and you’ll have a batch of spooky ghost meringue cookies that would make Carol proud. I’ve included time estimates and sensory cues so you know exactly what to look for.
- Preheat and Prep (5 minutes): Preheat your oven to 200°F (95°C). Line two large baking sheets with parchment paper. Set them aside. This low temperature is crucial—it dries the meringues out slowly without browning them. If your oven runs hot, consider using an oven thermometer. I learned this the hard way when my first batch turned a sad shade of tan.
- Clean Your Bowl (2 minutes): Wipe your mixing bowl and whisk attachment with a paper towel dipped in white vinegar or lemon juice. This removes any trace of grease. Even a tiny bit of oil can prevent your egg whites from whipping up. I do this every single time, without fail.
- Whip the Egg Whites (5-7 minutes): Add the room-temperature egg whites and cream of tartar to the bowl. Start mixing on medium speed. You’ll see the mixture become frothy and bubbly—that’s good. After about 2 minutes, it will start to look white and foamy. Increase the speed to medium-high. You’re looking for soft peaks—when you lift the whisk, the egg whites should form a soft, droopy peak that holds its shape for a moment before falling back.
- Add the Sugar, Slowly (5-7 minutes): With the mixer running on medium-high, start adding the granulated sugar, one tablespoon at a time. This is the most important step. Adding the sugar slowly allows it to dissolve completely. If you dump it all in at once, your meringue will be grainy and unstable. I set a timer and add a spoonful every 30 seconds. The mixture will start to look glossy and smooth. Keep whipping until you have stiff, glossy peaks. How do you know? Lift the whisk—the meringue should stand up straight, with no drooping. Rub a little between your fingers; it should feel smooth, not gritty. If it feels gritty, keep whipping. This whole process takes about 10-12 minutes from start to finish.
- Add Flavoring (30 seconds): Add the vanilla extract and a pinch of salt. Mix on low speed for just 10-15 seconds until combined. Don’t overmix, or you’ll deflate the meringue.
- Pipe the Ghosts (5-10 minutes): Transfer the meringue to your piping bag fitted with a round tip. Hold the bag straight up and down, about ½ inch above the baking sheet. Squeeze gently to create a round blob about 1½ inches wide. Stop squeezing, then pull the bag straight up to create a little peak on top. That peak becomes the ghost’s head. Repeat, leaving about 1 inch between each ghost. Don’t worry if they’re not perfect—ghosts are supposed to look a little wonky. If you want to make ghost faces, pipe a small teardrop shape instead of a round blob for a more traditional ghost silhouette. I’ve also seen people pipe a small “tail” on the bottom for a floating effect.
- Bake and Dry (2 hours): Place the baking sheets in the preheated oven. Bake for 1 hour and 30 minutes to 2 hours. The meringues are done when they are completely dry and firm to the touch. They should lift easily off the parchment paper. If they stick, they need more time. Don’t open the oven door for the first hour—the rush of cold air can cause the meringues to crack. I know it’s tempting, but resist. After an hour, you can check them quickly. The meringues will be pale and slightly puffy. They should not be brown at all.
- Cool Completely (30 minutes): Turn off the oven and leave the meringues inside with the door slightly ajar to cool completely. This gradual cooling prevents cracking. Once they’re cool, remove them from the baking sheet. They should feel light and hollow.
- Add the Faces (10 minutes): Dip a small paintbrush or toothpick into the black gel food coloring. Carefully paint two eyes and a mouth on each ghost. You can make them spooky (angry eyebrows) or silly (big round eyes). I like to make a few of each. Let the food coloring dry for about 10 minutes before serving or storing.
Troubleshooting Tip: If your meringue weeps (liquid pools on the baking sheet), it means the sugar wasn’t fully dissolved. Next time, add the sugar more slowly and whip longer. If your ghosts crack in the oven, the temperature was too high or they were baked too quickly. Stick to 200°F (95°C) and be patient.
Cooking Tips & Techniques
I’ve made these ghost meringue cookies more times than I can count, and I’ve made every mistake in the book. Here are the lessons I’ve learned so you can skip the failures and get straight to the delicious results.
The Clean Bowl Rule: This is the number one rule of meringue-making. Any trace of grease—from butter, oil, or even the natural oils on your fingers—will prevent the egg whites from whipping up. I wipe my bowl and whisk with vinegar every single time. It’s a small step that makes a huge difference.
Room Temperature Eggs Are Non-Negotiable: Cold egg whites are tighter and don’t incorporate air as well. They also take longer to whip, which can lead to over-whipping. Take your eggs out of the fridge 30 minutes before you start. If you’re in a hurry, place the eggs in a bowl of warm water for 5 minutes.
Don’t Overwhip: Once your meringue reaches stiff peaks, stop. If you keep whipping, the meringue will become dry and grainy, and it will start to separate. The texture will look curdled and the liquid will pool. If this happens, there’s no saving it. Start over with fresh egg whites.
The Humidity Factor: Meringues are notoriously finicky in humid weather. The sugar absorbs moisture from the air, which can make the meringue sticky and prevent it from drying out properly. If you live in a humid climate (like I do in the summer), make these on a dry day if possible. You can also add an extra 15-20 minutes to the baking time.
Multitasking Strategy: While the meringues are baking, you have two hours of free time. Use it to clean up your kitchen, prep other Halloween treats, or just relax. The meringues don’t need any attention during that time, so you’re free to do other things. I usually use this time to make a batch of caramel popcorn or to set up my Halloween decorations.
My Biggest Failure: The first time I made these, I used a plastic bowl that I thought was clean. It wasn’t. The egg whites never got past the foamy stage. I added more cream of tartar, I whipped longer, nothing worked. I finally gave up and threw the whole mess in the trash. That’s when I learned the plastic bowl rule. Now, I only use glass or metal for meringues, and I always, always wipe it down with vinegar.
Variations & Adaptations
One of the best things about these ghost meringue cookies is how easily you can adapt them to your taste, dietary needs, or the occasion. Here are a few variations I’ve tried and loved.
- Chocolate Ghosts: For a chocolate twist, replace 2 tablespoons of the granulated sugar with 2 tablespoons of unsweetened cocoa powder. Sift the cocoa powder with the sugar before adding it to the egg whites. The result is a dark, chocolatey ghost that looks even spookier. I made these for a Halloween party, and they were gone in minutes.
- Peppermint Ghosts: Replace the vanilla extract with ½ teaspoon of peppermint extract. The meringues will have a cool, refreshing flavor that’s perfect for a winter-themed party or a Christmas twist. Add a drop of green food coloring to the meringue for a festive look, or leave them white for a “snow ghost” effect.
- Lemon Ghosts: For a bright, citrusy flavor, replace the vanilla extract with 1 teaspoon of lemon extract and add 1 teaspoon of lemon zest. The lemon flavor pairs beautifully with the sweetness of the meringue. These are perfect for a spring or summer party, but they work for Halloween too—just call them “sour ghosts.”
- Vegan Aquafaba Ghosts: To make these vegan, replace the egg whites with aquafaba (the liquid from a can of chickpeas). Use 3 tablespoons of aquafaba per egg white. Whip it with the cream of tartar just like you would egg whites. It takes a little longer to reach stiff peaks (about 15-20 minutes), but it works. The texture is slightly less crisp, but the flavor is still delicious. I’ve tested this, and my vegan friends were thrilled.
- Spooky Spider Webs: Instead of painting faces, pipe a small spider web on each ghost. After piping the ghost shape, use a toothpick to drag the meringue from the center outward to create a web pattern. It’s a fun, creative twist that looks impressive.
Serving & Storage Suggestions
These ghost meringue cookies are best served at room temperature, and they’re perfect for a Halloween dessert table, a school party, or a spooky movie night. Here’s how to serve and store them for the best results.
Serving Temperature and Presentation: Serve the ghosts at room temperature. They’re light and airy, and they melt in your mouth. Arrange them on a cake stand or a platter for a dramatic effect. You can also place them on a bed of “dirt” (crushed chocolate cookies) for a graveyard scene. I like to add a few plastic spiders or a fake spider web for extra spookiness. For a Halloween party, I once arranged them around a small pumpkin centerpiece, and it looked amazing.
Complementary Dishes and Beverages: These cookies pair beautifully with a hot cup of coffee, tea, or hot chocolate. The sweetness of the meringue is balanced by the bitterness of coffee. For a kid-friendly option, serve them with a glass of milk or apple cider. They also work well alongside other Halloween treats like caramel apples, pumpkin pie, or chocolate bark. I’ve even crumbled them over a bowl of vanilla ice cream for a “ghostly” sundae.
Storage Instructions: Store the ghost meringue cookies in an airtight container at room temperature. Do not refrigerate them—the humidity in the fridge will make them sticky and soft. They will last for up to 2 weeks if stored properly. In fact, they actually get better after a day or two, as they dry out further and become even more crisp. I’ve kept them for 3 weeks, and they were still perfectly delicious.
Reheating Tips: You don’t need to reheat these cookies. They’re meant to be eaten at room temperature. If they’ve absorbed some moisture and become a little soft, you can crisp them up by placing them on a baking sheet in a 200°F (95°C) oven for 10-15 minutes. Let them cool completely before serving.
How Flavors Develop: The vanilla flavor becomes more pronounced after a day or two. The meringue also becomes more stable and crisp. I actually prefer the cookies on day two, when they’ve had time to fully dry out. So don’t be afraid to make them a day or two in advance.
Nutritional Information & Benefits
While these ghost meringue cookies are a treat, they’re surprisingly light compared to other Halloween desserts. Here’s a look at the nutritional profile and some health benefits of the key ingredients.
Estimated Nutritional Values (per cookie, based on 24 cookies):
- Calories: 30
- Total Fat: 0g
- Saturated Fat: 0g
- Cholesterol: 0mg
- Sodium: 5mg
- Total Carbohydrates: 7g
- Dietary Fiber: 0g
- Sugars: 7g
- Protein: 0.5g
Health Benefits of Key Ingredients: Egg whites are a good source of protein and are low in calories and fat. They contain all the essential amino acids your body needs. Cream of tartar is a byproduct of winemaking and is a good source of potassium. It also helps stabilize the egg whites, as we discussed. Vanilla extract contains small amounts of antioxidants, though the amount in this recipe is minimal.
Dietary Considerations: This recipe is naturally gluten-free, nut-free, and dairy-free. It’s also low in fat and cholesterol. For a vegan option, use aquafaba as a substitute for egg whites. The cookies are not suitable for a low-sugar or keto diet, as they are primarily sugar. However, they are a lighter alternative to many Halloween treats like candy bars or brownies.
Potential Allergens: The main allergen in this recipe is egg whites. If you have an egg allergy, use the vegan aquafaba variation. The cookies are also free from common allergens like dairy, nuts, and soy.
My Wellness Perspective: I believe in enjoying treats in moderation. These ghost meringue cookies are a perfect example of a dessert that feels indulgent but is actually quite light. They satisfy your sweet tooth without weighing you down. I love that I can serve them at a party and feel good about offering something that’s not loaded with butter or heavy cream. Plus, they’re a fun, creative activity to do with kids.
Conclusion
These spooky ghost meringue cookies for Halloween are more than just a treat—they’re an experience. They’re the kind of recipe that makes you feel like a kitchen wizard, even if you’ve never made meringue before. They’re light, airy, and just a little bit spooky, perfect for any Halloween gathering. And honestly, they’re so much fun to make. I mean, when else do you get to pipe little ghosts and paint faces on them?
I encourage you to make this recipe your own. Try the chocolate variation, or add a drop of peppermint extract for a wintery twist. Paint silly faces or spooky ones. The beauty of these cookies is that they’re forgiving—they still look adorable even if they’re a little lopsided. And if you mess up? Well, that’s what taste-testing is for. I’ve eaten my fair share of “mistakes,” and let me tell you, they taste just as good as the perfect ones.
I’d love to hear how your ghost meringue cookies turn out. Did you paint them with angry eyebrows? Did you try the lemon variation? Leave a comment below and share your experience. And if you loved this recipe, please share it with your friends and family. After all, Halloween is better when it’s shared. Happy baking, and may your ghosts be ever so spooky!
Frequently Asked Questions
Can I make these ghost meringue cookies in advance?
Yes, absolutely! In fact, I recommend making them a day or two ahead of time. They store beautifully in an airtight container at room temperature for up to two weeks. The texture actually improves as they dry out further.
Why did my meringue not get stiff?
This is usually caused by one of three things: your bowl or whisk had a trace of grease, your egg whites had a bit of yolk in them, or you added the sugar too quickly. Make sure your bowl is squeaky clean and your egg whites are perfectly separated. Add the sugar slowly, one tablespoon at a time.
Can I use liquid food coloring for the ghost faces?
I don’t recommend it. Liquid food coloring can make the meringue sticky and can cause the faces to bleed. Gel food coloring is much better because it’s thicker and more concentrated. It dries quickly and stays where you put it.
How do I know when the meringues are done baking?
The meringues are done when they are completely dry and firm to the touch. They should lift easily off the parchment paper without sticking. If they stick, they need more time. The baking time can vary from 1.5 to 2 hours depending on your oven and the humidity.
Can I freeze these ghost meringue cookies?
Yes, you can freeze them! Place the cooled meringues in a single layer in an airtight container, with parchment paper between layers. They will keep in the freezer for up to 3 months. Thaw them at room temperature for about 30 minutes before serving. They may be slightly less crisp after freezing, but they’ll still be delicious.
Pin This Recipe!
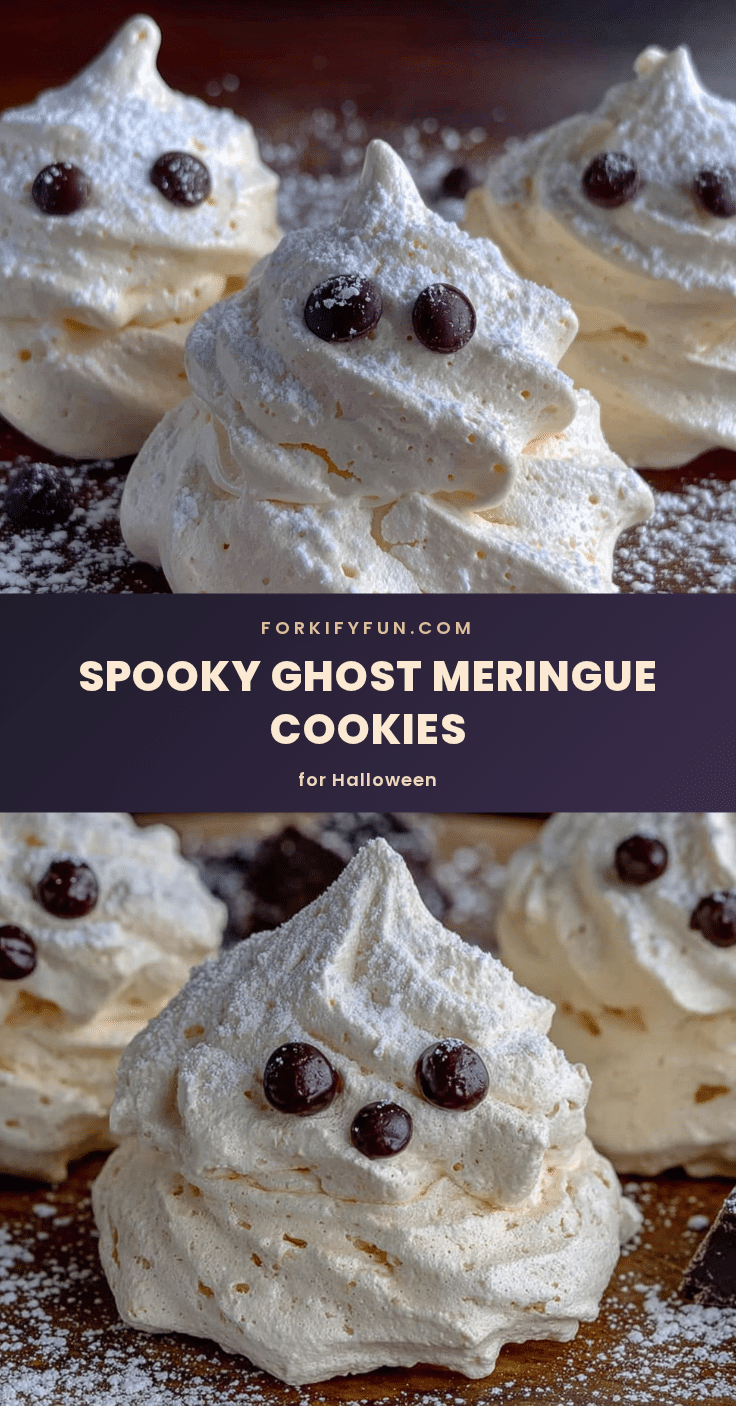
Easy Ghost Meringue Cookies: Best Spooky Halloween Treat
These spooky ghost meringue cookies are light, airy, and surprisingly easy to make. Perfect for Halloween parties, they require simple ingredients and create a charming, impressive treat that melts in your mouth.
- Prep Time: 15 minutes
- Cook Time: 1 hour 30 minutes to 2 hours
- Total Time: 2 hours to 2 hours 45 minutes
- Yield: 24 cookies 1x
- Category: Dessert
- Cuisine: American
Ingredients
- 3 large egg whites, room temperature
- ¾ cup (150g) granulated sugar
- ½ teaspoon cream of tartar
- 1 teaspoon vanilla extract
- a pinch of salt
- Black gel food coloring (for faces)
Instructions
- Preheat oven to 200°F (95°C). Line two large baking sheets with parchment paper.
- Wipe your mixing bowl and whisk attachment with a paper towel dipped in white vinegar or lemon juice to remove any trace of grease.
- Add room-temperature egg whites and cream of tartar to the bowl. Mix on medium speed until frothy and bubbly (about 2 minutes), then increase to medium-high and whip until soft peaks form (about 5-7 minutes total).
- With the mixer running on medium-high, add granulated sugar one tablespoon at a time, waiting about 30 seconds between each addition. Continue whipping until stiff, glossy peaks form and the mixture feels smooth between your fingers (about 10-12 minutes total).
- Add vanilla extract and a pinch of salt. Mix on low speed for 10-15 seconds until just combined.
- Transfer meringue to a piping bag fitted with a round tip (like Wilton 1A or 12). Pipe ghost shapes onto prepared baking sheets: squeeze gently to create a round blob about 1½ inches wide, stop squeezing, then pull the bag straight up to create a little peak on top. Leave about 1 inch between each ghost.
- Bake for 1 hour 30 minutes to 2 hours, until meringues are completely dry and firm to the touch. Do not open the oven door for the first hour.
- Turn off the oven and leave meringues inside with the door slightly ajar to cool completely (about 30 minutes).
- Once cool, use a small paintbrush or toothpick dipped in black gel food coloring to paint two eyes and a mouth on each ghost. Let dry for 10 minutes before serving or storing.
Notes
Ensure your bowl and whisk are completely grease-free for best results. Room temperature eggs are essential. For humid weather, add 15-20 minutes to baking time. Meringues can be stored in an airtight container at room temperature for up to 2 weeks. For vegan option, replace egg whites with aquafaba (3 tablespoons per egg white).
Nutrition
- Serving Size: 1 cookie
- Calories: 30
- Sugar: 7
- Sodium: 5
- Carbohydrates: 7
- Protein: 0.5
Keywords: ghost meringue cookies, Halloween cookies, meringue cookies, spooky treats, easy Halloween dessert, gluten-free cookies, nut-free cookies


