I showed up to my niece’s Halloween party two years ago with a store-bought veggie tray and a bag of pretzels. I know—criminal. Every other aunt had brought something homemade and festive, and there I was, the woman who writes a food blog, holding a sad plastic clamshell of carrots. I spent the whole party watching a different dip disappear. It was a taco dip, but it was wrapped in cheese to look like a mummy. The kids were losing their minds over it, and honestly, so was I. I went home that night, determined to make my own version that was faster, less fussy, and just as fun. That’s how this Easy Black Bean Mummy Taco Dip was born. It’s become my official Halloween party redemption story.
This isn’t just another layered dip. The black beans give it a heartiness that ground beef sometimes misses, and the whole thing comes together in about fifteen minutes. No oven required, no complicated steps. You just layer, decorate, and watch it vanish. I’ve made it for three Halloweens now, and every time, someone asks for the recipe before the party even ends. That’s the kind of dip this is.
Why You’ll Love This Recipe
You know those recipes that look impressive but are secretly the easiest thing you’ve ever made? That’s this dip. It’s the kind of appetizer that makes people think you spent hours on it, when really, you threw it together between answering the door for trick-or-treaters.
- Quick & Easy : Comes together in under 15 minutes with zero cooking required. Just layer and chill.
- Simple Ingredients : Canned black beans, sour cream, taco seasoning, and cheese—all stuff you probably already have in your pantry.
- Perfect for Halloween Parties : The mummy design is cute enough for kids and clever enough to impress adults.
- Crowd-Pleaser : It’s a taco dip. Everyone loves taco dip. I’ve never seen leftovers of this one.
- Make-Ahead Friendly : You can assemble it the night before and just add the mummy face right before serving.
What makes this different from every other Halloween dip out there is the black bean base. Most mummy dips use refried beans or plain cream cheese, but the black beans add texture and a subtle earthiness that balances the tangy sour cream and spicy taco seasoning. It’s not just a gimmick—it’s genuinely delicious. My sister-in-law, who claims she doesn’t like beans, ate half of it before I told her what was in it. That’s when you know you’ve got something good.
This is the recipe I bring when I want to actually enjoy the party instead of standing in the kitchen stressing. It’s comfort food with a costume on, and that’s the whole point of Halloween, right?
What Ingredients You Will Need
This recipe uses simple, everyday ingredients to create something that tastes like you spent way more effort than you actually did. Most of these are pantry staples, which means you can probably make this dip right now without a trip to the store.
- Black beans (1 can, 15 oz) – drained and rinsed. I prefer Goya or Bush’s Best for texture. Don’t skip the rinsing—it washes away the excess sodium and that canned taste.
- Sour cream (1 cup) – full fat works best for thickness, but Greek yogurt is a fine substitute if you want more protein.
- Cream cheese (8 oz, softened) – let it sit on the counter for 20 minutes so it blends smoothly. Philadelphia is my go-to brand.
- Taco seasoning (2 tablespoons) – store-bought is fine, but I usually make my own with cumin, chili powder, garlic powder, onion powder, paprika, and a pinch of cayenne.
- Shredded Mexican blend cheese (1 cup) – or cheddar, if that’s what you have. Shred it yourself if you can—it melts better and doesn’t have the anti-caking coating.
- Sliced black olives (1/4 cup) – for the mummy’s eyes. You can also use sliced jalapeños if you want a spicy mummy.
- Cherry tomatoes (2-3) – cut into small rounds for the eyes, or use red bell pepper strips for the mummy wrappings.
- Tortilla chips – for dipping. I like Tostitos Scoops because they hold up to the thick layers.
For the mummy face design, you’ll also need a few strips of bell pepper or carrot for the wrapping effect. I’ve also used strips of cheddar cheese, which melts slightly at room temperature and looks even more realistic.
If you’re feeding a crowd, double the recipe and use a larger baking dish. Just make sure you have enough cheese to cover the whole surface—that’s the part that looks like mummy bandages.
Equipment Needed
You don’t need anything fancy for this recipe, which is part of the appeal. Here’s what you’ll need:
- 9-inch pie dish or shallow baking dish – a round dish works best for the mummy shape, but an 8×8 square pan works too.
- Mixing bowls – one medium bowl for the black bean mixture and one small bowl for the sour cream layer.
- Hand mixer or stand mixer – for blending the cream cheese and sour cream until smooth. A fork works if you’re patient, but the mixer makes it fluffy.
- Spatula – for spreading layers evenly.
- Cutting board and knife – for slicing olives and tomatoes.
- Measuring cups and spoons – because eyeballing taco seasoning never ends well.
I’ve made this dip using just a fork and a butter knife when I was at a friend’s cabin for a Halloween weekend. It wasn’t as pretty, but it still tasted great. The mixer just makes the cream cheese layer smoother and more spreadable.
Preparation Method
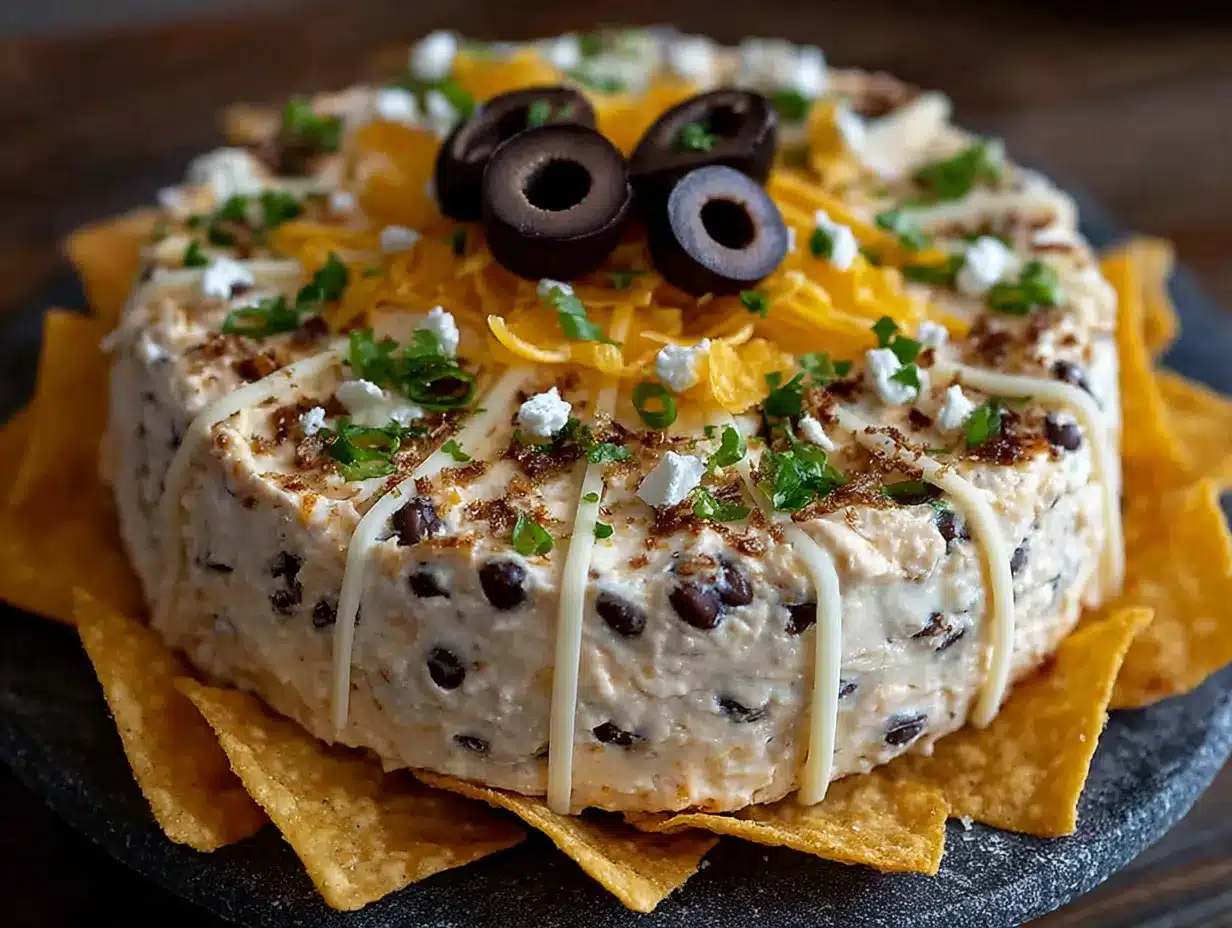
- Prep the black bean layer. Drain and rinse one can of black beans. Mash them lightly with a fork—you want some whole beans left for texture, but mostly a chunky paste. Stir in 1 tablespoon of taco seasoning and set aside.
- Make the cream cheese base. In a medium bowl, beat the softened cream cheese and sour cream together until smooth and fluffy. Add the remaining 1 tablespoon of taco seasoning and mix until combined. This is your mummy’s “body” layer.
- Layer the dip. Spread the black bean mixture evenly across the bottom of your pie dish. It should be about 1/2 inch thick. Top with the cream cheese mixture and spread it gently to cover the beans completely. Don’t press too hard or the layers will mix.
- Add the cheese “bandages.” Sprinkle the shredded cheese over the top, leaving a small oval space in the center for the mummy’s face. The cheese should look like strips of wrapping, not a solid blanket. I like to create diagonal lines with the cheese to mimic bandages.
- Create the mummy face. Place two olive slices in the center oval for the eyes. Use a small strip of cherry tomato or red bell pepper for the mouth. Arrange thin strips of bell pepper or carrot around the edges to look like loose bandages hanging off.
- Chill before serving. Refrigerate for at least 30 minutes to let the flavors meld. This step is crucial—the dip tastes completely different after it’s had time to sit. The sour cream gets tangier, the seasoning spreads, and everything becomes cohesive.
- Serve with tortilla chips. Arrange the chips around the dip or in a separate bowl. The Scoops-style chips work best because they can hold the thick layers without breaking.
A few things I’ve learned the hard way: Don’t over-mash the black beans or the layer gets too dense. Leave it chunky. And don’t skip the chilling step—I once served it immediately and it was soupy and bland. Thirty minutes in the fridge makes all the difference.
If you’re making this for a party, assemble it the night before and add the mummy face right before serving. The cheese might get a little dry overnight, so cover it tightly with plastic wrap.
Cooking Tips & Techniques
I’ve made this dip more times than I care to admit, and I’ve definitely made my share of mistakes. Here’s what I’ve learned:
Softening cream cheese is non-negotiable. I once tried to mix cold cream cheese with sour cream and ended up with lumpy, sad dip. Let it sit on the counter for 20 minutes, or microwave it in 10-second bursts until it’s soft but not melted.
Don’t over-season the black beans. The taco seasoning is strong, and the cream cheese layer already has its own seasoning. I use just one tablespoon for the beans and one for the cream cheese. Any more and the dip gets aggressively salty.
The cheese needs to be shredded thin. Pre-shredded cheese is coated with cellulose to prevent clumping, which means it doesn’t melt as smoothly. If you’re going for that mummy bandage look, shred your own cheese from a block. It drapes better and looks more like actual wrapping.
Chill the dip before adding the face. If you add the olive eyes and pepper mouth while the dip is still warm from mixing, they’ll sink into the cream cheese layer. Let it set in the fridge first, then decorate.
Make it ahead for better flavor. This dip honestly tastes better the next day. The flavors have time to meld and deepen. I’ve made it two days ahead and it was still perfect—just add the face decorations right before serving so they don’t dry out.
One time I forgot to rinse the black beans and the dip was way too salty. Another time I used low-fat sour cream and the texture was watery. Full fat matters here. Trust me.
Variations & Adaptations
This dip is surprisingly flexible. Here are a few ways I’ve changed it up depending on the crowd and occasion:
- Veggie-Loaded Mummy: Add a layer of sautéed bell peppers and onions between the black beans and cream cheese. It adds sweetness and color. I did this for a party where half the guests were vegetarian, and it was the first thing to disappear.
- Spicy Mummy: Mix 1/4 cup of pickled jalapeños into the cream cheese layer, or use hot taco seasoning. For the eyes, use sliced jalapeño rounds instead of olives. It gives the mummy a little attitude.
- Chicken Mummy: Swap the black beans for shredded rotisserie chicken mixed with taco seasoning. It’s heartier and works well if you’re feeding a crowd of meat-lovers. I made this version for a Halloween football party and it was a hit.
- Dairy-Free Mummy: Use vegan cream cheese, dairy-free sour cream, and plant-based shredded cheese. I’ve tested this with Kite Hill cream cheese and Violife cheddar shreds, and it works surprisingly well. The texture is slightly less creamy, but the flavor is still there.
- Mummy Face Variations: Use black bean slices for the eyes instead of olives, or create a spider web pattern on top using sour cream drizzled in concentric circles and dragged outward with a toothpick. I did this for a Halloween potluck and it got more photos than the actual costume contest.
If you’re serving this at a kid’s party, leave out the spicy elements and let them help decorate the mummy face. My niece insisted on using carrot sticks for the mouth one year, and honestly, it looked cuter than my version.
Serving & Storage Suggestions
This dip is best served chilled or at room temperature. I usually pull it out of the fridge about 15 minutes before the party starts so the cream cheese softens slightly and the chips don’t break when people scoop.
For presentation, place the dip in the center of a large platter and surround it with tortilla chips arranged to look like tombstones or spider webs. I’ve also added fake spider rings around the dish for a spooky touch—the kids love them.
As for drinks, this dip pairs beautifully with a cold Mexican beer or a smoky margarita. For the kids, serve it with apple cider or sparkling water with a splash of cranberry juice.
Storage: Cover the dish tightly with plastic wrap and refrigerate for up to 3 days. The cheese might get a little dry, but the flavor actually improves. I’ve never had leftovers last longer than that because someone always finishes it off.
Reheating: If you want to serve it warm, microwave individual portions for 30 seconds or reheat the whole dish in a 350°F oven for 10 minutes. The cheese will melt slightly, making the mummy look even more realistic—like it’s coming to life.
The flavors definitely develop overnight. The black beans absorb the taco seasoning, the cream cheese gets tangier, and everything becomes more cohesive. I honestly prefer day-old dip to fresh.
Nutritional Information & Benefits
Here’s the estimated nutritional breakdown per serving (about 1/8 of the dip, without chips):
| Nutrient | Amount |
|---|---|
| Calories | 210 |
| Protein | 9g |
| Fat | 14g |
| Carbohydrates | 14g |
| Fiber | 5g |
| Sodium | 480mg |
The black beans are the star here—they’re packed with fiber and plant-based protein, which helps keep you full. They’re also a good source of iron and folate. The cream cheese and sour cream add calcium, though I won’t pretend this is health food. It’s a Halloween party dip, not a salad.
If you’re watching your sodium, use low-sodium black beans and make your own taco seasoning with less salt. You can also swap the sour cream for Greek yogurt to boost the protein and cut the fat.
This dip is naturally vegetarian and can be made gluten-free by using certified gluten-free taco seasoning. Just check the label—some brands add flour as a filler.
Conclusion
This Easy Black Bean Mummy Taco Dip is the kind of recipe that makes you look like a Halloween hero without actually working for it. It’s cute enough to impress the Pinterest crowd, hearty enough to fill up hungry party guests, and simple enough that you can make it while simultaneously helping a kid glue googly eyes to a paper plate.
I’ve brought this dip to costume parties, trunk-or-treat events, and family Halloween dinners, and it’s never let me down. The mummy design is just the right amount of spooky for kids and clever for adults, and the black bean base makes it genuinely satisfying—not just a gimmick.
I’d love to hear how your mummy turns out! Did you use olives or jalapeños for the eyes? Did you add a spider web pattern? Drop a comment below and share your Halloween dip creations. And if you’re looking for more spooky snacks, check out these Black Velvet Halloween Cupcakes or this Pumpkin Cold Foam Iced Latte for the full Halloween spread.
Happy Halloween, and happy dipping!
Frequently Asked Questions
Can I make this dip ahead of time?
Absolutely. Assemble the dip completely, cover it tightly, and refrigerate for up to 24 hours. Add the mummy face decorations (olive eyes, pepper mouth) right before serving so they stay fresh and don’t dry out.
Can I use ground beef instead of black beans?
Yes! Brown 1 pound of ground beef with taco seasoning, drain the fat, and use it as the bottom layer instead of black beans. The dip becomes heartier and more like a traditional taco dip. Just let the beef cool before layering with the cream cheese.
How do I make the mummy face look better?
Use large olive slices for the eyes and a thin strip of red bell pepper for the mouth. For the bandages, create diagonal lines with shredded cheese and leave a small oval space in the center for the face. You can also use strips of carrot or cucumber for a different look.
Can I make this dip dairy-free?
Yes, use vegan cream cheese, dairy-free sour cream (like Kite Hill or Forager Project), and plant-based shredded cheese. The texture will be slightly less creamy, but the flavor is still excellent. I’ve tested it and it holds up well for parties.
How long does this dip last in the fridge?
Covered tightly, this dip will stay fresh for up to 3 days. The flavors actually improve after a day in the fridge. Just note that the cheese might get a little dry, so I recommend adding fresh shredded cheese on top before serving leftovers.
Pin This Recipe!
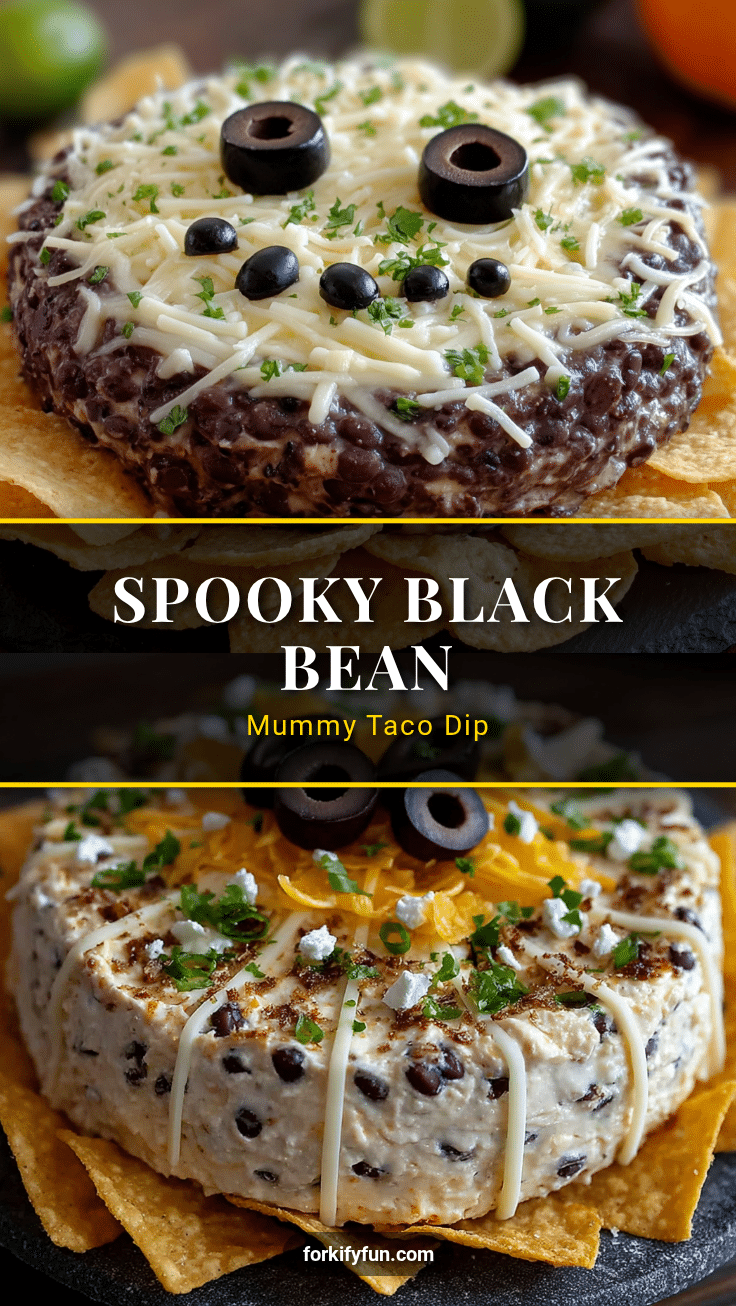
Easy Black Bean Mummy Taco Dip: The Best Halloween Appetizer
A quick and easy Halloween appetizer featuring a black bean base, creamy taco-seasoned sour cream, and a mummy face design made with cheese, olives, and bell peppers. Perfect for parties and ready in under 15 minutes.
- Prep Time: 15 minutes
- Cook Time: 0 minutes
- Total Time: 45 minutes (includes 30 minutes chilling)
- Yield: 8 servings 1x
- Category: Appetizer
- Cuisine: Mexican-American
Ingredients
- 1 can (15 oz) black beans, drained and rinsed
- 1 cup sour cream (full fat recommended)
- 8 oz cream cheese, softened
- 2 tablespoons taco seasoning (store-bought or homemade)
- 1 cup shredded Mexican blend cheese (or cheddar)
- 1/4 cup sliced black olives
- 2–3 cherry tomatoes, cut into small rounds
- Tortilla chips (Tostitos Scoops recommended)
- Bell pepper or carrot strips for mummy wrapping (optional)
Instructions
- Drain and rinse black beans. Mash lightly with a fork, leaving some whole beans for texture. Stir in 1 tablespoon taco seasoning.
- In a medium bowl, beat softened cream cheese and sour cream until smooth and fluffy. Add remaining 1 tablespoon taco seasoning and mix until combined.
- Spread black bean mixture evenly in a 9-inch pie dish or shallow baking dish (about 1/2 inch thick).
- Top with cream cheese mixture, spreading gently to cover beans without mixing layers.
- Sprinkle shredded cheese over the top, leaving a small oval space in the center for the mummy’s face. Create diagonal lines with cheese to mimic bandages.
- Place two olive slices in the center oval for eyes. Use a small strip of cherry tomato or red bell pepper for the mouth. Arrange thin strips of bell pepper or carrot around edges for loose bandages.
- Refrigerate for at least 30 minutes to let flavors meld.
- Serve chilled or at room temperature with tortilla chips.
Notes
For best flavor, chill at least 30 minutes before serving. Can be assembled up to 24 hours ahead; add mummy face decorations just before serving. Use full-fat sour cream and cream cheese for best texture. Shred cheese from a block for better melting and bandage appearance. If using low-sodium black beans, adjust taco seasoning salt accordingly.
Nutrition
- Serving Size: 1/8 of dip (without
- Calories: 210
- Sugar: 3
- Sodium: 480
- Fat: 14
- Saturated Fat: 8
- Carbohydrates: 14
- Fiber: 5
- Protein: 9
Keywords: Halloween appetizer, mummy dip, black bean taco dip, easy party dip, spooky snack, vegetarian dip, game day dip