That faint crackle of sugar hitting the oven floor — that sharp, almost imperceptible pop that makes you spin around too fast — still takes me straight to my first attempt at these ghost meringue cookies. I was twenty-two, living in a drafty apartment with a hand-me-down mixer that smelled faintly of burnt toast, and I was determined to prove I could make something that wasn’t just edible but cute. Halloween was three days away, and I had visions of a platter full of tiny, perfect ghosts floating across my countertop. What I got, instead, was a tray of slightly browned, vaguely sad-looking blobs that tasted fine but looked like they’d given up on life. I ate them anyway, standing over the sink, and promised myself I’d figure it out.
Years later, after more batches than I can count (and a few more oven mishaps), these crispy ghost meringue cookies have become my non-negotiable Halloween contribution. They are the thing I bring to parties, the thing my friends text me about in late September, the thing that makes my own kids squeal when I pull them out of the oven. And honestly? They are absurdly simple. You don’t need special equipment, you don’t need fancy ingredients, and you definitely don’t need to be a pastry chef. What you need is a little patience, a steady hand with a piping bag, and the willingness to accept that the first ghost might look a little wonky. That is part of the charm, I swear.
There is something quietly magical about watching a bowl of plain egg whites transform into these glossy, cloud-like peaks that then bake into something that actually looks like a ghost. It feels a bit like a science experiment, a bit like art, and a whole lot like the best kind of kitchen therapy. And when you bite into one and it shatters into a hundred tiny, sweet shards that dissolve on your tongue? That is the payoff. These cookies are light, airy, and just sweet enough — a perfect little treat that doesn’t weigh you down. I’ve never found another Halloween dessert that delivers this much charm with this little effort.
So, whether you are hosting a costume party, looking for a fun activity to do with kids, or just want something spooky but not scary to snack on while watching Hocus Pocus for the hundredth time, these ghosts are your answer. They are forgiving, they are fun, and they taste way better than anything you can buy in a store. Trust me on this one.
Why You’ll Love This Recipe
Let me tell you why these crispy ghost meringue cookies have earned a permanent spot in my Halloween rotation. I have tested this recipe more times than I care to admit, tweaking temperatures, playing with piping techniques, and even accidentally making a batch that tasted faintly of garlic (don’t ask). What I landed on is a version that works every single time, even for beginners.
- Surprisingly Simple: You only need five ingredients, and I bet you already have four of them in your pantry right now. No trips to a specialty baking store. No hunting down obscure extracts.
- Naturally Gluten-Free & Low-Fat: Since meringue is basically just egg whites and sugar, these cookies are a great option for guests with dietary restrictions. They are light, airy, and won’t leave anyone feeling heavy.
- Perfect for Halloween Fun: These aren’t just cookies; they are a project. Piping little ghost shapes is genuinely entertaining, and the results are always a conversation starter. They pair beautifully with other spooky treats like our spooky witch finger cookies for a truly themed platter.
- Incredibly Satisfying Texture: That first bite where the cookie shatters into a million delicate pieces is pure joy. It is crunchy, it is light, and it melts in your mouth. There is nothing else quite like it.
- Make-Ahead Friendly: These ghosts can be stored in an airtight container for up to two weeks. That means you can bake them well before the party and cross one thing off your to-do list.
What makes this recipe different from every other meringue cookie out there? It is the balance. I found that a touch of cream of tartar gives the meringue a stable structure without making it taste tangy, and baking at a low temperature for a longer time ensures the cookies dry out completely without browning. The result is a ghost that is snowy white, perfectly crisp, and just sweet enough without being cloying. I have tried versions with cornstarch, with vinegar, with different sugar-to-egg ratios, and this one wins every time. It is my best version, and I am so excited to share it with you.
What Ingredients You Will Need
This recipe uses simple, humble ingredients that come together to create something genuinely magical. The key is quality and temperature — room temperature egg whites whip up higher and hold their shape better, so don’t skip that step. Here is everything you need:
- 4 large egg whites, at room temperature: The foundation of our ghosts. Room temperature whites whip up to a greater volume than cold ones. If you forget to take them out of the fridge ahead of time, place the eggs in a bowl of warm water for 5 minutes before separating.
- 1 cup (200g) granulated white sugar: This is not the place for brown sugar or coconut sugar. Granulated sugar dissolves cleanly into the egg whites, creating that smooth, glossy structure. I prefer a standard brand like Domino for consistent results.
- 1/2 teaspoon cream of tartar: This is my secret weapon. It stabilizes the egg white foam, making it less likely to deflate or weep. It also helps the meringue hold its shape while piping. You can substitute with 1 teaspoon of white vinegar or lemon juice, but cream of tartar gives the most reliable results.
- 1 teaspoon vanilla extract: Pure vanilla extract adds warmth and rounds out the sweetness. Avoid imitation vanilla if you can — the difference in flavor is noticeable. For a more Halloween-appropriate twist, you can use peppermint extract instead.
- Mini chocolate chips or black decorating gel (optional, for faces): This is where the ghosts come to life. Mini chocolate chips are easier to place than full-sized ones, and they stay put better. Black decorating gel gives a smoother, more cartoonish look. I have used both, and I honestly prefer the chocolate chips for the subtle crunch they add.
And that is it. No butter, no flour, no complicated list of specialty items. These five ingredients are all that stand between you and a platter of adorable, crispy ghosts. I recommend using fresh eggs for the best volume — older eggs tend to have thinner whites that don’t whip up as well.
Equipment Needed
You don’t need a professional kitchen to make these, but having the right tools makes the process smoother. Here is what you will need:
- Electric Stand Mixer or Hand Mixer: Whipping egg whites by hand is possible, but it takes a very long time and a very strong arm. A stand mixer with a whisk attachment is ideal, but a hand mixer works perfectly well. I have used both, and the stand mixer offers more freedom to prep other things while it runs.
- Large Mixing Bowl: Make sure it is completely clean and free of any grease. Even a tiny bit of oil can prevent the egg whites from whipping properly. Glass or metal bowls are best; plastic bowls can retain traces of grease even after washing.
- Piping Bag with a Round Tip: A piping bag gives you control over the shape of your ghosts. I use a Wilton #12 round tip, but you can also snip the corner of a zip-top bag if you are in a pinch. Just be aware that the shape won’t be as precise.
- Baking Sheets Lined with Parchment Paper: Parchment paper is non-negotiable here. Meringue will stick to a greased baking sheet, and silicone mats can sometimes cause them to spread too much. Parchment gives the best results.
- Kitchen Scale (optional but helpful): While I have provided cup measurements, weighing your egg whites and sugar ensures the most consistent results. One large egg white typically weighs about 30g.
I have tried piping these ghosts directly onto foil, and I do not recommend it. The meringue slid around and lost its shape. Stick with parchment paper. Also, make sure your baking sheets are completely cool before piping the next batch — warm sheets will cause the meringue to spread and deflate.
Preparation Method
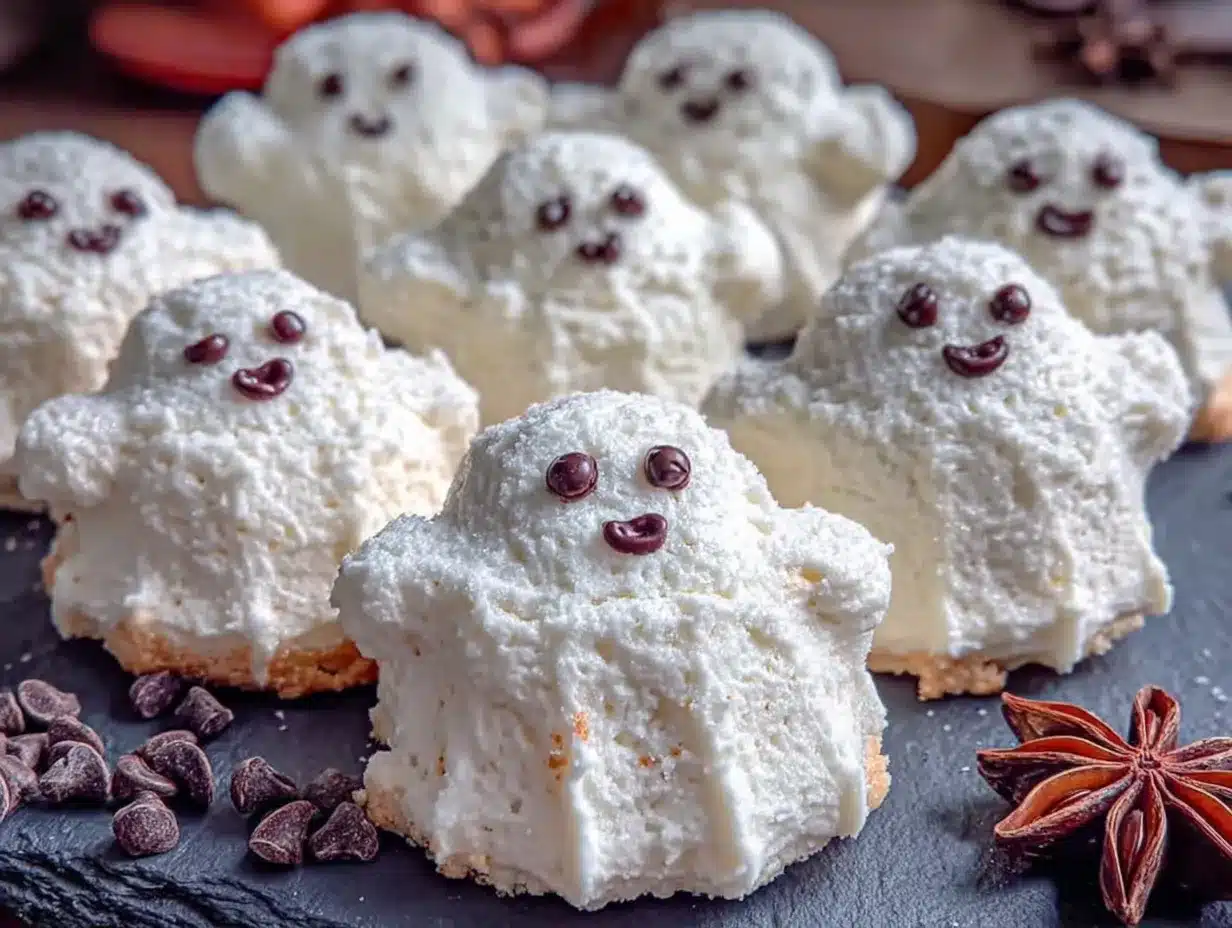
Alright, let’s make some ghosts. Take your time with each step — rushing is the enemy of good meringue. I learned that the hard way after a particularly deflated batch that looked more like sad pancakes than spooky spirits.
- Preheat your oven to 200°F (93°C) and line two large baking sheets with parchment paper. The low temperature is crucial. We are not baking the meringue; we are drying it out. A higher temperature will cause the cookies to brown or crack.
- In the bowl of your stand mixer (or a large mixing bowl if using a hand mixer), combine the room temperature egg whites and cream of tartar. Beat them on medium speed until they become frothy and bubbly, about 1-2 minutes. You should see small, uniform bubbles throughout the mixture.
- Increase the speed to medium-high and start adding the sugar, one tablespoon at a time. This is the most important step. Adding the sugar slowly allows it to dissolve fully into the egg whites. If you dump it all in at once, you will end up with a gritty, unstable meringue. I usually take about 5 minutes to add all the sugar.
- Once all the sugar is added, increase the speed to high and whip until the meringue forms stiff, glossy peaks. This will take about 5-7 minutes. You know it is ready when you lift the whisk attachment and the meringue stands up straight without drooping. The mixture should look smooth and shiny, not grainy. Rub a tiny bit between your fingers — if it feels smooth, the sugar is dissolved.
- Add the vanilla extract and beat for another 30 seconds to combine. The meringue will deflate slightly, but that is normal. Give it one more quick whip to bring it back to stiff peaks.
- Transfer the meringue to your piping bag fitted with the round tip. If you are using a zip-top bag, snip about 1/2 inch off one corner. Twist the top of the bag to push the meringue down toward the tip.
- Pipe the ghosts onto the prepared baking sheets. Hold the piping bag straight up and down, about 1/2 inch above the parchment. Squeeze out a generous dollop for the body, then lift the bag straight up while reducing pressure to create a smaller head. Release pressure completely and pull away with a quick flick of the wrist to create a little peak on top. Leave about 2 inches between each ghost — they don’t spread much, but they need some air circulation.
- If using mini chocolate chips for eyes, gently press two chips into each ghost’s head now. Do this right after piping while the meringue is still soft. If you wait, the surface will start to set, and the chips won’t stick. For a smoother look, you can also wait until the cookies are baked and cooled, then draw faces with black decorating gel.
- Bake for 60-75 minutes, or until the meringues are dry to the touch and easily peel off the parchment paper. They should not be brown at all — a ghost should be white! If they start to color, your oven runs hot, and you should reduce the temperature by 10-15 degrees next time.
- Turn off the oven and leave the meringues inside to cool completely. This is another non-negotiable step. Letting them cool in the oven prevents sudden temperature changes that can cause cracking. Leave them in there for at least 2 hours, or even overnight if you have the time.
Once they are completely cool, they should lift off the parchment with no resistance. If they stick, they need more time in the oven. Pop them back in at 200°F for another 15-20 minutes.
Cooking Tips & Techniques
I have made enough meringue mistakes to fill a small cookbook of failures, so let me save you some trouble. Here are the things I wish someone had told me before my first attempt:
Separate eggs carefully. This cannot be overstated. Any trace of egg yolk in your whites will prevent them from whipping to stiff peaks. I separate each egg into a small bowl first, then add the white to the mixing bowl. That way, if one yolk breaks, you haven’t ruined the entire batch. I learned this after a particularly frustrating afternoon where my meringue refused to stiffen, and I finally realized a tiny speck of yolk had slipped in.
Use a clean, grease-free bowl. Even a tiny bit of residual oil from a previous recipe can sabotage your meringue. Wash your bowl and whisk attachment with hot, soapy water, then wipe them down with a little white vinegar to ensure they are completely grease-free.
Don’t rush the sugar addition. I know it is tempting to dump it all in and walk away, but patience pays off here. Adding the sugar slowly ensures it dissolves completely, which gives you a smooth, stable meringue. A grainy meringue will weep and deflate during baking.
Humidity is your enemy. Meringue is hygroscopic, which means it absorbs moisture from the air. If you live in a humid climate, pick a dry day to make these cookies. I once made a batch during a summer thunderstorm, and they turned out sticky and soft instead of crisp. If you absolutely must bake on a humid day, you can add an extra 1/2 tablespoon of sugar to help stabilize the mixture.
Pipe with confidence. Your first ghost will probably look a little funny. That is okay. My first batch looked like a line of deformed snowmen. The more you pipe, the better you will get. And honestly, imperfect ghosts have more personality. They look like they have seen things.
Variations & Adaptations
One of the best things about this recipe is how easy it is to adapt. Over the years, I have tried several variations, and here are my favorites:
- Chocolate Ghosts: Swap 2 tablespoons of the granulated sugar for 2 tablespoons of unsweetened cocoa powder. Sift the cocoa powder with the sugar before adding it to the egg whites. The result is a deep, dark chocolate ghost that looks even more dramatic against a white platter.
- Peppermint Ghosts: Replace the vanilla extract with 1/2 teaspoon of peppermint extract. These are especially fun during the holiday season, but they also work great for a winter-themed Halloween party. The white meringue with a hint of cool mint is refreshing and unexpected.
- Colorful Spirits: Add a few drops of gel food coloring to the meringue after it reaches stiff peaks. Gently fold it in with a spatula to create swirls, or pipe different colors for a rainbow of ghosts. I have made purple and green ghosts for a more whimsical Halloween look, and they were a huge hit with kids.
- Gluten-Free & Dairy-Free: This recipe is naturally gluten-free and dairy-free, so no adaptations are needed. Just make sure your vanilla extract and any added flavorings are certified gluten-free if that is a concern.
- Spiced Ghosts: Add 1/2 teaspoon of pumpkin pie spice or ground cinnamon to the sugar before whipping. This gives the ghosts a warm, autumnal flavor that pairs beautifully with a cup of hot cider. You can even pair them with our iced pumpkin chai latte for a cozy fall treat.
My personal favorite variation is the peppermint version. I made a batch last December, and they disappeared faster than any cookie I have ever baked. The combination of the crisp, airy texture with the cool mint flavor is just perfect.
Serving & Storage Suggestions
These ghosts are best served at room temperature, and they look absolutely adorable piled on a platter or arranged in a glass jar. I like to place them on a bed of crushed black cookies or chocolate wafer crumbs to look like a graveyard. You can also stick them upright into a bowl of frosting or pudding for a more dramatic presentation.
For a Halloween party, I often serve them alongside our mummy hot dog bites and a bowl of white chocolate candy corn bark for a complete spooky spread. The contrast between the savory mummies and the sweet, airy ghosts is always a crowd-pleaser.
Storage: Store the cooled meringues in an airtight container at room temperature. Do not refrigerate them — the moisture in the fridge will make them sticky and soft. They will stay perfectly crisp for up to two weeks. If you live in a humid climate, you can add a silica gel packet (the kind you find in shoe boxes) to the container to absorb excess moisture.
Reheating: These cookies do not need reheating. If they have softened slightly due to humidity, you can pop them back into a 200°F oven for 10-15 minutes to re-crisp them. Let them cool completely before serving again.
One thing I love about these cookies is that their flavor actually improves after a day or two. The vanilla seems to mellow and deepen, and the texture becomes even more delicate. So don’t hesitate to make them a few days before your event.
Nutritional Information & Benefits
Let’s be real — these are still cookies, and they are made primarily of sugar. But compared to most Halloween treats, they are surprisingly light. One ghost meringue cookie (without chocolate chips) contains approximately 25-30 calories, 0g fat, and 6g of sugar. They are naturally gluten-free, dairy-free, and nut-free, making them a safe option for many common dietary restrictions.
Egg whites are a good source of high-quality protein, though the amount per cookie is minimal. They also contain riboflavin and selenium. The cream of tartar adds a small amount of potassium. So while I would not call these cookies health food, they are certainly a lighter alternative to butter-laden Halloween cookies or candy bars.
If you are watching your sugar intake, you can reduce the sugar by up to 25% without significantly affecting the texture. Just be aware that the cookies won’t be as crisp and may not hold their shape as well. I have tried a reduced-sugar version, and while it worked, the ghosts were a bit more fragile.
As always, if you have specific dietary concerns or allergies, please consult with a healthcare professional. And remember, the best way to enjoy these cookies is in moderation, surrounded by friends and family, with a big bowl of candy corn nearby for good measure.
Conclusion
These crispy ghost meringue cookies have become more than just a Halloween recipe in my house. They are a tradition, a little ritual that marks the start of the spooky season. Every year, when the air gets crisp and the stores start stocking pumpkin-flavored everything, I pull out my piping bag and whip up a batch. My kids hover nearby, waiting for the first ghost to come out of the oven, ready to poke its tiny chocolate chip eyes and declare it “the cutest one yet.”
I hope you give these a try, even if you have never made meringue before. They are forgiving, they are fun, and they are genuinely delicious. And if your first ghost looks a little lopsided or your piping hand gets shaky, just call it a “unique spirit” and move on. That is the beauty of homemade — it doesn’t have to be perfect to be wonderful.
I would love to hear how your ghosts turn out! Drop a comment below and let me know if you tried any variations, if your kids helped pipe the shapes, or if you came up with a completely new flavor combination. And if you share a photo on social media, tag me — I want to see your spooky creations. Until next time, happy baking, and may your ghosts be crisp, your Halloween be fun, and your candy bowl be full.
Frequently Asked Questions
Can I make these ghost meringue cookies without a piping bag?
Absolutely! If you don’t have a piping bag, you can use a sturdy zip-top plastic bag with one corner snipped off. The shape won’t be as precise, but you can still pipe out cute ghost shapes. Alternatively, you can use two spoons to drop dollops of meringue onto the baking sheet and then shape them slightly with the back of a spoon. They will look more rustic, but they will taste just as good.
Why did my meringue cookies turn out chewy instead of crispy?
Chewy meringue usually means they were not baked long enough or were exposed to too much humidity. The key is to bake them at a low temperature for a long time until they are completely dry. If they are still chewy after the recommended baking time, pop them back in the oven at 200°F for another 15-20 minutes. Also, make sure you are storing them in an airtight container once cooled.
Can I use liquid egg whites from a carton?
I do not recommend it. Liquid egg whites from a carton are pasteurized, which can affect their ability to whip to stiff peaks. They also often contain stabilizers that can alter the texture. For the best results, always use fresh egg whites from whole eggs.
How do I get my meringue to be perfectly white?
The key to white meringue is baking at a low temperature and not over-baking. If your oven runs hot, the meringue will brown slightly. I recommend using an oven thermometer to ensure your oven is actually at 200°F. Also, make sure your vanilla extract is clear or use a clear vanilla flavoring to avoid any discoloration.
Can I freeze these ghost meringue cookies?
Technically, yes, but I do not recommend it. Freezing can introduce moisture that makes the meringue sticky and soft. They store so well at room temperature (up to two weeks in an airtight container) that freezing is unnecessary. If you absolutely must freeze them, place them in a single layer in an airtight container with a layer of parchment paper between each cookie, and thaw them at room temperature without opening the container.
Pin This Recipe!
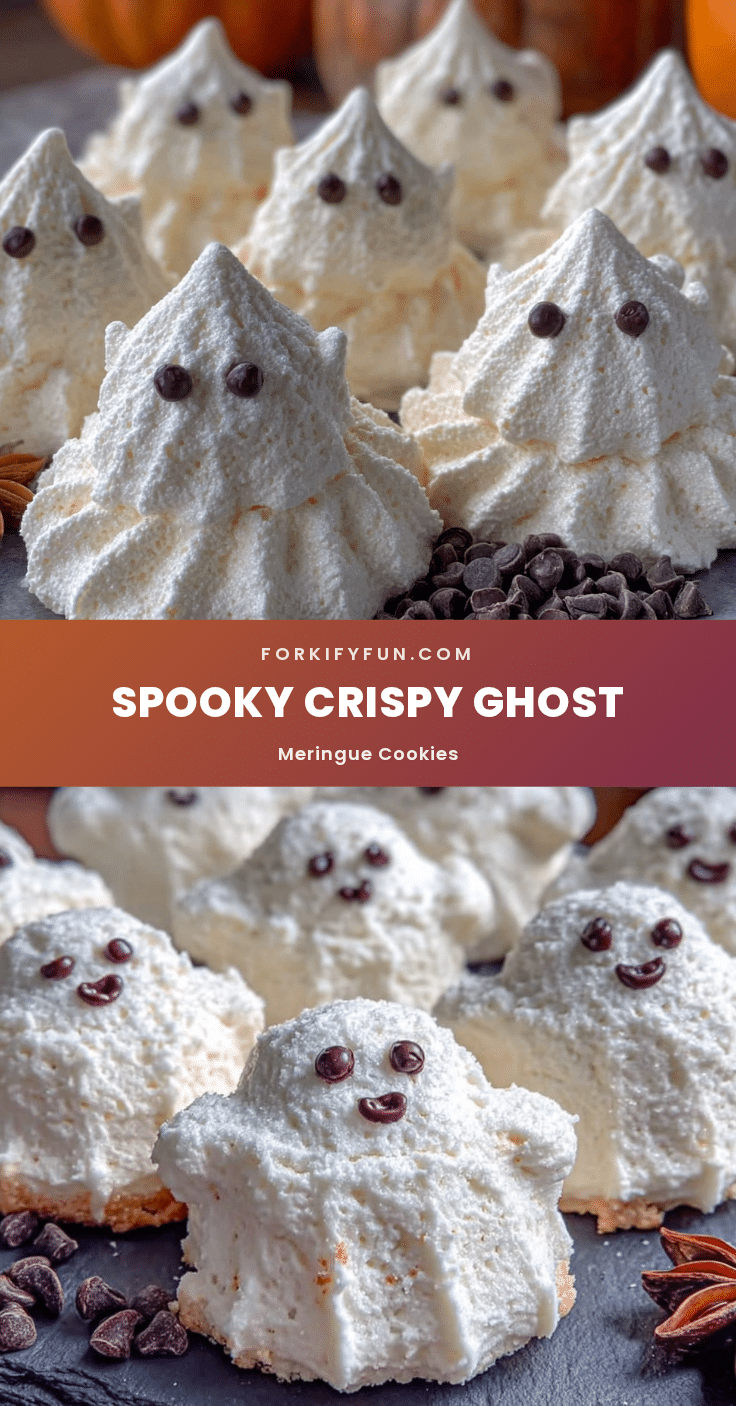
Crispy Ghost Meringue Cookies: Easy Halloween Treat
These light, airy, and perfectly crisp ghost meringue cookies are a fun and simple Halloween treat. Made with just five ingredients, they are naturally gluten-free and low-fat, and they look adorable on any spooky dessert platter.
- Prep Time: 15 minutes
- Cook Time: 60-75 minutes
- Total Time: 2 hours 15 minutes to 2 hours 30 minutes (plus cooling time)
- Yield: 24 servings 1x
- Category: Dessert
- Cuisine: American
Ingredients
- 4 large egg whites, at room temperature
- 1 cup (200g) granulated white sugar
- 1/2 teaspoon cream of tartar
- 1 teaspoon vanilla extract
- Mini chocolate chips or black decorating gel (optional, for faces)
Instructions
- Preheat your oven to 200°F (93°C) and line two large baking sheets with parchment paper.
- In the bowl of your stand mixer (or a large mixing bowl if using a hand mixer), combine the room temperature egg whites and cream of tartar. Beat them on medium speed until they become frothy and bubbly, about 1-2 minutes.
- Increase the speed to medium-high and start adding the sugar, one tablespoon at a time. Take about 5 minutes to add all the sugar.
- Once all the sugar is added, increase the speed to high and whip until the meringue forms stiff, glossy peaks, about 5-7 minutes. The mixture should look smooth and shiny, not grainy.
- Add the vanilla extract and beat for another 30 seconds to combine. Give it one more quick whip to bring it back to stiff peaks.
- Transfer the meringue to your piping bag fitted with the round tip. Twist the top of the bag to push the meringue down toward the tip.
- Pipe the ghosts onto the prepared baking sheets. Hold the piping bag straight up and down, about 1/2 inch above the parchment. Squeeze out a generous dollop for the body, then lift the bag straight up while reducing pressure to create a smaller head. Release pressure completely and pull away with a quick flick of the wrist to create a little peak on top. Leave about 2 inches between each ghost.
- If using mini chocolate chips for eyes, gently press two chips into each ghost’s head now. Do this right after piping while the meringue is still soft.
- Bake for 60-75 minutes, or until the meringues are dry to the touch and easily peel off the parchment paper. They should not be brown at all.
- Turn off the oven and leave the meringues inside to cool completely. Leave them in there for at least 2 hours, or even overnight if you have the time.
Notes
Separate eggs carefully to avoid any yolk. Use a clean, grease-free bowl. Don’t rush the sugar addition. Humidity is your enemy; pick a dry day to bake. Pipe with confidence; imperfect ghosts have more personality. For a smoother look, draw faces with black decorating gel after baking and cooling.
Nutrition
- Serving Size: 1 cookie
- Calories: 30
- Sugar: 6
- Sodium: 15
- Carbohydrates: 7
- Protein: 1
Keywords: ghost meringue cookies, Halloween cookies, meringue cookies, gluten-free Halloween treat, easy Halloween dessert