I was wrestling a bag of overripe bananas in the community garden parking lot, trying to free one without bruising it further, when Mrs. Chen from plot 27 finally put down her trowel and walked over. She didn’t say anything at first—just watched me for a second, then reached into her own canvas tote and pulled out a small, misshapen sugar pumpkin. “You’re making something sweet, yes?” she asked. I admitted I was planning banana bread, again. She nodded, handed me the pumpkin, and said, “Then you have too many bananas. Use half. Add this.” That was it. No formal recipe, no measurements. Just a gesture and a knowing smile.
Honestly, I stood there holding that pumpkin like an idiot for a good minute. But that afternoon, I pureed it, threw it into my usual one-bowl banana bread batter, and crossed my fingers. The result? A loaf that was somehow more tender, more moist, and just a little bit more special than the version I’d been making for years. My kids, who are my toughest critics, polished off half the loaf before dinner. That was three autumns ago, and I haven’t made plain banana bread since. Maybe you’ve been there—stuck in a recipe rut, making the same thing on repeat because it works. Let me tell you, this one-bowl banana pumpkin bread is the shake-up you didn’t know you needed.
It’s the kind of recipe that feels like a secret handshake between two home cooks. Mrs. Chen didn’t teach me; she just nudged me in the right direction. And I’ve been passing that nudge along ever since.
Why You’ll Love This Recipe
Let’s be real—finding a baked good that pleases everyone at the table without requiring a second mortgage for ingredients is a small miracle. This one-bowl banana pumpkin bread delivers on every front. I’ve tested it through three autumns, two moves, and one very chaotic Thanksgiving morning when I forgot the eggs (spoiler: it still worked). Here’s why it earns a permanent spot in your rotation:
- One Bowl, No Fuss: Everything comes together in a single mixing bowl. That means less cleanup, less time, and fewer dishes to hide from your partner.
- Budget-Friendly Pantry Staples: Canned pumpkin puree is cheap, bananas are practically free when they’re spotty, and the rest is stuff you likely already have. No specialty flours or expensive extracts here.
- Kid-Approved and Picky-Eater Proof: My youngest swears she hates pumpkin. She ate three slices of this before I told her what was in it. The banana does a beautiful job of masking the pumpkin flavor while keeping the bread incredibly moist.
- Freezes Like a Dream: This bread actually gets better after a night in the freezer. I always bake two loaves—one for now, one for the chaos of next week’s school lunches.
- Forgiving and Foolproof: Overmix it? Fine. Use slightly green bananas? Still works. Forget the vanilla? It’s okay, I’ve done it. This recipe has a wide margin for error, which is exactly what busy parents need.
This isn’t just another pumpkin bread recipe. It’s the one that uses up two problem ingredients at once, keeps your kitchen quiet for twenty minutes while the kids snack, and makes you look like you have your act together. Honestly, that last part alone is worth the price of a can of pumpkin.
What Ingredients You Will Need
This recipe relies on simple, everyday ingredients that work together to create something unexpectedly special. The pumpkin adds moisture without screaming “pumpkin spice,” and the bananas bring natural sweetness and structure. Here’s what you’ll need:
- Overripe Bananas (3 medium, mashed): The spottier, the better. Black bananas are actually ideal here—they’re sweeter and easier to mash. If your bananas are still yellow, pop them in a 300°F oven for 10 minutes to speed up ripening.
- Pumpkin Puree (1 cup, canned or homemade): I prefer Libby’s for consistency, but any 100% pure pumpkin works. Do not grab the pumpkin pie filling—that’s already sweetened and spiced, and it will throw off the balance.
- Granulated Sugar (¾ cup): Just regular white sugar. You can reduce it to ½ cup if your bananas are extremely ripe, but I wouldn’t go lower unless you prefer a less sweet loaf.
- Brown Sugar (¼ cup, packed): Light or dark brown sugar both work. Dark brown adds a deeper molasses note that plays beautifully with the pumpkin.
- Vegetable Oil (⅓ cup): Any neutral oil works—canola, avocado, or even melted coconut oil. Oil keeps this bread tender longer than butter would.
- Eggs (2 large, room temperature): Room temperature eggs incorporate more evenly. If you forgot to take them out, place them in a bowl of warm water for 5 minutes.
- Vanilla Extract (1 teaspoon): Pure vanilla is best, but imitation works in a pinch. I’ve used both and honestly can’t tell the difference in this recipe.
- All-Purpose Flour (1¾ cups): Spoon and level your flour—scooping directly from the bag packs in too much and makes the bread dense. If you need gluten-free, a 1:1 baking blend works well here.
- Baking Soda (1 teaspoon): Make sure it’s fresh. Test it by dropping a pinch into vinegar—if it fizzes, you’re good.
- Baking Powder (½ teaspoon): Not all baking powders are created equal. I like Rumford for its aluminum-free formula.
- Salt (½ teaspoon): Fine sea salt or table salt. Salt isn’t just for savory food—it balances sweetness and enhances flavor.
- Cinnamon (1½ teaspoons): This is the dominant spice. I use Vietnamese cinnamon for its bold, almost spicy kick.
- Nutmeg (½ teaspoon, freshly grated if possible): Pre-ground is fine, but fresh nutmeg makes a noticeable difference. A microplane makes quick work of it.
- Ginger (¼ teaspoon, ground): Optional, but I love the warmth it adds. Skip it if you’re serving very young kids who prefer milder flavors.
- Optional Mix-Ins (½ cup): Chocolate chips, chopped walnuts, or dried cranberries all work. My kids insist on semi-sweet chocolate chips.
Equipment Needed
The beauty of this recipe is that it doesn’t demand fancy equipment. Here’s what you’ll actually need:
- Large Mixing Bowl (1): Any bowl works, but a wide one makes mashing easier. I use a ceramic nesting bowl that I picked up for $8 at a discount store.
- Wooden Spoon or Sturdy Spatula: You don’t need an electric mixer. A good wooden spoon does the job and saves on cleanup.
- Potato Masher or Fork: For mashing the bananas. A fork works perfectly fine, but a masher is faster if you make this often.
- 9×5-Inch Loaf Pan: Standard size. If you use an 8×4 pan, you’ll need to increase baking time by 5-10 minutes. Glass pans bake faster than metal, so check earlier.
- Parchment Paper: Not strictly necessary, but it makes lifting the bread out effortless. I cut two strips to create a sling.
- Cooling Rack: A wire rack prevents the bottom from getting soggy. No rack? Invert the loaf onto a clean kitchen towel.
- Measuring Cups and Spoons: For accuracy. I learned the hard way that eyeballing baking soda leads to sad, flat bread.
That’s it. No stand mixer, no sifter, no pastry blender. If you have these six things, you’re ready.
Preparation Method
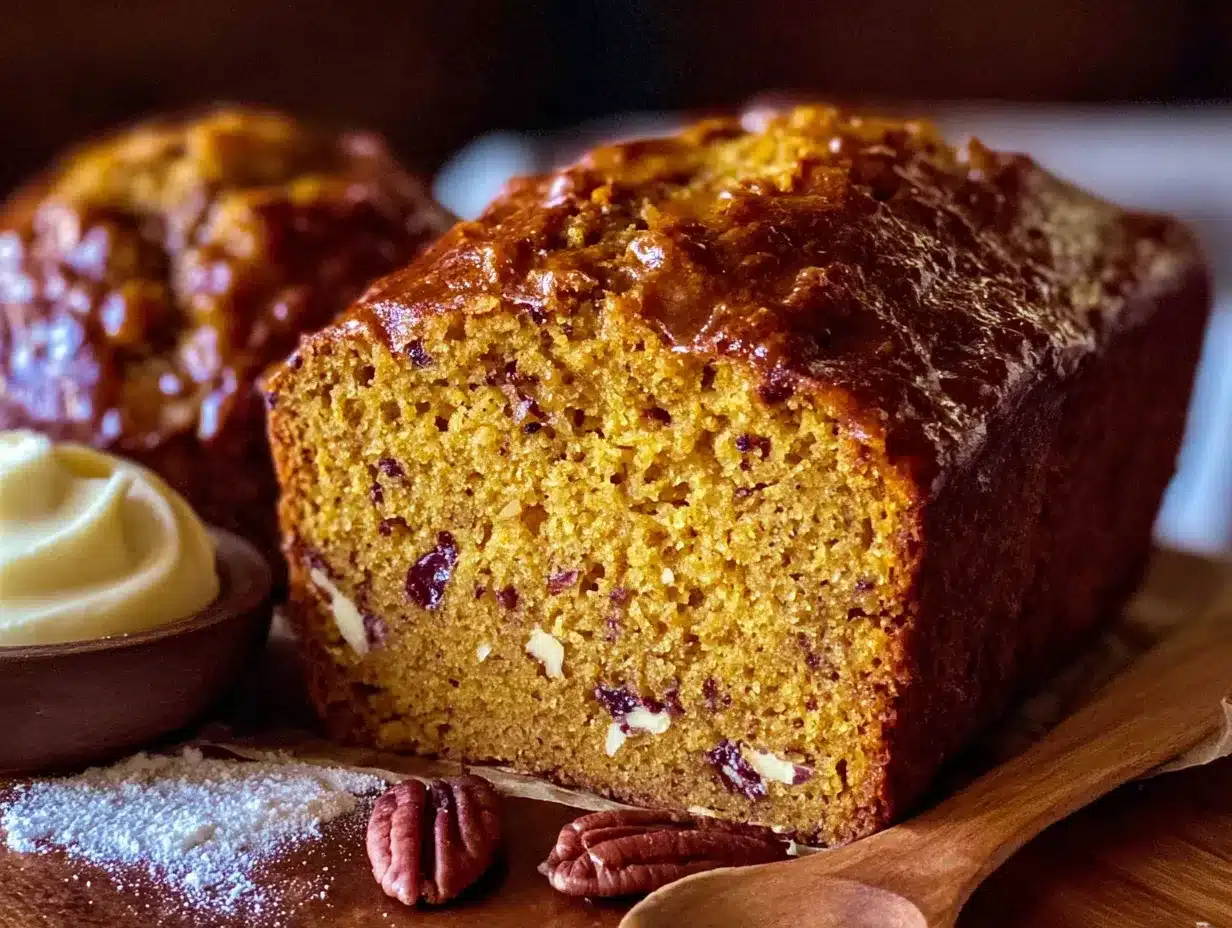
This one-bowl method is designed to minimize dishes and maximize flavor. Follow these steps, and you’ll have a perfect loaf every time.
- Preheat and Prep: Set your oven to 350°F (175°C). Grease your loaf pan with butter or non-stick spray, then line it with parchment paper, leaving overhang on the long sides. This makes lifting the bread out so much easier.
- Mash the Bananas: Peel the bananas and drop them into your mixing bowl. Mash them with a fork or potato masher until mostly smooth with a few small lumps. Over-mashing is fine—lumpy bananas actually create nice pockets of texture in the finished bread.
- Add the Wet Ingredients: To the mashed bananas, add the pumpkin puree, granulated sugar, brown sugar, vegetable oil, eggs, and vanilla extract. Stir with your wooden spoon until everything is combined. Don’t worry if it looks a little separated—that’s normal.
- Add the Dry Ingredients: Sprinkle the flour, baking soda, baking powder, salt, cinnamon, nutmeg, and ginger over the wet mixture. Stir gently until just combined. A few streaks of flour are okay. Over-mixing at this stage develops gluten and makes the bread tough. Stop when you can’t see dry flour anymore.
- Fold in Mix-Ins (Optional): If you’re using chocolate chips, nuts, or dried fruit, fold them in now with a few gentle strokes. Reserve a handful to sprinkle on top for a prettier presentation.
- Pour and Smooth: Scrape the batter into your prepared loaf pan. Use the back of your spoon or a small offset spatula to spread it evenly. Tap the pan on the counter once or twice to release any air bubbles.
- Bake: Place the pan on the center rack and bake for 55-65 minutes. At the 50-minute mark, start checking for doneness. The bread is done when a toothpick inserted into the center comes out clean or with a few moist crumbs. If the top is browning too quickly, tent it loosely with foil at the 40-minute mark.
- Cool: Let the bread cool in the pan for 10 minutes. Then lift it out using the parchment sling and transfer it to a wire rack. Cool completely before slicing—about 1 hour. I know it’s tempting to cut into it warm, but it will crumble. Trust me, I’ve learned this the hard way more times than I’d like to admit.
Pro tip: If your bread sinks in the middle, it likely needed another 5 minutes in the oven. Don’t panic—it will still taste amazing.
Cooking Tips & Techniques
Over the years, I’ve made every mistake in the book with this bread. Here’s what I’ve learned so you don’t have to repeat my errors:
- Don’t Overmix: This is the number one mistake. Stir until the flour disappears, then stop. Overmixed batter creates tunnels and a tough, rubbery texture. Your bread should be tender, not chewy.
- Use Room Temperature Ingredients: Cold eggs and cold pumpkin can cause the batter to seize up. If you’re in a rush, warm your eggs in a bowl of hot water for 5 minutes and microwave the pumpkin for 15 seconds.
- Check Your Oven Temperature: Ovens lie. I owned one that ran 25 degrees hot for years before I bought a cheap oven thermometer. Your bread might need more or less time depending on your oven’s personality.
- Rotate the Pan Halfway Through: Ovens have hot spots. Turning the pan at the 30-minute mark ensures even browning and baking.
- Let It Cool: I once cut into a loaf 15 minutes out of the oven because I couldn’t wait. It was a gummy, sticky mess. Patience pays off—cooling allows the structure to set.
- Test with a Toothpick, Not Your Finger: Pressing the top isn’t reliable. A toothpick or skewer inserted into the center tells the real story. If it comes out wet with batter, it needs more time.
One time, I forgot the baking soda entirely. The bread came out flat and dense, like a brick of banana-pumpkin sadness. My kids still ate it, but they asked for extra butter. Learn from my absent-mindedness—double-check your leavening agents.
Variations & Adaptations
This recipe is endlessly adaptable. Here are a few ways I’ve tweaked it over the years:
- Gluten-Free Version: Swap the all-purpose flour for a 1:1 gluten-free baking blend. I’ve used Bob’s Red Mill with great results. Add 1 tablespoon of apple cider vinegar to help with lift—it reacts with the baking soda.
- Dairy-Free Adaptation: This recipe is already dairy-free if you use oil instead of butter. Double-check your chocolate chips if you’re adding them—some brands contain milk solids.
- Lower Sugar Option: Reduce the granulated sugar to ½ cup and use very ripe bananas. The bread will be less sweet but still delicious. I’ve also successfully used ¼ cup maple syrup in place of the brown sugar.
- Vegan Version: Replace the eggs with two flax eggs (2 tablespoons ground flaxseed mixed with 6 tablespoons water, let sit for 5 minutes). The texture will be slightly denser but still wonderful.
- Spice It Up: Add ¼ teaspoon cardamom or cloves for a more complex flavor profile. My neighbor adds a pinch of black pepper, and I thought she was crazy until I tried it.
- Muffin Adaptation: Divide the batter into a greased muffin tin and bake at 350°F for 18-22 minutes. Perfect for lunchboxes or grab-and-go breakfasts.
I once tried a version with shredded zucchini added in. It worked surprisingly well—just squeeze the zucchini dry first to avoid adding too much moisture. My kids didn’t even notice the extra vegetable.
Serving & Storage Suggestions
This bread is wonderful in so many ways. Here’s how to make the most of it:
Serving: I prefer this bread at room temperature, but a warm slice with a pat of salted butter is hard to beat. For a treat, toast a slice and drizzle it with honey or maple syrup. It’s also fantastic alongside a cup of coffee or a glass of cold milk.
Storage: Wrap the cooled loaf tightly in plastic wrap or aluminum foil and store at room temperature for up to 4 days. Do not refrigerate—the cold air dries out baked goods faster. If your kitchen is very warm, store it in a bread box or a sealed container.
Freezing: This bread freezes beautifully. Wrap the entire loaf (or individual slices) in plastic wrap, then in foil, and place in a freezer bag. It keeps for up to 3 months. To thaw, leave it on the counter overnight or pop individual slices in the microwave for 20 seconds.
Reheating: For that fresh-baked taste, warm slices in a 300°F oven for 5-7 minutes. The microwave works in a pinch, but the texture won’t be as good. If you’re making it for school lunches, slice and freeze individually—they thaw by lunchtime.
One thing I love about this bread is how the flavors deepen overnight. Day two is always better than day one. The pumpkin and banana meld together, and the spices become more pronounced. If you can resist eating it all on day one, you’re a stronger person than I am.
Nutritional Information & Benefits
This bread is a treat, but it also packs some surprising nutritional perks. Here’s the breakdown per slice (assuming 10 slices):
| Nutrient | Amount per Slice |
|---|---|
| Calories | 245 |
| Total Fat | 9g |
| Saturated Fat | 1.5g |
| Carbohydrates | 38g |
| Fiber | 2.5g |
| Sugar | 18g |
| Protein | 4g |
| Vitamin A | 45% DV |
| Vitamin C | 6% DV |
| Potassium | 200mg |
The pumpkin provides a hefty dose of vitamin A, which supports eye health and immune function. Bananas contribute potassium and vitamin B6. The cinnamon may help with blood sugar regulation. Is this a health food? No. But it’s a smarter choice than most store-bought muffins or pastries.
If you’re watching your sugar intake, the lower-sugar variation is a solid option. For those with gluten sensitivities, the gluten-free version works beautifully. This recipe is naturally nut-free (unless you add walnuts) and can be made egg-free with the flax egg substitution.
Frequently Asked Questions
Can I use fresh pumpkin instead of canned?
Absolutely. Roast a sugar pumpkin at 400°F until tender, scoop out the flesh, and puree it until smooth. Fresh pumpkin puree has a higher water content, so you may need to drain it in a cheesecloth-lined sieve for 30 minutes before using. The flavor is slightly milder but lovely.
Why did my bread sink in the middle?
This usually happens for one of three reasons: the oven wasn’t hot enough, the bread was underbaked, or the batter was overmixed. Make sure your oven is fully preheated, test for doneness with a toothpick, and stop mixing as soon as the flour disappears.
Can I make this without eggs?
Yes! Use two flax eggs (2 tablespoons ground flaxseed mixed with 6 tablespoons water) or ½ cup unsweetened applesauce. The applesauce version will be slightly denser and a bit sweeter. Both work well.
How do I know when the bread is done?
Insert a toothpick or skewer into the center. If it comes out clean or with a few moist crumbs, it’s done. If it’s wet with batter, give it another 5 minutes. The top should be golden brown and spring back when lightly pressed.
Can I double this recipe?
Yes, and I often do. Simply double all ingredients and bake in two loaf pans. You may need to add 5-10 minutes to the baking time since the oven has more mass to heat. I recommend baking both loaves on the same rack for even results.
Conclusion
This one-bowl banana pumpkin bread is more than just a recipe—it’s a solution to two common kitchen problems: overripe bananas and a can of pumpkin sitting in the back of the pantry. It’s the bread that makes busy mornings feel manageable and after-school snacks feel special. Mrs. Chen’s simple nudge changed the way I bake, and I hope it changes something for you too.
I genuinely believe this is the easiest, most forgiving quick bread you’ll make all season. It doesn’t demand perfection. It doesn’t require a trip to a specialty store. It just asks for a bowl, a spoon, and a little trust in the process. Whether you’re feeding picky eaters, packing lunchboxes, or just treating yourself to a quiet slice with coffee, this bread delivers.
Try it this week. Swap in your favorite mix-ins. Make it your own. And when you do, come back and tell me how it turned out—I love hearing about your kitchen victories. Happy baking, friends!
Pin This Recipe!
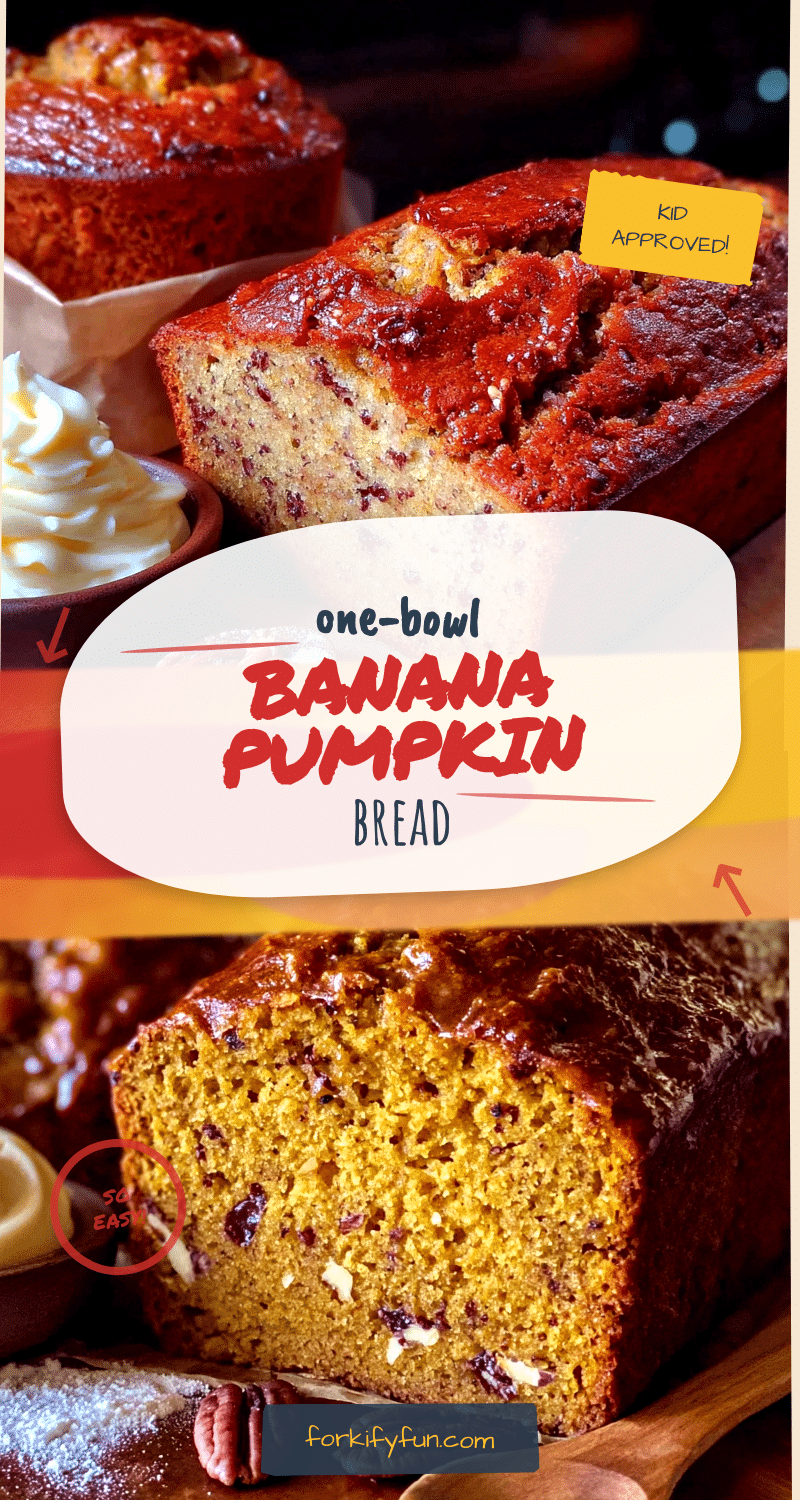
Best Easy One-Bowl Banana Pumpkin Bread Recipe
This one-bowl banana pumpkin bread is incredibly moist, tender, and forgiving. It uses up overripe bananas and canned pumpkin puree for a budget-friendly, kid-approved treat that freezes beautifully.
- Prep Time: 15 minutes
- Cook Time: 55-65 minutes
- Total Time: 1 hour 20 minutes
- Yield: 10 servings 1x
- Category: Dessert
- Cuisine: American
Ingredients
- 3 medium overripe bananas, mashed
- 1 cup pumpkin puree (canned or homemade)
- ¾ cup granulated sugar
- ¼ cup packed brown sugar (light or dark)
- ⅓ cup vegetable oil (or canola, avocado, melted coconut oil)
- 2 large eggs, room temperature
- 1 teaspoon vanilla extract
- 1¾ cups all-purpose flour (spooned and leveled)
- 1 teaspoon baking soda
- ½ teaspoon baking powder
- ½ teaspoon fine sea salt
- 1½ teaspoons ground cinnamon
- ½ teaspoon ground nutmeg (freshly grated if possible)
- ¼ teaspoon ground ginger (optional)
- ½ cup optional mix-ins: chocolate chips, chopped walnuts, or dried cranberries
Instructions
- Preheat oven to 350°F (175°C). Grease a 9×5-inch loaf pan with butter or non-stick spray, then line with parchment paper, leaving overhang on the long sides.
- Peel bananas and mash them in a large mixing bowl with a fork or potato masher until mostly smooth with a few small lumps.
- Add pumpkin puree, granulated sugar, brown sugar, vegetable oil, eggs, and vanilla extract to the mashed bananas. Stir with a wooden spoon until combined.
- Sprinkle flour, baking soda, baking powder, salt, cinnamon, nutmeg, and ginger over the wet mixture. Stir gently until just combined (a few streaks of flour are okay). Do not overmix.
- If using mix-ins, fold them in with a few gentle strokes, reserving a handful to sprinkle on top.
- Pour batter into the prepared loaf pan, spread evenly, and tap the pan on the counter once or twice to release air bubbles.
- Bake on the center rack for 55-65 minutes. At 50 minutes, start checking for doneness: a toothpick inserted into the center should come out clean or with a few moist crumbs. If the top browns too quickly, tent loosely with foil at 40 minutes.
- Cool in the pan for 10 minutes, then lift out using the parchment sling and transfer to a wire rack. Cool completely before slicing (about 1 hour).
Notes
For best results, use very ripe (spotty) bananas. Do not overmix the batter. The bread freezes well for up to 3 months. If the bread sinks in the middle, it likely needed a few more minutes in the oven.
Nutrition
- Serving Size: 1 slice
- Calories: 245
- Sugar: 18
- Sodium: 200
- Fat: 9
- Saturated Fat: 1.5
- Carbohydrates: 38
- Fiber: 2.5
- Protein: 4
Keywords: banana pumpkin bread, one-bowl banana bread, easy pumpkin bread, moist banana bread, fall baking, quick bread