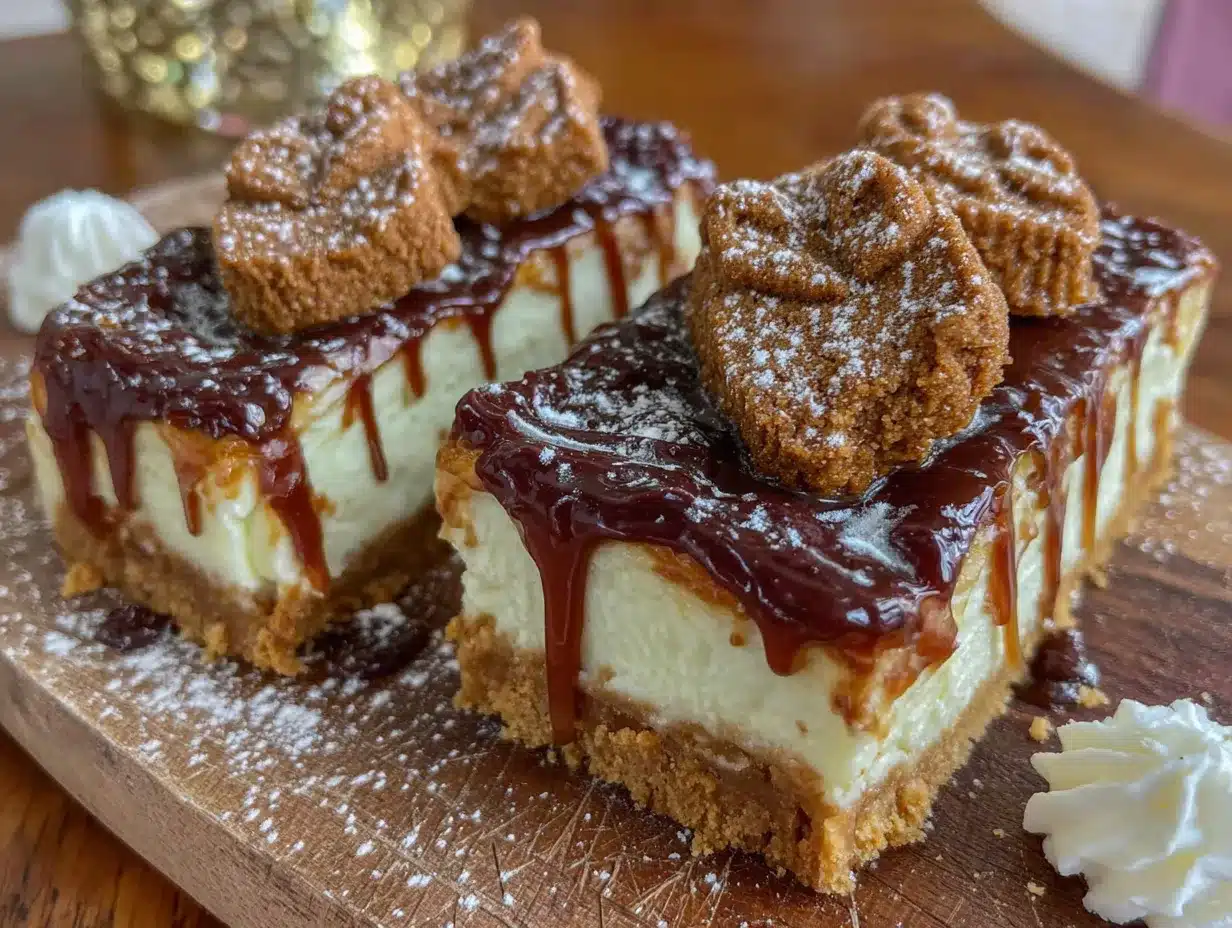
The crack. That sharp, clean snap of the Biscoff cookie crust giving way under the knife is the whole point. Honestly, I made these creamy Biscoff cheesecake bars for the holidays last year just to hear that sound again. The crust isn’t crumbly or sandy—it’s compact and buttery, with the faintest resistance before it breaks. And then the knife slides through the filling, and you feel it. That silky, dense give that tells you the cheesecake set perfectly, no cracks, no drama. I stood over the pan in my quiet kitchen (everyone else was napping, finally) and just stared at the first clean slice. The smooth top, the caramel-colored swirls of melted cookie butter, the way the light caught the edges. It felt like I’d made something that actually looked like the photos for once. And yeah, I ate that first slice standing at the counter. No plate. No fork. Just me, the bar, and that ridiculous, creamy bite that tasted like a hug from someone who remembers your coffee order. That’s the feeling I wanted to bottle. And now, every time the holidays roll around, these bars are the first thing I think about making. Not the turkey. Not the ham. These.
Why You’ll Love This Recipe
Let me tell you why these creamy Biscoff cheesecake bars for the holidays are about to become your new favorite dessert. I’ve tested this recipe six times (six, you guys) to get the texture exactly right. No water bath, no fuss, no cracked tops. Just pure, velvety cheesecake with that signature Biscoff flavor that makes people close their eyes when they take a bite.
- No Water Bath Needed : I figured out the exact oven temperature and cooling method so you get a smooth, crack-free top every single time. No wrestling with foil or worrying about leaks.
- Simple Ingredients : Cream cheese, eggs, sugar, and Biscoff cookie butter. That’s it. No weird stabilizers or hard-to-find items.
- Perfect for Holiday Gatherings : These bars feed a crowd, travel beautifully, and look impressive without requiring any decorating skills. I brought them to a Friendsgiving and they disappeared before the pie.
- Make-Ahead Friendly : You can make these up to three days in advance. The flavor actually gets better after a day in the fridge—the Biscoff mellows and melds with the cream cheese in a way that’s just unfair.
- That Texture : The crust is crunchy and spiced, the filling is dense and creamy, and the top has that gorgeous swirl of melted cookie butter. It’s a textural dream.
I’ve made a lot of cheesecakes in my life. Some were disasters (don’t ask about the one that ended up in a blender). But these bars? They’re forgiving. They’re reliable. And they taste like you spent hours when really, you just followed a few simple steps. That’s the kind of holiday dessert I can get behind.
What Ingredients You Will Need
This recipe uses straightforward ingredients that come together to create something truly special. Here’s what you’ll need and why each one matters.
For the Biscoff Crust
- Biscoff Cookies (250g / about 2 cups crushed) : The star of the show. I use the original speculoos cookies—not the spread. You can crush them in a food processor or put them in a ziplock bag and go to town with a rolling pin. Both work. I’ve done both.
- Unsalted Butter (85g / 6 tablespoons, melted) : Use good butter here. It binds the crumbs and adds richness. I prefer Land O’Lakes or Kerrygold for the flavor.
- Granulated Sugar (2 tablespoons / 25g) : Just a tiny bit to help the crust hold together and add a hint of sweetness.
- Salt (a pinch) : Balances the sweetness of the cookies. Trust me on this.
For the Cheesecake Filling
- Cream Cheese (680g / 24 oz, softened) : Three standard blocks. Make sure they’re at room temperature—cold cream cheese gives you lumpy filling. I leave mine on the counter for about an hour before I start. Philadelphia is my go-to brand for consistent results.
- Granulated Sugar (200g / 1 cup) : Regular white sugar. Nothing fancy.
- Large Eggs (3, room temperature) : Eggs bind the filling and give it structure. Room temperature eggs incorporate more smoothly. If you forgot to take them out, place them in a bowl of warm water for 5 minutes.
- Vanilla Extract (2 teaspoons / 10ml) : Pure vanilla, not imitation. It rounds out the flavor and makes everything taste more, well, delicious.
- Sour Cream (120g / ½ cup, room temperature) : This is my secret ingredient. The sour cream adds tanginess and makes the filling extra creamy. Full-fat works best, but low-fat is okay in a pinch.
- Biscoff Cookie Butter (120g / ½ cup) : For swirling into the top. Look for the jarred spread, not the crunchy version. I use the Lotus brand—it’s the most widely available and has the perfect consistency.
A quick note: I’ve tried making these bars with reduced-fat cream cheese and the texture just isn’t the same. The filling becomes a bit grainy and doesn’t set as firmly. If you’re looking for a lighter option, you might enjoy my no-bake cheesecake bars which use Greek yogurt instead. But for these creamy Biscoff cheesecake bars for the holidays, go full-fat. Your taste buds will thank you.
Equipment Needed
You don’t need a professional pastry kitchen to make these bars. Here’s what I use:
- 9×13-inch Baking Pan : Metal or glass works fine. I prefer metal because it conducts heat more evenly and gives a crisper crust.
- Parchment Paper : Cut two long strips that overhang the pan on opposite sides. This creates a sling that lets you lift the entire cheesecake out cleanly.
- Food Processor : For crushing the cookies. You can also use a ziplock bag and rolling pin—I’ve done both. The food processor is faster and gives a more even crumb.
- Electric Hand Mixer or Stand Mixer : A stand mixer with the paddle attachment is my preference, but a hand mixer works perfectly too. Just don’t use a whisk attachment—it incorporates too much air.
- Large Mixing Bowls : One for the crust, one for the filling.
- Spatula : A rubber spatula for scraping down the bowl and smoothing the filling.
- Measuring Cups and Spoons : For accuracy. Baking is a science, even if I’m casual about it.
- Sharp Knife : For cutting clean slices. A chef’s knife or a long serrated knife works best.
I bought my 9×13 pan at a thrift store for three dollars and it’s my favorite baking pan. You don’t need expensive equipment. Just reliable tools that do the job.
Preparation Method
Let’s make these creamy Biscoff cheesecake bars for the holidays. Follow these steps and you’ll have a dessert that looks and tastes like you spent all day in the kitchen (but you didn’t).
- Prep the Pan : Preheat your oven to 325°F (163°C). Line your 9×13-inch baking pan with parchment paper, leaving a 2-inch overhang on the long sides. This is your sling for lifting the cheesecake out later. Lightly grease the parchment with butter or non-stick spray.
- Make the Crust : Place the Biscoff cookies in a food processor and pulse until they become fine crumbs. You should have about 2 cups. Transfer to a medium bowl. Pour in the melted butter, sugar, and a pinch of salt. Stir with a fork until the crumbs are evenly moistened. They should look like wet sand and clump together when you squeeze a handful.
- Press the Crust : Dump the crumb mixture into your prepared pan. Use the bottom of a measuring cup or a flat-bottomed glass to press it down firmly and evenly. Don’t skip this step—a compact crust holds together better when you cut the bars. Press all the way to the edges and into the corners. Bake for 10 minutes, then set aside to cool slightly while you make the filling.
- Soften the Cream Cheese : In a large mixing bowl (or the bowl of your stand mixer), beat the softened cream cheese on medium speed for about 2 minutes until it’s smooth and fluffy. Scrape down the sides and bottom of the bowl with a spatula. This step is crucial—lumps now mean lumps later.
- Add the Sugar : Add the granulated sugar and beat on medium speed for another 2 minutes until the mixture is light and airy. Scrape the bowl again.
- Add the Eggs One at a Time : Crack the first egg into the bowl and beat on low speed until just combined. Add the second egg and beat again. Add the third egg and beat until smooth. Overmixing at this stage can incorporate too much air, which leads to cracks during baking. Mix just until the yolk disappears into the batter.
- Add the Vanilla and Sour Cream : Pour in the vanilla extract and the sour cream. Beat on low speed until just combined. The batter should be smooth, glossy, and thick. Scrape the bowl one more time.
- Pour the Filling : Pour the cheesecake filling over the pre-baked crust. Use your spatula to spread it evenly, all the way to the edges. Give the pan a gentle tap on the counter to release any air bubbles.
- Add the Biscoff Swirl : Warm the Biscoff cookie butter in the microwave for about 15 seconds until it’s pourable but not hot. Drop spoonfuls of the warm cookie butter over the top of the filling—about 8 to 10 dollops. Use a butter knife or a skewer to swirl the cookie butter into the cheesecake. Don’t over-swirl or you’ll lose the distinct ribbons. A few figure-eight motions are enough.
- Bake : Place the pan on the middle rack of your preheated oven. Bake for 35 to 40 minutes. The edges should look set and slightly puffed, but the center should still jiggle slightly when you gently shake the pan. This jiggle is your friend—it means the center will finish setting as it cools without becoming dry.
- Cool Slowly : Turn off the oven and crack the door open. Let the cheesecake sit in the warm oven for 1 hour. This gradual cooling prevents the dreaded crack. After an hour, transfer the pan to a wire rack and let it cool completely at room temperature for another hour.
- Chill : Cover the pan with plastic wrap or foil and refrigerate for at least 4 hours, but preferably overnight. This is the hardest step. I know you want to eat it now. But the flavor and texture improve dramatically after a full chill. The cheesecake firms up, the flavors meld, and the texture becomes velvety and dense.
- Slice and Serve : When you’re ready to serve, lift the cheesecake out of the pan using the parchment sling. Place it on a cutting board. Use a sharp knife to cut into bars—I usually get 12 to 16 depending on how generous I’m feeling. Wipe the knife clean between cuts for clean edges. Serve cold or at room temperature.
Cooking Tips & Techniques
I’ve learned a few things the hard way so you don’t have to. Here are my best tips for perfect creamy Biscoff cheesecake bars for the holidays.
Room Temperature Ingredients Are Non-Negotiable : I cannot stress this enough. Cold cream cheese creates lumps that no amount of beating will fix. Cold eggs make the batter seize up. Set everything out on the counter at least an hour before you start. Set a timer if you have to. I’ve ruined two batches by being impatient.
Don’t Overmix the Eggs : When you add the eggs, beat on low speed and stop as soon as they’re incorporated. Overmixing incorporates too much air, which expands during baking and then collapses, causing cracks. I learned this after my third cracked cheesecake. Now I’m religious about it.
That Jiggle Test : The center of the cheesecake should wobble like Jell-O when you gently shake the pan. If it’s completely firm, it’s overbaked. If it sloshes like soup, it needs more time. The residual heat will finish cooking the center as it cools.
Cooling Is Part of the Recipe : The hour in the turned-off oven is not optional. It’s the gentlest way to bring the cheesecake down to room temperature without shocking it. I once skipped this step because I was in a hurry, and the top cracked into a canyon. Never again.
Use a Warm Knife for Clean Slices : Run your knife under hot water, dry it, then slice. The warmth glides through the cold cheesecake without dragging or crumbling. Wipe and re-warm between each cut. Your bars will look bakery-perfect.
If you’re looking for another holiday dessert that’s equally impressive but completely different, try my pumpkin coffee cake with streusel. It’s perfect for brunch or a cozy afternoon treat.
Variations & Adaptations
One of the best things about this recipe is how easy it is to adapt. Here are some variations I’ve tried and loved.
Gluten-Free Version : Biscoff cookies are not gluten-free, but you can substitute with gluten-free speculoos cookies or even gluten-free graham crackers. The flavor will be slightly different, but the texture will be just as good. I tested this for a friend with celiac disease and she gave it two thumbs up.
Chocolate Lover’s Twist : Add ½ cup of mini chocolate chips to the cheesecake filling before pouring it over the crust. Or drizzle melted dark chocolate over the finished bars before serving. The chocolate and Biscoff flavor are a match made in heaven.
Pumpkin Biscoff Cheesecake Bars : For a fall-inspired version, replace ½ cup of the sour cream with ½ cup of pumpkin puree. Add 1 teaspoon of pumpkin pie spice to the filling. Swirl in the Biscoff cookie butter as directed. This variation is perfect for Thanksgiving. Speaking of which, my maple pumpkin sourdough bread would be a fantastic addition to your holiday table as well.
Vegan Option : Use vegan cream cheese (I like the brand Violife), vegan sour cream, and a flax egg (1 tablespoon ground flaxseed mixed with 3 tablespoons water per egg). The texture won’t be exactly the same—it’ll be slightly softer—but it’s still delicious. I’ve made this for a vegan friend and she asked for the recipe.
Mini Cheesecake Bites : Press the crust into a mini muffin tin (lined with paper liners) and fill with the cheesecake batter. Bake for 12 to 15 minutes. These are perfect for holiday parties where people want a single bite. I made these for a cookie swap and they were the first thing to disappear.
Serving & Storage Suggestions
These creamy Biscoff cheesecake bars for the holidays are versatile when it comes to serving. Here’s how I handle it.
Serving Temperature : I prefer these bars cold, straight from the fridge. The texture is firm and almost fudge-like. But they’re also delicious at room temperature, where the filling becomes softer and more luxurious. Try both and see which you prefer. I won’t judge.
Presentation Ideas : Dust the tops with a little powdered sugar before serving for a snowy effect. Or drizzle with melted Biscoff cookie butter and sprinkle with crushed Biscoff cookies. For a truly indulgent presentation, serve each bar with a dollop of whipped cream and a drizzle of caramel sauce.
What to Serve With Them : These bars are rich, so they pair well with something light and bright. A cup of strong black coffee or espresso is my go-to. For a holiday gathering, serve them alongside a platter of fresh berries or a simple fruit salad. The acidity cuts through the richness beautifully.
Storage Instructions : Store the bars in an airtight container in the refrigerator for up to 5 days. They actually get better after a day or two as the flavors meld. I’ve never had them last longer than 5 days because they get eaten, but they should be fine for up to a week.
Freezing Instructions : These bars freeze beautifully. Wrap individual bars tightly in plastic wrap, then place them in a freezer-safe bag or container. Freeze for up to 3 months. To thaw, transfer to the refrigerator overnight or let sit at room temperature for about 30 minutes. I always keep a stash in my freezer for unexpected guests or late-night cravings.
Reheating : These bars are best served cold or at room temperature. If you want a warm dessert, microwave a single bar for about 15 seconds. The filling will soften and become almost molten. It’s a completely different experience, but a good one.
Nutritional Information & Benefits
Let’s be real—these are a treat, not a health food. But here’s what you should know.
Per serving (based on 16 bars):
- Calories: 380
- Fat: 24g
- Saturated Fat: 14g
- Carbohydrates: 36g
- Sugar: 26g
- Protein: 7g
- Sodium: 280mg
These numbers are estimates and will vary based on the specific brands you use.
On the plus side, cream cheese contains calcium and protein. The eggs provide vitamin D and B12. And the Biscoff cookies? They make you happy. Sometimes that’s enough.
If you’re watching your sugar intake, you can reduce the sugar in the filling to ¾ cup without significantly affecting the texture. I’ve done this and the bars are still plenty sweet because the Biscoff cookies and cookie butter add so much sweetness on their own.
For a lighter option, consider my high-protein chicken salad cups for a balanced meal. But for dessert? Go ahead and indulge. The holidays are about joy, not restriction.
Conclusion
These creamy Biscoff cheesecake bars for the holidays are everything I want in a dessert. They’re rich without being heavy. They’re impressive without being complicated. And they taste like the holidays—warm, spiced, and full of joy.
I’ve made these for Thanksgiving, Christmas, New Year’s Eve, and random Tuesdays when I needed a pick-me-up. Every single time, they deliver. The crust is crunchy, the filling is velvety, and that Biscoff swirl on top? Pure magic.
I want you to try these. I want you to taste that first bite and feel proud of what you made. And I want you to share them with the people you love, because that’s what the holidays are really about.
If you make these bars, please come back and leave a comment. Tell me how they turned out. Tell me if you added your own twist. Tell me if you ate the whole pan in one sitting (I won’t tell anyone, I promise). Your feedback helps me create better recipes for you.
Happy baking, friends. May your cheesecake be crack-free and your holidays be sweet.
Frequently Asked Questions
Can I use a different type of cookie for the crust?
Absolutely. Graham crackers, shortbread cookies, or even vanilla wafers work well. The flavor will change, but the texture will be similar. If you use a less sweet cookie, you might want to add a bit more sugar to the crust.
How do I know when the cheesecake is done baking?
The edges should be set and slightly puffed, but the center should still jiggle when you gently shake the pan. It should look like a firm Jell-O wobble, not a liquid slosh. The residual heat will finish cooking the center as it cools.
Why did my cheesecake crack on top?
Cracks usually happen for one of three reasons: overmixing the eggs (incorporates too much air), overbaking (the center dries out), or cooling too quickly (thermal shock). Follow the cooling instructions—the hour in the turned-off oven is your best defense against cracks.
Can I make these bars dairy-free?
Yes, with some adjustments. Use vegan cream cheese and vegan sour cream. The butter in the crust can be replaced with coconut oil or a vegan butter substitute. The texture will be slightly different—softer and less firm—but still delicious.
How far in advance can I make these bars?
You can make them up to 3 days in advance. Store them in the refrigerator in an airtight container. The flavor actually improves after a day or two as the Biscoff flavor melds with the cream cheese. You can also freeze them for up to 3 months.
Pin This Recipe!
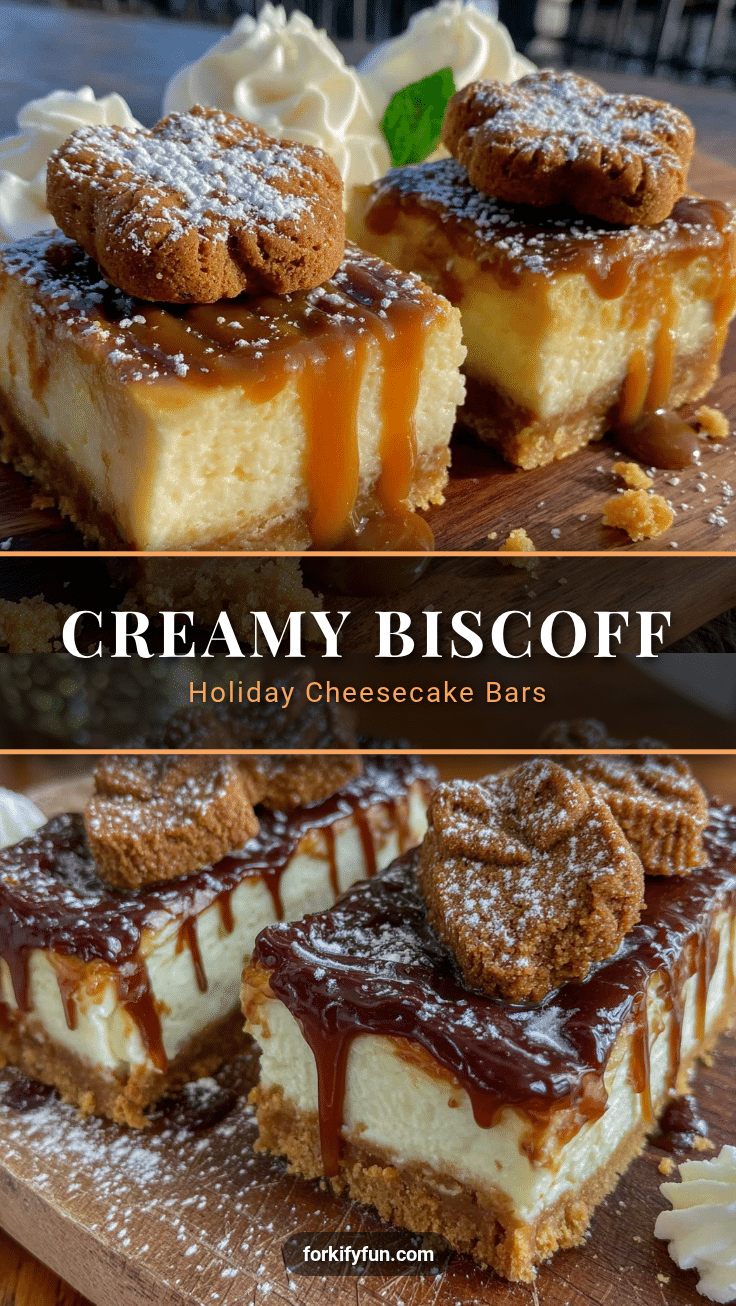
Creamy Biscoff Cheesecake Bars: Easy Holiday Dessert
These creamy Biscoff cheesecake bars feature a crunchy Biscoff cookie crust, a velvety cheesecake filling, and a beautiful swirl of cookie butter on top. No water bath needed, they are perfect for holiday gatherings and can be made ahead.
- Prep Time: 20 minutes
- Cook Time: 40 minutes
- Total Time: 5 hours (includes cooling and chilling)
- Yield: 12 to 16 servings
- Category: Dessert
- Cuisine: American
Ingredients
- Biscoff Cookies (250g / about 2 cups crushed)
- Unsalted Butter (85g / 6 tablespoons, melted)
- Granulated Sugar (2 tablespoons / 25g)
- Salt (a pinch)
- Cream Cheese (680g / 24 oz, softened)
- Granulated Sugar (200g / 1 cup)
- Large Eggs (3, room temperature)
- Vanilla Extract (2 teaspoons / 10ml)
- Sour Cream (120g / ½ cup, room temperature)
- Biscoff Cookie Butter (120g / ½ cup)
Instructions
- Prep the Pan: Preheat your oven to 325°F (163°C). Line your 9×13-inch baking pan with parchment paper, leaving a 2-inch overhang on the long sides. Lightly grease the parchment with butter or non-stick spray.
- Make the Crust: Place the Biscoff cookies in a food processor and pulse until they become fine crumbs. Transfer to a medium bowl. Pour in the melted butter, sugar, and a pinch of salt. Stir with a fork until the crumbs are evenly moistened.
- Press the Crust: Dump the crumb mixture into your prepared pan. Use the bottom of a measuring cup or a flat-bottomed glass to press it down firmly and evenly. Bake for 10 minutes, then set aside to cool slightly.
- Soften the Cream Cheese: In a large mixing bowl, beat the softened cream cheese on medium speed for about 2 minutes until smooth and fluffy. Scrape down the sides and bottom of the bowl.
- Add the Sugar: Add the granulated sugar and beat on medium speed for another 2 minutes until light and airy. Scrape the bowl again.
- Add the Eggs One at a Time: Crack the first egg into the bowl and beat on low speed until just combined. Add the second egg and beat again. Add the third egg and beat until smooth. Do not overmix.
- Add the Vanilla and Sour Cream: Pour in the vanilla extract and the sour cream. Beat on low speed until just combined. The batter should be smooth, glossy, and thick.
- Pour the Filling: Pour the cheesecake filling over the pre-baked crust. Use a spatula to spread it evenly. Give the pan a gentle tap on the counter to release any air bubbles.
- Add the Biscoff Swirl: Warm the Biscoff cookie butter in the microwave for about 15 seconds until pourable. Drop spoonfuls over the top of the filling and swirl with a butter knife or skewer.
- Bake: Place the pan on the middle rack and bake for 35 to 40 minutes. The edges should be set but the center should still jiggle slightly.
- Cool Slowly: Turn off the oven and crack the door open. Let the cheesecake sit in the warm oven for 1 hour. Then transfer to a wire rack and cool completely at room temperature for another hour.
- Chill: Cover the pan with plastic wrap or foil and refrigerate for at least 4 hours, preferably overnight.
- Slice and Serve: Lift the cheesecake out of the pan using the parchment sling. Cut into bars with a sharp knife, wiping the knife clean between cuts. Serve cold or at room temperature.
Notes
Room temperature ingredients are crucial for a smooth filling. Do not overmix the eggs to avoid cracks. The jiggle test is key: the center should wobble like Jell-O when done. Cooling slowly in the turned-off oven prevents cracking. Use a warm knife for clean slices.
Nutrition
- Serving Size: 1 bar (based on 16 b
- Calories: 380
- Sugar: 26
- Sodium: 280
- Fat: 24
- Saturated Fat: 14
- Carbohydrates: 36
- Protein: 7
Keywords: Biscoff cheesecake bars, holiday dessert, no water bath cheesecake, Biscoff dessert, easy cheesecake bars