Juggling the chaos of a backyard barbecue while realizing the dessert is nowhere near ready—my kitchen was a whirlwind of spatters and half-mixed batter when the idea of the perfect red, white & blue layer cake hit me. The kids were clamoring for something sweet, the grill was almost done, and I had maybe twenty minutes before guests expected something festive on the table. There was no time for a complicated dessert, but this layered beauty had to happen. The vibrant red velvet layers, the creamy white of the frosting, and the bright blue berries I had stashed away came together almost by accident, yet somehow it turned into the centerpiece I didn’t even know I needed.
Honestly, making this cake under pressure taught me how to trust simple ingredients and just go with the flow. The cream cheese frosting, silky and tangy, was the perfect foil to the mild cocoa in the red velvet layers. The fresh blueberries added that pop of juicy sweetness that made every bite a little celebration. You know, it was one of those moments when you realize a recipe isn’t just about the food—it’s about the memories and the people gathered around, waiting for that first forkful.
This red, white & blue layer cake sticks with me—not just because it looks stunning, but because it’s a recipe born from the kind of kitchen madness we all know too well. It’s approachable, forgiving, and honestly, a crowd-pleaser that turns any holiday or summer get-together into something special without the fuss. I trust it to show up every time, with that creamy cream cheese frosting tying it all together in the best way.
Why You’ll Love This Perfect Red, White & Blue Layer Cake Recipe
This red, white & blue layer cake isn’t just a dessert; it’s a celebration in every bite. From my many trials (and yes, some kitchen slip-ups), I can say this recipe strikes just the right balance between show-stopping and doable. Here’s why it’s become my go-to:
- Quick & Easy: Comes together in under 90 minutes from start to finish, perfect when you’re balancing a million things but still want an impressive dessert.
- Simple Ingredients: No need for specialty stores—basic pantry staples like cocoa powder, cream cheese, and fresh or frozen berries do the trick.
- Perfect for Celebrations: Whether it’s Independence Day, a summer brunch, or a birthday, this cake’s patriotic colors and flavors make it a natural choice.
- Crowd-Pleaser: Kids adore the bright colors, and adults appreciate the subtle cocoa flavor and tangy frosting.
- Unbelievably Delicious: The moist red velvet layers paired with the smooth, luscious cream cheese frosting create a texture and flavor combo that feels like comfort food with a festive twist.
- Special Technique: Using buttermilk and a touch of cocoa powder in the batter gives the cake a tender crumb and subtle depth without overpowering the classic red velvet taste.
- Creative Twist: Instead of the usual heavy buttercream, this cream cheese frosting is whipped just right for a light, tangy finish that complements the layers beautifully.
From my experience, this recipe isn’t just another layered cake. It’s the kind of dessert that makes you pause, close your eyes, and savor the moment. It’s a little slice of celebration that’s fast enough to pull together when time’s tight but special enough to feel like a treat.
What Ingredients You Will Need
This perfect red, white & blue layer cake uses straightforward, wholesome ingredients that deliver big flavor without overcomplicating things. Most are pantry staples, and you can easily swap a few based on what you have on hand.
- For the Cake Layers:
- All-purpose flour – 2 ½ cups (315g), sifted for lightness
- Sugar – 1 ¾ cups (350g), granulated
- Cocoa powder – 2 tablespoons, unsweetened (I like Ghirardelli for rich flavor)
- Baking soda – 1 ½ teaspoons
- Salt – 1 teaspoon
- Buttermilk – 1 cup (240ml), room temperature (you can use regular milk plus 1 tablespoon lemon juice if needed)
- Vegetable oil – 1 cup (240ml), for moistness
- Eggs – 2 large, room temperature
- Vanilla extract – 2 teaspoons
- Red food coloring – 2 tablespoons (gel works best for vibrant color without thinning batter)
- White vinegar – 1 teaspoon (reacts with baking soda for lift)
- For the Cream Cheese Frosting:
- Cream cheese – 16 ounces (450g), softened (full fat for best flavor and texture)
- Unsalted butter – ½ cup (115g), softened
- Powdered sugar – 4 cups (480g), sifted to avoid lumps
- Vanilla extract – 1 teaspoon
- Heavy cream – 2-3 tablespoons (optional, for thinning if needed)
- For the Decorations:
- Fresh blueberries – 1 ½ cups (about 225g), washed and dried
- Strawberries – 1 cup sliced (optional, for extra red and white contrast)
- White chocolate shavings or sprinkles (optional, for extra festive touch)
Look for firm cream cheese that isn’t overly watery to keep your frosting creamy and stable. If you prefer, frozen blueberries work fine too—just thaw and drain well to avoid soggy layers. And if you want a gluten-free version, swapping all-purpose flour for a gluten-free blend works great, just watch the texture as you mix.
Equipment Needed
- Three 8-inch (20 cm) round cake pans: These give the perfect layered height. If you only have two pans, bake in batches and cool between bakes.
- Mixing bowls: Medium and large bowls for batter and frosting.
- Electric mixer or stand mixer: Essential for smooth cream cheese frosting and well-mixed batter. A hand mixer works too if you’re careful.
- Measuring cups and spoons: For accuracy, especially with baking soda and vinegar.
- Rubber spatula: For folding and scraping bowls clean.
- Cooling racks: To cool cake layers evenly and prevent sogginess.
- Offset spatula or butter knife: For smooth frosting application.
Personally, I’ve found silicone bakeware liners save a step on greasing and make cleanup easier. If you don’t have a stand mixer, a sturdy whisk and some elbow grease can get you through, but the electric mixer really helps achieve that perfectly fluffy cream cheese frosting. Don’t forget to keep your cream cheese and butter at room temperature; cold ingredients will make your frosting lumpy.
Preparation Method
- Preheat oven and prepare pans: Set your oven to 350°F (175°C). Grease three 8-inch pans and line bottoms with parchment paper for easy release. This step takes about 10 minutes.
- Mix dry ingredients: In a large bowl, sift together 2 ½ cups flour, 1 ¾ cups sugar, 2 tablespoons cocoa powder, 1 ½ teaspoons baking soda, and 1 teaspoon salt. Whisk lightly to combine. This ensures even distribution and avoids clumps.
- Combine wet ingredients: In a separate bowl, whisk together 1 cup buttermilk, 1 cup vegetable oil, 2 large eggs, 2 teaspoons vanilla extract, 2 tablespoons red food coloring, and 1 teaspoon white vinegar. The vinegar reacts with the baking soda for a light crumb.
- Make the batter: Gradually add the wet ingredients to the dry, stirring gently with a spatula until just combined. Be careful not to overmix—stop as soon as the flour disappears to keep the cake tender. Batter should be smooth and glossy, with a vivid red hue.
- Divide and bake: Pour batter evenly into the three pans—about 2 cups (475 ml) per pan. Tap pans gently on the counter to remove air bubbles. Bake for 25-30 minutes or until a toothpick inserted comes out clean. Rotate pans halfway through baking for even color.
- Cool the layers: Let cakes cool in pans for 10 minutes, then invert onto wire racks to cool completely. Cooling is key before frosting to prevent melting.
- Prepare the cream cheese frosting: In a large bowl, beat 16 ounces softened cream cheese and ½ cup softened butter on medium speed until creamy (about 2-3 minutes). Gradually add 4 cups powdered sugar, one cup at a time, beating on low until combined. Add 1 teaspoon vanilla extract. If frosting seems too thick, beat in 1-2 tablespoons heavy cream to reach spreading consistency.
- Assemble the cake: Place one cake layer on your serving plate. Spread about ½ cup frosting evenly on top. Repeat with second layer. Place final layer on top and frost the outside and top with remaining frosting. Use an offset spatula for a smooth finish.
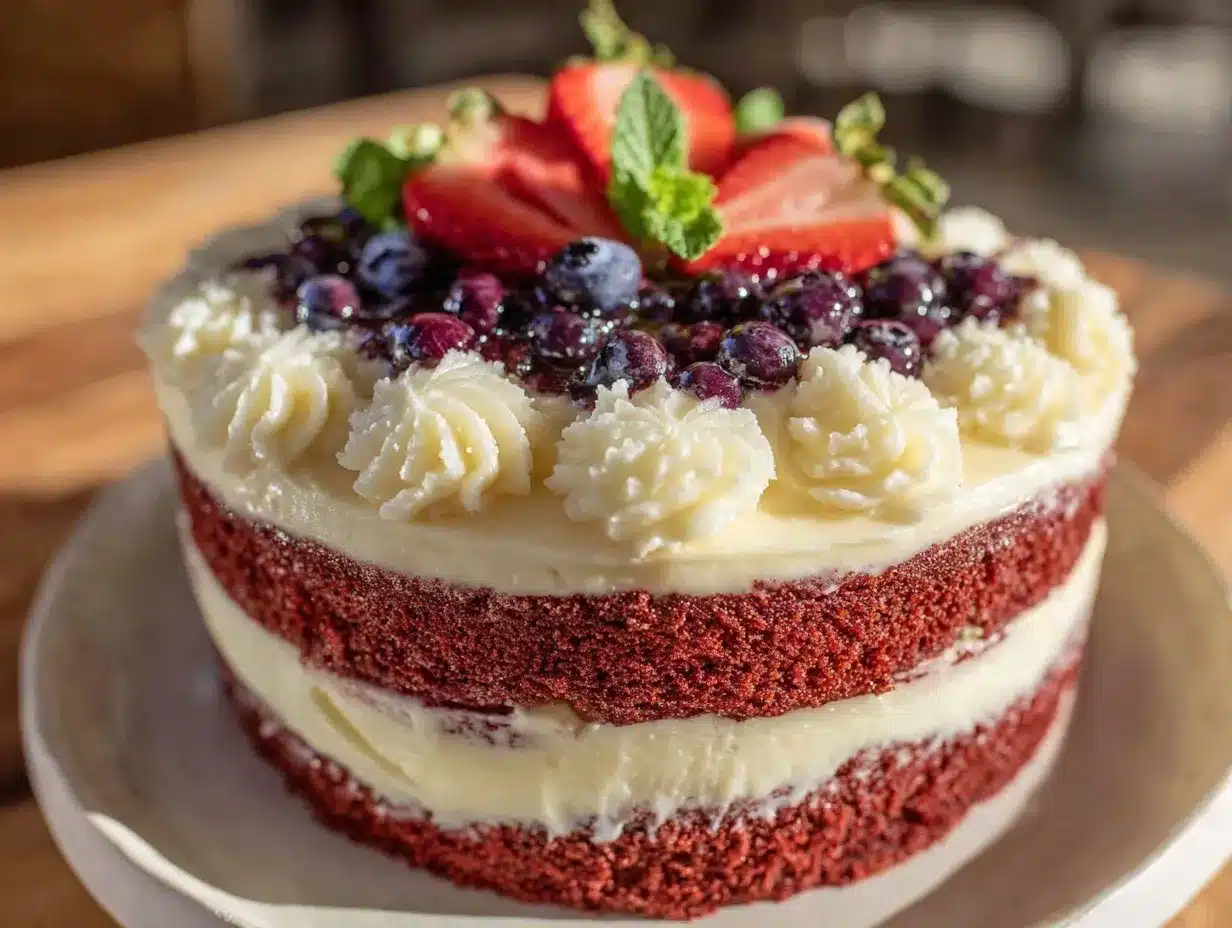
- Decorate: Arrange fresh blueberries and sliced strawberries on top in a festive pattern—think stars and stripes. Optionally, sprinkle white chocolate shavings for extra flair.
When frosting, keep your hands clean and work quickly to avoid melting. If your kitchen is warm, chilling the cake for 15-20 minutes before decorating helps the frosting set nicely. If you notice any cracks in the cake layers, a thin crumb coat layer of frosting can help smooth things out before the final coat.
Cooking Tips & Techniques
Here’s what I’ve learned making this red, white & blue layer cake enough times to call it my own:
- Room temperature is key: Eggs, buttermilk, cream cheese, and butter all perform best at room temp. Cold ingredients make batter lumpy and frosting difficult to spread.
- Don’t skip sifting: Sifting the dry ingredients and powdered sugar keeps the cake light and the frosting silky smooth.
- Gel food coloring for vibrant layers: Liquids can thin your batter, but gel coloring packs color without changing texture.
- Watch the baking time closely: Overbaking dries out red velvet quickly. Start checking at 25 minutes and test with a toothpick.
- Whip frosting just right: Overbeating cream cheese frosting can cause it to become too soft or grainy. Beat until smooth and fluffy, then stop.
- Multitask smartly: While cakes bake, whip up the frosting and prepare the berries to save time.
- Use an offset spatula for neat frosting: It’s easier to control and gives a professional look.
I once forgot the vinegar and ended up with a dense cake—not a disaster, but not the light texture I wanted. The vinegar’s acid working with baking soda is a subtle but important trick. Also, chilling the cake layers briefly before frosting helps prevent crumbs mixing into the icing, making your layers look clean and pretty.
Variations & Adaptations
This red, white & blue layer cake is flexible and can be customized to suit your taste or dietary needs.
- Fruit variations: Swap blueberries and strawberries for raspberries or blackberries for a different berry combo. In summer, fresh, juicy fruits really shine.
- Frosting twists: Try adding a hint of lemon zest to the cream cheese frosting for a fresh zing or use a whipped coconut cream frosting for a dairy-free version.
- Gluten-free option: Substitute all-purpose flour with an equal amount of gluten-free flour blend. You might need to add 1/4 teaspoon xanthan gum if your blend doesn’t contain it.
- Mini cakes or cupcakes: Make individual servings by dividing the batter into cupcake liners and reduce baking time to 18-22 minutes.
- Alternative colors: For a fun twist, try a pink velvet layer instead of red or add blue food coloring to one of the layers for a bolder blue contrast.
Personally, I once made a version using a tangy Greek yogurt frosting mixed with cream cheese—less sweet but still creamy and delicious. It’s all about what suits your palate and occasion.
Serving & Storage Suggestions
Serve this cake chilled or at room temperature—both work beautifully. Chilling firms up the frosting for cleaner slices, while room temp brings out the cream cheese’s tanginess.
For presentation, the fresh berries on top add vibrant color and a fresh bite. Pair with a cold glass of lemonade or iced tea for a classic summer combo. This cake also complements savory dishes like slow cooker BBQ pulled pork sliders or a light kale and chicken Caesar salad to round out a festive meal.
Store leftovers in an airtight container in the refrigerator for up to 4 days. If you want to freeze, wrap cake layers tightly in plastic wrap and foil—freeze up to 2 months. Thaw in the fridge overnight before frosting.
When reheating (if you prefer warm cake), bring to room temp and avoid microwave heating, which can make frosting oily. The flavors actually deepen after a day, so it’s a dessert that rewards patience.
Nutritional Information & Benefits
Estimated per slice (1/12th of cake): 350 calories, 18g fat, 45g carbohydrates, 3g protein.
Key ingredients like cream cheese provide calcium and protein, while buttermilk adds probiotics and tangy richness. The fresh berries are loaded with antioxidants and vitamins C and K, contributing a refreshing burst of nutrients.
This recipe can be made gluten-free and dairy-free with simple substitutions, making it adaptable for various dietary needs. The moderate sugar content means it’s an occasional treat balanced with wholesome ingredients.
Personally, I appreciate that this cake feels indulgent without being overly heavy, so it fits nicely into celebrations where everyone wants a slice of joy.
Conclusion
This perfect red, white & blue layer cake with cream cheese frosting is a recipe that’s stuck around in my kitchen for good reason. It’s quick enough to pull off when time’s tight but impressive enough to make any holiday or summer gathering feel special. The combination of moist red velvet layers, tangy, creamy frosting, and fresh berries is a crowd favorite every time.
Feel free to tweak the fruit toppings or frosting to suit your taste, but the basics here will never let you down. I love how this cake brings a little color and joy to the table, especially when the day’s been hectic and you just want something sweet and festive without the fuss.
When you try this recipe, I’d love to hear how it turned out for you or any twists you made! There’s something pretty wonderful about sharing food stories, after all.
Frequently Asked Questions
Can I make this cake ahead of time?
Yes! You can bake the layers a day ahead and store them wrapped tightly in the fridge. Assemble and frost the cake the day you plan to serve for the best texture.
What if I don’t have buttermilk?
Simple fix: add 1 tablespoon of lemon juice or white vinegar to 1 cup of milk, let it sit for 5 minutes, then use as a buttermilk substitute.
Can I use frozen berries for decoration?
Frozen berries can be used but make sure to thaw and drain them well to prevent excess moisture from making the frosting runny.
How do I store leftover cake?
Keep leftovers in an airtight container in the refrigerator for up to 4 days. For longer storage, freeze the unfrosted layers separately.
Is this recipe suitable for gluten-free diets?
Absolutely! Replace the all-purpose flour with a gluten-free flour blend and add xanthan gum if your blend doesn’t contain it for best results.
Pin This Recipe!
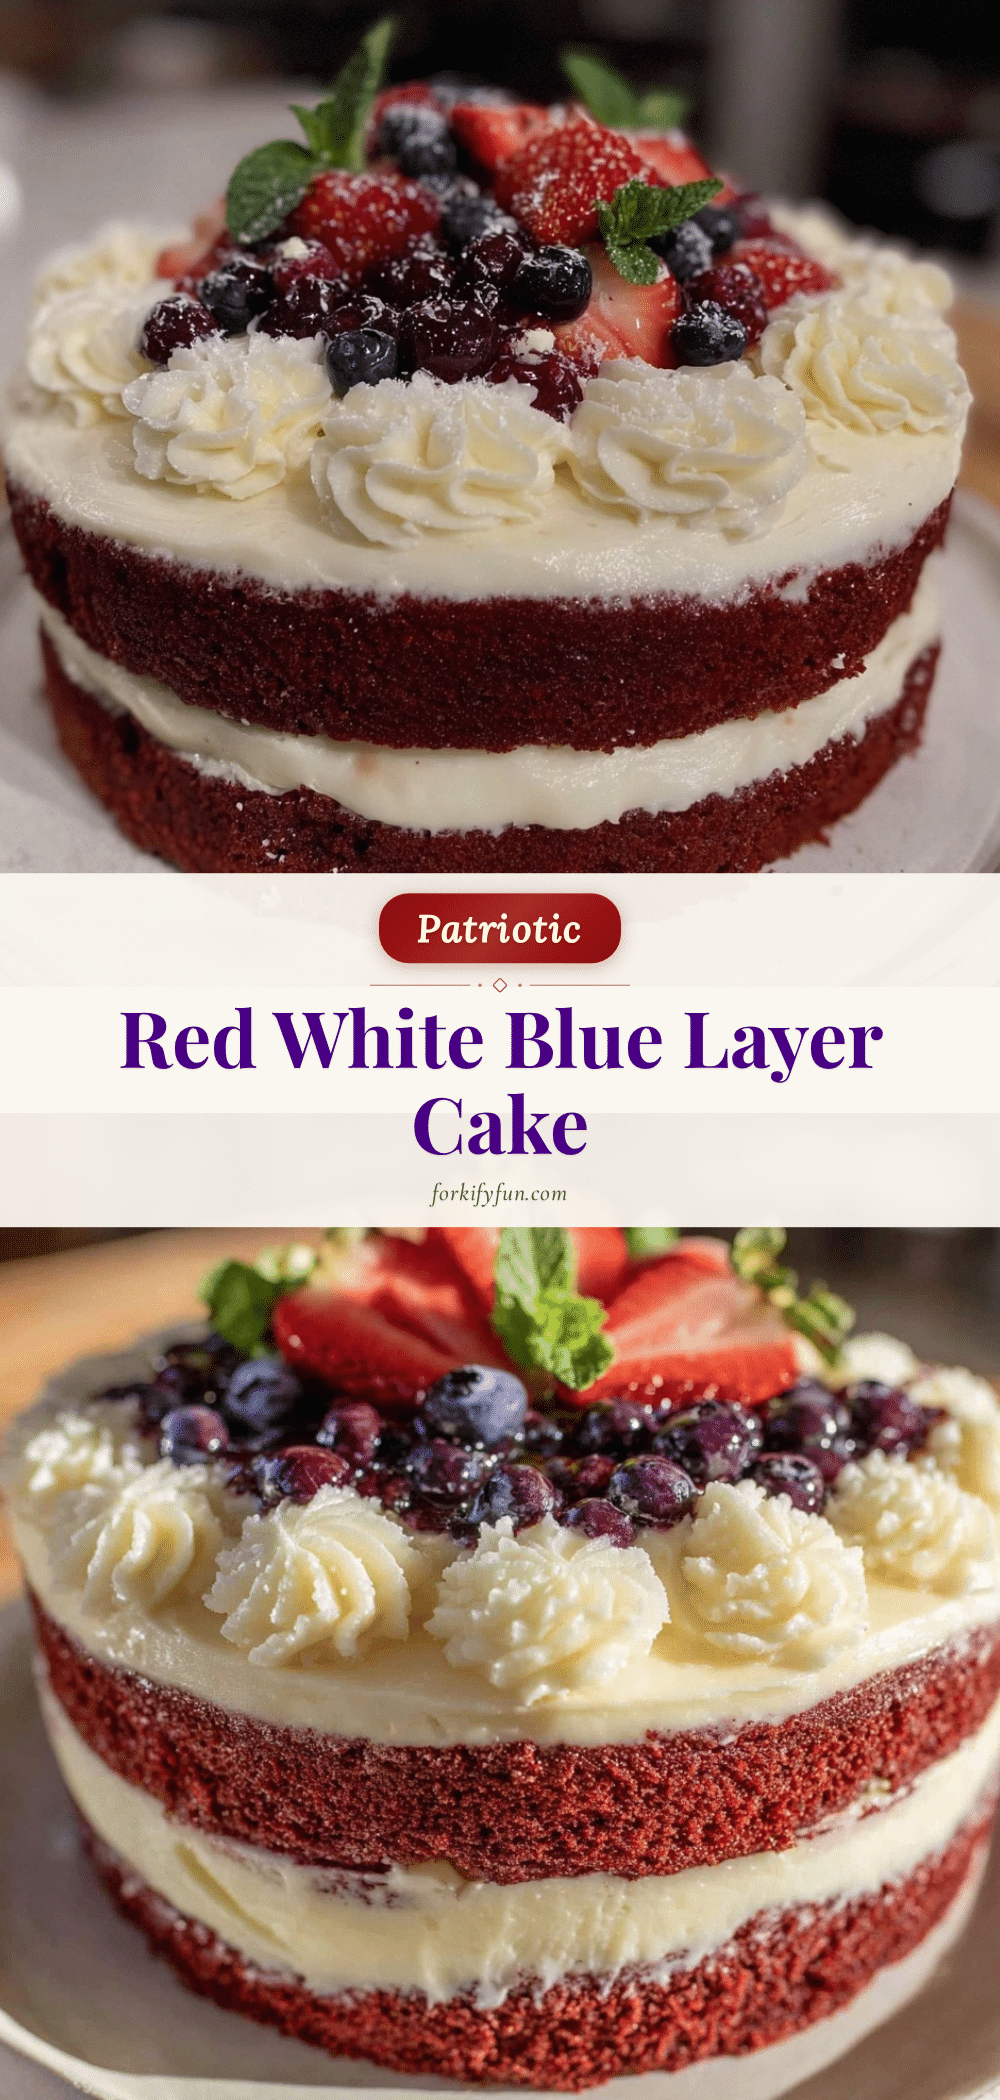
Perfect Red White Blue Layer Cake Recipe Easy Homemade Cream Cheese Frosting
A quick and easy red, white & blue layer cake featuring moist red velvet layers, tangy cream cheese frosting, and fresh berries, perfect for celebrations and summer gatherings.
- Prep Time: 20 minutes
- Cook Time: 30 minutes
- Total Time: 50 minutes
- Yield: 12 servings 1x
- Category: Dessert
- Cuisine: American
Ingredients
- 2 ½ cups (315g) all-purpose flour, sifted
- 1 ¾ cups (350g) granulated sugar
- 2 tablespoons unsweetened cocoa powder
- 1 ½ teaspoons baking soda
- 1 teaspoon salt
- 1 cup (240ml) buttermilk, room temperature (or 1 cup milk + 1 tablespoon lemon juice/vinegar)
- 1 cup (240ml) vegetable oil
- 2 large eggs, room temperature
- 2 teaspoons vanilla extract
- 2 tablespoons red food coloring (gel preferred)
- 1 teaspoon white vinegar
- 16 ounces (450g) cream cheese, softened (full fat)
- ½ cup (115g) unsalted butter, softened
- 4 cups (480g) powdered sugar, sifted
- 1 teaspoon vanilla extract
- 2–3 tablespoons heavy cream (optional, for thinning frosting)
- 1 ½ cups (about 225g) fresh blueberries, washed and dried
- 1 cup sliced strawberries (optional)
- White chocolate shavings or sprinkles (optional)
Instructions
- Preheat oven to 350°F (175°C). Grease three 8-inch round cake pans and line bottoms with parchment paper.
- In a large bowl, sift together flour, sugar, cocoa powder, baking soda, and salt. Whisk lightly to combine.
- In a separate bowl, whisk together buttermilk, vegetable oil, eggs, vanilla extract, red food coloring, and white vinegar.
- Gradually add wet ingredients to dry ingredients, stirring gently with a spatula until just combined. Do not overmix.
- Divide batter evenly into the three pans (about 2 cups per pan). Tap pans gently to remove air bubbles.
- Bake for 25-30 minutes or until a toothpick inserted comes out clean. Rotate pans halfway through baking.
- Cool cakes in pans for 10 minutes, then invert onto wire racks to cool completely.
- For frosting, beat cream cheese and butter on medium speed until creamy (2-3 minutes). Gradually add powdered sugar, one cup at a time, beating on low until combined.
- Add vanilla extract and, if needed, 1-2 tablespoons heavy cream to reach spreading consistency.
- Place one cake layer on serving plate. Spread about ½ cup frosting evenly on top. Repeat with second layer.
- Place final layer on top and frost the outside and top with remaining frosting using an offset spatula for smooth finish.
- Decorate with fresh blueberries and sliced strawberries in a festive pattern. Optionally, sprinkle white chocolate shavings.
Notes
Use room temperature ingredients for best results. Gel food coloring provides vibrant color without thinning batter. Chill cake before decorating if kitchen is warm to help frosting set. For gluten-free version, substitute flour with gluten-free blend and add xanthan gum if needed. Avoid overbaking to keep cake moist.
Nutrition
- Serving Size: 1 slice (1/12th of c
- Calories: 350
- Fat: 18
- Carbohydrates: 45
- Protein: 3
Keywords: red velvet cake, cream cheese frosting, layered cake, patriotic cake, red white blue cake, easy cake recipe, summer dessert, celebration cake


