Perfect Custom School Colors Sheet Cake Recipe Easy Step-by-Step with Edible Photo Tutorial
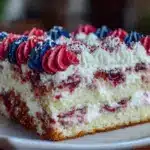
A moist and tender sheet cake decorated with vibrant school colors and an edible photo, perfect for school events and celebrations. This recipe is easy to follow and yields a crowd-pleasing dessert that looks as good as it tastes.
- Prep Time: 20 minutes
- Cook Time: 35-40 minutes
- Total Time: 55-60 minutes
- Yield: 12-16 servings 1x
- Category: Dessert
- Cuisine: American
Ingredients
- 2 ½ cups (312g) all-purpose flour
- 2 cups (400g) granulated sugar
- 2 ½ tsp baking powder
- ½ tsp baking soda
- ½ tsp salt
- ¾ cup (170g) unsalted butter, softened
- 1 cup (240ml) buttermilk, room temperature
- 3 large eggs, room temperature
- 2 tsp pure vanilla extract
- 1 cup (227g) unsalted butter, softened (for frosting)
- 4 cups (480g) powdered sugar, sifted
- 3–4 tbsp (45-60ml) heavy cream
- 1 tsp vanilla extract (for frosting)
- Gel food coloring in your school’s colors
- Edible image sheet printed on frosting paper
- Edible ink printer (optional)
Instructions
- Preheat your oven to 350°F (175°C). Grease a 9×13 inch sheet cake pan and line it with parchment paper, leaving some overhang for easy removal. Set aside.
- In a large bowl, whisk together the flour, sugar, baking powder, baking soda, and salt until fully combined.
- In a mixer bowl, beat ¾ cup softened unsalted butter on medium speed for about 2 minutes until light and fluffy.
- Beat in the eggs one at a time, ensuring each is fully incorporated before adding the next. Mix in the vanilla extract.
- With the mixer on low, add the flour mixture in three parts, alternating with the buttermilk, beginning and ending with the dry ingredients. Mix just until combined.
- Pour the batter into the prepared pan and spread evenly, scraping edges and smoothing the top.
- Bake for 35-40 minutes until the cake springs back lightly when pressed and a toothpick inserted in the center comes out clean.
- Cool the cake completely on a cooling rack before frosting.
- For the frosting, beat 1 cup softened unsalted butter on medium speed until creamy. Gradually add powdered sugar, mixing on low to avoid a sugar cloud.
- Add heavy cream and vanilla extract, beating until fluffy and spreadable.
- Divide the frosting into bowls and tint each with gel food coloring.
- Apply a thin crumb coat to the cake and chill for 15 minutes.
- Apply the final thick layer of colored frosting, smoothing well.
- Carefully place the edible photo sheet on the frosted cake, pressing gently to avoid air bubbles or wrinkles.
- Keep the cake in a cool place and serve within 24 hours.
Notes
[‘Use gel food coloring to maintain frosting consistency and vibrant colors.’, ‘Avoid frosting a warm cake to prevent melting and photo wrinkling.’, ‘Chill the cake between frosting layers for a smooth finish.’, ‘Handle edible photo sheets gently to avoid tears or wrinkles.’, ‘Store the cake in a cool place and serve within 24 hours for best photo quality.’, ‘If edible photo edges curl, lightly mist the back with water before placing.’, ‘Practice piping colors on parchment paper before applying to cake.’, ‘Substitute gluten-free flour blend for gluten-free option.’, ‘Use coconut milk yogurt and dairy-free butter for dairy-free adaptation.’, ‘Freeze unfrosted cake layers wrapped tightly for up to 3 months.’]
Nutrition
- Serving Size: 1 slice (approximate
- Calories: 350400
- Sugar: 30
- Fat: 18
- Carbohydrates: 50
- Protein: 4
Keywords: sheet cake, school colors cake, edible photo cake, custom cake, party cake, easy sheet cake, colorful frosting, edible image