Let me tell you—when the scent of melted chocolate, creamy peanut butter, and toasted Rice Krispies starts wafting through my kitchen, it’s basically a siren call for anyone within smelling distance. That first time I made these Peanut Butter Cup Muddy Buddy Rice Krispie Bars, I knew I’d stumbled onto something dangerously delicious. The kind of moment where you pause, take a deep breath, and just smile because you feel like you’ve landed on pure, nostalgic comfort (with a gooey twist!).
Years ago, when I was knee-high to a grasshopper, my grandma would whip up classic Rice Krispie treats for every holiday, but she’d always sneak in a little peanut butter for extra flavor. Fast forward to a rainy Saturday when I decided to mash up my favorite muddy buddy mix with those childhood bars—oh man, it was love at first bite. I wish I’d discovered this combo long ago! You know what? My family couldn’t stop sneaking pieces off the cooling rack (and, honestly, I didn’t try very hard to stop them). These bars have a way of disappearing before you even realize it.
There’s just something about the chocolate-peanut butter duo, those crunchy bits of cereal, and the pop of chopped peanut butter cups on top that makes these bars the perfect treat for potlucks, birthday parties, or even just a sweet pick-me-up for your Pinterest board. I’ve tested this recipe more times than I can count—in the name of research, of course—and it’s become a staple for family gatherings and gifting. Each batch feels like a warm hug, and you’re going to want to bookmark this one for those moments when only a seriously irresistible, homemade treat will do.
Why You’ll Love This Recipe
Honestly, these Peanut Butter Cup Muddy Buddy Rice Krispie Bars are the kind of dessert that makes people ask for the recipe before they’ve even finished their first piece. Over the years, I’ve tweaked and tested every step—so you’re getting my best version, packed with flavor and texture that’s totally unforgettable.
- Quick & Easy: Comes together in under 30 minutes, perfect for busy weeknights or last-minute cravings (no oven required!).
- Simple Ingredients: Uses pantry staples like Rice Krispies, chocolate chips, and peanut butter—so you probably have everything already.
- Perfect for Any Occasion: Great for after-school snacks, birthday parties, holiday cookie trays, or just a cozy night in.
- Crowd-Pleaser: Kids can’t resist the chocolatey crunch, and adults rave about the peanut butter cup topping.
- Unbelievably Delicious: The combo of creamy peanut butter, rich chocolate, and crispy cereal is basically next-level comfort food.
What sets these bars apart from other recipes? It’s all about the technique—melting the peanut butter and chocolate together for a smooth base, tossing the Rice Krispies until every piece is coated, and finishing with a generous layer of chopped peanut butter cups. I’ve tried adding pretzels, swapping in different cereals, and tweaking the ratio of chocolate to peanut butter, but this version is, hands-down, the most addictive. It’s comfort food, but with a little extra pizzazz—healthier than store-bought treats, faster than baking cookies, and every bit as satisfying.
These bars aren’t just good—they’re the kind that makes you close your eyes after the first bite and savor every crumb. Whether you want to impress guests without breaking a sweat or just turn a simple snack into something memorable, Peanut Butter Cup Muddy Buddy Rice Krispie Bars are your ticket. Trust me, you’ll find yourself making them again and again!
What Ingredients You Will Need
This recipe uses simple, wholesome ingredients to deliver bold flavor and satisfying texture without the fuss. Everything you need is easy to find, and you can swap in a few pantry staples if you’re in a pinch. Here’s the breakdown:
- For the Base:
- 6 cups Rice Krispies cereal (about 180g; any crispy rice cereal works)
- 1 cup smooth peanut butter (240g; I recommend Jif or Skippy for best texture)
- 1/2 cup unsalted butter (113g; softened for easy melting)
- 1 1/2 cups semisweet chocolate chips (270g; Ghirardelli or Nestle are my go-tos)
- 1 teaspoon pure vanilla extract (5ml; adds warmth and depth)
- For the Muddy Buddy Coating:
- 1 1/2 cups powdered sugar (180g; coats the cereal for that classic muddy buddy finish)
- 1/2 cup unsweetened cocoa powder (40g; adds a rich chocolatey kick)
- For the Topping:
- 1 1/2 cups mini peanut butter cups, chopped (about 200g; Reese’s Minis work perfectly)
- 1/4 cup milk chocolate chips (45g; optional, for drizzling)
Ingredient Tips: If you want a gluten-free option, make sure your cereal is certified gluten-free. For dairy-free, swap the butter for coconut oil or vegan margarine, and use dairy-free chocolate chips. In summer, you can toss in fresh or freeze-dried berries instead of peanut butter cups for a fruity twist. I’ve also used almond butter in place of peanut butter—it’s a little lighter and just as delicious.
Don’t worry if you’re missing an ingredient or two—you can easily substitute with what you have. Use almond flour in the coating for a gluten-free crunch, or swap out regular chocolate chips for dark chocolate if you like things extra rich. The beauty of this recipe is how flexible it is, so don’t be afraid to get creative!
Equipment Needed
You don’t need a fancy kitchen to make these Peanut Butter Cup Muddy Buddy Rice Krispie Bars—just a few basic tools and a little elbow grease. Here’s what I always grab:
- Large mixing bowl (for combining everything; glass or stainless steel works best)
- Medium saucepan (for melting butter, peanut butter, and chocolate together)
- Spatula or wooden spoon (for stirring and spreading; silicone spatulas make cleanup a breeze)
- 9×13-inch baking pan (23x33cm; line with parchment or foil for easy removal)
- Sharp knife (for slicing bars and chopping peanut butter cups)
- Measuring cups and spoons (for accuracy; I use both US and metric)
If you don’t have a 9×13-inch pan, a slightly smaller pan will work—the bars will just be a bit thicker (which isn’t a bad thing, honestly). For melting, if you’re short on saucepans, a microwave-safe bowl does the trick—just melt in 30-second bursts and stir often. I’ve used budget-friendly silicone spatulas and dollar-store pans, and they hold up well with a little TLC. To keep your pans lasting longer, avoid metal utensils when cutting and always hand wash if possible.
Preparation Method
- Prep the Pan: Line a 9×13-inch (23x33cm) baking pan with parchment paper or foil, leaving an overhang for easy lifting. Lightly spray with nonstick cooking spray. This step makes cleanup so much easier—trust me.
- Melt the Base: In a medium saucepan over low heat, combine 1/2 cup (113g) unsalted butter, 1 cup (240g) peanut butter, and 1 1/2 cups (270g) semisweet chocolate chips. Stir constantly until smooth and glossy (about 3-4 minutes). Remove from heat and mix in 1 teaspoon (5ml) vanilla extract. The mixture should be silky and fragrant—if it looks grainy, add a dash more butter.
- Coat the Cereal: Pour 6 cups (180g) Rice Krispies into a large mixing bowl. Add the melted chocolate-peanut butter mixture and stir gently with a spatula until every kernel is coated. Work quickly so the mixture doesn’t cool and clump. If you notice dry spots, drizzle a bit more melted chocolate or peanut butter and fold again.
- Add Muddy Buddy Coating: In a separate bowl, combine 1 1/2 cups (180g) powdered sugar and 1/2 cup (40g) unsweetened cocoa powder. Sprinkle half over the Rice Krispie mixture and gently toss until fully coated. Add the remaining coating and toss again. The cereal should look dusted and slightly matte (not sticky). If clumps form, gently break them apart with your spatula.
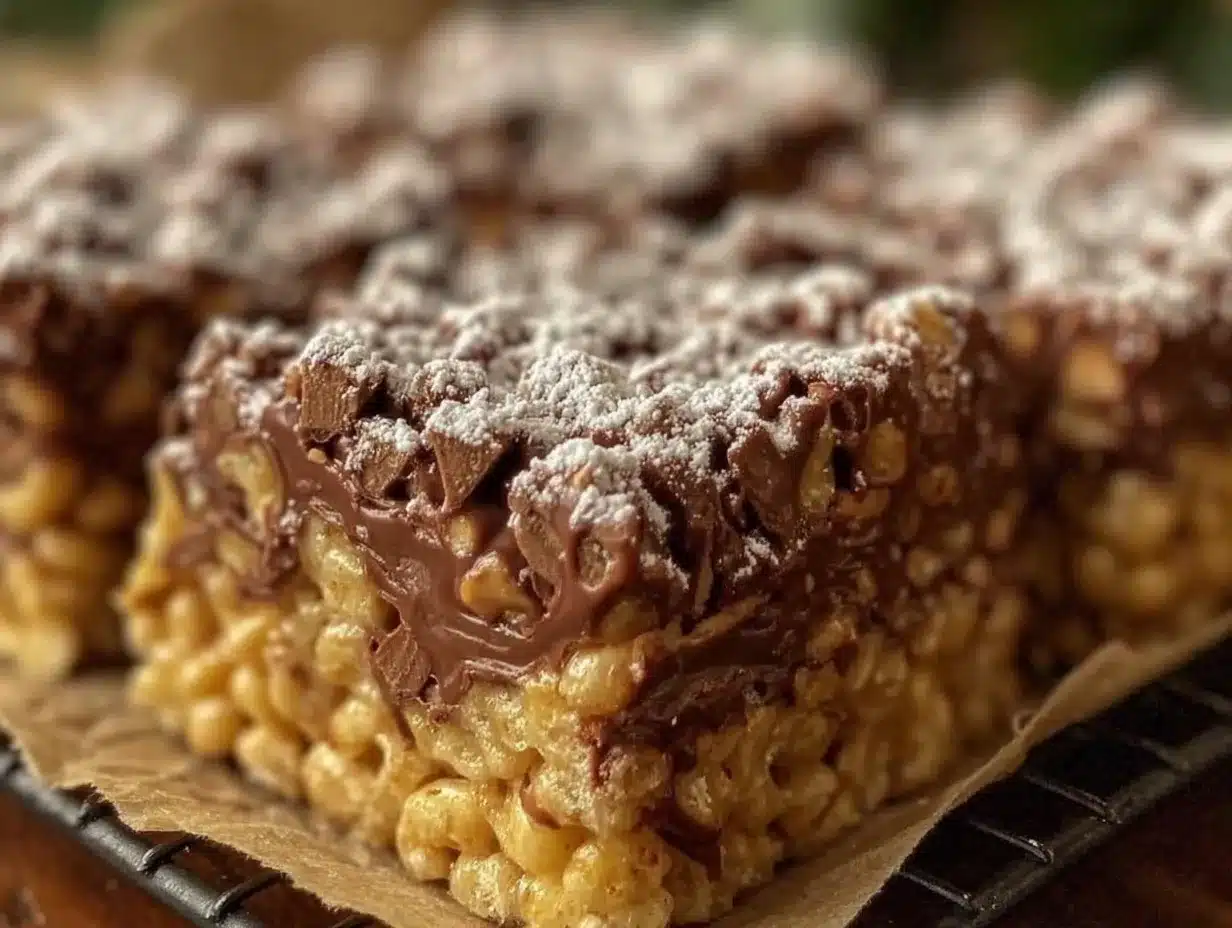
- Press and Top: Transfer the coated cereal mix into the prepared pan, pressing evenly with a spatula or your hands (lightly greased if needed). Scatter 1 1/2 cups (200g) chopped mini peanut butter cups over the top, pressing them in slightly. If you like a little extra flair, melt 1/4 cup (45g) milk chocolate chips and drizzle over the bars. Chill in the fridge for 30-40 minutes until set.
Notes: Don’t rush the melting step—low and slow is key for a creamy base. If your bars seem crumbly, press them down firmly before chilling. For clean slices, use a sharp knife and wipe between cuts. These bars are forgiving, so even if the top looks uneven, the flavor is always spot-on.
Time Estimates: Prep time: 10 minutes; Assembly: 10 minutes; Chilling: 30-40 minutes. You can make these in under an hour, start to finish!
Cooking Tips & Techniques
When it comes to making Peanut Butter Cup Muddy Buddy Rice Krispie Bars, a few little tricks can make a big difference. I’ve learned (sometimes the hard way) what works best for that perfect balance of crunch and gooeyness.
- Low and Slow Melting: Melt your butter, peanut butter, and chocolate chips over low heat to prevent scorching. I’ve rushed this step before—trust me, burnt chocolate is no fun to clean or taste.
- Gentle Mixing: Use a folding motion when combining the cereal and chocolate mixture. Over-mixing can crush the Rice Krispies and make the bars dense instead of crispy.
- Even Coating: Sift the powdered sugar and cocoa together before adding. This prevents clumps and gives each piece a uniform “muddy buddy” finish.
- Press, Don’t Pound: When pressing the mixture into the pan, use just enough pressure to compact without squashing. Too much force leads to hard bars—too little and they’ll crumble.
- Chill Thoroughly: Let the bars chill fully before slicing. I’ve tried cutting them warm (impatience is real), and it just turns into goo. Waiting pays off with clean, beautiful squares.
If you’re multitasking, you can chop the peanut butter cups while the base mixture melts, or prep your pan and coating in advance. Consistency is key—measure everything, don’t eyeball it. And don’t worry if your bars aren’t picture-perfect; a little imperfection actually makes them look homemade (and more appealing!).
Variations & Adaptations
One of my favorite things about Peanut Butter Cup Muddy Buddy Rice Krispie Bars is how easy it is to switch things up. Here are some tried-and-true variations you can play with:
- Dietary: For gluten-free, use gluten-free crispy rice cereal and check your chocolate for hidden gluten. For dairy-free, swap butter for coconut oil and use dairy-free chocolate and peanut butter cups (Enjoy Life makes good options).
- Seasonal: In the fall, add a sprinkle of cinnamon or pumpkin pie spice to the coating. For summer, mix in chopped strawberries or dried cherries instead of peanut butter cups for a fruity twist.
- Flavor: Try almond butter or cashew butter in place of peanut butter for a nuttier taste. Dark chocolate chips add a deeper, richer flavor if you’re a serious chocolate lover.
- Cooking Method: If you’re not into chilling, you can press the bars into muffin tins for individual servings, then freeze for 15 minutes to set.
- Custom Toppings: Swap peanut butter cups for M&M’s, crushed pretzels, or even mini marshmallows for a playful look and new flavors.
Personally, I’ve made a version with pretzels mixed into the base for a salty crunch—it’s always a hit at parties. Don’t be afraid to experiment; these bars are forgiving and fun to adapt for any crowd or craving.
Serving & Storage Suggestions
Honestly, these Peanut Butter Cup Muddy Buddy Rice Krispie Bars are best served at room temperature, when they’re chewy but not sticky. For a pretty presentation, slice into small squares and stack on a colorful platter; sprinkle a little extra powdered sugar on top for that “Pinterest-perfect” finish.
Pair with a cold glass of milk, iced coffee, or even a scoop of vanilla ice cream for dessert. These bars make fantastic gifts—just wrap in wax paper and tuck into a cute box.
For storage, keep bars in an airtight container at room temperature for up to 4 days. If you want to stash some for later, freeze individual squares between layers of parchment paper in a freezer-safe bag; they’ll keep for 2-3 months. To reheat, let thaw at room temp for 30 minutes—no microwave needed. Honestly, the flavors only get better after a day or two as everything melds together.
Nutritional Information & Benefits
Each Peanut Butter Cup Muddy Buddy Rice Krispie Bar (based on a batch cut into 24 squares) contains roughly 180 calories, 9g fat, 22g carbohydrates, and 3g protein. They’re a sweet treat, for sure, but the peanut butter adds a boost of healthy fats and a bit of protein to help curb hunger.
Key ingredients like peanut butter provide vitamin E and magnesium, while Rice Krispies are naturally gluten-free (as long as you double-check the label). This recipe can be made nut-free by swapping peanut butter for sunflower seed butter and using nut-free chocolate cups.
If you have allergies, watch for peanuts, dairy, and gluten in the toppings. I love that you can tweak the recipe for dietary needs and still enjoy all that comforting crunch—sometimes, a homemade treat just feels good for the soul!
Conclusion
So, why should you make these Peanut Butter Cup Muddy Buddy Rice Krispie Bars? Because they hit every mark: easy, outrageously tasty, and absolutely crowd-friendly. There’s pure joy in every bite—whether you’re serving them at a party or sneaking a piece with your morning coffee.
Feel free to customize the bars with different toppings or nut butters, make them gluten-free, or double the batch for a big event. I honestly love how these bars bring people together—there’s always someone asking for “just one more piece.”
If you try this recipe, I’d love to hear how you made it your own! Drop a comment below, share your photos, or let me know your favorite twist. Save this recipe for your next sweet craving (it’s a keeper!), and remember—sometimes the simplest treats are the ones you’ll remember most.
FAQs
Can I use other cereals instead of Rice Krispies?
Yes! You can swap in Chex, Cheerios, or even Cocoa Pebbles. Just keep the measurement the same for best results.
How do I make these bars nut-free?
Use sunflower seed butter instead of peanut butter and choose nut-free chocolate cups. Always check labels for hidden allergens.
Can I freeze Peanut Butter Cup Muddy Buddy Rice Krispie Bars?
Absolutely. Freeze individual bars between layers of parchment paper in a sealed container. They keep well for 2-3 months.
What’s the best way to cut the bars cleanly?
Chill the bars first, then use a sharp knife. Wipe the blade between cuts for neat squares (trust me, it helps!).
Can I make these bars ahead of time for a party?
Yes, you can prepare them up to two days in advance. Store in an airtight container at room temperature or in the fridge.
Pin This Recipe!
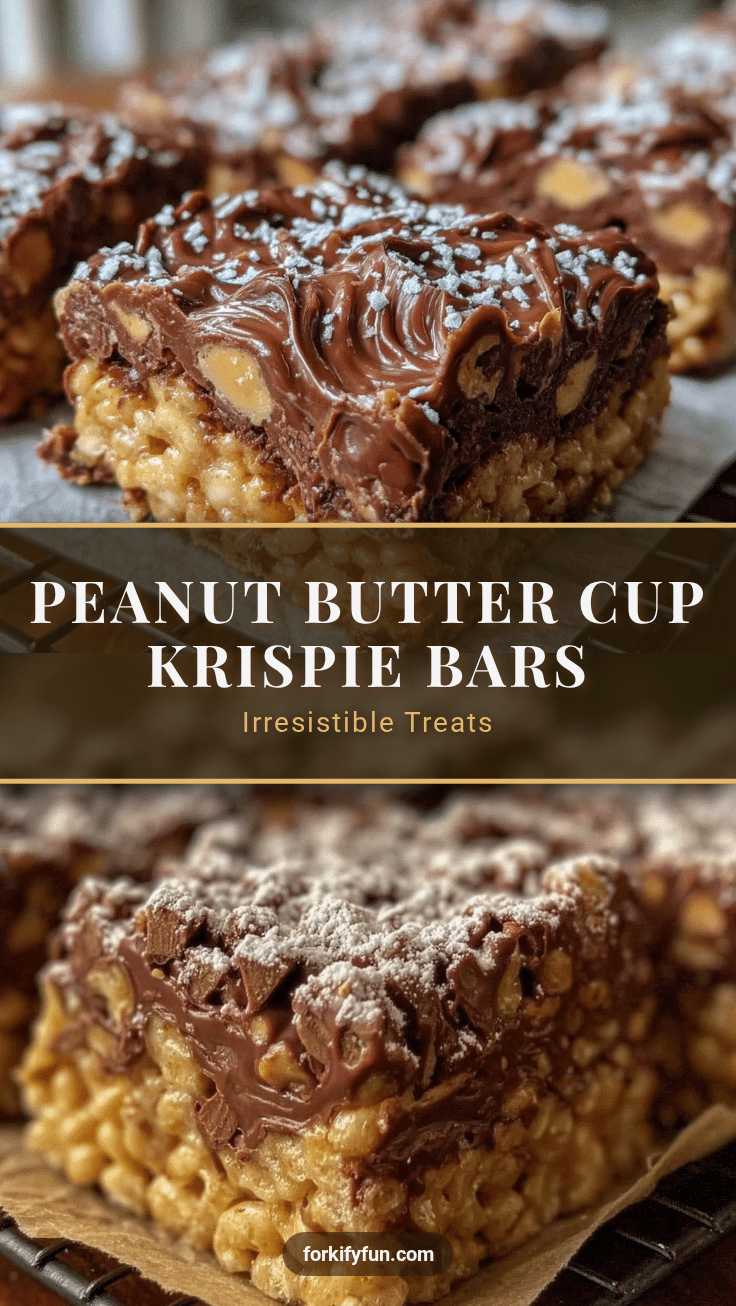
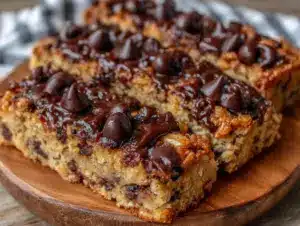
Peanut Butter Cup Muddy Buddy Rice Krispie Bars

These no-bake bars combine the nostalgic crunch of Rice Krispies with creamy peanut butter, rich chocolate, and a classic muddy buddy coating, finished with chopped peanut butter cups for an irresistible treat. Quick to make and perfect for parties, potlucks, or a sweet snack at home.
- Prep Time: 10 minutes
- Cook Time: 10 minutes
- Total Time: 50 minutes
- Yield: 24 bars 1x
- Category: Dessert
- Cuisine: American
Ingredients
- 6 cups Rice Krispies cereal
- 1 cup smooth peanut butter
- 1/2 cup unsalted butter, softened
- 1 1/2 cups semisweet chocolate chips
- 1 teaspoon pure vanilla extract
- 1 1/2 cups powdered sugar
- 1/2 cup unsweetened cocoa powder
- 1 1/2 cups mini peanut butter cups, chopped
- 1/4 cup milk chocolate chips (optional, for drizzling)
- Nonstick cooking spray
- Parchment paper or foil
Instructions
- Line a 9×13-inch baking pan with parchment paper or foil, leaving an overhang for easy lifting. Lightly spray with nonstick cooking spray.
- In a medium saucepan over low heat, combine unsalted butter, peanut butter, and semisweet chocolate chips. Stir constantly until smooth and glossy (about 3-4 minutes). Remove from heat and mix in vanilla extract.
- Pour Rice Krispies into a large mixing bowl. Add the melted chocolate-peanut butter mixture and stir gently with a spatula until every kernel is coated.
- In a separate bowl, combine powdered sugar and unsweetened cocoa powder. Sprinkle half over the Rice Krispie mixture and gently toss until fully coated. Add the remaining coating and toss again.
- Transfer the coated cereal mix into the prepared pan, pressing evenly with a spatula or your hands. Scatter chopped mini peanut butter cups over the top, pressing them in slightly. If desired, melt milk chocolate chips and drizzle over the bars. Chill in the fridge for 30-40 minutes until set.
- Slice into squares and serve at room temperature.
Notes
Melt butter, peanut butter, and chocolate chips over low heat to avoid scorching. For clean slices, chill bars thoroughly and wipe the knife between cuts. Easily adapt for gluten-free or dairy-free diets by swapping ingredients. Bars can be frozen for up to 3 months. For extra crunch, add pretzels or swap toppings for M&M’s or marshmallows.
Nutrition
- Serving Size: 1 bar (1/24th of rec
- Calories: 180
- Sugar: 14
- Sodium: 80
- Fat: 9
- Saturated Fat: 4
- Carbohydrates: 22
- Fiber: 2
- Protein: 3
Keywords: muddy buddy bars, rice krispie treats, peanut butter cup bars, no bake dessert, chocolate peanut butter bars, party snacks, easy dessert, kid friendly, potluck recipe