Introduction
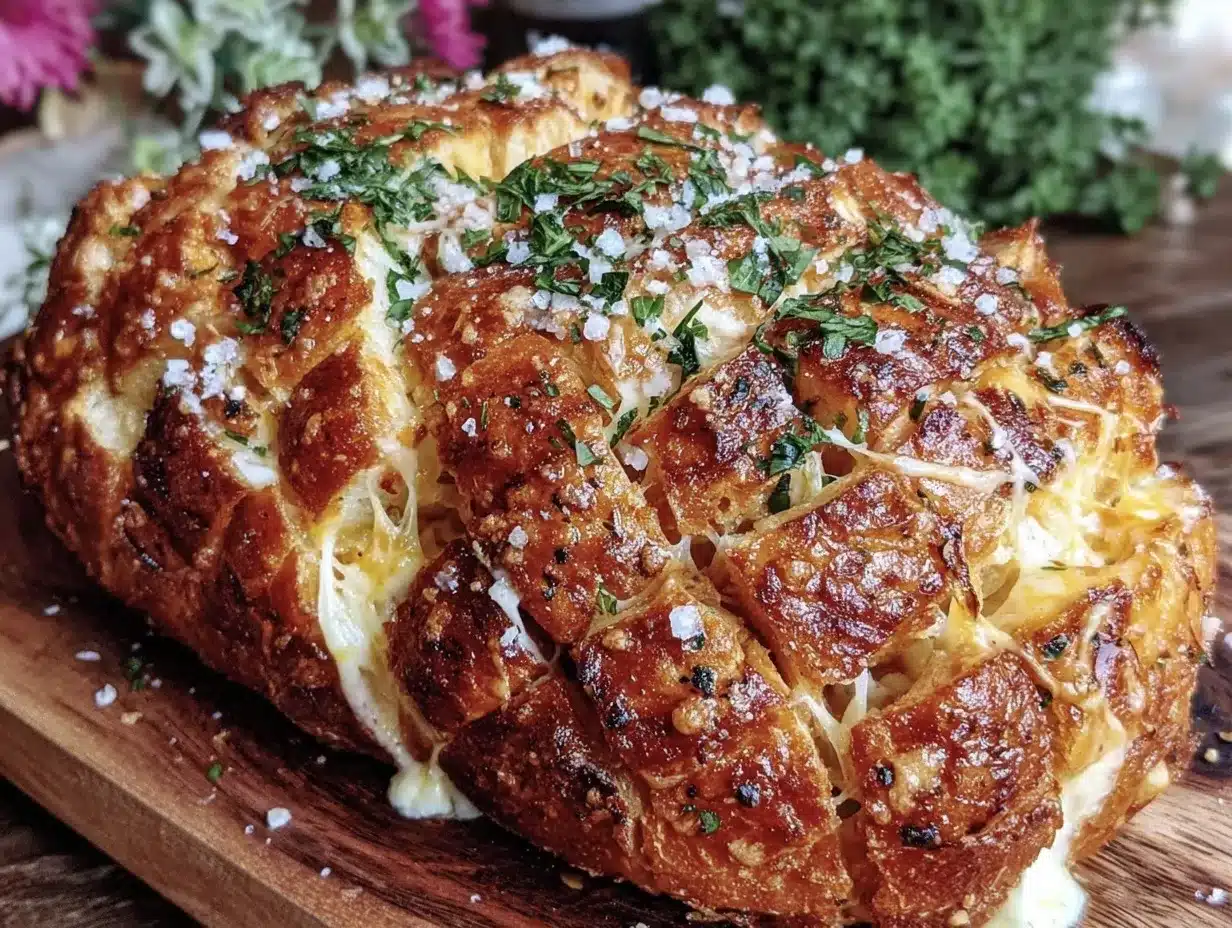
Let me tell you, there’s absolutely nothing that compares to the intoxicating aroma of freshly baked bread loaded with garlic, Italian herbs, and bubbling, golden cheese. The first time I made this Crispy Pull-Apart Italian Herb and Cheese Garlic Bread, my kitchen transformed into a little slice of heaven—seriously, the smell alone could lure anyone from the farthest corner of the house. I remember watching the cheese start to sizzle, the herbs crackling and releasing their oils, and my mouth watered before I even pulled it apart. You know, it’s the kind of moment where you pause, take a deep breath, and just smile because you know you’re onto something truly special.
This recipe has roots in my childhood (back when I was knee-high to a grasshopper), sitting at my grandma’s table with a big basket of homemade bread and a bowl of marinara for dipping. Over the years, I’ve tried to recreate that perfect balance of crispy edges, gooey cheese, and punchy garlic—sometimes with more success than others! One rainy weekend, I finally got it right, and I’ll never forget how my family couldn’t stop sneaking pieces off the cooling rack (and honestly, I couldn’t blame them). It’s become a staple for family gatherings, gifting, and those days when you need pure, nostalgic comfort. If you’re looking for a bread that’s dangerously easy and guaranteed to brighten up your Pinterest board, this Crispy Italian Herb and Cheese Garlic Bread is it.
Honestly, I wish I’d stumbled on this recipe years ago. It feels like a warm hug, and every time I test it (in the name of research, of course), I fall in love all over again. You’re going to want to bookmark this one—it’s the kind of bread that turns an ordinary day into something special.
Why You’ll Love This Recipe
There’s a reason this Crispy Italian Herb and Cheese Garlic Bread has become an absolute go-to in my kitchen. After years of tinkering with different bread recipes (and, let’s face it, a few glorious kitchen fails), this one always delivers. Here’s why you’ll be reaching for it again and again:
- Quick & Easy: From start to finish, you’ll have delicious pull-apart bread in under 45 minutes—ideal for busy weeknights or when surprise guests pop by.
- Simple Ingredients: You don’t need anything fancy. Most ingredients are pantry staples, and you probably already have them sitting in your kitchen right now.
- Perfect for Any Occasion: Whether it’s a cozy Sunday dinner, a big holiday brunch, or a game-day snack, this bread is always a crowd-pleaser.
- Crowd-Pleaser: Both kids and adults give this one rave reviews. I’ve watched picky eaters devour slice after slice (and ask for seconds).
- Unbelievably Delicious: The combination of crispy crust, gooey cheese, and punchy garlic is next-level comfort food. It’s the kind of bread that makes you close your eyes and savor every bite.
What sets this recipe apart? Instead of just slathering garlic butter on a loaf, you get those amazing layers of flavor—herbs tucked into every nook, cheese melted between each pull-apart piece, and a perfectly crispy bottom (thanks to a sneaky splash of olive oil). If you’ve ever struggled with soggy garlic bread or bland flavors, I’ve got you covered. This technique guarantees every bite is loaded with flavor and texture. Plus, if you’re anything like me, you’ll appreciate that it’s forgiving—no stress about fancy shaping or perfect dough.
Honestly, this isn’t just another garlic bread. It’s comfort food reimagined—faster, easier, and with all the soul-soothing satisfaction you crave. I love serving it at parties because it looks impressive but is secretly so simple. So, grab your apron and get ready to impress (with very little fuss)!
What Ingredients You Will Need
This Crispy Italian Herb and Cheese Garlic Bread recipe is all about simple, wholesome ingredients working together for bold flavor. Most are probably already in your pantry, and you can swap a few to fit your dietary needs or preferences. Here’s what you’ll need:
- For the Dough:
- 2 cups (250g) all-purpose flour (use bread flour for chewier texture, or swap for gluten-free blend)
- 2 teaspoons (8g) instant yeast (I like SAF brand for reliability)
- 3/4 cup (180ml) warm water (about 110°F/43°C)
- 1 tablespoon (15ml) olive oil (plus more for brushing)
- 1 teaspoon (5g) sugar (helps activate yeast)
- 1/2 teaspoon (3g) salt
- For the Herb & Cheese Filling:
- 3 tablespoons (42g) unsalted butter, melted (use vegan butter if needed)
- 4 cloves garlic, minced (fresh is best but jarred works in a pinch)
- 2 tablespoons (8g) chopped fresh parsley (or 1 tablespoon dried)
- 1 tablespoon (4g) chopped fresh basil (or 1/2 tablespoon dried)
- 1 teaspoon (2g) dried oregano
- 1/2 teaspoon crushed red pepper flakes (optional, for a little kick)
- 1 1/2 cups (180g) shredded mozzarella cheese (go for whole milk mozzarella for best melt)
- 1/2 cup (60g) grated Parmesan cheese (Parmigiano Reggiano if you’re feeling fancy)
- For Topping:
- Extra melted butter or olive oil for brushing
- Pinch of flaky sea salt (adds crunch)
- More Italian herbs for garnish (totally optional but makes it pretty)
If you want to shake things up, you can substitute the cheeses—try sharp provolone or a little smoked gouda for deeper flavor. No fresh herbs? Dried works just fine. And if you’re gluten-free, swap in your favorite blend and adjust the water as needed. For dairy-free, vegan cheese shreds are a solid option (though the melt isn’t quite as dreamy, you know?). I’ve even used leftover roasted garlic for an extra punch. In summer, toss in a handful of chopped chives or fresh thyme. This bread is flexible—just don’t skimp on the garlic!
Equipment Needed
To whip up this Crispy Italian Herb and Cheese Garlic Bread, you really don’t need a ton of fancy kitchen gear. Here’s what I use (and what you can swap in if you’re missing something):
- Mixing bowl: Any medium-sized bowl will do. Stainless steel is my favorite for easy cleanup.
- Measuring cups and spoons: Precision matters for baking, so don’t eyeball unless you’re feeling brave.
- Rubber spatula or wooden spoon: For mixing and scraping the dough.
- Baking pan: I like using a 9×5-inch (23x13cm) loaf pan for tall, pull-apart pieces. Round cake pans work too, or even a cast iron skillet for extra crispy edges.
- Pastry brush: Makes brushing on butter and oil a breeze, but you can use the back of a spoon in a pinch.
- Sharp knife or bench scraper: For cutting the dough into sections.
- Kitchen towel or plastic wrap: To cover the dough while it rises.
If you don’t have a loaf pan, don’t stress—just pull-apart the dough into rough balls and bake on a lined baking sheet. I’ve done this more times than I can count, especially when my loaf pan mysteriously vanished (kitchen gremlins, I swear). For maintenance, wash your bread pans by hand to keep them nonstick. If you’re on a budget, most grocery store brands work just fine—no need for top-dollar tools here.
Preparation Method
- Activate the yeast: In your mixing bowl, combine 3/4 cup (180ml) warm water, 2 teaspoons (8g) instant yeast, and 1 teaspoon (5g) sugar. Stir gently and let it sit for 5 minutes until foamy. If it doesn’t foam, check your water temperature and yeast freshness.
- Make the dough: Add 2 cups (250g) all-purpose flour, 1/2 teaspoon (3g) salt, and 1 tablespoon (15ml) olive oil to the yeast mixture. Stir with a wooden spoon until a shaggy dough forms. If it’s too sticky, add flour 1 tablespoon at a time; if too dry, add a splash of water.
- Knead: Turn the dough out onto a lightly floured surface. Knead for 5-7 minutes until smooth and elastic. It should feel soft but not sticky. If it tears, let it rest for a few minutes, then continue kneading.
- First rise: Place the dough in a lightly oiled bowl, cover with a towel or plastic wrap, and let rise for 30 minutes in a warm spot. It should double in size. If your kitchen is chilly, set the bowl near a warm oven.
- Prepare the filling: While the dough rises, melt 3 tablespoons (42g) butter and stir in 4 minced garlic cloves, 2 tablespoons (8g) parsley, 1 tablespoon (4g) basil, 1 teaspoon (2g) oregano, and 1/2 teaspoon red pepper flakes. Mix in 1 1/2 cups (180g) mozzarella and 1/2 cup (60g) Parmesan.
- Shape the dough: Punch down the risen dough and turn it out onto the counter. Roll into a rectangle, about 12×8 inches (30x20cm). If the dough springs back, let it rest for 5 minutes.
- Add filling: Brush the melted butter mixture all over the dough, making sure to cover every inch. Sprinkle the cheese and herb mixture evenly.
- Cut and stack: Using a sharp knife, cut the dough into 3-inch (8cm) strips, then stack the strips and slice into squares. Arrange the stacks upright in your greased loaf pan. Don’t worry if it looks messy; the rustic look is part of the charm!
- Final rise: Cover the pan loosely and let the dough rise for another 15-20 minutes. It should puff up slightly.
- Bake: Preheat your oven to 375°F (190°C). Bake the bread for 25-30 minutes until golden brown and crispy on top. If the cheese gets too dark, tent with foil for the last 10 minutes.
- Finishing touches: Brush the hot bread with extra melted butter or olive oil. Sprinkle with flaky sea salt and more herbs if you like.
- Cool and serve: Let the bread cool for 10 minutes before pulling apart. The cheese should be stretchy and the crust crispy. Serve warm for best results.
If you run into issues—dough too sticky, cheese leaking, uneven baking—don’t worry. I’ve had all those mishaps, and honestly, it still tastes amazing. For efficiency, prep the filling while the dough rises, and always check your oven temperature with an oven thermometer (mine runs hot!).
Cooking Tips & Techniques
After making this Crispy Italian Herb and Cheese Garlic Bread a hundred different ways, I’ve picked up some tricks (and made plenty of mistakes along the way). Here’s what I’ve learned for best results:
- Proofing the yeast: Always use warm water, not hot. If your yeast doesn’t foam, it’s either expired or the water was too hot/cold. Trust me, I’ve ruined a batch by rushing this step.
- Herb freshness: Fresh herbs give brighter flavor, but dried work in a pinch. If using dried, rub them between your palms to release more aroma.
- Cheese layering: Layer the cheese evenly so every bite has that gooey stretch. I used to dump it all in one spot and ended up with soggy dough—spread it out!
- Crispy edges: A drizzle of olive oil in the pan makes the bottom extra crispy. I learned this by accident when I ran out of parchment and just oiled the pan—happy accident!
- Troubleshooting sticky dough: If the dough sticks, dust with flour, but don’t add too much or it’ll get tough. Wet hands help for shaping the dough.
- Multitasking: Prep the filling while the dough rises. It saves time and keeps the process flowing.
- Final rise matters: Don’t skip the second rise. It gives the bread its light, pull-apart texture. I’ve rushed this before and ended up with dense bread.
- Baking time: Ovens vary, so check early. The top should be golden and the cheese bubbling. A quick tap on the crust should sound hollow and crisp.
Consistency is key—measure everything, trust your senses, and don’t be afraid to make mistakes. The best bread comes from a little trial and error, and sometimes, the imperfect ones taste the best!
Variations & Adaptations
One of my favorite things about this Crispy Italian Herb and Cheese Garlic Bread is how easy it is to tweak. Here are a few variations I’ve tried (or recommend for dietary needs):
- Gluten-Free: Use your favorite gluten-free flour blend. You may need to add an extra tablespoon of water and knead a little longer for elasticity.
- Vegan: Swap in vegan butter and dairy-free cheese shreds. The flavor is still great, though the cheese won’t stretch as much.
- Spicy Kick: Add more red pepper flakes or swap mozzarella for pepper jack cheese.
- Seasonal Twist: In summer, add chopped sun-dried tomatoes and fresh basil. In winter, use rosemary and a sprinkle of smoked paprika.
- Cheese Swap: Try gouda, fontina, or provolone for different flavor profiles. I once used cheddar for a sharper taste, and it was a hit!
- Cooking Methods: If you don’t have a loaf pan, shape dough balls and bake them on a sheet tray for pull-apart rolls. Or use a cast iron skillet for rustic, crispy edges.
- Allergen Substitutions: For nut allergies, ensure your cheese and butter are nut-free brands. Dairy-free swaps work for lactose intolerant folks.
Personally, I love tossing in roasted garlic and swapping half the mozzarella for smoked provolone. It’s smoky, savory, and perfect for cold evenings. Don’t be afraid to mix and match—this bread is all about making it your own!
Serving & Storage Suggestions
This Crispy Italian Herb and Cheese Garlic Bread is best served warm, right out of the oven—when the cheese is gooey and the crust is shatteringly crispy. For presentation, pull it apart at the table and serve with a bowl of marinara or ranch for dipping. It’s perfect alongside pasta, soup, salad, or even as a party appetizer.
If you have leftovers (which is rare in my house), wrap the bread tightly in foil and store in the fridge for up to 3 days. To reheat, pop slices in a 350°F (175°C) oven for 8-10 minutes, or microwave for 30 seconds (though the oven keeps it crispy). You can also freeze slices for up to 1 month—just thaw and reheat as above.
The flavors actually deepen overnight, so next-day bread is still delicious. If you want extra crunch, toast leftovers under the broiler for a minute or two. Pair with tomato soup or a big Caesar salad for a simple meal. Honestly, I’ve even used slices for sandwiches—garlic bread grilled cheese, anyone?
Nutritional Information & Benefits
Each serving of this Crispy Italian Herb and Cheese Garlic Bread (about 1/8 loaf) contains roughly:
- Calories: 240
- Fat: 10g
- Carbohydrates: 28g
- Protein: 8g
- Fiber: 1g
Key ingredients like garlic and fresh herbs offer immune-boosting properties (garlic is full of antioxidants, and parsley packs vitamin K). Using olive oil adds heart-healthy fats. You can make it gluten-free or dairy-free with substitutions. Note: contains wheat, dairy, and possible trace allergens from cheese—always check labels if you have sensitivities.
From a wellness perspective, I love that this bread feels indulgent but still uses real, simple ingredients. It’s all about balance—enjoying comfort food without going overboard.
Conclusion
There’s something magical about Crispy Italian Herb and Cheese Garlic Bread—the way it pulls apart, that aroma of herbs and garlic, the golden cheese. This is the kind of recipe you’ll come back to, again and again, whether you need a show-stopping side, a comforting snack, or something to wow your friends. It’s flexible, forgiving, and just plain fun to make.
Don’t be afraid to tweak it—add your favorite cheeses, toss in extra herbs, or adapt for dietary needs. I honestly love this bread, not just for the flavor, but for the way it brings people together (no one can resist sneaking a piece!).
If you give it a try, let me know how it turns out! Drop a comment below, share your version, or pin it for later. I can’t wait to hear your stories and see your pull-apart masterpieces. Happy baking, and may your kitchen always smell this good!
FAQs
Can I make this bread ahead of time?
Absolutely! You can prepare the dough and filling, assemble in the pan, then cover and refrigerate overnight. Let it come to room temperature before baking for best results.
What’s the best way to reheat leftover garlic bread?
For the crispiest texture, reheat slices in a preheated 350°F (175°C) oven for 8-10 minutes. Microwave works in a pinch, but you’ll lose some crunch.
Can I freeze this bread?
Yes! Slice and wrap tightly in foil, then freeze for up to 1 month. Thaw and reheat in the oven for best flavor and texture.
What herbs work best for this recipe?
Parsley, basil, and oregano are classic, but you can use rosemary, thyme, or chives. Fresh herbs give brighter flavor, but dried work if that’s what you have.
Is this bread gluten-free or vegan?
It can be! Use a gluten-free flour blend and swap in vegan butter and cheese. The texture and flavor are still delicious—just tweak as needed for your diet!
Pin This Recipe!
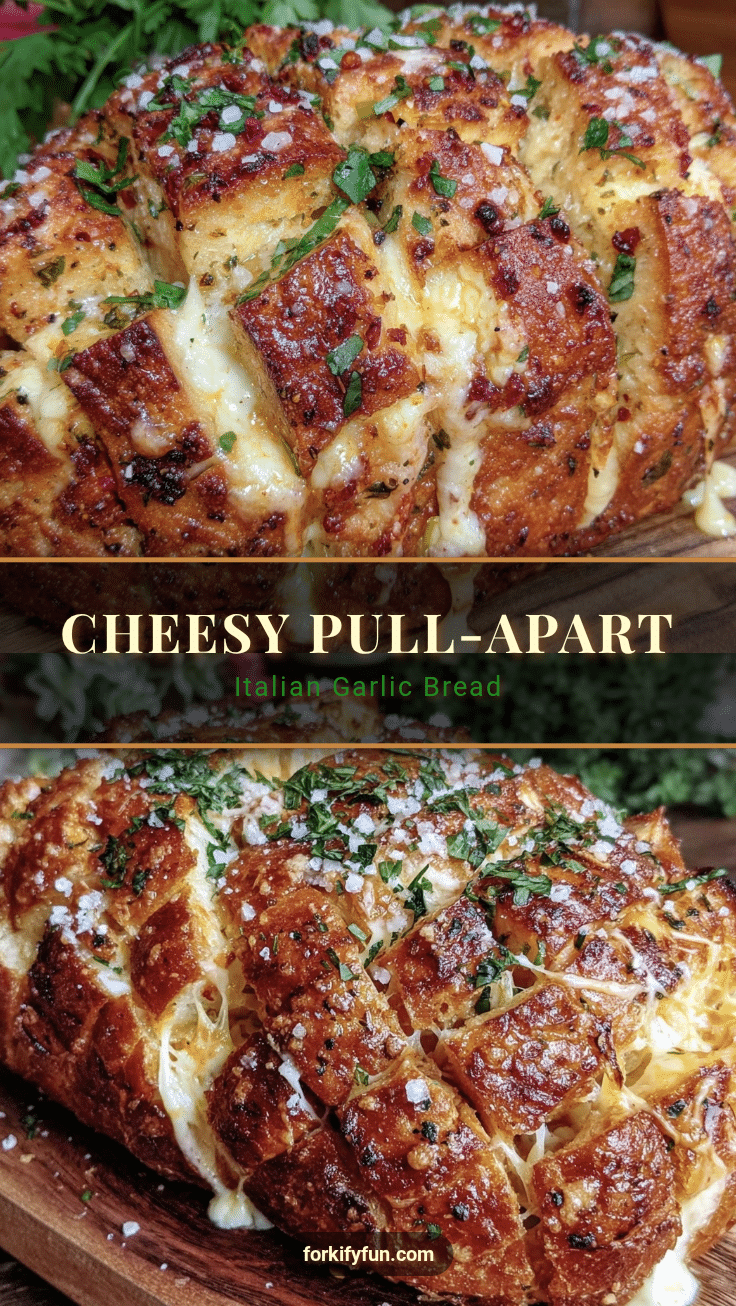
Crispy Italian Herb and Cheese Garlic Bread
This pull-apart garlic bread is loaded with Italian herbs and bubbling cheese, featuring crispy edges and gooey, flavorful layers. It’s quick, easy, and perfect for gatherings or comfort food cravings.
- Prep Time: 15 minutes
- Cook Time: 30 minutes
- Total Time: 45 minutes
- Yield: 8 servings 1x
- Category: Side Dish
- Cuisine: Italian
Ingredients
- 2 cups all-purpose flour (or bread flour, or gluten-free blend)
- 2 teaspoons instant yeast
- 3/4 cup warm water (about 110°F)
- 1 tablespoon olive oil (plus more for brushing)
- 1 teaspoon sugar
- 1/2 teaspoon salt
- 3 tablespoons unsalted butter, melted (or vegan butter)
- 4 cloves garlic, minced
- 2 tablespoons chopped fresh parsley (or 1 tablespoon dried)
- 1 tablespoon chopped fresh basil (or 1/2 tablespoon dried)
- 1 teaspoon dried oregano
- 1/2 teaspoon crushed red pepper flakes (optional)
- 1 1/2 cups shredded mozzarella cheese
- 1/2 cup grated Parmesan cheese
- Extra melted butter or olive oil for brushing
- Pinch of flaky sea salt
- More Italian herbs for garnish (optional)
Instructions
- In a mixing bowl, combine warm water, instant yeast, and sugar. Stir gently and let sit for 5 minutes until foamy.
- Add flour, salt, and olive oil to the yeast mixture. Stir until a shaggy dough forms. Adjust flour or water as needed for consistency.
- Turn dough onto a lightly floured surface and knead for 5-7 minutes until smooth and elastic.
- Place dough in a lightly oiled bowl, cover, and let rise for 30 minutes in a warm spot until doubled in size.
- While dough rises, melt butter and stir in garlic, parsley, basil, oregano, and red pepper flakes. Mix in mozzarella and Parmesan cheese.
- Punch down the risen dough and roll into a rectangle about 12×8 inches.
- Brush the melted butter mixture all over the dough and sprinkle the cheese and herb mixture evenly.
- Cut the dough into 3-inch strips, stack the strips, and slice into squares. Arrange stacks upright in a greased loaf pan.
- Cover pan loosely and let dough rise for another 15-20 minutes until slightly puffed.
- Preheat oven to 375°F. Bake bread for 25-30 minutes until golden brown and crispy on top. Tent with foil if cheese browns too quickly.
- Brush hot bread with extra melted butter or olive oil. Sprinkle with flaky sea salt and more herbs if desired.
- Let bread cool for 10 minutes before pulling apart. Serve warm.
Notes
For best results, use fresh herbs and whole milk mozzarella. The bread is flexible—swap cheeses or herbs as desired. For gluten-free or vegan adaptations, use appropriate flour and cheese substitutes. Serve warm with marinara or ranch for dipping. Leftovers can be stored in the fridge for up to 3 days or frozen for 1 month.
Nutrition
- Serving Size: 1/8 loaf
- Calories: 240
- Sugar: 2
- Sodium: 350
- Fat: 10
- Saturated Fat: 5
- Carbohydrates: 28
- Fiber: 1
- Protein: 8
Keywords: garlic bread, Italian herbs, cheese bread, pull-apart bread, easy bread recipe, party appetizer, comfort food, vegetarian, homemade bread