Let me tell you, the scent of rich chocolate pudding mingling with the crisp, crumbly soil of crushed cookies is enough to make anyone’s mouth water—especially when it’s all topped off with eerie little tombstones and gummy worms wriggling about. The first time I made these creamy graveyard pudding cups, it was on a chilly October evening, the kind where the wind howls just right and the house feels cozy and mysterious. I was instantly hooked—the kind of moment where you pause, take a deep breath, and just smile because you know you’re onto something truly special.
Years ago, when I was knee-high to a grasshopper, Halloween desserts were pretty straightforward—pumpkin pie or maybe some candy apples. But stumbling upon this recipe at a neighborhood potluck changed everything. Honestly, I wish I’d discovered these creamy graveyard pudding cups years ago; they bring such playful joy and pure, nostalgic comfort to any spooky celebration.
My family couldn’t stop sneaking them off the cooling rack (and I can’t really blame them). These little cups have become a staple for our Halloween gatherings and even for gifting to friends who appreciate a good scare with their sweets. You know what? They’re dangerously easy to make and perfect for potlucks, classroom parties, or just brightening up your Pinterest cookie board with something fun and festive. No fuss, just pure fun and flavor.
I’ve tested this recipe more times than I care to admit—in the name of research, of course—and every time, it feels like a warm hug from the inside out. You’re going to want to bookmark this one for all your spooky treat needs.
Why You’ll Love This Recipe
Let me share why this creamy graveyard pudding cups recipe is a total winner in my kitchen:
- Quick & Easy: Comes together in under 20 minutes, perfect for last-minute Halloween parties or sweet cravings.
- Simple Ingredients: No fancy grocery trips needed; you likely already have everything in your pantry or fridge.
- Perfect for Halloween: Great for spooky-themed gatherings, kid’s parties, or just a fun dessert to get everyone in the spirit.
- Crowd-Pleaser: Always gets rave reviews from kids and adults alike—plus, it’s a fun way to sneak in some calcium and protein with the pudding and milk.
- Unbelievably Delicious: The creamy texture contrasts beautifully with the crunchy cookie “soil,” making every bite a little adventure.
What sets this recipe apart? It’s not just any pudding cup. The secret is in the layering—starting with a silky, perfectly blended chocolate pudding base, topped with crushed Oreo “dirt,” and finishing with whimsical decorations that look spooky but taste sweet. I use a smooth vanilla pudding mix blended with a touch of cream for ultra-richness, making it feel a bit like a grown-up treat but still kid-approved.
This recipe isn’t just good—it’s the kind that makes you close your eyes after the first bite and smile. It’s Halloween fun reimagined—simple, fast, but with the same soul-soothing satisfaction you crave when it’s candy season. Perfect for impressing guests without stress or turning a simple dessert into a spooky highlight.
What Ingredients You Will Need
This recipe uses simple, wholesome ingredients to deliver bold flavor and satisfying texture without the fuss. Most are pantry staples, and substitutions are easy if you’re catering to dietary needs or picky eaters.
- Chocolate pudding mix: Instant, 3.9 oz (110 g) package (I recommend JELL-O for best texture)
- Milk: 2 cups (480 ml), whole milk preferred for creaminess (swap with almond or oat milk for dairy-free version)
- Heavy cream: 1/2 cup (120 ml), whipped slightly for a fluffy topping (optional but highly recommended)
- Oreos or chocolate sandwich cookies: 15 cookies, crushed into fine crumbs (this creates the “graveyard dirt”)
- Gummy worms: 1 small bag, for creepy decoration
- Chocolate wafer cookies or rectangular shortbread: for tombstones (look for firm cookies that stand upright)
- Black decorating gel or edible marker: to write “RIP” on tombstones
- Optional: mini marshmallows or candy eyes for added spooky flair
If you want to get a bit creative, fresh berries can be swapped in place of gummy worms for a less sugary option, or use gluten-free sandwich cookies to keep it allergen-friendly. The crushed cookies are key for texture—trust me, you want that contrast between creamy and crunchy.
Equipment Needed
- Mixing bowls: A couple of medium-sized bowls for pudding and whipped cream
- Whisk or electric mixer: To get that pudding smooth and cream fluffy
- Measuring cups and spoons: For precise liquid and dry measurements
- Small spatula or spoon: For folding in whipped cream gently
- Serving cups or small clear glasses: To show off the layers (I like using clear plastic cups for easy portioning at parties)
- Food-safe marker or small piping bag: For decorating tombstones
If you don’t have a mixer, no worries—just whisk by hand; it might take a bit longer but works just fine. For the cookie crushing, I use a zip-top bag and a rolling pin; convenient and mess-free. Budget-friendly and versatile tools make this recipe a breeze any time you want a spooky treat.
Preparation Method

- Prepare the pudding: In a medium bowl, whisk together the instant chocolate pudding mix with 2 cups (480 ml) of cold milk. Whisk vigorously for about 2 minutes until smooth and starting to thicken. Let it sit for 5 minutes to set properly.
- Crush the cookies: Place 15 Oreo cookies into a sealed plastic bag. Using a rolling pin or your hands, crush them into fine crumbs resembling dirt. Set aside.
- Whip the cream: In a separate bowl, whip 1/2 cup (120 ml) heavy cream until soft peaks form. This usually takes about 3-4 minutes with an electric mixer or about 6-8 minutes by hand.
- Fold cream into pudding: Gently fold the whipped cream into the set pudding to create a creamy, airy texture. Be careful not to overmix—you want those fluffy swirls!
- Assemble the cups: Spoon a generous layer of the pudding mixture into each serving cup, filling about halfway. Next, sprinkle a layer of crushed cookie crumbs on top to form the “dirt.” Repeat the layers if your cup is tall enough, finishing with a cookie crumb layer on top.
- Add decorations: Take your chocolate wafer cookies or shortbread and write “RIP” on them using black decorating gel or an edible marker. Place one tombstone cookie gently sticking out of the “soil” in each cup. Tuck gummy worms into the cookie crumbs for a creepy-crawly effect.
- Chill: Refrigerate the assembled pudding cups for at least 1 hour before serving. This helps the layers meld and the flavors deepen.
- Serve: Just before serving, you can add mini marshmallows or candy eyes on top for extra spooky fun!
Quick tip: If your pudding is too runny, let it chill a bit longer before folding in whipped cream. If your cookie crumbs are too chunky, crush them a little more for that perfect dirt-like texture.
Cooking Tips & Techniques
Here’s what I’ve learned from making these creamy graveyard pudding cups a dozen times (and eating even more!):
- Use cold milk: Always start with cold milk when mixing instant pudding to get that smooth, creamy texture without lumps.
- Crush cookies finely: The finer, the better—it really helps sell the “graveyard dirt” effect and adds a nice crunch.
- Don’t overwhip cream: Whip until soft peaks only; overwhipping can turn it grainy and ruin the texture.
- Layer carefully: Use a spoon or small scoop to layer pudding and crumbs gently to keep the layers distinct and pretty.
- Chill before serving: This lets flavors meld and pudding firm up just right. If you skip this, the dessert can be a bit runny.
- Personalize your tombstones: If you mess up writing “RIP,” use a toothpick to gently scrape off gel and try again. It’s part of the fun!
One time, I accidentally added warm milk to the pudding mix (don’t ask), and it was a gloopy mess. Lesson learned: patience pays off! Also, prepping pudding cups ahead of time saves you from last-minute chaos on party day.
Variations & Adaptations
If you want to switch things up or cater to different tastes, here are some fun twists I’ve tried and loved:
- Pumpkin Spice Graveyard: Use pumpkin pudding mix instead of chocolate and swap Oreo crumbs for crushed gingersnap cookies. It’s like fall in a cup!
- Vegan Version: Use dairy-free pudding mix and almond or coconut milk, plus vegan sandwich cookies. Whip up coconut cream instead of heavy cream for the topping.
- Peanut Butter Twist: Mix a spoonful of creamy peanut butter into the pudding before folding in the whipped cream. Top with chopped peanuts instead of cookie crumbs.
- Mini Graveyard Jars: Use small mason jars instead of cups for a rustic look. Great for gifting or party favors.
I once swapped gummy worms for sour candy snakes (yes, those exist!)—the kids loved the tangy surprise. If food allergies are a concern, always check labels on cookies and candies or make your own dirt from gluten-free crackers crushed fine.
Serving & Storage Suggestions
Serve these pudding cups chilled—right out of the fridge is best for that creamy, cool contrast with crunchy cookie crumbs. They look adorable on a Halloween dessert table, especially with little plastic spiders or Halloween-themed picks.
Pair them with:
- Warm apple cider or spiced hot chocolate
- Simple vanilla cupcakes or pumpkin muffins for a combo dessert spread
- Fresh fruit slices for a balance of sweet and tangy
Leftovers keep well in the fridge for up to 3 days. Cover tightly with plastic wrap to prevent cookie crumbs from getting soggy. When reheating is needed (though not usually required), remove tombstones and microwave just until pudding softens slightly—about 15 seconds. Let it cool before serving.
Flavors meld beautifully after a few hours, so making these a day ahead is a smart move. Just add gummy worms and tombstones last minute to keep them looking fresh and spooky.
Nutritional Information & Benefits
Each serving of these creamy graveyard pudding cups contains approximately 250-300 calories, depending on ingredient brands and portion size. They provide a modest amount of calcium and protein from the milk and cream, making them a little more satisfying than your average sugary treat.
Using whole milk and heavy cream adds richness but also fat, so you can lighten the recipe by substituting with low-fat milk and skipping the whipped cream topping if desired. The crushed cookies add sugar and carbs, so keep that in mind for dietary preferences.
For those needing gluten-free options, swapping in gluten-free sandwich cookies keeps the fun without the gluten. Vegan versions can be made easily with dairy-free pudding mixes and coconut cream, ideal for those avoiding dairy.
Overall, these pudding cups are a festive indulgence—perfect for occasional treats that bring joy without overcomplication.
Conclusion
So, if you’re looking for a fun, easy, and downright adorable dessert to impress this Halloween, these creamy graveyard pudding cups should be your go-to. They combine simplicity with playful flair, perfect for all ages and skill levels in the kitchen.
Feel free to customize with your favorite candies, cookie types, or flavors. Honestly, that’s part of the joy—making this spooky treat your own. I love how these cups bring the whole family together, sharing laughs and sneaky bites.
Give this recipe a try, and I’d love to hear your twists and tips! Drop a comment below or share your photos on social media. Here’s to sweet, spooky fun that’s as delicious as it is delightful!
Frequently Asked Questions
Can I make these pudding cups ahead of time?
Absolutely! Prepare the pudding and layers up to 24 hours in advance, but add gummy worms and tombstone decorations just before serving to keep them fresh.
What can I use instead of gummy worms?
You can swap gummy worms for sour candy snakes, fresh berries, or even small chocolate chips for a less sugary option.
Are these pudding cups gluten-free?
Not with traditional Oreos, but you can use gluten-free sandwich cookies to make the recipe gluten-free.
How do I prevent the cookie crumbs from getting soggy?
Layer the cookie crumbs just before serving or keep the assembled cups chilled and covered tightly. Adding crumbs last minute is best for crunch.
Can I use homemade pudding instead of instant mix?
Yes! Homemade pudding works great and adds an extra touch of creaminess, just be sure it’s fully cooled before assembling the cups.
Pin This Recipe!

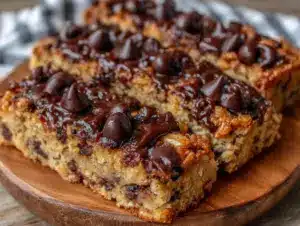
Creamy Graveyard Pudding Cups

A spooky and fun Halloween dessert featuring creamy chocolate pudding layered with crushed cookies to resemble graveyard dirt, topped with tombstone cookies and gummy worms for a festive treat.
- Prep Time: 10 minutes
- Cook Time: 0 minutes
- Total Time: 1 hour 10 minutes
- Yield: 8 servings 1x
- Category: Dessert
- Cuisine: American
Ingredients
- 1 (3.9 oz) package instant chocolate pudding mix (recommend JELL-O)
- 2 cups whole milk (can substitute almond or oat milk for dairy-free)
- 1/2 cup heavy cream, whipped slightly (optional but recommended)
- 15 Oreo or chocolate sandwich cookies, crushed into fine crumbs
- 1 small bag gummy worms
- Chocolate wafer cookies or rectangular shortbread for tombstones
- Black decorating gel or edible marker to write ‘RIP’ on tombstones
- Optional: mini marshmallows or candy eyes for decoration
Instructions
- In a medium bowl, whisk together the instant chocolate pudding mix with 2 cups of cold milk. Whisk vigorously for about 2 minutes until smooth and starting to thicken. Let it sit for 5 minutes to set.
- Place 15 Oreo cookies into a sealed plastic bag and crush into fine crumbs resembling dirt. Set aside.
- In a separate bowl, whip 1/2 cup heavy cream until soft peaks form (3-4 minutes with mixer or 6-8 minutes by hand).
- Gently fold the whipped cream into the set pudding to create a creamy, airy texture without overmixing.
- Spoon a generous layer of pudding into each serving cup, filling about halfway. Sprinkle a layer of crushed cookie crumbs on top to form the ‘dirt.’ Repeat layers if cups are tall enough, finishing with cookie crumbs on top.
- Write ‘RIP’ on chocolate wafer or shortbread cookies using black decorating gel or edible marker. Place one tombstone cookie sticking out of the ‘soil’ in each cup. Tuck gummy worms into the cookie crumbs for decoration.
- Refrigerate the assembled pudding cups for at least 1 hour before serving to let flavors meld and pudding firm up.
- Just before serving, optionally add mini marshmallows or candy eyes on top for extra spooky fun.
Notes
Use cold milk to avoid lumps in pudding. Crush cookies finely for best ‘graveyard dirt’ effect. Whip cream to soft peaks only to avoid grainy texture. Chill pudding cups for at least 1 hour before serving. Add gummy worms and tombstones just before serving to keep fresh. For gluten-free, use gluten-free sandwich cookies. For vegan, use dairy-free pudding mix, plant milk, and coconut cream.
Nutrition
- Serving Size: 1 pudding cup (about
- Calories: 275
- Sugar: 25
- Sodium: 180
- Fat: 14
- Saturated Fat: 7
- Carbohydrates: 35
- Fiber: 1
- Protein: 4
Keywords: Halloween dessert, pudding cups, spooky treats, chocolate pudding, Oreo dirt, gummy worms, easy Halloween recipe