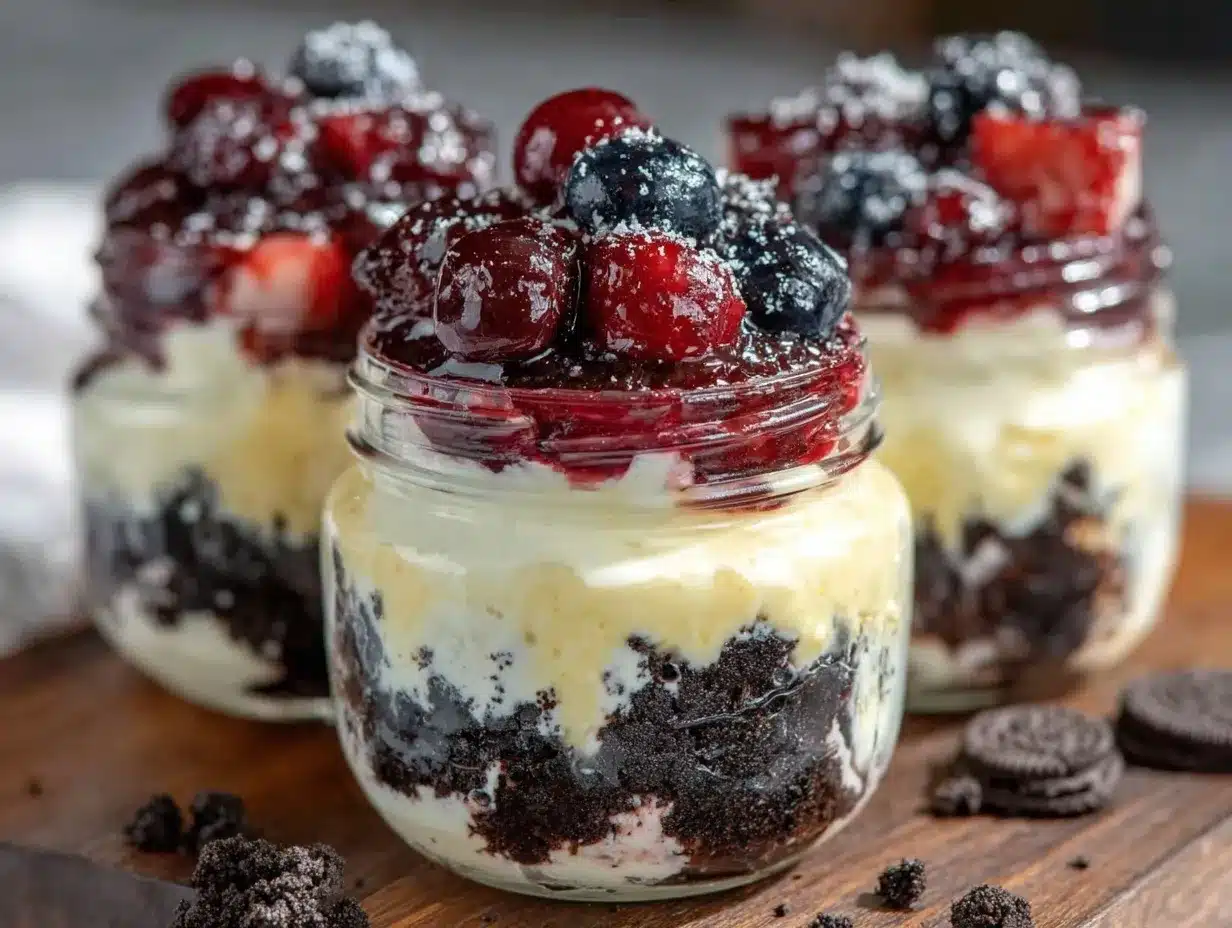
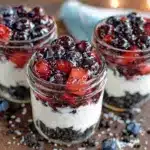
“Are you sure these are supposed to look like this?” my niece asked, peering suspiciously into the clear jars filled with layers of crumbly chocolate, bright red berries, creamy white pudding, and jewel-toned blueberries. Honestly, I wasn’t sure either when I first threw together these Flavorful Red White and Blue Dirt Cup Dessert Jars. It started as a little experiment for a casual 4th of July picnic when I realized I forgot the usual flag cake I’d planned.
With no time to run to the store, I grabbed what I had—Oreos, pudding mix, and fresh berries—and layered them quickly in small jars. I expected a messy, forgettable dessert but instead got a crowd-pleaser that had everyone asking for seconds. The mix of textures—the crumbly “dirt,” smooth pudding, and juicy berries—was just pure magic. Plus, the red, white, and blue colors looked festive without any fancy decorating skills.
Since then, I’ve made these jars a few times every summer, tweaking the flavors and layers, sometimes adding a dollop of whipped cream or a sprinkle of patriotic sprinkles. They’re the perfect grab-and-go treat when you want something fun but fuss-free, and honestly, they remind me of those carefree afternoons spent chatting and laughing in the backyard. It’s not just dessert; it’s a little jar of summer memories, simple and sweet.
These Flavorful Red White and Blue Dirt Cup Dessert Jars stuck with me because they bring a smile without any stress—just good flavors, easy assembly, and that satisfying crunch and cream combo you didn’t know you needed. It’s a recipe that feels like a small victory every time, which is why I keep coming back to it.
Why You’ll Love This Recipe
After making these dessert jars several times, I can say with confidence they’re a hit for plenty of reasons. Not only are they visually cheerful, but the taste and texture balance is spot-on, making this more than just a cute patriotic snack.
- Quick & Easy: From start to finish, these jars come together in about 20 minutes, perfect for last-minute holiday gatherings or spontaneous summer get-togethers.
- Simple Ingredients: You probably already have most of these pantry staples, like chocolate cookies and pudding mix, which means no crazy grocery runs.
- Perfect for 4th of July: Their red, white, and blue layers scream celebration—great for picnics, BBQs, or even a fun school party treat.
- Crowd-Pleaser: Kids love the “dirt” and berries, and adults appreciate the fresh flavors and creamy pudding. Everyone gets something they enjoy.
- Unbelievably Delicious: The combo of crumbly cookie “dirt,” smooth vanilla pudding, and fresh berries creates a mouthfeel that’s both nostalgic and refreshing.
What sets this recipe apart is the layering technique paired with a homemade vanilla pudding mix that’s creamier than store-bought and a cookie crumb base that stays crunchy longer. It’s not just a dirt cup—it’s a thoughtfully crafted dessert jar you can whip up without breaking a sweat. Plus, the jars make portion control easy, so no one ends up with a too-big slice of cake (though I won’t judge if you want seconds!).
This dessert hits that sweet spot of feeling festive and thoughtfully made, yet it’s totally approachable—even if you don’t consider yourself much of a baker or decorator. It’s the kind of recipe that brings people together, whether you’re sharing at a backyard BBQ or a casual afternoon with neighbors, similar to how my copycat Dunkaroos dip always sparks smiles.
What Ingredients You Will Need
This recipe uses simple, wholesome ingredients to deliver bold flavor and satisfying texture without the fuss. Most of these are pantry staples or fresh produce you can easily grab at your local market. Feel free to swap or skip ingredients based on what you have on hand.
- Chocolate Cookie Crumbs: About 20 Oreos or any chocolate sandwich cookies, crushed finely (the “dirt” base). I prefer Newman’s Own for their rich flavor and crumbly texture.
- Vanilla Pudding Mix: One package (3.4 oz) instant vanilla pudding mix or homemade vanilla pudding for a creamier touch. If using homemade, see my tips in the preparation section.
- Milk: 2 cups (480 ml) whole milk or your preferred milk alternative (almond or oat milk work well, too).
- Fresh Strawberries: 1 cup, hulled and sliced or chopped. In summer, fresh berries make all the difference.
- Fresh Blueberries: 1 cup, washed and patted dry.
- Whipped Cream (optional): For a light topping, either homemade or store-bought.
- Patriotic Sprinkles (optional): Red, white, and blue sprinkles to add a festive touch.
If you want to switch things up, try using gluten-free chocolate cookies or swap the vanilla pudding for a cream cheese mixture for a tangier flavor. For a lower sugar option, use sugar-free pudding mix or Greek yogurt in place of the pudding. You can also substitute fresh berries with frozen ones, just thaw and drain excess moisture before layering.
Equipment Needed
- Mixing Bowls: For blending pudding and crushing cookies. I like medium-sized glass or stainless steel bowls.
- Whisk: Essential for making smooth pudding, especially if you go homemade.
- Measuring Cups and Spoons: Precise measurements help keep the layers balanced.
- Small Mason Jars or Clear Dessert Cups: These are perfect for serving—around 8 oz (240 ml) capacity works well. I use small glass jars with lids for easy transport.
- Spatula or Spoon: For spreading pudding and layering ingredients neatly.
- Food Processor or Plastic Bag and Rolling Pin: For crushing cookies. A food processor makes it quicker, but a zip-top bag and rolling pin work just fine.
If you don’t have mason jars, small clear plastic cups work too, especially for casual picnics. For homemade pudding, a small saucepan helps if you prefer cooking it from scratch rather than instant mix. Keeping your tools clean and dry ensures the cookie crumbs stay crisp longer.
Preparation Method
- Crush the Chocolate Cookies: Place about 20 Oreos in a food processor and pulse until fine crumbs form, or put them in a zip-top bag and gently crush with a rolling pin. Aim for a mix of fine crumbs and small chunks to mimic “dirt.” Set aside. (5 minutes)
- Prepare the Vanilla Pudding: If using instant pudding mix, whisk the mix with 2 cups (480 ml) cold milk for 2 minutes until thickened. For homemade pudding, combine 2 cups (480 ml) milk, 1/3 cup (65 g) sugar, 3 tablespoons (24 g) cornstarch, pinch of salt, and 1 teaspoon vanilla extract in a saucepan. Cook over medium heat, whisking constantly until thickened and boiling, then simmer 1 minute before cooling. (10-15 minutes)
- Prepare Fresh Berries: Rinse strawberries and blueberries gently under cold water. Hull and slice strawberries into small pieces. Pat all berries dry with paper towels to avoid soggy layers. (5 minutes)
- Layer the Dessert Jars: Start with about 2 tablespoons (30 g) of cookie crumbs at the bottom of each jar. Next, spoon about 1/4 cup (60 ml) vanilla pudding over the crumbs. Add a layer of strawberries (about 2 tablespoons), then another 2 tablespoons of cookie crumbs, followed by blueberries (2 tablespoons). Finish with a final layer of pudding and a sprinkle of cookie crumbs on top if desired. (10 minutes)
- Optional Toppings: Add a dollop of whipped cream and a pinch of red, white, and blue sprinkles for a festive finish. (2 minutes)
- Chill Before Serving: Refrigerate the jars for at least 30 minutes to let flavors meld and pudding set fully. This also helps the cookie crumbs soften slightly but stay pleasantly crumbly. (30 minutes minimum)
Pro tip: If your pudding seems too thick, whisk in a splash of milk before layering. Also, layering quickly prevents the cookie crumbs from absorbing moisture prematurely and becoming soggy. Keep the jars covered in the fridge if making ahead to preserve freshness.
Cooking Tips & Techniques
Making these Flavorful Red White and Blue Dirt Cup Dessert Jars was a learning curve in the best way. Here are some tips that helped me nail the perfect texture and flavor balance:
- Cookie Crumbs: Crushing cookies finely but leaving some small chunks gives the “dirt” texture that feels interesting instead of just powdery. I’ve found that using a food processor saves time and creates a consistent crumb size.
- Pudding Perfection: Whisking pudding briskly prevents lumps and ensures a smooth, creamy texture. Homemade pudding is richer but requires watching the heat carefully to avoid burning or curdling.
- Layering Order: Starting and ending with cookie crumbs frames the pudding and berries nicely. It also prevents the berries from sinking and keeps the jars looking pretty.
- Berry Prep: Always dry berries well to avoid watery layers. If berries are very juicy, consider lightly tossing them with a teaspoon of sugar to macerate and intensify their flavor.
- Timing: Assemble the jars close to serving time, or keep covered in the fridge if prepping ahead. The cookie crumbs will soften after a day, so best eaten within 24 hours.
- Multitasking: While pudding thickens, crush cookies and prep berries to save time. This also keeps the process smooth when making multiple jars.
One time, I left cookie crumbs exposed, and they got soggy too fast—lesson learned! Covering jars tightly really helps keep the texture just right. These small tweaks make a big difference for that perfect bite.
Variations & Adaptations
This recipe is a great base for playing around with flavors and dietary preferences. Here are a few ways I’ve adapted it over time:
- Dietary Switch: Use gluten-free chocolate cookies and dairy-free pudding mix or coconut milk to make the jars allergy-friendly and vegan.
- Seasonal Twist: Swap strawberries and blueberries with fresh peaches and blackberries in late summer for a different color palette and flavor.
- Flavor Boost: Add a layer of cream cheese mixed with a touch of powdered sugar and vanilla for a cheesecake-inspired jar.
- Cooking Method: Instead of instant pudding, try a no-bake vanilla custard or mousse for a lighter texture.
- Personal Favorite: I once stirred in a teaspoon of bourbon vanilla extract into the pudding, which gave it a subtle depth and made the jars feel a bit more grown-up for a family BBQ.
These jars adapt well to whatever you have on hand or your guests’ dietary needs. Plus, changing up the cookie base—from chocolate to graham crackers—can give you a whole new dessert vibe. If you want a more indulgent version, layering in chocolate chips or a drizzle of caramel sauce is a winner.
Serving & Storage Suggestions
These dessert jars are best served chilled, which lets the pudding set and the flavors marry. The cool, creamy pudding against the crumbly cookie and fresh berries is just pure joy.
For presentation, serve with small spoons and maybe a few extra fresh berries on the side. They pair wonderfully with iced tea or lemonade for a complete summer treat.
Store any leftovers tightly covered in the refrigerator for up to 2 days—after that, the cookie crumbs start to lose their crunch. They don’t freeze well because the pudding texture changes, so plan to enjoy fresh.
When reheating, it’s best to serve these cold, but if you want to warm them slightly, remove the berries and heat the pudding layer gently in the microwave before reassembling.
Flavors actually mellow and blend nicely after a few hours in the fridge, so making these a few hours ahead or even the night before your party works great. Just keep the jars sealed tightly.
If you enjoy layering desserts, you might also like the creamy texture and simple prep of my creamy instant pot mac and cheese for kids—a totally different flavor profile but the same easy layering concept.
Nutritional Information & Benefits
Each serving of these dessert jars provides approximately 300-350 calories, depending on exact portion size and optional toppings. The pudding and berries contribute protein and vitamins, while the cookie crumbs add a satisfying crunch.
Key benefits include antioxidants from fresh blueberries and strawberries, vitamin C, and calcium from the pudding. Using whole milk or fortified plant milk boosts calcium content further.
For those watching carbs or sugar, swapping in sugar-free pudding mix and low-sugar cookies can reduce the sugar load. Naturally, these jars contain gluten and dairy unless substitutions are made.
From a wellness perspective, this treat balances indulgence with fruit freshness, making it a nice occasional dessert that feels less heavy than a traditional cake.
Conclusion
These Flavorful Red White and Blue Dirt Cup Dessert Jars are proof that a delicious, festive dessert doesn’t have to be complicated or time-consuming. The layers of cookie crumbs, creamy pudding, and fresh berries come together to create a treat that’s as fun to eat as it is to make.
Feel free to tweak the layers, swap berries, or add your own spin to make it truly yours. This recipe has become a little tradition in my kitchen, reminding me that simple ingredients and a bit of creativity can bring a lot of joy.
Give these jars a try at your next gathering, and I’d love to hear how you customize them. Sharing recipes like this makes cooking feel like a community, and I’m always excited to swap ideas or hear your stories.
So grab those cookies, pudding, and berries, and let this dessert add a little festive fun to your table—no fuss, just flavor and smiles.
FAQs
- Can I make these dessert jars ahead of time? Yes, you can assemble them up to 24 hours in advance. Just keep them tightly covered in the fridge to maintain freshness and texture.
- What can I use instead of Oreos for the cookie crumbs? Graham crackers, gluten-free chocolate cookies, or even crushed chocolate chip cookies work well as alternatives.
- Is there a dairy-free option for the pudding? Absolutely! Use dairy-free pudding mix or make homemade pudding using coconut or almond milk instead of dairy milk.
- Can I use frozen berries? Yes, but be sure to thaw and drain them well to avoid soggy layers before layering in the jars.
- How many servings does this recipe make? This recipe yields about 6 dessert jars, depending on jar size (approx. 8 oz each).
Pin This Recipe!
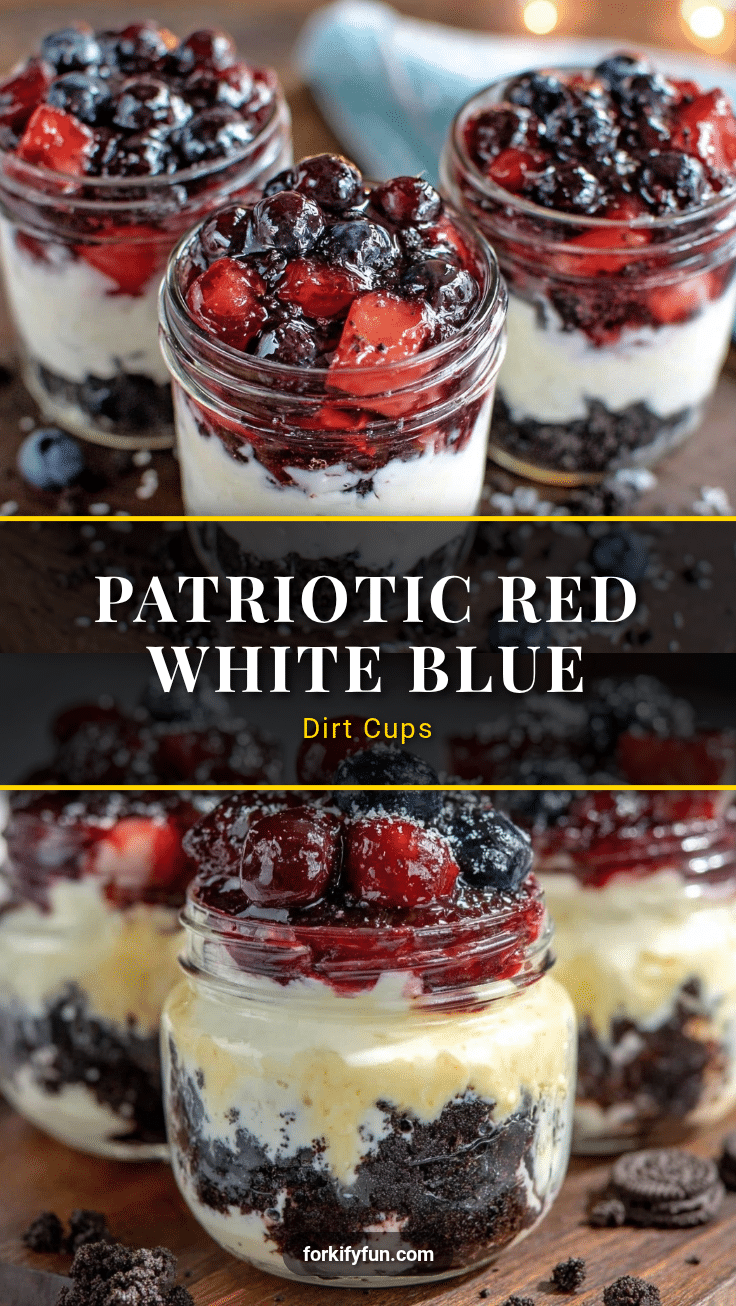
Flavorful Red White and Blue Dirt Cup Dessert Jars
A quick and easy patriotic dessert featuring layers of chocolate cookie crumbs, creamy vanilla pudding, and fresh red and blue berries, perfect for 4th of July celebrations.
- Prep Time: 15 minutes
- Cook Time: 15 minutes
- Total Time: 45 minutes
- Yield: 6 servings 1x
- Category: Dessert
- Cuisine: American
Ingredients
- About 20 Oreos or any chocolate sandwich cookies, crushed finely
- 1 package (3.4 oz) instant vanilla pudding mix or homemade vanilla pudding
- 2 cups (16 fl oz) whole milk or preferred milk alternative
- 1 cup fresh strawberries, hulled and sliced or chopped
- 1 cup fresh blueberries, washed and patted dry
- Whipped cream (optional)
- Red, white, and blue patriotic sprinkles (optional)
Instructions
- Crush about 20 Oreos into fine crumbs with some small chunks using a food processor or rolling pin in a zip-top bag. Set aside.
- Prepare the vanilla pudding: For instant mix, whisk pudding mix with 2 cups cold milk for 2 minutes until thickened. For homemade pudding, combine 2 cups milk, 1/3 cup sugar, 3 tablespoons cornstarch, pinch of salt, and 1 teaspoon vanilla extract in a saucepan. Cook over medium heat, whisking constantly until thickened and boiling, then simmer 1 minute before cooling.
- Rinse strawberries and blueberries under cold water. Hull and slice strawberries. Pat all berries dry with paper towels.
- Layer the dessert jars starting with 2 tablespoons cookie crumbs at the bottom, then 1/4 cup vanilla pudding, 2 tablespoons strawberries, 2 tablespoons cookie crumbs, 2 tablespoons blueberries, and finish with a final layer of pudding and a sprinkle of cookie crumbs on top.
- Optionally, add a dollop of whipped cream and a pinch of patriotic sprinkles on top.
- Refrigerate the jars for at least 30 minutes before serving to let flavors meld and pudding set.
Notes
Whisk pudding briskly to avoid lumps. Layer quickly to prevent cookie crumbs from becoming soggy. Keep jars covered in the fridge if making ahead. Use gluten-free cookies and dairy-free pudding for allergy-friendly or vegan versions. Frozen berries should be thawed and drained before use.
Nutrition
- Serving Size: One 8 oz dessert jar
- Calories: 325
- Sugar: 35
- Sodium: 220
- Fat: 12
- Saturated Fat: 6
- Carbohydrates: 50
- Fiber: 2
- Protein: 5
Keywords: 4th of July dessert, patriotic dessert, dirt cup, pudding jars, easy dessert, summer dessert, berry dessert