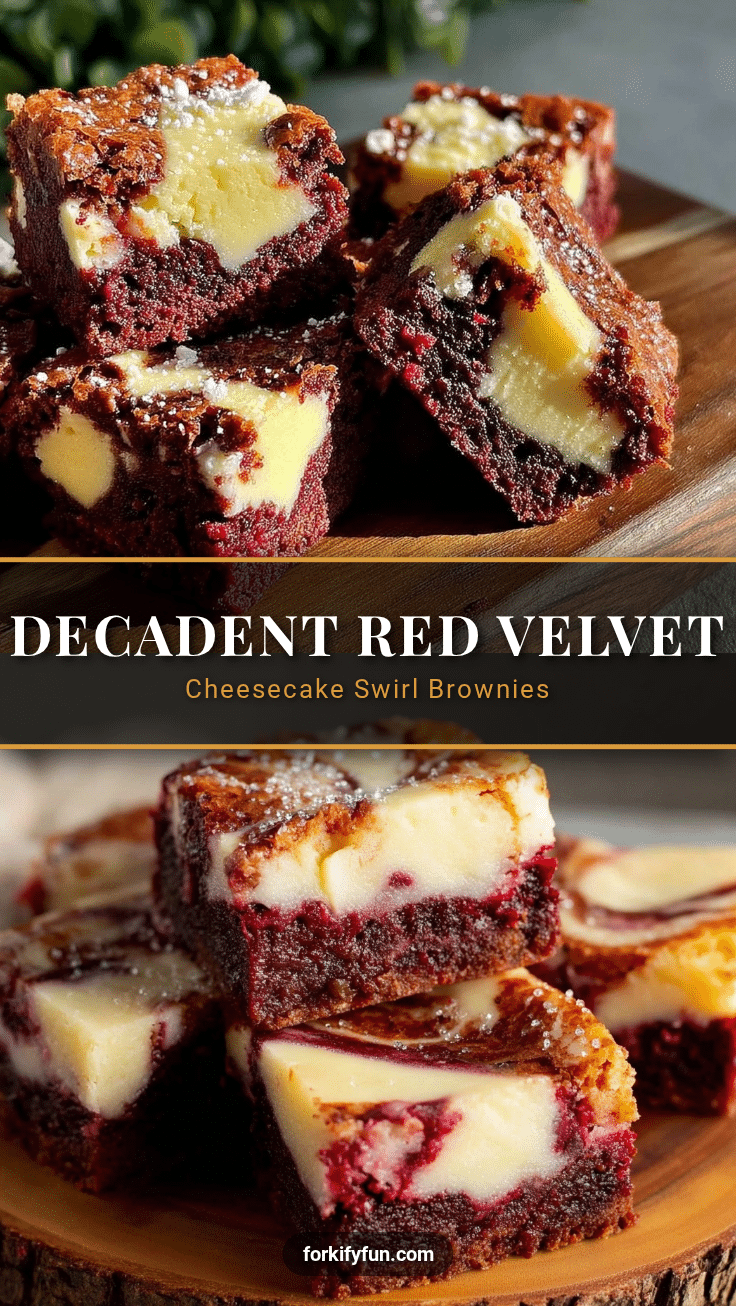
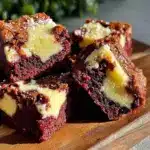
Let me tell you, the rich scent of cocoa mingled with the tangy sweetness of cream cheese swirling through the air is enough to make anyone’s mouth water. The first time I baked these decadent red velvet cheesecake swirl brownies, I was instantly hooked. It was one of those rare moments where you pause, take a deep breath, and just smile because you know you’re onto something truly special. I remember when I was knee-high to a grasshopper, my grandma used to bake the most amazing desserts, but nothing quite like this combo of bold red velvet and luscious cheesecake.
You know what? I stumbled upon this recipe on a rainy weekend, trying to recreate that perfect balance of chocolate and cream cheese swirl I tasted at a local bakery. Honestly, it’s dangerously easy and delivers pure, nostalgic comfort in every bite. My family couldn’t stop sneaking them off the cooling rack (and I can’t really blame them). These brownies feel like a warm hug wrapped in festive color — perfect for potlucks, sweet treats for your kids, or brightening up your Pinterest cookie board with something that looks as amazing as it tastes.
After testing this recipe multiple times (in the name of research, of course), it quickly became a staple for family gatherings and gifting. Trust me, you’re going to want to bookmark this one.
Why You’ll Love This Recipe
Honestly, these decadent red velvet cheesecake swirl brownies aren’t just any brownies — they’re the kind of treat that stops people mid-conversation for a bite. Here’s why they’re a winner in my kitchen:
- Quick & Easy: Comes together in under an hour, perfect for last-minute dessert cravings or busy weeknights.
- Simple Ingredients: No fancy grocery trips needed; you likely already have everything in your pantry and fridge.
- Perfect for Any Occasion: Whether it’s a birthday, holiday, or just because, these brownies bring a festive touch.
- Crowd-Pleaser: Kids and adults alike rave about the creamy cheesecake swirls balanced with rich red velvet.
- Unbelievably Delicious: The fudgy texture meets the smooth tang of cheesecake — pure magic.
What sets this recipe apart is the way the cheesecake is whipped to silky smoothness before being gently swirled into the red velvet batter, creating that gorgeous marbled effect. Plus, I use a touch of espresso powder in the brownie base to deepen the chocolate flavor without making it taste like coffee (trust me on that one). This isn’t just another brownie recipe; it’s the best version I’ve found after tons of trial and error.
Honestly, this recipe makes you close your eyes after the first bite. It’s comfort food reimagined — rich, creamy, and just the right amount of sweet. Plus, it’s simple enough to impress guests without any stress.
What Ingredients You Will Need
This recipe uses simple, wholesome ingredients to deliver bold flavor and that satisfying creamy texture without fuss. Most ingredients are pantry staples, so no need to run to a specialty store!
- For the Red Velvet Brownie Batter:
- Unsalted butter, 1/2 cup (113g), melted (adds richness and moistness)
- Granulated sugar, 1 cup (200g)
- Large eggs, 2, room temperature
- Vanilla extract, 1 teaspoon
- Cocoa powder, 1/4 cup (25g), unsweetened (I prefer Hershey’s for consistent flavor)
- All-purpose flour, 3/4 cup (95g), sifted
- Red food coloring, 2 tablespoons (gel-based for vibrant color without extra liquid)
- Baking powder, 1/2 teaspoon
- Salt, 1/4 teaspoon
- Espresso powder, 1/2 teaspoon (optional but recommended for depth)
- For the Cheesecake Swirl:
- Cream cheese, 8 oz (226g), softened (look for full-fat for best creamy texture)
- Granulated sugar, 1/4 cup (50g)
- Large egg, 1, room temperature
- Vanilla extract, 1 teaspoon
- All-purpose flour, 1 tablespoon (8g) (helps stabilize the cheesecake layer)
Substitutions: For a gluten-free option, substitute the all-purpose flour with an equal amount of a gluten-free flour blend. If dairy-free is needed, swap cream cheese with a dairy-free cream cheese alternative and use coconut oil instead of butter.
Equipment Needed
- 8×8 inch (20×20 cm) square baking pan — I recommend a metal pan for even baking, but glass works too (just adjust baking time slightly).
- Mixing bowls — one medium for the brownie batter, one small for the cheesecake mixture.
- Electric mixer or handheld mixer — essential for whipping the cheesecake filling smooth and fluffy.
- Rubber spatula — for folding ingredients gently and scraping every last bit.
- Measuring cups and spoons — accurate measurements make a difference here.
- Toothpick or skewer — to create the signature cheesecake swirl pattern.
If you don’t have an electric mixer handy, a sturdy whisk will work for the cheesecake, but it takes some elbow grease. A budget-friendly option is to use a silicone spatula and mix by hand carefully to avoid overmixing the batter. Keep your tools clean and dry for best results!
Preparation Method

- Preheat your oven to 350°F (175°C) and grease your 8×8 inch baking pan with butter or non-stick spray. Line it with parchment paper if you want easy removal later — trust me, it’s worth the extra step.
- Prepare the brownie batter: In a medium bowl, whisk together the melted butter and sugar until smooth and glossy. Add the eggs one at a time, beating well after each addition. Stir in the vanilla extract.
- In a separate bowl, sift together the cocoa powder, flour, baking powder, salt, and espresso powder. Slowly fold the dry ingredients into the wet mixture until just combined — don’t overmix or your brownies might turn out cakey instead of fudgy.
- Add the red food coloring: Fold in the gel-based red food coloring until the batter turns that classic bright red velvet shade. The batter will be thick but smooth.
- Prepare the cheesecake swirl: Using an electric mixer, beat the softened cream cheese until creamy and smooth, about 2 minutes. Add the sugar and continue beating until well combined.
- Add the egg and vanilla extract: Beat again until smooth. Lastly, stir in the tablespoon of flour until just incorporated — this helps prevent cracking.
- Pour half the red velvet batter into the prepared pan, spreading it evenly. Dollop half of the cheesecake mixture over the brownie layer in spoonfuls. Repeat with the remaining brownie batter and cheesecake mixture.
- Create the signature swirl: Using a toothpick or skewer, gently swirl the cheesecake and brownie layers together. Make figure-eight motions or random loops — whatever feels fun! The aim is a marbled effect, not total blending.
- Bake for 30-35 minutes, or until a toothpick inserted in the center comes out with moist crumbs but no wet batter. The edges will look set and slightly pulled away from the pan.
- Allow to cool completely in the pan on a wire rack. This step is crucial for clean slicing and that perfect fudgy texture.
- Once cooled, lift the brownies out using the parchment paper and cut into squares. Store leftovers in an airtight container at room temperature for up to 3 days, or refrigerate for up to a week.
Pro tip: If your cheesecake layer cracks a little, don’t fret — that’s part of the charm! The brownies will still taste divine.
Cooking Tips & Techniques
Getting these decadent red velvet cheesecake swirl brownies just right has taught me a few things along the way. Here are some tips to help you nail it every time:
- Don’t overmix the batter: When combining wet and dry ingredients, fold gently until just mixed. Overmixing leads to tough brownies, and nobody wants that.
- Use room temperature eggs and cream cheese: This helps everything blend smoothly without lumps, especially in the cheesecake swirl.
- Whip the cream cheese well: It should be fluffy and smooth before adding sugar and eggs — this ensures the swirl bakes up creamy and light.
- Swirling technique: Be playful but gentle. Too much swirling blends the layers instead of creating contrast.
- Baking time: Keep an eye starting at 30 minutes. Overbaking dries out the brownies and the cheesecake layer can crack more.
- Multitasking: While the brownies bake, clean your bowls to save time and avoid sticky mess later. It’s a small hack but trust me, it helps.
Once, I had a batch where I forgot the espresso powder, and although the brownies were tasty, they lacked that deep chocolate pop. Lesson learned — little additions like that make a big difference.
Variations & Adaptations
Feel like mixing things up? These decadent red velvet cheesecake swirl brownies are surprisingly adaptable. Here are a few ways I’ve tweaked the recipe:
- Nutty Twist: Add 1/2 cup (60g) chopped pecans or walnuts to the brownie batter for a crunchy surprise. I love this for holiday baking.
- Berry Swirl: Drop in 1/4 cup (60ml) raspberry puree into the cheesecake mixture before swirling. It adds a tart brightness that balances the richness.
- Vegan Version: Use dairy-free cream cheese and substitute eggs with flax eggs (1 tbsp ground flax + 3 tbsp water per egg). The texture is a bit different but still satisfying.
- Seasonal Flavor: In fall, sprinkle a teaspoon of pumpkin pie spice into the brownie batter for cozy warmth.
One of my favorite personal tweaks is adding mini white chocolate chips to the batter — it gives an extra creamy sweetness that melts in your mouth. Feel free to experiment with mix-ins to suit your tastes!
Serving & Storage Suggestions
These brownies are best served at room temperature to let the flavors and textures shine. If you prefer, a quick 10-second zap in the microwave revives that soft, gooey feel, but be careful not to overdo it.
Pair them with a cold glass of milk, a cup of strong coffee, or even a scoop of vanilla ice cream for dessert that feels like a special occasion.
Store leftovers in an airtight container at room temperature for up to 3 days. For longer storage, refrigerate for up to one week — just bring to room temp before serving. You can also freeze them, tightly wrapped, for up to 2 months. Thaw in the fridge overnight or on the counter for a few hours.
Interestingly, the flavors meld beautifully after a day or two, making the cheesecake swirl even creamier and the red velvet richer. So if you can resist, letting them rest overnight is a sweet little reward.
Nutritional Information & Benefits
These decadent red velvet cheesecake swirl brownies are a treat, but they also bring some nutritional perks. Each square (assuming 16 servings) contains roughly:
| Calories | 220 kcal |
|---|---|
| Fat | 12g (with 7g saturated fat) |
| Carbohydrates | 26g |
| Protein | 3g |
| Sugar | 18g |
The cream cheese provides a source of calcium and protein, while the eggs add quality protein and important vitamins. Using unsweetened cocoa powder means you get antioxidants without added sugar. For those with dietary restrictions, substitutions can make these brownies gluten-free or dairy-free.
From a wellness perspective, I see these as a perfect occasional indulgence — satisfying a sweet tooth while still nourishing the body with real ingredients.
Conclusion
In short, these decadent red velvet cheesecake swirl brownies are a must-try for anyone who loves the perfect marriage of rich chocolate and creamy cheesecake. They’re simple enough to whip up on a whim but special enough to impress every time.
Feel free to customize by adding nuts, swirl in some berry puree, or try a vegan twist. I love this recipe because it’s flexible and always delivers that cozy, nostalgic feeling that makes dessert truly memorable.
If you give this a go, please leave a comment and share your experience — or any fun twists you tried! I’m excited to hear how you make these brownies your own. Happy baking, and don’t forget to treat yourself to a square (or two) — you deserve it!
FAQs
Can I make these brownies ahead of time?
Absolutely! They actually taste better the next day once the flavors have melded. Store them in an airtight container at room temperature or in the fridge.
What’s the best way to get clean cheesecake swirls?
Use a toothpick or skewer and swirl gently in figure-eight motions. Don’t overdo it, or the layers will blend too much.
Can I use boxed brownie mix instead of making the batter from scratch?
You can, but the homemade version gives the best texture and flavor. If you do use a mix, add the red food coloring and espresso powder for that classic red velvet flavor.
How do I prevent the cheesecake from cracking?
Adding a little flour to the cheesecake mix helps, as does not overbaking. Also, make sure the cream cheese is room temperature and well-whipped before mixing.
Are these brownies gluten-free?
The recipe as written is not, but you can substitute the all-purpose flour with a gluten-free flour blend and get great results.
Pin This Recipe!
Decadent Red Velvet Cheesecake Swirl Brownies
Rich and fudgy red velvet brownies with creamy cheesecake swirls, perfect for any occasion and easy to make with simple pantry ingredients.
- Prep Time: 15 minutes
- Cook Time: 30-35 minutes
- Total Time: 45-50 minutes
- Yield: 16 servings 1x
- Category: Dessert
- Cuisine: American
Ingredients
- 1/2 cup (113g) unsalted butter, melted
- 1 cup (200g) granulated sugar
- 2 large eggs, room temperature
- 1 teaspoon vanilla extract
- 1/4 cup (25g) unsweetened cocoa powder
- 3/4 cup (95g) all-purpose flour, sifted
- 2 tablespoons red food coloring (gel-based)
- 1/2 teaspoon baking powder
- 1/4 teaspoon salt
- 1/2 teaspoon espresso powder (optional)
- 8 oz (226g) cream cheese, softened
- 1/4 cup (50g) granulated sugar
- 1 large egg, room temperature
- 1 teaspoon vanilla extract
- 1 tablespoon (8g) all-purpose flour
Instructions
- Preheat your oven to 350°F (175°C) and grease an 8×8 inch baking pan with butter or non-stick spray. Line with parchment paper for easy removal.
- In a medium bowl, whisk together melted butter and sugar until smooth and glossy. Add eggs one at a time, beating well after each addition. Stir in vanilla extract.
- In a separate bowl, sift together cocoa powder, flour, baking powder, salt, and espresso powder. Slowly fold dry ingredients into wet mixture until just combined; do not overmix.
- Fold in the gel-based red food coloring until batter is bright red and smooth.
- Using an electric mixer, beat softened cream cheese until creamy and smooth, about 2 minutes. Add sugar and beat until combined.
- Add egg and vanilla extract to the cream cheese mixture and beat until smooth. Stir in flour until just incorporated.
- Pour half of the red velvet batter into the prepared pan, spreading evenly. Dollop half of the cheesecake mixture over the brownie layer in spoonfuls. Repeat with remaining brownie batter and cheesecake mixture.
- Use a toothpick or skewer to gently swirl the cheesecake and brownie layers together in figure-eight or random loops to create a marbled effect.
- Bake for 30-35 minutes, or until a toothpick inserted in the center comes out with moist crumbs but no wet batter. Edges should look set and slightly pulled away from the pan.
- Allow to cool completely in the pan on a wire rack for clean slicing and fudgy texture.
- Once cooled, lift brownies out using parchment paper and cut into squares. Store leftovers in an airtight container at room temperature for up to 3 days or refrigerate for up to a week.
Notes
Do not overmix the batter to avoid cakey brownies. Use room temperature eggs and cream cheese for smooth blending. Swirl gently to create a marbled effect without blending layers completely. Baking time may vary slightly depending on pan type. Let brownies cool completely before slicing for best texture. Substitutions available for gluten-free and dairy-free diets.
Nutrition
- Serving Size: 1 brownie square (1/
- Calories: 220
- Sugar: 18
- Fat: 12
- Saturated Fat: 7
- Carbohydrates: 26
- Protein: 3
Keywords: red velvet brownies, cheesecake swirl, dessert, easy brownies, homemade dessert, fudgy brownies, red velvet, cheesecake brownies


