I was standing at the counter of a tiny hardware store in rural Vermont, waiting for my husband to pick out a new shovel, when the woman behind the register started talking about pumpkin cake. Not the polite “nice weather we’re having” kind of talk—she was describing it with her hands, leaning forward, her voice dropping to a near whisper like she was sharing a secret. “You have to use the dark brown sugar,” she said, pointing her pen at me. “Not the light. And you let it sit overnight before you glaze it.” I had no idea who this woman was, but she was clearly a woman on a mission. I grabbed a receipt from the counter and started scribbling notes while she told me about her grandmother’s pumpkin bundt cake recipe, the one that won the county fair three years running back in the seventies.
Honestly, I almost walked out without the recipe. I mean, I was there for a snow shovel, not a baking lesson. But something about the way she talked about that cake—the way the spices hit you first, then the cream cheese glaze melts into all the nooks and crannies—made me stop and listen. She told me her grandma used to say that a good pumpkin cake should taste like fall in a single bite, and that most recipes get the balance wrong. Too much cinnamon, not enough nutmeg. Too dry, not enough sour cream. Her grandma figured it out, though, and apparently, she wasn’t shy about telling people.
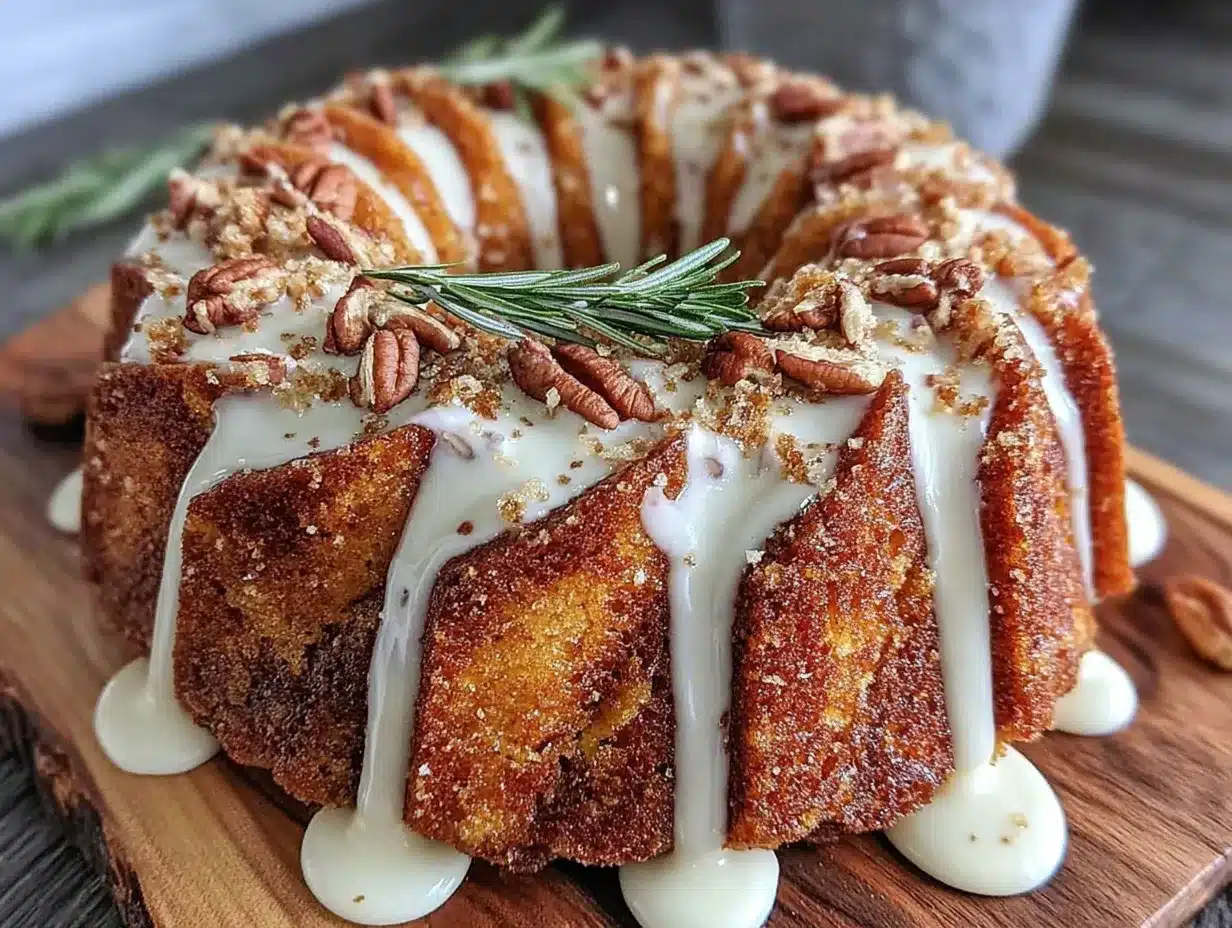
So I went home, bought a bundt pan I definitely didn’t need, and made the cake that very weekend. The first bite—and I’m not exaggerating here—made me text my sister a photo with the caption “I think I just found the one.” It was that good. The cake was impossibly moist, with a tight, tender crumb that held up beautifully under the thick maple cream cheese glaze. The spices were warm but not overpowering, and the maple flavor in the glaze added this almost caramel-like depth that I hadn’t expected. I’ve made it every fall since, and it has become my go-to for dinner parties, Thanksgiving, and those random Tuesday nights when you just need a slice of something good. Maybe you’ve been there—standing in an unexpected place, overhearing something that changes your kitchen routine forever. That hardware store recipe became my best pumpkin bundt cake, and now I’m passing it on to you.
Why You’ll Love This Recipe
This isn’t just another pumpkin bundt cake recipe floating around the internet. This is the one I’ve tested, tweaked, and served to dozens of friends and family members over the years, and it has never let me down. Here’s why I think you’ll feel the same way:
- Perfect for Entertaining: This cake is a showstopper on any dessert table. The tall, elegant bundt shape with the glossy maple cream cheese glaze drizzled over the top makes it look like you spent hours on it. But honestly? It comes together in about 20 minutes of active prep time. You can make it the day before your party, and it actually tastes better the next day as the flavors meld together.
- Simple, Pantry-Friendly Ingredients: No hunting down specialty flours or obscure spices. You likely have most of these ingredients in your kitchen right now—pumpkin puree, brown sugar, flour, eggs, butter, and basic baking spices. The maple syrup and cream cheese are the only “special” items, and they’re both easy to find at any grocery store.
- Unbelievably Moist Texture: The secret here is a combination of sour cream and pumpkin puree, which keeps the cake incredibly moist without making it heavy or dense. I’ve tried versions with oil only, butter only, and various ratios, but this specific blend gives you that perfect tender crumb that stays fresh for days.
- Crowd-Pleaser Guaranteed: I’ve served this cake at potlucks, holiday dinners, and casual get-togethers, and it always gets the same reaction. People take a bite, pause, and then go back for seconds. The pumpkin flavor is present but not overwhelming, and the maple cream cheese glaze adds just the right amount of sweetness and tang.
- Make-Ahead Friendly: This is a huge win for hosts. You can bake the cake up to two days in advance, wrap it tightly, and glaze it just before serving. It actually gives the spices more time to develop and deepen, which means a more flavorful cake for your guests.
This recipe isn’t just good—it’s the kind of cake that makes people close their eyes after the first bite. It’s comfort food reimagined, with all the cozy fall flavors you love but with a texture that’s next-level. Perfect for impressing guests without the stress, or turning a simple dessert into something truly memorable.
What Ingredients You Will Need
This recipe uses simple, wholesome ingredients to deliver bold flavor and satisfying texture without the fuss. Most of these are pantry staples, and I’ve included notes on substitutions where they work well.
For the Pumpkin Bundt Cake
- All-purpose flour – 3 cups (360g). I use King Arthur Flour for consistent results, but any unbleached all-purpose flour works. Spoon and level your flour for the most accurate measurement.
- Baking soda – 2 teaspoons. This helps the cake rise and gives it a tender crumb. Make sure your baking soda is fresh—test it by dropping a pinch into vinegar; it should bubble immediately.
- Baking powder – 1 teaspoon. Adds extra lift for that beautiful domed top on your bundt cake.
- Salt – 1 teaspoon. I use fine sea salt. It balances the sweetness and enhances the warm spices.
- Ground cinnamon – 2 teaspoons. This is the backbone of the spice blend. I prefer Saigon cinnamon for its bold, slightly sweet flavor.
- Ground nutmeg – 1 teaspoon. Freshly grated nutmeg makes a noticeable difference here, but pre-ground works in a pinch.
- Ground ginger – ½ teaspoon. Adds warmth without heat.
- Ground cloves – ¼ teaspoon. Just a touch—cloves are potent and can easily overpower the other spices.
- Unsalted butter – 1 cup (2 sticks, 226g), softened to room temperature. If you only have salted butter, reduce the added salt to ½ teaspoon.
- Granulated sugar – 1 cup (200g). Provides sweetness and helps create a tender crumb.
- Light brown sugar – 1 cup (200g), packed. This adds moisture and a subtle molasses flavor that pairs beautifully with pumpkin. Dark brown sugar works too and gives an even deeper flavor.
- Large eggs – 4, at room temperature. Room temperature eggs emulsify better into the batter, creating a smoother, more uniform texture.
- Vanilla extract – 2 teaspoons. Pure vanilla extract is worth the splurge here—it rounds out the spice flavors beautifully.
- Canned pumpkin puree – 1 can (15 oz, about 425g). Make sure you’re using 100% pumpkin puree, not pumpkin pie filling. Libby’s is my go-to brand for consistent texture and moisture content.
- Sour cream – ½ cup (120g), at room temperature. This is the secret ingredient for an ultra-moist cake. Full-fat sour cream gives the best results, but Greek yogurt works as a substitute.
For the Maple Cream Cheese Glaze
- Cream cheese – 4 oz (113g), softened to room temperature. Use full-fat block cream cheese for the thickest, creamiest glaze. Avoid whipped or spreadable cream cheese—they have too much air and water.
- Unsalted butter – ¼ cup (½ stick, 57g), softened.
- Powdered sugar – 1½ cups (180g), sifted if lumpy. Sifting prevents tiny clumps in your glaze.
- Pure maple syrup – 3 tablespoons. Use real maple syrup, not pancake syrup. Grade A dark amber or Grade B maple syrup has a stronger maple flavor that stands up well in the glaze.
- Vanilla extract – ½ teaspoon. Enhances the maple flavor without competing with it.
- Pinch of salt – Just a tiny pinch to balance the sweetness.
Equipment Needed
You don’t need a professional kitchen to make this cake, but having the right tools makes the process smoother and more enjoyable.
- 10 to 12-cup bundt pan: This is non-negotiable. A standard 10-cup bundt pan works perfectly for this recipe. I love my Nordic Ware Anniversary Bundt Pan—it heats evenly and releases cakes beautifully. If you’re using an older or non-stick pan, make sure to grease it thoroughly.
- Stand mixer or hand mixer: You can cream the butter and sugar by hand, but a mixer makes it much easier and gives you a lighter, fluffier batter. I’ve made this cake with both, and the stand mixer gives slightly better results because of the consistent speed.
- Large mixing bowls: You’ll need at least two—one for the dry ingredients and one for the wet ingredients.
- Whisk: For combining the dry ingredients evenly.
- Rubber spatula: For scraping down the bowl and folding in the dry ingredients. A good silicone spatula is worth its weight in gold here.
- Cooling rack: Essential for cooling the cake evenly before glazing. If you don’t have one, you can use the inverted bundt pan insert or even the grates from your oven (cooled, of course).
- Piping bag or zip-top bag: For drizzling the glaze in a controlled, pretty pattern. A zip-top bag with a tiny corner snipped off works just as well.
- Pastry brush: For greasing the bundt pan thoroughly. A brush reaches all the nooks and crannies better than a paper towel.
Budget-friendly tip: If you don’t own a bundt pan, check thrift stores or garage sales—I found my first one for $3, and it worked perfectly for years. Just make sure it’s not scratched or warped.
Preparation Method
Let’s walk through this step by step. I’ve included visual cues and troubleshooting tips so you know exactly what to look for at each stage.
- Preheat and prepare the pan. Position your oven rack in the center and preheat to 350°F (175°C). Generously grease your bundt pan with butter or baking spray, making sure to get into every crevice. I like to use a pastry brush with melted butter, then dust the pan lightly with flour. This double-coating method has never failed me. If you’re using a non-stick pan, you can skip the flour and just use a good baking spray that contains flour.
- Whisk the dry ingredients. In a large bowl, whisk together 3 cups (360g) all-purpose flour, 2 teaspoons baking soda, 1 teaspoon baking powder, 1 teaspoon salt, 2 teaspoons cinnamon, 1 teaspoon nutmeg, ½ teaspoon ginger, and ¼ teaspoon cloves. Whisk for about 30 seconds to aerate the flour and distribute the spices evenly. Set aside.
- Cream the butter and sugars. In the bowl of a stand mixer fitted with the paddle attachment (or in a large bowl with a hand mixer), beat 1 cup (226g) softened unsalted butter, 1 cup (200g) granulated sugar, and 1 cup (200g) packed light brown sugar together on medium speed until light and fluffy, about 3 to 4 minutes. Scrape down the sides and bottom of the bowl halfway through. The mixture should look pale and feel airy when you touch it.
- Add the eggs one at a time. With the mixer on medium-low, add 4 room-temperature eggs one at a time, beating well after each addition. The batter should look smooth and glossy. If it looks curdled or separated, don’t panic—this sometimes happens if the eggs are too cold. Just keep mixing and it will come back together.
- Mix in the pumpkin and vanilla. Add 1 can (15 oz) pumpkin puree, ½ cup (120g) sour cream, and 2 teaspoons vanilla extract. Mix on low speed until just combined. The batter will look thick and a little lumpy—that’s okay. Scrape the bottom of the bowl to make sure everything is incorporated.
- Fold in the dry ingredients. With the mixer on low speed, gradually add the flour mixture in three additions, mixing just until the flour disappears after each addition. Do not overmix. Overmixing develops the gluten and makes the cake tough. I like to stop the mixer when there are still a few streaks of flour and finish folding by hand with a rubber spatula. The final batter should be thick, smooth, and smell incredibly fragrant.
- Fill the pan. Spoon the batter into the prepared bundt pan and spread it evenly with the spatula. Gently tap the pan on the counter a few times to release any air bubbles. The pan should be about two-thirds full.
- Bake. Bake for 50 to 60 minutes, or until a long wooden skewer inserted into the center comes out clean or with a few moist crumbs attached. The top should be golden brown and spring back when lightly touched. Start checking at 50 minutes—oven temperatures vary, and you don’t want to overbake this cake.
- Cool in the pan. Place the pan on a wire rack and let the cake cool in the pan for exactly 15 minutes. This is important—too short and the cake will stick, too long and it will steam and become soggy. After 15 minutes, invert the pan onto the cooling rack and lift it off gently. If the cake doesn’t release immediately, don’t force it. Let it sit upside down for another 5 minutes, and it should drop out on its own.
- Cool completely. Let the cake cool completely on the wire rack, about 1 to 2 hours. Do not glaze a warm cake—the glaze will melt and run right off, leaving you with a sad, sticky mess. Trust me, I learned this the hard way.
- Make the glaze. While the cake cools, make the maple cream cheese glaze. In a medium bowl, beat 4 oz (113g) softened cream cheese and ¼ cup (57g) softened butter together until smooth and creamy. Add 1½ cups (180g) powdered sugar, 3 tablespoons maple syrup, ½ teaspoon vanilla, and a pinch of salt. Beat on low speed until combined, then increase to medium and beat for 1 to 2 minutes until the glaze is smooth, thick, and glossy. If it’s too thick to drizzle, add a teaspoon of milk or maple syrup to thin it out.
- Glaze the cake. Transfer the glaze to a piping bag or a zip-top bag with a tiny corner snipped off. Drizzle the glaze over the cooled cake in a back-and-forth motion, letting it cascade down the sides naturally. For a more dramatic look, let the glaze set for 10 minutes, then add a second layer. Let the glaze set completely before slicing, about 30 minutes.
Cooking Tips & Techniques
After making this cake more times than I can count, I’ve gathered a few tips that make a real difference. Some of these came from trial and error, and some came from that hardware store lady’s grandma herself.
Room temperature ingredients matter. I know it’s tempting to use cold eggs straight from the fridge, but room temperature ingredients emulsify better and create a smoother, more tender crumb. Take your butter, eggs, and sour cream out of the fridge about 30 to 45 minutes before you start baking. If you’re short on time, place the eggs in a bowl of warm water for 5 minutes and microwave the sour cream for 10 seconds.
Don’t overmix the batter. This is the most common mistake I see with bundt cakes. Once you add the flour, mix only until it disappears. Overmixing develops gluten, which makes the cake dense and tough instead of light and tender. I actually stop my mixer when there are still a few streaks of flour and finish folding by hand. It takes an extra 30 seconds but makes a noticeable difference.
Grease your pan like you mean it. Bundt pans are notorious for sticking, especially in those intricate crevices. I use a pastry brush to apply softened butter to every nook and cranny, then dust with flour and tap out the excess. For extra insurance, you can use a baking spray that contains flour, like Baker’s Joy. Do not use regular non-stick spray—it can create a gummy residue that actually causes sticking.
Let the cake cool properly. That 15-minute cooling window in the pan is critical. I once got distracted by a phone call and let the cake sit for 45 minutes. When I finally turned it out, about a third of the cake stayed stuck to the pan. The steam had nowhere to escape and created a soggy layer that glued the cake to the metal. Set a timer—it’s worth it.
Make the glaze the right consistency. The glaze should be thick enough to hold its shape when drizzled but thin enough to flow slowly down the sides of the cake. If it’s too thick, add a teaspoon of maple syrup or milk. If it’s too thin, add a tablespoon more powdered sugar. You want it to look like a slightly thinner version of cream cheese frosting.
Variations & Adaptations
One of the best things about this pumpkin bundt cake is how flexible it is. Here are some variations I’ve tried and loved.
Gluten-Free Version: Substitute the all-purpose flour with a good 1:1 gluten-free baking flour blend. I’ve had great results with King Arthur Measure for Measure. Add 1 teaspoon of xanthan gum if your blend doesn’t already include it. The texture will be slightly more delicate, so handle the cake gently when turning it out of the pan.
Dairy-Free Version: Replace the butter with a high-quality vegan butter stick, use dairy-free sour cream or coconut yogurt, and swap the cream cheese in the glaze for a dairy-free cream cheese alternative. Miyoko’s brand works beautifully here. The cake will be slightly less tender but still delicious.
Spice It Up: For a bolder spice profile, add ¼ teaspoon of cardamom or allspice to the dry ingredients. I made this version for a Thanksgiving dinner once, and my brother-in-law asked for the recipe before he finished his first slice. The cardamom adds a slightly floral, citrusy note that pairs beautifully with the maple glaze.
Nutty Crunch: Fold 1 cup of toasted pecans or walnuts into the batter just before pouring it into the pan. The nuts add a lovely crunch and earthy flavor that contrasts with the soft cake. Toast them first in a dry skillet over medium heat for 3 to 4 minutes to deepen their flavor.
Chocolate Twist: Fold ½ cup of mini chocolate chips into the batter. The chocolate melts into little pockets of richness throughout the cake. Use dark chocolate chips for a less sweet option that complements the maple glaze beautifully.
Serving & Storage Suggestions
This cake is versatile enough for casual snacking or elegant entertaining, and it stores beautifully.
Serving: Serve the cake at room temperature for the best flavor and texture. The glaze will be set but still soft, and the cake will be perfectly moist. For an extra-special presentation, dust the top with a light sprinkle of flaky sea salt or cinnamon before serving. The salt balances the sweetness and makes the maple flavor pop. I like to serve this cake on a simple cake stand with a few fresh rosemary sprigs or cinnamon sticks arranged around the base for a rustic fall look.
What to Serve Alongside: This cake pairs beautifully with a cup of strong coffee, chai tea, or a warm apple cider. For a dessert spread, serve it alongside a scoop of vanilla bean ice cream or a dollop of lightly sweetened whipped cream. If you’re hosting a fall brunch, this cake works wonderfully with a savory quiche or frittata to balance the sweetness.
Storage: Store the glazed cake in an airtight container at room temperature for up to 3 days. If your kitchen is warm or humid, store it in the refrigerator to prevent the glaze from becoming too soft. Let it come back to room temperature before serving for the best texture. You can also freeze the unglazed cake for up to 3 months—wrap it tightly in plastic wrap, then a layer of foil. Thaw overnight in the refrigerator, then bring to room temperature before glazing and serving.
Reheating: If you prefer your cake slightly warm, microwave individual slices for 10 to 15 seconds. The glaze will soften and become almost gooey, which is a delightful contrast to the tender cake. Do not reheat the entire cake—it will dry out.
Flavor Development: This cake actually tastes better on the second day. The spices have time to meld and deepen, and the texture becomes even more moist. If you can resist eating it immediately, wrap it tightly and let it sit at room temperature overnight before glazing. You’ll be rewarded with a more flavorful, cohesive cake.
Nutritional Information & Benefits
While this is definitely a treat, it does offer some nutritional perks thanks to its star ingredient. Here’s a quick breakdown per slice (based on 16 servings):
| Nutrient | Amount Per Serving |
|---|---|
| Calories | 385 |
| Total Fat | 18g |
| Saturated Fat | 11g |
| Cholesterol | 85mg |
| Sodium | 320mg |
| Total Carbohydrates | 52g |
| Dietary Fiber | 1.5g |
| Sugars | 35g |
| Protein | 5g |
| Vitamin A | 85% DV |
Health Benefits: Pumpkin is packed with vitamin A (mostly as beta-carotene), which supports eye health and immune function. It’s also a good source of fiber and potassium. The cream cheese and sour cream add calcium and protein, while the eggs provide high-quality protein and B vitamins. Of course, this is still a dessert, so enjoy it in moderation. But knowing there’s real pumpkin in there makes that second slice feel a little less indulgent.
Dietary Considerations: This recipe contains wheat, dairy, and eggs. For gluten-free or dairy-free options, see the variations section above. The cake is nut-free as written, making it a safe option for many school or party settings.
Conclusion
This pumpkin bundt cake with maple cream cheese glaze has become my signature fall dessert, and I honestly can’t imagine the season without it. It started with a chance encounter in a hardware store and turned into a recipe I reach for year after year. The cake is moist, tender, and perfectly spiced, and that maple cream cheese glaze is honestly the stuff of dreams—creamy, tangy, sweet, and just a little bit decadent.
Whether you’re making it for Thanksgiving dessert, a fall dinner party, or just because you want your house to smell like autumn, this cake delivers every single time. Don’t be afraid to make it your own—try the variations, adjust the spices to your taste, and serve it in a way that feels special to you. That’s what cooking is all about, honestly.
I’d love to hear how yours turns out! Leave a comment below and let me know if you tried any variations, or tag me in your photos on Pinterest. Happy baking, friends—here’s to finding recipes in the most unexpected places and making them part of your own story.
Frequently Asked Questions
Can I use fresh pumpkin instead of canned?
You can, but the texture will be different. Fresh pumpkin has more water content than canned, which can make the cake denser and moister. If you use fresh pumpkin, roast it until very dry, then puree it and let it drain in a cheesecloth-lined sieve for at least 30 minutes to remove excess moisture. Canned pumpkin is actually more consistent and reliable for baking.
Why did my bundt cake stick to the pan?
This usually happens for one of three reasons: the pan wasn’t greased thoroughly enough, the cake was left in the pan too long after baking, or the pan has scratches that create sticking points. Make sure you’re using a pastry brush to get butter into every crevice, and set a timer for exactly 15 minutes of cooling in the pan before turning it out.
Can I make this cake ahead of time for a party?
Absolutely! This cake is actually better when made a day ahead. Bake the cake, let it cool completely, wrap it tightly in plastic wrap, and store it at room temperature. Make the glaze and glaze the cake just before serving for the prettiest presentation. The flavors will be more developed and the texture will be even more moist on day two.
Can I skip the maple cream cheese glaze?
You can, but I really think it’s what makes this cake special. The tangy cream cheese and sweet maple syrup balance the warm pumpkin spices perfectly. If you need a dairy-free option, try a simple maple glaze made with powdered sugar, maple syrup, and a splash of non-dairy milk. For a simpler topping, dust the cake with powdered sugar or serve it with a dollop of whipped cream.
How do I know when the cake is done baking?
The best way to test is with a long wooden skewer inserted into the center of the cake. It should come out clean or with just a few moist crumbs attached. The top should be golden brown and spring back when you gently press it. Start checking at 50 minutes, and don’t open the oven door too often during baking—temperature fluctuations can cause the cake to sink in the middle.
Pin This Recipe!
Best Pumpkin Bundt Cake with Maple Cream Cheese Glaze
This incredibly moist pumpkin bundt cake is perfectly spiced and topped with a luscious maple cream cheese glaze. It’s a showstopper for fall entertaining, made with simple pantry ingredients and a secret touch of sour cream for the ultimate tender crumb.
- Prep Time: 20 minutes
- Cook Time: 55 minutes
- Total Time: 1 hour 15 minutes
- Yield: 16 servings 1x
- Category: Dessert
- Cuisine: American
Ingredients
- 3 cups (360g) all-purpose flour
- 2 teaspoons baking soda
- 1 teaspoon baking powder
- 1 teaspoon salt
- 2 teaspoons ground cinnamon
- 1 teaspoon ground nutmeg
- ½ teaspoon ground ginger
- ¼ teaspoon ground cloves
- 1 cup (2 sticks, 226g) unsalted butter, softened
- 1 cup (200g) granulated sugar
- 1 cup (200g) packed light brown sugar
- 4 large eggs, at room temperature
- 2 teaspoons vanilla extract
- 1 can (15 oz, about 425g) canned pumpkin puree
- ½ cup (120g) sour cream, at room temperature
- 4 oz (113g) cream cheese, softened
- ¼ cup (½ stick, 57g) unsalted butter, softened
- 1½ cups (180g) powdered sugar, sifted
- 3 tablespoons pure maple syrup
- ½ teaspoon vanilla extract
- Pinch of salt
Instructions
- Preheat oven to 350°F (175°C). Generously grease a 10 to 12-cup bundt pan with butter or baking spray, then dust with flour.
- In a large bowl, whisk together flour, baking soda, baking powder, salt, cinnamon, nutmeg, ginger, and cloves. Set aside.
- In a stand mixer fitted with the paddle attachment, beat butter, granulated sugar, and brown sugar on medium speed until light and fluffy, about 3-4 minutes.
- Add eggs one at a time, beating well after each addition.
- Mix in pumpkin puree, sour cream, and vanilla extract on low speed until just combined.
- Gradually add the flour mixture in three additions, mixing on low until just incorporated. Do not overmix. Finish folding by hand if needed.
- Spoon batter into prepared bundt pan and spread evenly. Tap pan on counter to release air bubbles.
- Bake for 50-60 minutes, until a skewer inserted in the center comes out clean or with a few moist crumbs.
- Cool in pan on a wire rack for exactly 15 minutes, then invert onto rack to cool completely (about 1-2 hours).
- For the glaze: Beat cream cheese and butter until smooth. Add powdered sugar, maple syrup, vanilla, and salt; beat until smooth and glossy.
- Transfer glaze to a piping bag or zip-top bag with a snipped corner. Drizzle over cooled cake. Let set for 30 minutes before slicing.
Notes
Room temperature ingredients are crucial for best texture. Do not overmix batter. Grease bundt pan thoroughly to prevent sticking. Cake tastes even better the next day. For a dairy-free version, use vegan butter, dairy-free sour cream, and dairy-free cream cheese. For gluten-free, use a 1:1 gluten-free flour blend with xanthan gum.
Nutrition
- Serving Size: 1 slice
- Calories: 385
- Sugar: 35
- Sodium: 320
- Fat: 18
- Saturated Fat: 11
- Carbohydrates: 52
- Fiber: 1.5
- Protein: 5
Keywords: pumpkin bundt cake, maple cream cheese glaze, fall dessert, pumpkin cake, bundt cake, Thanksgiving dessert