My neighbor Mark had claimed for years that vegetable platters were a cop-out. “Just raw stuff on a plate,” he’d mutter at every potluck, bypassing the celery sticks for the spinach dip. He was a grill master, a man of smoked meats and complex reductions. I’d nod and keep my mouth shut, because honestly, I kind of agreed. A standard veggie tray always felt like an afterthought—something thrown together when the host ran out of time.
Then last October, I was tasked with bringing an appetizer to our annual block party Halloween bash. The theme was “Pumpkin Patch Potluck,” and I was stumped. I wanted to bring something that looked like I’d tried, but I also didn’t want to spend my Saturday afternoon carving a watermelon into a ghastly face. I was staring at a bag of baby carrots and a block of cream cheese, feeling completely uninspired, when my four-year-old nephew knocked over a bowl of ranch dressing onto the cutting board. In the mess, I saw it—a little orange hill, a splash of green. The Easy Halloween Pumpkin Patch Veggie Tray was born from a spill and a sigh. I didn’t tell anyone that part.
I assembled it in about fifteen minutes, arranged it on a cheap wooden board, and brought it to the party feeling a little self-conscious. Mark took one look at it, raised an eyebrow, and grabbed a pepper strip. Then another. By the end of the night, he was standing next to the tray, telling people how to build their own perfect bite. “You gotta get a little of that dip on the broccoli stem,” he was saying, “it’s the whole point.” I just smiled. This veggie tray had done what years of my polite arguments couldn’t—it proved that a vegetable platter could be the star of the show, especially when it looked like a tiny, edible pumpkin patch.
Why You’ll Love This Easy Halloween Pumpkin Patch Veggie Tray
Let’s be honest, most Halloween appetizers are sugar bombs. You have the candy corn, the frosted cookies, the cupcakes that look like eyeballs. By the time the main course rolls around, everyone is running on a sugar high and then crashing hard. This tray is your secret weapon. It gives the party a colorful, festive centerpiece that actually makes people feel good about grazing.
- Incredibly Quick to Assemble: You can put this together in under 20 minutes. Seriously. No baking, no cooking, just smart arranging. It’s the perfect last-minute recipe for when you realize the party starts in an hour.
- Uses Simple, Readily Available Ingredients: There is nothing fancy here. You can find everything at your local grocery store. No need to hunt down specialty stores or weird seasonal items.
- Perfect for Halloween Gatherings: Whether it’s a kids’ costume party, a spooky dinner party, or a casual get-together, this tray fits the theme perfectly without being overly kitschy or messy.
- A True Crowd-Pleaser: It’s a hit with both kids and adults. The fun presentation tricks people into eating more vegetables, and the creamy ranch dip is always the first thing to disappear.
- Unbelievably Delicious (and Healthy!): The combination of crunchy veggies with a cool, herby dip is classic for a reason. It’s satisfying, refreshing, and balances out all the heavy party food.
What sets this recipe apart is the visual payoff. It’s not just vegetables on a plate; it’s a scene. The “pumpkins” are adorable, the “dirt” is savory, and the whole thing feels like a tiny, edible garden party. It’s the kind of appetizer that makes people stop and take a picture before they even grab a plate. And for you, the host, it means you have one less thing to stress about. You get a gorgeous, themed platter that requires zero oven time and leaves you free to mingle.
What Ingredients You Will Need
This recipe uses a handful of everyday ingredients to create a big visual impact. The beauty is in the presentation, not the complexity of the shopping list. Here’s what you’ll need to grab to build your own pumpkin patch.
For the “Pumpkin Patch” Base
- 1 large (10-12 inch) round or oval platter: This is your “field.” A wooden board or a white platter works best to contrast with the colors.
- 1 cup of your favorite ranch dressing: This acts as the “dirt” for your pumpkins. I personally prefer a thick, homemade-style ranch for the best texture, but a good quality store-bought one works perfectly.
- Optional: 1/2 cup crushed tortilla chips or panko breadcrumbs: This adds a “mulch” texture to the ranch “dirt,” making it look more realistic. I often skip this step if I’m in a hurry, but it does add a nice crunch.
For the “Pumpkins” (The Stars of the Show)
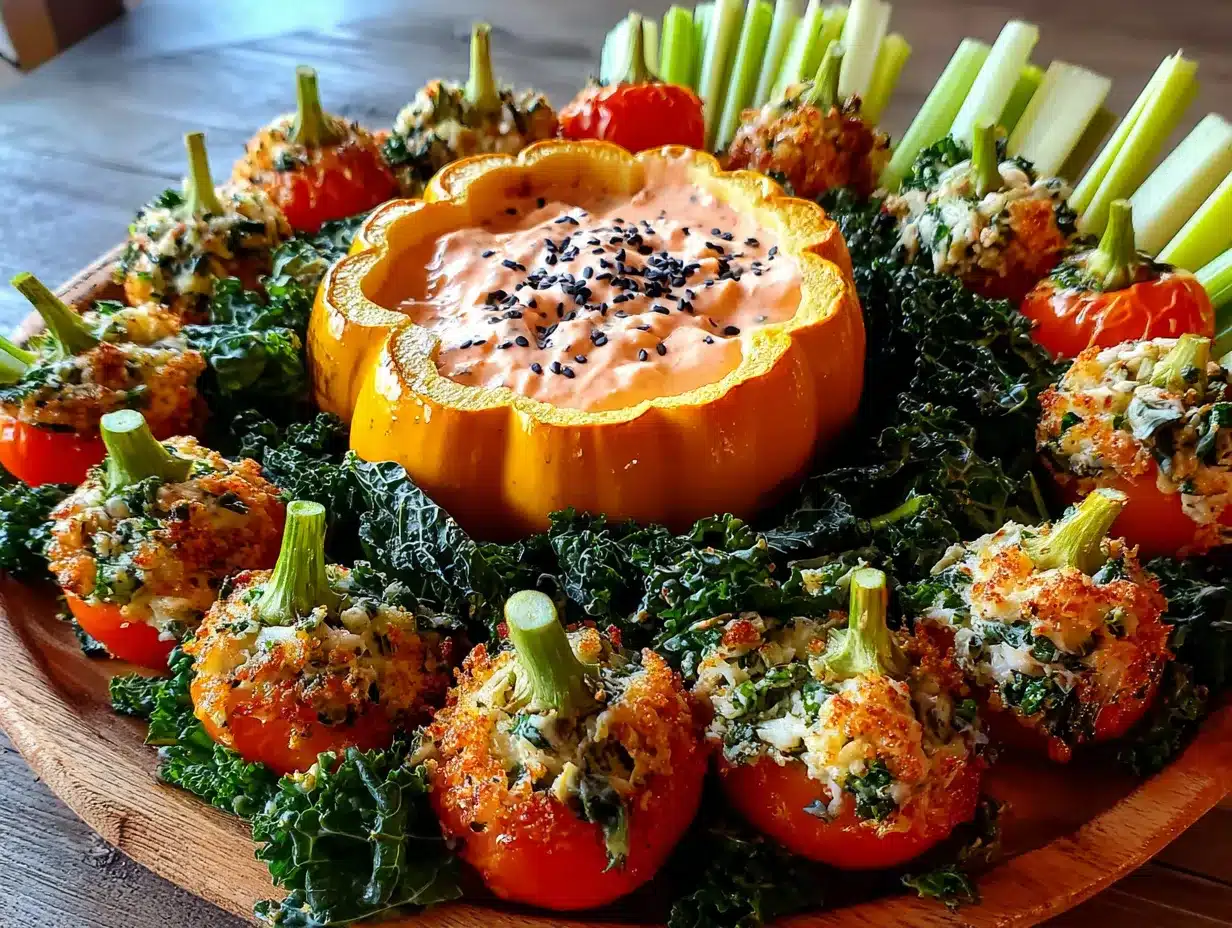
- 1 large orange bell pepper: This will be your main pumpkin. Look for one that is squat and round, not long and pointy. (A squat shape looks more like a classic pumpkin).
- 1 small orange bell pepper: For a smaller pumpkin buddy.
- 1 cup baby carrots: These will be cut to form the “pumpkin stems” and also serve as additional “fence posts” or “vines” around the patch.
- Fresh chives or green onion tops: You will need about 10-12 pieces, cut into 2-inch lengths. These become the curly pumpkin vines.
For the “Vegetable Fence” and Patch Fillers
- 1 cup broccoli florets: These represent little “bushes” or “trees” around the patch. They add great texture and a deep green color.
- 1 cup cauliflower florets: These can be little “cauliflower ghosts” or just white rocks in the patch. They offer a nice color contrast.
- 1 cup snap peas or snow peas: These are perfect for creating a “fence” around the edge of the platter. Their bright green color and flat shape are ideal.
- 1 cup cherry tomatoes: These are your “little red apples” or “berries” scattered around the patch. They add a pop of red.
- 1/2 cup cucumber slices: Cut into half-moons or rounds. They can be “fallen logs” or “stepping stones.”
Ingredient Tips and Substitutions
I’ve made this tray so many times now, and I’ve learned a few things. For the ranch, I really recommend Hidden Valley for that classic, nostalgic flavor. It’s what most people expect. If you want a healthier option, you can use a Greek yogurt-based ranch. For the orange bell peppers, try to find ones that are naturally squat and have a flat bottom—they sit much better on the platter and look more pumpkin-like. If you can’t find baby carrots, you can cut a regular carrot into 2-inch sticks. And honestly, any green vegetable works for the “bushes.” Asparagus spears or green beans are great substitutes for the snap peas.
Equipment Needed
You don’t need any fancy kitchen gadgets for this recipe, which is part of its charm. Here’s the simple toolkit you’ll need:
- Large Serving Platter: A round or oval platter is best. A wooden cutting board also looks fantastic and rustic.
- Sharp Knife: A good chef’s knife makes cutting the bell peppers and other veggies clean and easy.
- Cutting Board: For prepping your vegetables.
- Small Bowl or Ramekin: This is optional, but if you want to keep the ranch dip separate from the “dirt,” a small bowl in the center of the platter works well.
- Paper Towels: Essential for drying your vegetables. Wet veggies make the dip slide off and look messy.
If you don’t have a large platter, don’t worry! A large baking sheet lined with parchment paper works just as well. It gives it a fun, rustic “farm stand” vibe.
Preparation Method
This is the fun part. Follow these steps, and you’ll have a masterpiece in no time. The key is to build it like a landscape, starting from the back and working your way forward.
- Prep Your Veggies: Wash and thoroughly dry all your vegetables. This is the most important step! Wet veggies lead to a soggy, sad tray. Pat them dry with paper towels. Cut the broccoli and cauliflower into bite-sized florets. Slice the cucumber into rounds or half-moons. Cut the cherry tomatoes in half if they are large. Set everything aside.
- Create Your “Pumpkins”: This is the magic trick. Take your large orange bell pepper. Cut off the top (the stem end) about 1/2 inch down. Set the top aside. Carefully remove the seeds and white pith from inside the pepper. Now, take one of your baby carrots. Cut a small, 1-inch piece off the thick end. Insert this carrot piece, pointy side down, into the hole where the stem was. You now have a pumpkin with a carrot stem! Repeat this process with your smaller orange bell pepper. You can also use a yellow or red bell pepper for a “variety” pumpkin look.
- Prepare the “Vines”: Take your chives or green onion tops. Gently curl them around your finger to give them a natural, curly shape. You can also just leave them straight. You’ll place these near the base of your pumpkins.
- Assemble the “Dirt” Base: Spoon your ranch dressing onto the center of your platter. Use the back of the spoon to spread it out into a rough, uneven circle. It should look like a patch of dirt, about 6-8 inches in diameter. Don’t make it a perfect circle—pumpkin patches are organic! If you are using the crushed chips or panko, sprinkle a thin layer over the ranch now. This gives it a beautiful, textured “mulch” look.
- Place Your Pumpkins: Gently place your bell pepper pumpkins on top of the ranch “dirt.” Position them so they look like they are growing out of the patch. Nestle them in slightly so they feel grounded. Place the curly chives at the base of the pumpkins to look like vines.
- Build the “Fence”: Now, use your snap peas or snow peas to create a border around the edge of the platter. Arrange them in a single layer, slightly overlapping, like a little picket fence. This frames your pumpkin patch beautifully.
- Fill the Patch: Fill in the remaining empty space on the platter with your other vegetables. Arrange the broccoli and cauliflower florets around the edges of the ranch “dirt” to look like bushes. Scatter the cherry tomatoes around the patch as little “apples” or “berries.” Place the cucumber slices as “stepping stones” leading up to the pumpkins. Use the leftover baby carrots as “fence posts” or “fallen branches” near the snap pea fence.
- Final Touches: Step back and look at your creation. Does it need more green? Add more broccoli. Does it look too bare? Add more tomatoes. The beauty of this recipe is that it’s completely customizable. You can even add a few pretzel sticks as “fence rails” or some black olives as “rocks.” Serve immediately or cover with plastic wrap and refrigerate for up to 4 hours before serving.
Cooking Tips & Techniques
I’ve made a few mistakes with this tray so you don’t have to. Here are my best tips for a perfect pumpkin patch.
The Biggest Mistake: Wet Vegetables. I cannot stress this enough. If your veggies are wet, the ranch will slide right off, and the whole tray will look like a sad, watery mess. Take the extra minute to dry everything with a clean kitchen towel or paper towels. It makes a world of difference.
Don’t Overthink the Pumpkin Shape. You don’t have to carve a face or anything complicated. The simple act of cutting the top off a bell pepper and adding a carrot stem creates a recognizable pumpkin. The more imperfect the pepper, the more it looks like a real pumpkin from a patch. I once spent ten minutes trying to find a perfectly round pepper, and the one I ended up using was slightly lopsided—it was everyone’s favorite.
Mastering the “Dirt.” The ranch “dirt” is the anchor of your display. If you use a very runny ranch, it will spread too much and look messy. A thick, creamy ranch is your best friend. If you only have a thin dressing, you can thicken it by mixing in a little sour cream or Greek yogurt. And don’t forget the crushed chips! That extra layer of texture is what makes people say, “Wait, is that real dirt?”
Timing is Everything. You can prep all your vegetables a day in advance. Store them in a sealed container with a damp paper towel in the refrigerator. On the day of the party, all you have to do is arrange them. This is a huge time-saver when you’re juggling other dishes. I usually assemble the whole tray about an hour before guests arrive, so it’s fresh and crisp.
Variations & Adaptations
One of the best things about this recipe is how easy it is to adapt. Here are a few ways to make it your own.
Dietary Adaptations: To make this recipe vegan or dairy-free, simply use a plant-based ranch dressing. There are some excellent options available now. For a gluten-free version, just make sure your ranch is certified gluten-free, and skip the panko breadcrumbs (use crushed corn chips instead for the “mulch”).
Flavor Variations: Instead of classic ranch, try a different dip! A creamy dill dip, a roasted red pepper hummus, or a spicy chipotle ranch would all be incredible. The “dirt” can be any color or flavor you like. I once made a version with a green goddess dip as the “moss,” and it was a huge hit.
Seasonal Twists: While this is perfect for Halloween, you can adapt it for any fall gathering. For Thanksgiving, use a pumpkin-shaped platter and add some “fall leaves” by using red and yellow bell pepper strips. You can even swap the ranch for a warm butternut squash dip for a cozier feel.
Personal Variation: My personal favorite twist is to add a “scarecrow.” I use a pretzel stick for the body, a small round cracker for the head, and a few strips of yellow bell pepper for the straw hair. It’s a silly little addition, but it always makes the kids (and the adults) smile.
Serving & Storage Suggestions
This tray is best served cold and fresh. The crunch of the vegetables is the star of the show.
Serving Temperature and Presentation: Serve the tray directly from the refrigerator. The cold vegetables contrast beautifully with the creamy dip. I like to place the platter on a slightly elevated surface, like a cake stand, so it becomes a centerpiece. You can garnish the edges of the platter with a few extra fresh herbs like parsley or dill for a pop of green.
Complementary Dishes: This veggie tray pairs perfectly with other Halloween party foods. It’s a great counterpoint to spicy chili, cheesy pizza, or rich, creamy dips. It also works wonderfully alongside a platter of spooky sandwiches (like “mummy” wraps) or a bowl of popcorn “brains.”
Storage Instructions: If you have leftovers (which is rare!), you can store the vegetables in an airtight container in the refrigerator for up to 2 days. The ranch dip should be stored separately. I do not recommend freezing this tray, as the vegetables will become limp and watery upon thawing.
Reheating: This is a cold appetizer, so no reheating is needed! The flavors actually get a little better after an hour in the fridge as the dip chills and thickens. If you’ve made the dip ahead of time, just give it a quick stir before serving.
Nutritional Information & Benefits
This is one of the healthier options on a Halloween party table, and that’s a good thing! Here’s a quick look at what you’re getting.
Estimated Nutritional Values (per serving, based on 1/8 of the tray): Calories: 120, Fat: 8g, Carbohydrates: 10g, Fiber: 3g, Protein: 3g. (Note: This varies based on the type of ranch and vegetables used).
Health Benefits: This tray is packed with vitamins and fiber. Bell peppers are an excellent source of Vitamin C. Broccoli is rich in Vitamin K and antioxidants. Carrots are famous for their beta-carotene, which is great for eye health. The fiber from all the vegetables will help keep you feeling full and satisfied, which is a lifesaver when you’re surrounded by sugary treats.
Dietary Considerations: This recipe is naturally low in calories and can be easily adapted to be vegan, gluten-free, and dairy-free. It is a great option for guests with dietary restrictions. The main potential allergen is dairy in the ranch dressing, but this is easily swapped.
Personal Wellness Perspective: I love having this tray at my Halloween party because it gives people a guilt-free option. It allows everyone to graze and socialize without feeling like they’ve overdone it on the sugar. It’s a little bit of balance in a sea of candy, and honestly, my body thanks me for it the next day.
Conclusion
This Easy Halloween Pumpkin Patch Veggie Tray is more than just a pretty face. It’s a practical, delicious, and genuinely fun way to serve vegetables at your next Halloween gathering. It takes almost no time to put together, uses ingredients you can find anywhere, and it always, always gets a reaction. It’s the kind of recipe that makes you look like a creative genius without any of the stress.
I encourage you to make this your own. Play with the vegetables, change up the dip, add your own little touches. Whether you build a tiny fence out of snap peas or add a little pretzel scarecrow, the joy is in the process. It’s a reminder that sometimes the best party food doesn’t come from a complicated recipe—it comes from a little bit of imagination and a willingness to have fun with your food.
So go ahead, grab a bell pepper and some baby carrots, and build your own pumpkin patch. I promise, it will be the most talked-about dish at the party. And if you make it, I’d love to see your creation! Leave a comment below and tell me how your guests reacted. Did they get tricked into eating their veggies? Happy Halloween, and happy snacking!
Frequently Asked Questions
Can I make this veggie tray the night before?
Yes, you can prep all the vegetables the night before. Wash, dry, and cut them, and store them in an airtight container in the fridge. I recommend assembling the tray no more than 4-6 hours before serving to keep the vegetables crisp and the dip fresh.
What if I can’t find orange bell peppers?
No problem at all! You can use any color of bell pepper. Red, yellow, or even green peppers will work. They just won’t look like classic orange pumpkins. You could call them “ghost pumpkins” (for white/yellow) or “heirloom pumpkins” (for red/green).
Can I use a different dip instead of ranch?
Absolutely! This is one of the easiest parts to customize. Hummus, a creamy dill dip, a roasted red pepper dip, or even a spinach artichoke dip would all be fantastic. Just make sure the dip is thick enough to hold the “mulch” topping if you are using one.
How do I keep the vegetables from sliding off the platter?
Make sure your platter is completely dry before you start. The “dirt” (ranch dip) acts as a natural anchor for the bell pepper pumpkins. For the other vegetables, a dry platter surface and dry vegetables will help them stay put. If things are still sliding, you can place a small bed of lettuce leaves under the vegetables for extra grip.
Is this recipe kid-friendly to make?
Yes, it’s a fantastic recipe to make with kids! They can help wash the vegetables, arrange the “fence,” and place the “pumpkins” in the “dirt.” It’s a great way to get them excited about eating vegetables. Just be sure an adult handles the knife work for cutting the bell peppers.
Pin This Recipe!

Easy Halloween Pumpkin Patch Veggie Tray: Best Party Appetizer
This Easy Halloween Pumpkin Patch Veggie Tray is a fun, festive, and healthy appetizer that looks like a tiny edible pumpkin patch. It’s quick to assemble with simple ingredients and is a guaranteed crowd-pleaser for any Halloween gathering.
- Prep Time: 15 minutes
- Cook Time: 0 minutes
- Total Time: 15 minutes
- Yield: 8 servings 1x
- Category: Appetizer
- Cuisine: American
Ingredients
- 1 large (10-12 inch) round or oval platter
- 1 cup ranch dressing
- 1/2 cup crushed tortilla chips or panko breadcrumbs (optional)
- 1 large orange bell pepper
- 1 small orange bell pepper
- 1 cup baby carrots
- 10–12 fresh chives or green onion tops, cut into 2-inch lengths
- 1 cup broccoli florets
- 1 cup cauliflower florets
- 1 cup snap peas or snow peas
- 1 cup cherry tomatoes
- 1/2 cup cucumber slices
Instructions
- Wash and thoroughly dry all vegetables. Cut broccoli and cauliflower into bite-sized florets. Slice cucumber into rounds or half-moons. Cut cherry tomatoes in half if large. Set aside.
- Create the ‘pumpkins’: Cut the top off the large orange bell pepper about 1/2 inch down. Remove seeds and white pith. Cut a 1-inch piece from the thick end of a baby carrot and insert it pointy side down into the hole where the stem was. Repeat with the small orange bell pepper.
- Prepare the ‘vines’: Gently curl chives or green onion tops around your finger to create curly shapes, or leave them straight.
- Assemble the ‘dirt’ base: Spoon ranch dressing onto the center of the platter and spread into a rough, uneven circle about 6-8 inches in diameter. If using, sprinkle crushed chips or panko over the ranch.
- Place the bell pepper pumpkins on top of the ranch ‘dirt,’ nestling them in slightly. Place curly chives at the base of the pumpkins for vines.
- Build the ‘fence’: Arrange snap peas or snow peas in a single layer around the edge of the platter, slightly overlapping, to create a border.
- Fill the patch: Arrange broccoli and cauliflower florets around the edges of the ranch ‘dirt’ as bushes. Scatter cherry tomatoes as little ‘apples’ or ‘berries.’ Place cucumber slices as ‘stepping stones.’ Use leftover baby carrots as ‘fence posts’ or ‘fallen branches.’
- Step back and adjust as needed. Serve immediately or cover with plastic wrap and refrigerate for up to 4 hours before serving.
Notes
Dry vegetables thoroughly to prevent soggy tray. Use thick, creamy ranch for best ‘dirt’ texture. Prep vegetables a day in advance to save time. Customize with different dips or vegetables.
Nutrition
- Serving Size: 1/8 of tray
- Calories: 120
- Sugar: 4
- Sodium: 280
- Fat: 8
- Saturated Fat: 1.5
- Carbohydrates: 10
- Fiber: 3
- Protein: 3
Keywords: Halloween appetizer, veggie tray, pumpkin patch, party food, healthy snack, vegetable platter, easy recipe


