Dropping a full bag of chocolate chips on the floor at 4 PM on a Friday, three kids underfoot, and a classroom Halloween party starting in less than twelve hours. Honestly, that moment felt like a personal attack from the universe. I needed something fast, foolproof, and frankly, a little bit creepy. Store-bought treats felt like a cop-out, but I didn’t have the time or the patience for a multi-layer, fondant-covered masterpiece. So I stood there, staring at the spilled chocolate, and the idea hit me: the easiest brownie batter I know, baked until perfectly fudgy, and then—the fun part. A little frosting, a candy eyeball, and suddenly you have a pan of adorable little monsters that took almost zero effort.
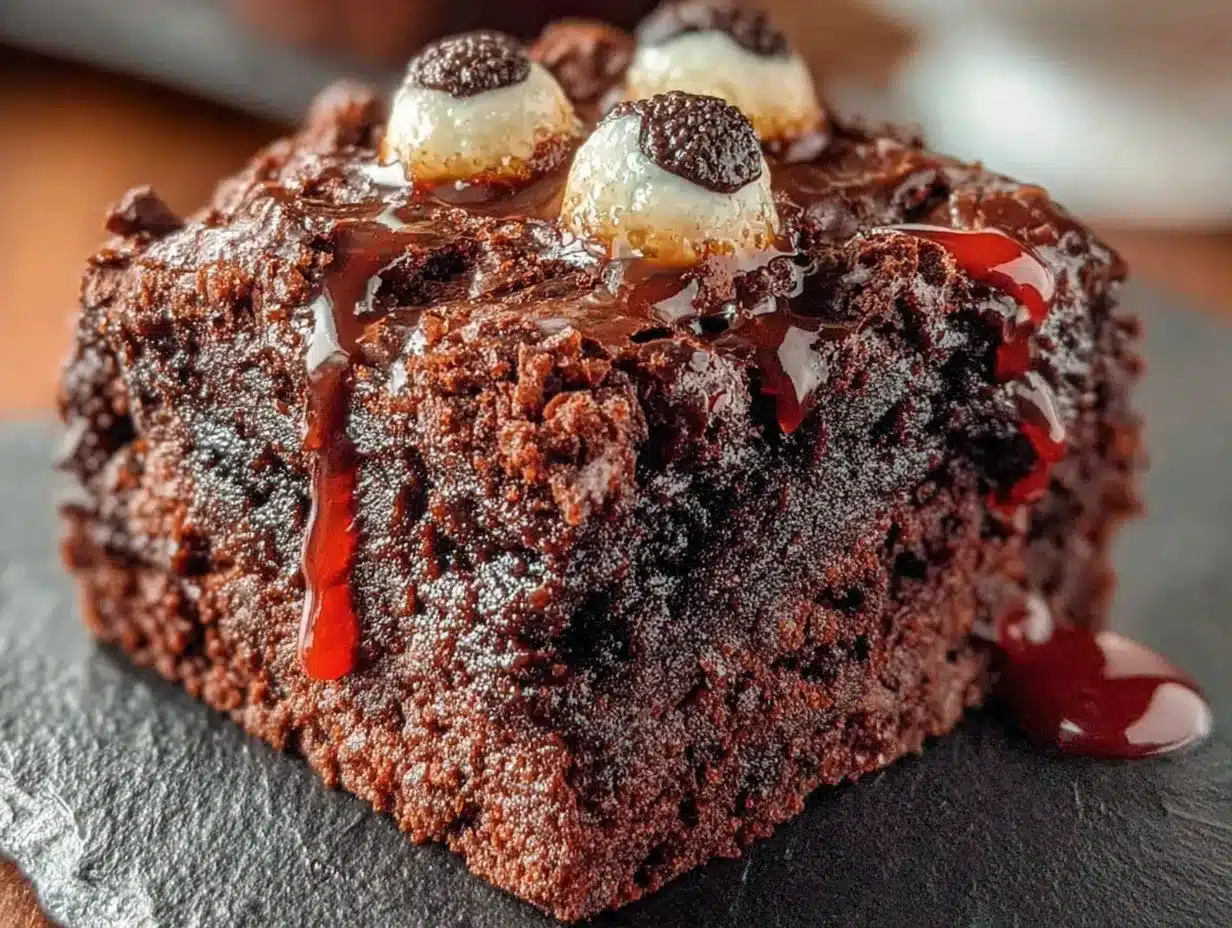
These spooky easy Halloween brownies with candy eyeball toppers are my secret weapon for every October event. They look like you spent hours piping and decorating, but the truth is, a kid could do it (and probably should—it keeps them busy for a solid twenty minutes). The brownie itself is that perfect middle ground: rich, dark, and intensely chocolatey, but not so dense it feels like you’re eating a truffle. It’s a brownie that holds its shape when you cut it, which is non-negotiable when you’re dealing with little fingers grabbing for the one with the most eyeballs.
I’ve made these for school bake sales, after-school snack attacks, and even a grown-up Halloween movie night where we pretended we were just there for the kids. Every single time, they disappear before the regular brownies. There’s just something about a food staring back at you that makes it impossible to resist. This isn’t a recipe that needs a lot of fussing. It’s the one you pull out when you want to be the hero of the party without actually breaking a sweat. Trust me on this one.
Why You’ll Love This Recipe
Let’s be real—most Halloween treats are either too complicated or taste like cardboard. These brownies fix both problems. I’ve tested this batter more times than I can count, tweaking the fat-to-flour ratio until I got that crackly top and gooey center that makes everyone close their eyes on the first bite. This isn’t just another recipe I found online; it’s the one I’ve settled on after years of trial and error, and I’m pretty possessive about it.
- Quick & Easy: From start to finish, you’re looking at about 35 minutes. The batter comes together in one bowl with a whisk—no stand mixer required. Perfect for those last-minute “I forgot the class party is tomorrow” moments.
- Simple Ingredients: You probably have everything in your pantry right now. Butter, sugar, eggs, cocoa powder, flour—that’s it. No weird extracts, no specialty flours, nothing that requires a trip to a specialty store.
- Perfect for Halloween Parties: Whether it’s a school celebration, a trunk-or-treat event, or just a cozy night watching Hocus Pocus, these brownies fit the bill. They’re portable, easy to serve, and the eyeball toppers make them instantly festive.
- Crowd-Pleaser: Kids go absolutely nuts for the candy eyeballs, and adults appreciate that the brownie itself is legitimately delicious. It’s a rare recipe that satisfies both groups equally.
- Unbelievably Delicious: The texture is that perfect balance between fudgy and cakey, with a paper-thin crackly top that shatters when you bite into it. The deep chocolate flavor comes from using both melted chocolate and cocoa powder—a trick I picked up from a pastry chef friend who swore by it.
What makes this different from the other Halloween brownie recipes out there is the frosting. It’s not a thick, overly sweet buttercream that overpowers the chocolate. Instead, it’s a thin, glossy glaze that sets up just enough to hold the eyeballs in place without being a whole separate project. It’s the kind of detail that makes you look like you know what you’re doing, even if you’re just having fun.
What Ingredients You Will Need
This recipe uses simple, everyday ingredients to create something that feels special. The magic is in the technique, not the grocery list. Here’s what you’ll need to gather before you start.
- For the Brownie Base:
- 1/2 cup (113g) unsalted butter — Use good quality butter here; it’s the backbone of the flavor. I prefer Kerrygold or Plugrà for their higher fat content, which makes the brownies richer. Cut it into chunks so it melts evenly.
- 1 cup (200g) granulated sugar — Regular white sugar works perfectly. It dissolves into the butter and eggs to create that signature crackly top. Don’t substitute with brown sugar here—it changes the texture too much.
- 2 large eggs, room temperature — Cold eggs will seize the melted butter mixture. If you forget to take them out of the fridge, place them in a bowl of warm water for five minutes. It really does make a difference in how the batter comes together.
- 1 teaspoon vanilla extract — Pure vanilla extract adds depth. Imitation works in a pinch, but the real stuff is worth the splurge for that warm, aromatic note.
- 1/3 cup (28g) unsweetened cocoa powder — I use Dutch-processed cocoa here because it’s darker and less acidic, which gives the brownies a more intense chocolate flavor. Ghirardelli is my go-to brand for consistent results.
- 1/2 cup (63g) all-purpose flour — Spoon and level your flour into the measuring cup. Scooping directly from the bag packs it down and you’ll end up with dry, cakey brownies. No one wants that.
- 1/4 teaspoon salt — Don’t skip this. Salt balances the sweetness and makes the chocolate taste more chocolatey. I use fine sea salt for even distribution.
- 1/2 cup (90g) semi-sweet chocolate chips (optional but recommended) — These melt into the batter and create pockets of gooey chocolate. I fold them in at the very end so they don’t sink to the bottom.
- For the Spooky Toppers:
- 1 cup (120g) powdered sugar — Sift it if it’s lumpy. Nobody wants a lumpy frosting on their monster brownie.
- 2-3 tablespoons milk — Start with two tablespoons and add more if needed. You’re looking for a consistency that’s thick but pourable, like heavy cream.
- 1/2 teaspoon vanilla extract — Same as above, pure is better.
- 1-2 drops black or orange food coloring (optional) — I usually leave the glaze white for a ghostly look, but a few drops of orange make them feel more festive. Gel food coloring works best because it doesn’t thin out the glaze.
- 1 bag (about 50 pieces) candy eyeballs — These are widely available at craft stores, grocery stores, and online. Wilton makes a good version that sticks well to the glaze. You can also use candy melts or M&Ms if you can’t find the eyeballs, but the eyes really sell the spooky effect.
- Black decorating gel (optional) — For drawing little mouths or spider legs on the brownies. It’s totally optional but adds a lot of personality.
Equipment Needed
You don’t need a professional bakery setup for this. Here’s what you’ll actually use.
- 8×8-inch baking pan — This is the perfect size for a thick, fudgy brownie. A 9×9 will work, but the brownies will be thinner and bake faster. Line it with parchment paper, leaving some overhang on two sides, so you can lift the whole block out easily.
- Mixing bowls — One large bowl for the brownie batter and one small bowl for the glaze.
- Whisk — A sturdy whisk is better than a hand mixer here. You want to incorporate air without overmixing.
- Rubber spatula — For folding in the chocolate chips and scraping every last bit of batter into the pan. I’m partial to the one-piece silicone spatulas that don’t have a seam.
- Parchment paper — Non-negotiable. It prevents sticking and makes cleanup a breeze. I’ve tried buttering and flouring the pan, and I always end up with a stuck corner.
- Cooling rack — Letting the brownies cool completely in the pan before cutting is crucial. A cooling rack helps them cool evenly and prevents a soggy bottom.
- Small offset spatula or butter knife — For spreading the glaze. An offset spatula gives you more control, but a regular butter knife works fine.
If you don’t have an 8×8 pan, you can use a 9-inch round cake pan and adjust the baking time by about 5 minutes. I once made these in a disposable aluminum pan for a camping trip, and they turned out great—just watch the edges so they don’t burn.
Preparation Method
Let’s get into the actual making of these spooky easy Halloween brownies with candy eyeball toppers. The steps are straightforward, but I’ve included some notes from my own kitchen disasters so you can avoid the same mistakes.
- Preheat and Prep: Preheat your oven to 350°F (175°C). Line your 8×8 baking pan with parchment paper, leaving about 2 inches of overhang on two opposite sides. This creates handles that let you lift the entire brownie block out later. Lightly spray the parchment with non-stick spray just to be safe.
- Melt the Butter: In a large microwave-safe bowl, melt the butter in 30-second intervals, stirring between each, until it’s fully liquid. Don’t let it boil—you just want it melted. If you prefer the stovetop, melt it in a small saucepan over low heat, then pour it into your mixing bowl.
- Mix Sugar and Butter: Add the granulated sugar to the melted butter and whisk vigorously for about 1 minute. The mixture should look glossy and slightly thickened. This step is important because it starts the process of dissolving the sugar, which helps create that crackly top.
- Add Eggs and Vanilla: Crack the eggs into a separate small bowl first (this way you avoid shell pieces in your batter). Add them to the butter-sugar mixture along with the vanilla extract. Whisk for another 30-45 seconds until everything is well combined and the batter looks smooth and slightly lighter in color.
- Combine Dry Ingredients: In a separate small bowl, whisk together the cocoa powder, all-purpose flour, and salt. This ensures the cocoa is evenly distributed and you don’t end up with pockets of dry powder in your batter.
- Fold Dry into Wet: Pour the dry ingredients into the wet mixture. Use a rubber spatula to fold everything together gently. Stop as soon as you no longer see streaks of flour. Overmixing at this stage develops gluten and gives you tough, cakey brownies. We want fudgy.
- Add Chocolate Chips: Fold in the semi-sweet chocolate chips until they’re evenly distributed. The batter will be thick and glossy—that’s exactly what you want.
- Bake: Pour the batter into the prepared pan and spread it into an even layer with your spatula. Bake for 22-25 minutes. The brownies are done when the edges are set and the top looks dry and crackly, but the center still jiggles slightly when you shake the pan. A toothpick inserted into the center should come out with a few moist crumbs attached—not wet batter. My oven runs hot, so I start checking at 20 minutes.
- Cool Completely: Place the pan on a cooling rack and let the brownies cool completely in the pan. This is the hardest part of the recipe, I know. But if you try to cut them while they’re warm, you’ll end up with a crumbly mess. Patience pays off here.
- Make the Glaze: While the brownies cool, make the glaze. In a small bowl, whisk together the powdered sugar, 2 tablespoons of milk, and vanilla extract. If it’s too thick, add another teaspoon of milk. If it’s too thin, add a little more powdered sugar. You want it thick enough to coat the back of a spoon but still pourable. Add your food coloring if using.
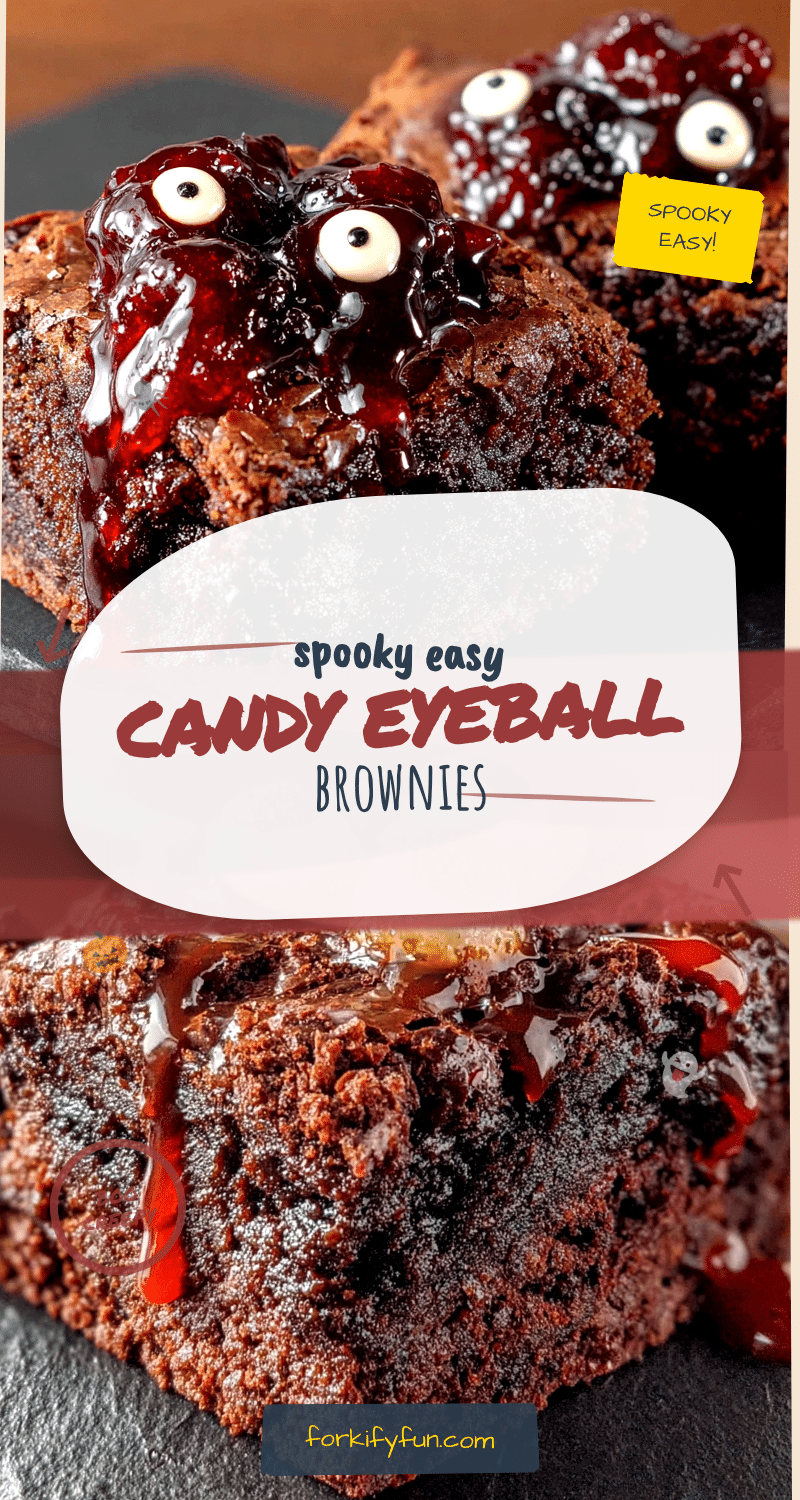
- Glaze and Decorate: Once the brownies are completely cool, lift them out of the pan using the parchment handles. Place the block on a cutting board. Spread the glaze evenly over the top using your offset spatula or butter knife. While the glaze is still wet, press the candy eyeballs into the glaze. I like to arrange them in random patterns—some looking up, some looking sideways, some clustered together for a multi-eyed monster effect. Work quickly because the glaze sets fast.
- Cut and Serve: Let the glaze set for about 15 minutes before cutting. Use a sharp chef’s knife to cut the brownies into squares. Wipe the knife clean between cuts for neat edges. I usually get 16 perfect squares from an 8×8 pan.
Cooking Tips & Techniques
I’ve made these spooky easy Halloween brownies with candy eyeball toppers at least a dozen times, and I’ve learned a few things the hard way. Here are the tips that actually matter.
Don’t Overbake. This is the number one mistake people make with brownies. They see the center looks soft and they panic, leaving them in the oven for another five minutes. By then, the edges are dry and the texture is more cake than fudge. Trust the jiggle test. If the center wobbles when you shake the pan, they’re done. The residual heat will finish cooking the center as they cool.
Use Room Temperature Eggs. I know I said this already, but it’s worth repeating. Cold eggs will seize the melted butter into little clumps, and you’ll end up with a greasy, uneven batter. If you forget to set them out, place them in a bowl of warm water for 5-7 minutes. It works every time.
Line Your Pan Properly. The parchment paper overhang is not optional. I tried skipping it once because I was out of parchment, and I spent twenty minutes chiseling brownie corners out of the pan. Just use the paper.
Cutting Clean Lines. For the cleanest cuts, use a long, sharp knife and wipe it clean with a damp paper towel between each slice. If the glaze cracks or drags, run the knife under hot water, dry it off, and try again. The heat helps the blade glide through the glaze without pulling it.
Glaze Consistency is Key. If your glaze is too thin, it will run off the edges of the brownies and pool on the cutting board. If it’s too thick, it won’t spread evenly and the eyeballs won’t stick. Aim for a consistency that’s similar to honey—thick but pourable. If you accidentally make it too thin, whisk in a tablespoon of powdered sugar to thicken it up.
Work in Batches. If you’re making these for a big party, double the recipe and use a 9×13 pan. Bake for 28-32 minutes, and use the same toothpick test. You’ll need more eyeballs, obviously, but the process is exactly the same.
Variations & Adaptations
One of the best things about this recipe is how easy it is to customize. Here are a few ways I’ve adapted it over the years.
- Gluten-Free Version: Substitute the all-purpose flour with a 1:1 gluten-free baking flour blend. I use Bob’s Red Mill or King Arthur’s measure-for-measure blend. The texture will be slightly more delicate, but the flavor is identical. Don’t use almond flour or coconut flour—they absorb moisture differently and will change the texture completely.
- Dairy-Free Option: Use a high-quality vegan butter stick (like Miyoko’s or Country Crock Plant Butter) and a dairy-free milk alternative in the glaze. Oat milk works best because it’s thick and creamy. The brownies will be slightly less rich, but still delicious. I’ve also used coconut oil in place of butter, but the flavor changes noticeably—use refined coconut oil if you don’t want a coconut taste.
- Peppermint Chocolate Brownies: Add 1/2 teaspoon of peppermint extract to the brownie batter along with the vanilla. Top the finished brownies with crushed candy canes or peppermint candies along with the eyeballs. It’s a great Christmas twist on the Halloween theme.
- Spider Web Brownies: Instead of spreading the glaze evenly, drizzle it in concentric circles and drag a toothpick from the center outward to create a spider web pattern. Place a single candy eyeball in the center of each web. It takes an extra minute but looks incredibly impressive.
- Nutella Swirl: Drop spoonfuls of Nutella on top of the brownie batter before baking and swirl it with a knife. The hazelnut chocolate pairs beautifully with the fudgy brownie base. Just don’t over-swirl or you’ll lose the marbled effect.
I once made a batch with white chocolate chips instead of semi-sweet for a friend who doesn’t like dark chocolate. They were sweeter, obviously, but still really good. The white chocolate chips stayed soft and creamy in the baked brownies, which was a nice contrast to the fudgy texture.
Serving & Storage Suggestions
These brownies are best served at room temperature, but they’re also delicious straight from the fridge if you like a denser, almost truffle-like texture. I usually cut them into 16 squares and arrange them on a platter with the eyeballs facing up so everyone can see the faces. For a Halloween party, I’ll serve them alongside a bowl of popcorn and some creamy pumpkin cold foam iced latte with Halloween cinnamon sprinkles for a full spooky spread.
They pair surprisingly well with salty snacks. The sweetness of the brownies cuts through the saltiness of pretzels or popcorn, making for a perfect flavor contrast. If you’re serving them at a potluck, I recommend placing them on a cake stand so they’re the center of attention—they really do look that good.
Storage: Store leftover brownies in an airtight container at room temperature for up to 4 days. The glaze will soften slightly over time, but the flavor actually improves after a day as the chocolate deepens. If you stack them, place a piece of parchment paper between layers to prevent the eyeballs from sticking to each other.
Freezing: These brownies freeze beautifully. Once they’re completely cool and glazed, place them on a baking sheet in a single layer and freeze for 1 hour. Transfer the frozen brownies to a freezer-safe bag or container, separating layers with parchment paper. They’ll keep for up to 3 months. To thaw, let them sit at room temperature for about 30 minutes. The glaze might lose a little of its shine, but the texture of the brownie stays perfect.
Reheating: If you want a warm, gooey brownie, microwave a single square for 10-15 seconds. The chocolate chips will melt slightly, and the texture becomes almost lava cake-like. Just don’t overdo it, or the glaze will melt off.
Nutritional Information & Benefits
Let’s be honest—brownies are a treat, not a health food. But that doesn’t mean they can’t fit into a balanced lifestyle. Here’s the estimated nutritional breakdown for one brownie (based on 16 servings).
| Nutrient | Amount per Serving |
|---|---|
| Calories | 195 |
| Total Fat | 10g |
| Saturated Fat | 6g |
| Cholesterol | 40mg |
| Sodium | 85mg |
| Total Carbohydrates | 27g |
| Dietary Fiber | 1g |
| Sugars | 20g |
| Protein | 3g |
Dark chocolate and cocoa powder are rich in antioxidants called flavonoids, which have been linked to heart health and improved blood flow. The eggs provide a small amount of protein and essential amino acids. And honestly, sometimes the mental health benefit of eating a delicious, fun treat with your kids is just as important as the nutritional numbers. I’m a firm believer in balance—enjoy the brownies, and don’t feel guilty about it.
If you’re looking for a slightly healthier option, you can reduce the sugar to 3/4 cup without dramatically changing the texture. The brownies will be less sweet, but the chocolate flavor will be more pronounced. I’ve tried it, and it works well.
Conclusion
These spooky easy Halloween brownies with candy eyeball toppers are the kind of recipe that makes you look like a hero with almost zero effort. The brownie itself is rich, fudgy, and deeply chocolatey, while the glaze and candy eyeballs turn them into little monsters that kids and adults can’t resist. They’re perfect for classroom parties, Halloween gatherings, or just a fun afternoon baking project with the family.
I love this recipe because it’s forgiving. You don’t need to be a pastry chef to get perfect results. The batter comes together in one bowl, the baking time is short, and the decorating is genuinely fun. My kids fight over who gets to place the eyeballs, and I love watching them arrange the faces in different expressions. It’s one of those rare recipes that brings everyone into the kitchen together.
If you make these brownies, I’d love to hear about it. Leave a comment below and tell me how you decorated yours—did you go for a single giant eyeball on each square, or did you create multi-eyed monsters? Share your photos on Pinterest and tag me so I can see your creations. And if you end up with extra candy eyeballs (which always happens), you can use them to top perfect black velvet Halloween cupcakes with easy spider web frosting or even cozy brown butter snickerdoodle blondies for a different kind of spooky treat. Happy Halloween, and happy baking!
Frequently Asked Questions
Can I use a boxed brownie mix instead of making from scratch?
Absolutely. If you’re short on time, a boxed mix works perfectly. Just follow the package instructions for fudgy brownies (usually using oil and eggs, but not water). The glaze and candy eyeballs will still make them look homemade. I’ve done this before when I was really rushed, and nobody knew the difference.
How far in advance can I make these brownies?
You can make the brownies up to 2 days ahead of time and store them in an airtight container at room temperature. Add the glaze and candy eyeballs the day you plan to serve them. The glaze sets best when it’s fresh, and the eyeballs stay brighter and more secure. If you need to make them further ahead, freeze the unglazed brownies and add the glaze after thawing.
My glaze turned out too thin. Can I fix it?
Yes, easily. Just whisk in an additional tablespoon of powdered sugar at a time until it thickens to the right consistency. If it’s too thick, add a few drops of milk. The glaze should be thick enough to coat the back of a spoon but still pourable. If it runs off the brownies completely, it’s too thin.
Can I use different types of candy for the toppers?
Definitely. If you can’t find candy eyeballs, you can use M&Ms, candy melts, chocolate chips, or even small gummy worms. For a different spooky look, try pressing a pretzel stick into each brownie for a “bone” or using orange and black sprinkles. The possibilities are endless, and that’s part of the fun.
How do I keep the brownies from sticking to the knife when cutting?
Use a sharp chef’s knife and wipe it clean with a damp paper towel between each cut. For even cleaner cuts, run the knife under hot water, dry it off, and slice while the blade is warm. The heat helps the knife glide through the glaze without dragging or cracking it. Let the brownies cool completely before cutting—warm brownies will crumble and stick to everything.
Pin This Recipe!
Easy Halloween Brownies with Candy Eyeballs: Best Spooky Treat
These spooky easy Halloween brownies with candy eyeball toppers are rich, fudgy, and deeply chocolatey, topped with a simple glaze and candy eyeballs for a fun, festive treat that looks like you spent hours decorating but comes together in about 35 minutes.
- Prep Time: 10 minutes
- Cook Time: 25 minutes
- Total Time: 35 minutes
- Yield: 16 servings 1x
- Category: Dessert
- Cuisine: American
Ingredients
- 1/2 cup (113g) unsalted butter
- 1 cup (200g) granulated sugar
- 2 large eggs, room temperature
- 1 teaspoon vanilla extract
- 1/3 cup (28g) unsweetened cocoa powder (Dutch-processed recommended)
- 1/2 cup (63g) all-purpose flour
- 1/4 teaspoon salt
- 1/2 cup (90g) semi-sweet chocolate chips (optional but recommended)
- 1 cup (120g) powdered sugar
- 2–3 tablespoons milk
- 1/2 teaspoon vanilla extract
- 1–2 drops black or orange food coloring (optional)
- 1 bag (about 50 pieces) candy eyeballs
- Black decorating gel (optional)
Instructions
- Preheat oven to 350°F (175°C). Line an 8×8-inch baking pan with parchment paper, leaving about 2 inches of overhang on two opposite sides. Lightly spray with non-stick spray.
- In a large microwave-safe bowl, melt the butter in 30-second intervals, stirring between each, until fully liquid. Do not let it boil.
- Add the granulated sugar to the melted butter and whisk vigorously for about 1 minute until glossy and slightly thickened.
- Add the eggs and vanilla extract. Whisk for 30-45 seconds until well combined and smooth.
- In a separate small bowl, whisk together the cocoa powder, all-purpose flour, and salt.
- Pour the dry ingredients into the wet mixture. Use a rubber spatula to fold gently until just combined. Do not overmix.
- Fold in the semi-sweet chocolate chips until evenly distributed.
- Pour the batter into the prepared pan and spread into an even layer. Bake for 22-25 minutes. The brownies are done when the edges are set and the top looks dry and crackly, but the center still jiggles slightly. A toothpick inserted into the center should come out with a few moist crumbs.
- Place the pan on a cooling rack and let the brownies cool completely in the pan.
- While the brownies cool, make the glaze: In a small bowl, whisk together the powdered sugar, 2 tablespoons of milk, and vanilla extract. Add more milk if too thick, or more powdered sugar if too thin. Add food coloring if desired.
- Once the brownies are completely cool, lift them out of the pan using the parchment handles. Place on a cutting board. Spread the glaze evenly over the top. While the glaze is still wet, press the candy eyeballs into the glaze in random patterns.
- Let the glaze set for about 15 minutes before cutting. Use a sharp chef’s knife to cut into 16 squares, wiping the knife clean between cuts.
Notes
Don’t overbake; the center should jiggle slightly. Use room temperature eggs to prevent the butter from seizing. Line the pan with parchment paper for easy removal. For clean cuts, wipe the knife between slices. The glaze should be thick but pourable, like honey. If making ahead, store unglazed brownies and add glaze the day of serving.
Nutrition
- Serving Size: 1 brownie
- Calories: 195
- Sugar: 20
- Sodium: 85
- Fat: 10
- Saturated Fat: 6
- Carbohydrates: 27
- Fiber: 1
- Protein: 3
Keywords: Halloween brownies, candy eyeballs, spooky treats, easy brownies, fudgy brownies, Halloween dessert, kid-friendly