My sister showed up at my door with a bag of candy corn and a panicked look. “I signed up for the neighborhood Halloween party and I have nothing to bring that isn’t just a bag of chips.” She waved the candy corn at me like it was a magic wand. And honestly? It kind of was.
I had a block of cream cheese in the fridge, some cheddar I was saving for nachos, and a bag of pretzel sticks that were dangerously close to stale. The clock was ticking—we had maybe an hour before the party started. So I did what any slightly chaotic home cook would do. I started arranging things on a board and hoping it looked intentional.
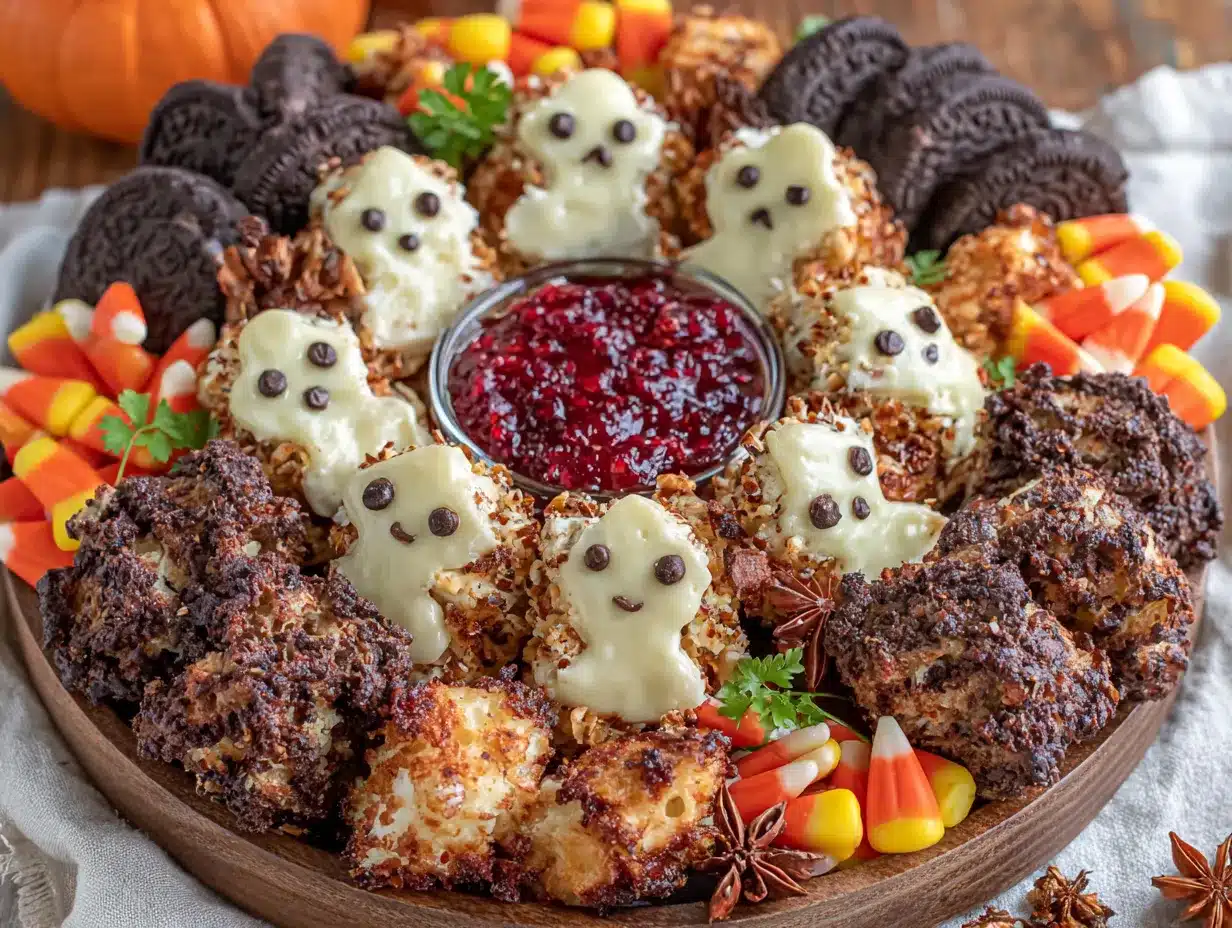
That’s how this Spooky Halloween Charcuterie Board with Candy Corn and Cheese Ghosts was born. Not from a carefully planned recipe testing session, but from sheer panic and a willingness to make cream cheese look like a ghost. And you know what? It was the first thing to disappear at that party. People couldn’t stop talking about the little cheese ghosts staring up at them from the board. There’s something deeply satisfying about watching grown adults giggle over a piece of cheese shaped like a ghost.
This isn’t one of those complicated charcuterie boards that takes hours and a second mortgage to assemble. It’s the kind of board that looks like you spent way more effort than you actually did. And honestly? That’s my favorite kind of recipe.
Why You’ll Love This Recipe
I’ve made this board for three Halloweens in a row now, and it never gets old. Here’s why this Spooky Halloween Charcuterie Board with Candy Corn and Cheese Ghosts has become my go-to for every spooky gathering:
- No Cooking Required : Zero oven time. Zero stovetop time. Just arranging and snacking. Perfect for when you’re already stressed about costumes and decorations.
- Comes Together in 20 Minutes : I timed myself last year. From fridge to finished board in 18 minutes flat. That includes shaping the cheese ghosts.
- Kid-Approved and Adult-Friendly : The candy corn and cheese ghosts make kids lose their minds. The prosciutto and fig jam keep the adults happy. Everyone wins.
- Customizable for Any Dietary Need : Swap in dairy-free cheese, use gluten-free crackers, or load up on extra veggies. The base concept is totally flexible.
- Minimal Cleanup : One cutting board. One knife. A few small bowls. That’s it. No pots, no pans, no regrets.
What makes this board different from a standard charcuterie platter is the playful spooky theme without being overly complicated. The cheese ghosts are seriously the easiest thing you’ll make all Halloween season, and they look adorable. Plus, the candy corn adds that nostalgic sweetness that balances out all the savory, salty elements. It’s the kind of board that makes people stop and take a picture before they even grab a cracker.
I’ve tested this with picky kids, dairy-free friends, and even a few self-proclaimed charcuterie snobs. Every single person came back for seconds. That’s not bragging—that’s just what happens when you combine cheese, candy corn, and a little bit of spooky fun.
What Ingredients You Will Need
This recipe uses simple, mostly store-bought ingredients to create something that looks way more impressive than it actually is. Here’s what you’ll need to build your Spooky Halloween Charcuterie Board with Candy Corn and Cheese Ghosts:
For the Cheese Ghosts
- 8 ounces cream cheese , softened (I prefer Philadelphia for the creamiest texture—it holds its shape better when chilled)
- 1/4 cup powdered sugar (optional, for sweeter ghosts—skip if you want them savory)
- Mini chocolate chips or black sesame seeds (for the ghost eyes—about 12-16 chips depending on how many ghosts you make)
For the Savory Elements
- 6-8 ounces sharp cheddar cheese , cut into cubes or small bat shapes using a cookie cutter (I like Cabot or Tillamook for flavor)
- 4 ounces prosciutto or salami, thinly sliced
- 1/2 cup fig jam or honey (this pairs beautifully with the cheese and adds that sweet-savory balance)
- 1 cup assorted crackers (I go with a mix of buttery rounds and whole wheat crisps for variety)
- 1/2 cup pretzel sticks (they look like little witch fingers—perfect for the theme)
For the Sweet Elements
- 1 cup candy corn (the star of the show—get the classic or seasonal flavors)
- 1/2 cup candy pumpkins (optional, but they add great color)
- 1/4 cup dark chocolate chips or chopped dark chocolate bar
For the Fresh Elements
- 1 cup red grapes , washed and separated into small clusters
- 1/2 cup dried apricots or dried figs (they look like little mummy faces—trust me on this)
- Fresh rosemary sprigs or thyme (for garnish—they look like little spooky trees)
Optional Add-Ins
- Black olives (look like spider eggs—great for the theme)
- Roasted pumpkin seeds (adds crunch and fits the Halloween vibe)
- Apple slices (toss in lemon water to prevent browning)
If you’re feeling particularly festive, you can also add some creamy pumpkin cold foam iced latte with Halloween cinnamon sprinkles on the side for a complete spooky spread.
Equipment Needed
You don’t need much for this board, which is part of the beauty. Here’s what I use:
- Large wooden cutting board or serving platter (at least 12×16 inches—the bigger the better for spreading everything out)
- Small bowls or ramekins (for the fig jam, candy corn, and any loose items that might roll away)
- Paring knife (for cutting cheese and shaping the ghosts)
- Ghost-shaped cookie cutter (optional but makes the cheese ghosts way easier—I got mine at a craft store for $3)
- Small offset spatula or butter knife (for spreading cream cheese if needed)
- Cheese knife or small spreader for serving
If you don’t have a ghost cookie cutter, don’t worry. I’ve made these ghosts freehand with just a paring knife, and they looked perfectly imperfect. Honestly, the slightly lopsided ghosts have more character anyway. If you’re using a wooden board, just make sure it’s clean and dry before you start arranging. I’ve learned that lesson the hard way—wet boards make crackers sad.
Preparation Method
Let me walk you through exactly how I put this board together. It’s easier than you think, I promise.
- Make the cheese ghosts first (5 minutes). Take your softened cream cheese and mix in the powdered sugar if you’re using it. You want it smooth and spreadable but still firm enough to hold a shape. If it’s too soft, pop it in the fridge for 10 minutes. Scoop the cream cheese onto a piece of plastic wrap and form it into a rough log shape. Wrap it up and twist the ends. Refrigerate for at least 20 minutes until firm.
- Shape the ghosts (5 minutes). Once the cream cheese log is firm, unwrap it and slice it into 1/2-inch thick rounds. Use your ghost cookie cutter to press into each round, or freehand cut ghost shapes with a paring knife. Don’t stress about perfection—ghosts are supposed to look a little wonky. Press two mini chocolate chips into each ghost for eyes. Place them back in the fridge while you prep everything else.
- Prep the savory elements (5 minutes). Cut your cheddar into cubes or use a small bat-shaped cookie cutter if you have one. Fold the prosciutto slices into loose ribbons or roll them into little rosettes. Arrange your crackers and pretzel sticks in small piles nearby so they’re ready to go.
- Arrange the board (5 minutes). This is where the magic happens. Start by placing your small bowls on the board—one for fig jam, one for candy corn, one for candy pumpkins. These act as anchors. Then arrange your cheese ghosts in a little ghost village in one corner. They look adorable clustered together.
- Fill in the gaps (5 minutes). Start adding your cheddar cubes, prosciutto ribbons, and cracker piles around the bowls. Place grape clusters in a few spots for color contrast. Tuck dried apricots and pretzel sticks into any empty spaces. Sprinkle the dark chocolate chips around for little “dirt” spots.
- Add the finishing touches (2 minutes). Tuck fresh rosemary sprigs between items to look like little spooky trees. Position a few candy pumpkins near the cheese ghosts for a cute fall vibe. Step back and admire your work. Add anything that looks sparse.
- Serve immediately or refrigerate . If you’re making this ahead, cover the whole board with plastic wrap and refrigerate for up to 4 hours. Take it out 15 minutes before serving so the cheese softens slightly. The cheese ghosts will firm up nicely in the fridge, making them easier to handle.
A quick note about timing: the cream cheese needs at least 20 minutes to chill before you shape it, so start that first. Everything else moves fast after that. I usually make the ghosts while my kids are getting their costumes on, then assemble the board while they’re arguing about who gets the good candy.
Cooking Tips & Techniques
I’ve made this board enough times to learn a few tricks the hard way. Here’s what I wish someone had told me:
Soft cream cheese is your enemy. The first time I made these ghosts, I used cream cheese straight from the counter. It was too soft to hold a shape, and my ghosts looked more like sad blobs. Lesson learned. Start with cold cream cheese, mix it quickly, and get it back in the fridge. If it gets too warm while you’re shaping, just pop the whole tray in the freezer for 5 minutes.
Wet your knife slightly when cutting the cream cheese log. It sounds weird, but a slightly damp knife glides through cream cheese without sticking. This gives you cleaner edges for your ghost shapes. Just don’t use too much water—you don’t want soggy ghosts.
Layer textures and colors for visual appeal. A board that’s all one color is boring. I make sure to have dark elements (black olives, chocolate chips), bright elements (candy corn, grapes), and neutral elements (crackers, cheese) scattered throughout. It makes the board look intentional and professional.
Don’t overcrowd the board. I know it’s tempting to pile everything on, but leave a little breathing room between items. People need space to grab things without knocking over a cheese ghost. If you have too much food, just set up a small side plate with extras.
Use the bowls strategically. Sticky things like fig jam and loose items like candy corn belong in bowls. Everything else can go directly on the board. This keeps things tidy and prevents candy corn from rolling onto the floor (where it will inevitably be stepped on and crushed into the carpet).
If you want to add a warm element to balance the cold board, try pairing this with a creamy roasted tomato basil soup with crispy grilled cheese croutons for a cozy Halloween dinner spread.
Variations & Adaptations
One of the best things about this board is how flexible it is. Here are some variations I’ve tried and loved:
Sweet Ghost Board : Skip the savory elements entirely and make a dessert board. Use sweetened cream cheese for the ghosts, add chocolate-covered pretzels, marshmallows, and extra candy. My kids beg for this version every year, and honestly? I don’t blame them.
Savory Ghost Board : Make the ghosts savory by skipping the powdered sugar and adding garlic powder and fresh herbs to the cream cheese. Use sharp cheddar, aged gouda, and plenty of cured meats. This version is perfect for adult parties where you want the spooky theme without the sugar overload.
Dairy-Free Version : Use dairy-free cream cheese alternative for the ghosts (Kite Hill works great), and load up on nuts, dried fruit, and dairy-free crackers. The candy corn is naturally dairy-free, so that part stays the same. I’ve made this for a friend with lactose intolerance, and she was thrilled to have her own cheese ghosts.
Kid-Friendly Lunch Board : Scale it down for a single serving and pack it in a bento box. Use mini ghost-shaped cheese, a few candy corns, and some crackers. It’s a fun easy bento box chicken teriyaki lunch for kids alternative for Halloween week at school.
Gluten-Free Version : Swap regular crackers for gluten-free options, and use rice crackers or vegetable sticks instead of pretzels. Everything else is naturally gluten-free. Just double-check your candy corn—most brands are gluten-free, but it’s worth verifying.
I once tried making the ghosts with goat cheese instead of cream cheese. It was… interesting. The flavor was fantastic, but goat cheese is softer and didn’t hold the ghost shape as well. If you want to try it, freeze the goat cheese for 15 minutes before shaping. The texture will be firmer and easier to work with.
Serving & Storage Suggestions
This board is best served at room temperature, so take it out of the fridge about 15-20 minutes before your guests arrive. The cheese softens slightly, the crackers stay crisp, and everything just tastes better when it’s not straight-from-the-fridge cold.
For presentation , I like to scatter a few extra candy pumpkins around the board and tuck rosemary sprigs between items. It adds a pop of green that contrasts beautifully with all the orange and white. A small sign saying “Enter if you dare” or “Beware of cheese ghosts” is a fun touch for parties.
What to serve alongside : This board pairs beautifully with a warm drink. I love serving it with creamy pumpkin cold foam iced latte with Halloween cinnamon sprinkles for a complete Halloween experience. For a savory option, a bowl of creamy roasted tomato basil soup with crispy grilled cheese croutons makes an excellent starter.
Storage : If you have leftovers (unlikely, but possible), separate the components. Store the cheese ghosts in an airtight container in the fridge for up to 3 days. Keep crackers and pretzels in a separate bag at room temperature. Candy corn can stay in its original bag. Don’t store the assembled board—the crackers will get soft and the grapes will make everything soggy.
Reheating : There’s nothing to reheat here, but if your cheese ghosts get a little soft after being in the fridge, just pop them in the freezer for 5 minutes before serving. They’ll firm right back up.
Flavor development : The fig jam and cheese actually taste better after sitting together for a bit. If you’re making this a few hours ahead, go ahead and arrange everything on the board, then cover and refrigerate. The flavors meld together beautifully.
Nutritional Information & Benefits
Let’s be real—this is a treat board, not a health food. But here’s a rough breakdown per serving (assuming 8 servings):
- Calories : Approximately 350-400 per serving
- Protein : 8-10 grams (from cheese and prosciutto)
- Carbohydrates : 35-40 grams (mostly from candy and crackers)
- Fat : 20-25 grams (from cheese and cured meats)
- Fiber : 2-3 grams (from grapes and dried fruit)
Health benefits to highlight : The cheese provides calcium and protein, grapes offer antioxidants, and dark chocolate (if included) has flavonoids. The fig jam adds a touch of natural sweetness and fiber. The candy corn? Well, it brings joy. And sometimes that’s the most important nutrient.
Dietary considerations : This board contains dairy, gluten (from crackers), and common allergens. It’s naturally nut-free if you skip any nut-based crackers. For a lower-sugar version, reduce the candy corn and add more fresh fruit. For a lower-fat version, use reduced-fat cream cheese and skip the prosciutto.
Potential allergens : Dairy (cream cheese, cheddar), gluten (crackers, pretzels), and possibly soy (in some chocolate chips). Always check labels if serving to guests with allergies.
My personal take? This is a once-a-year treat board. Halloween comes around once every 365 days. Enjoy the candy corn, savor the cheese ghosts, and don’t stress about the nutritional breakdown. Life is short—eat the spooky snacks.
Conclusion
This Spooky Halloween Charcuterie Board with Candy Corn and Cheese Ghosts has become my most-requested Halloween recipe, and I totally get why. It’s fun without being fussy, impressive without being complicated, and it genuinely makes people smile. There’s something about a little cream cheese ghost staring up at you from a cracker that just feels right.
I’ve made this board for costume parties, family gatherings, and even just for a spooky movie night at home. Every single time, it’s the first thing to disappear. The kids fight over the cheese ghosts, the adults sneak extra prosciutto, and somehow the candy corn always vanishes last (which is fine by me—more for the leftover bowl).
I’d love to hear how your board turns out! Did you add any fun variations? Did your cheese ghosts look perfectly spooky or gloriously wonky? Drop a comment below and let me know. And if you snap a picture, tag me—I live for seeing your spooky creations. Happy Halloween, friends. May your cheese ghosts be plentiful and your candy corn never go stale.
Frequently Asked Questions
Can I make the cheese ghosts ahead of time?
Absolutely! You can make them up to 2 days in advance. Store them in an airtight container in the fridge with wax paper between layers. Just add the chocolate chip eyes after you shape them—they stay put better that way.
What if I can’t find a ghost-shaped cookie cutter?
No problem at all! Use a small paring knife to freehand cut ghost shapes from the cream cheese rounds. Imperfect ghosts look even cuter—they’re supposed to be a little spooky and uneven. You can also use a small round cookie cutter and just pinch one end to make it look ghost-like.
How long does this board stay fresh at a party?
About 2 hours at room temperature. After that, the crackers start getting soft and the cheese might sweat a bit. If your party runs longer, just refresh the board with fresh crackers and grapes halfway through.
Can I use different cheese for the ghosts?
You can, but cream cheese works best because it holds its shape and has a neutral flavor. Goat cheese is a good alternative if you freeze it first. Soft brie won’t hold the ghost shape—it’s too runny at room temperature.
What’s the best way to arrange the board so it looks professional?
Start with your bowls as anchors, then place your largest items (cheese ghosts, prosciutto piles) next. Fill gaps with smaller items like grapes, candy corn, and chocolate chips. Step back every few minutes to check the balance. And don’t be afraid to rearrange—I move things around at least three times before I’m happy.
Pin This Recipe!
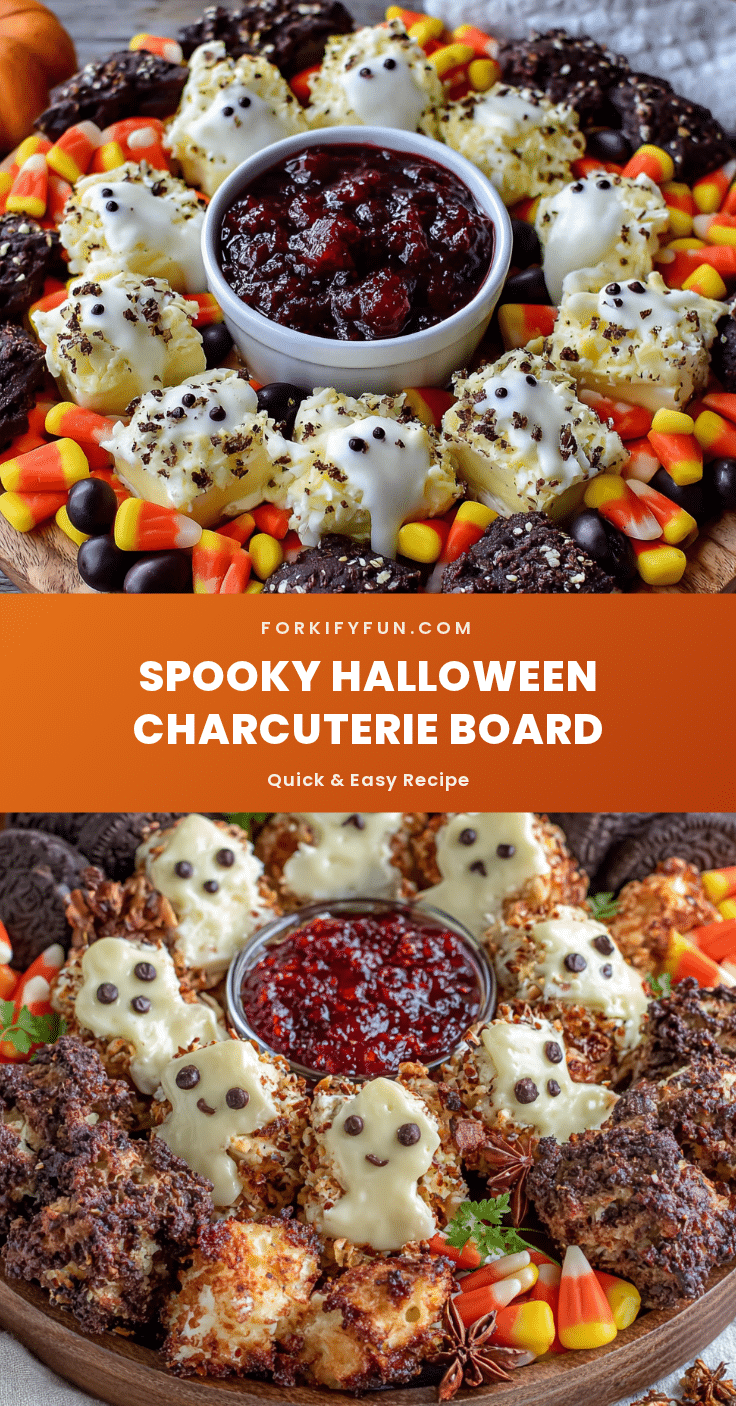
Easy Spooky Halloween Charcuterie Board with Candy Corn
A fun and festive Halloween charcuterie board featuring adorable cream cheese ghosts, candy corn, and a mix of sweet and savory snacks. This no-cook recipe comes together in just 20 minutes and is perfect for parties, movie nights, or any spooky gathering.
- Prep Time: 20 minutes
- Cook Time: 0 minutes
- Total Time: 20 minutes (plus 20 minutes chilling for cream cheese)
- Yield: 8 servings 1x
- Category: Appetizer
- Cuisine: American
Ingredients
- 8 ounces cream cheese, softened
- 1/4 cup powdered sugar (optional, for sweeter ghosts)
- 12–16 mini chocolate chips or black sesame seeds (for ghost eyes)
- 6–8 ounces sharp cheddar cheese, cut into cubes or bat shapes
- 4 ounces prosciutto or salami, thinly sliced
- 1/2 cup fig jam or honey
- 1 cup assorted crackers
- 1/2 cup pretzel sticks
- 1 cup candy corn
- 1/2 cup candy pumpkins (optional)
- 1/4 cup dark chocolate chips or chopped dark chocolate bar
- 1 cup red grapes, washed and separated into small clusters
- 1/2 cup dried apricots or dried figs
- Fresh rosemary sprigs or thyme (for garnish)
- Black olives (optional)
- Roasted pumpkin seeds (optional)
- Apple slices (optional, tossed in lemon water)
Instructions
- Make the cheese ghosts first (5 minutes). Take your softened cream cheese and mix in the powdered sugar if using. You want it smooth and spreadable but still firm enough to hold a shape. If it’s too soft, pop it in the fridge for 10 minutes. Scoop the cream cheese onto a piece of plastic wrap and form it into a rough log shape. Wrap it up and twist the ends. Refrigerate for at least 20 minutes until firm.
- Shape the ghosts (5 minutes). Once the cream cheese log is firm, unwrap it and slice it into 1/2-inch thick rounds. Use your ghost cookie cutter to press into each round, or freehand cut ghost shapes with a paring knife. Press two mini chocolate chips into each ghost for eyes. Place them back in the fridge while you prep everything else.
- Prep the savory elements (5 minutes). Cut your cheddar into cubes or use a small bat-shaped cookie cutter if you have one. Fold the prosciutto slices into loose ribbons or roll them into little rosettes. Arrange your crackers and pretzel sticks in small piles nearby so they’re ready to go.
- Arrange the board (5 minutes). Start by placing your small bowls on the board—one for fig jam, one for candy corn, one for candy pumpkins. These act as anchors. Then arrange your cheese ghosts in a little ghost village in one corner.
- Fill in the gaps (5 minutes). Start adding your cheddar cubes, prosciutto ribbons, and cracker piles around the bowls. Place grape clusters in a few spots for color contrast. Tuck dried apricots and pretzel sticks into any empty spaces. Sprinkle the dark chocolate chips around for little ‘dirt’ spots.
- Add the finishing touches (2 minutes). Tuck fresh rosemary sprigs between items to look like little spooky trees. Position a few candy pumpkins near the cheese ghosts for a cute fall vibe. Step back and admire your work. Add anything that looks sparse.
- Serve immediately or refrigerate. If making ahead, cover the whole board with plastic wrap and refrigerate for up to 4 hours. Take it out 15 minutes before serving so the cheese softens slightly.
Notes
Start with cold cream cheese for best results when shaping ghosts. If cream cheese gets too warm, pop it in the freezer for 5 minutes. Wet your knife slightly when cutting the cream cheese log for cleaner edges. Don’t overcrowd the board—leave space for guests to grab items. Use bowls for sticky or loose items like fig jam and candy corn. For best flavor, serve at room temperature (remove from fridge 15-20 minutes before serving). Leftover cheese ghosts can be stored in an airtight container in the fridge for up to 3 days.
Nutrition
- Serving Size: 1 serving (approxima
- Calories: 375
- Sugar: 24
- Sodium: 480
- Fat: 22
- Saturated Fat: 12
- Carbohydrates: 38
- Fiber: 2
- Protein: 9
Keywords: Halloween charcuterie board, spooky charcuterie, cheese ghosts, candy corn board, Halloween appetizer, no-cook recipe, party platter