Staring into the fridge at 10 PM on a Sunday night, I realized I had absolutely nothing prepped for the week ahead. The lunchbox containers were clean, sure, but empty. The kids’ snack drawer? A sad collection of lone granola bar wrappers. I had a pack of flour tortillas, some deli turkey that was about to hit its expiration date, and a block of cream cheese that felt like it had been waiting for a purpose. That’s when I just started slathering and rolling, honestly not even thinking it would be anything special. I cut the first roll and saw those perfect little spirals—turkey, cheese, a bit of green—and I knew I’d stumbled onto something that would save my sanity every single school morning. These easy turkey and cheese pinwheel wraps became the lunchbox hero I didn’t know I needed, and they’ve been on repeat ever since.
These aren’t just any rolled-up sandwich. They’re the kind of lunch that makes you feel like you have your act together, even when you absolutely don’t. The cream cheese holds everything together beautifully, the turkey adds that savory protein punch, and the whole thing comes together in about ten minutes flat. No cooking, no fuss, just a little assembly and a sharp knife. It’s the kind of recipe that feels almost too simple to share, but trust me—once you see how fast they disappear from lunchboxes, you’ll understand why I had to write it down.
So whether you’re packing for a picky preschooler, a hungry teenager, or honestly just yourself for a quick work-from-home lunch, these pinwheels deliver. They’re customizable, they travel well, and they don’t get soggy like a regular sandwich can. Let me show you exactly how to make them, because once you start, you won’t go back to plain old sandwiches again.
Why You’ll Love This Recipe
I’ve tested a lot of lunchbox recipes over the years, and these turkey and cheese pinwheel wraps have earned a permanent spot in my rotation. Here’s why they work so well for real families with real schedules:
- Ready in 10 Minutes : No cooking, no complicated steps. Just spread, layer, roll, and slice. Perfect for Sunday meal prep or a quick morning assembly.
- Simple Ingredients : You probably already have everything you need. Tortillas, cream cheese, deli turkey, and your favorite cheese. That’s it.
- Perfect for Lunchboxes : These hold up beautifully in a lunch bag or thermos-friendly container. No sogginess, no mess, just neat little spirals that stay intact.
- Crowd-Pleaser : Kids love the fun shape, and adults appreciate how satisfying they are. I’ve served these at playdates and watched even the pickiest eaters go back for seconds.
- Endlessly Customizable : Swap the turkey for ham or roast beef, change up the cheese, add veggies—this recipe is a template for whatever you have on hand.
What makes these different from other pinwheel recipes I’ve tried is the cream cheese base. It acts as both a binder and a flavor carrier, keeping everything together without making the tortilla soggy. I’ve tried versions with mayo and mustard, and they just don’t hold up as well. The cream cheese creates a barrier that protects the tortilla from moisture, so your pinwheels stay perfect from morning until lunchtime.
Honestly, this is the kind of recipe that makes you feel like a kitchen genius with almost zero effort. It’s comfort food reimagined for busy lives—faster, simpler, but with the same satisfying feeling of a good sandwich. Perfect for impressing your kids without any stress, or turning a boring lunch into something they actually look forward to opening.
What Ingredients You Will Need
This recipe uses simple, everyday ingredients that you can find at any grocery store. The beauty is in how they work together to create something greater than the sum of their parts. Here’s what you’ll need:
For the Pinwheels
- Large flour tortillas (10-inch) – Burrito-sized works best for getting nice, thick pinwheels. You can use spinach or sun-dried tomato tortillas for extra color and flavor.
- 8 ounces cream cheese, softened – Full-fat gives the best texture and hold. Let it sit on the counter for 20 minutes before using, or microwave for 10 seconds. (I prefer Philadelphia brand for consistent results.)
- 1/2 cup shredded cheddar cheese – Sharp cheddar adds bold flavor. You can also use Monterey Jack, provolone, or a Mexican blend.
- 1/2 pound thinly sliced deli turkey – Look for oven-roasted or smoked turkey for the best taste. Ask for it shaved at the deli counter if possible—it rolls up much easier than thick slices.
- 1/4 cup finely chopped green onions – Adds a mild oniony bite without being overpowering. You can substitute chives or skip them entirely.
- 1/4 teaspoon garlic powder – Just a little to enhance the savory notes. Don’t skip it—it makes a difference.
- 1/4 teaspoon black pepper – Freshly ground is best, but pre-ground works fine too.
- Optional: 1/4 cup finely chopped red bell pepper – Adds crunch and a pop of color. You can also use shredded carrots or finely chopped cucumber.
I recommend using high-quality deli turkey from the counter rather than pre-packaged slices. The texture is better, and it rolls up without tearing. If you’re using pre-packaged, look for thin-sliced varieties. For the cream cheese, make sure it’s really softened—cold cream cheese will tear your tortillas when you try to spread it.
If you’re looking for a lower-carb option, you can use low-carb tortillas or even large lettuce leaves. The technique stays the same, though the rolling will be a bit different. For a dairy-free version, use dairy-free cream cheese and your favorite plant-based cheese shreds. I’ve tried both, and they work surprisingly well!
Equipment Needed

You don’t need any fancy tools for this recipe, which is part of what makes it so great. Here’s what you’ll need:
- Cutting board – A large, stable surface for assembling and slicing. I prefer a wooden board because it doesn’t slip around.
- Sharp knife – A serrated bread knife works best for clean slices without squishing the pinwheels. A chef’s knife works too, just make sure it’s sharp.
- Small mixing bowl – For combining the cream cheese mixture. Any medium bowl will do.
- Spatula or butter knife – For spreading the cream cheese mixture evenly across the tortillas.
- Plastic wrap – For wrapping the rolled tortillas tightly before chilling. This helps them hold their shape.
- Baking sheet or large plate – For holding the wrapped rolls in the fridge. A sheet pan works great if you’re making multiple batches.
If you don’t have plastic wrap, you can use beeswax wraps or even just place the rolled tortillas seam-side down on a plate. The key is keeping them snug so they don’t unroll while chilling. I’ve also used parchment paper in a pinch—it works, just not as tightly.
A good serrated knife is worth investing in for this recipe. I learned the hard way that a dull knife will squish your beautiful pinwheels flat. A sharp blade glides through without crushing the layers. If you don’t have one, try using dental floss—seriously! Slide a long piece under the roll, cross the ends over the top, and pull. It gives perfect slices every time.
Preparation Method
Making these turkey and cheese pinwheel wraps is almost embarrassingly easy. Follow these steps, and you’ll have a week’s worth of lunches ready in no time.
- Soften the cream cheese – Take your cream cheese out of the fridge about 20 minutes before you start. If you’re in a hurry, unwrap it and microwave on low power for 10-15 seconds. You want it soft enough to spread easily but not melted. I’ve made the mistake of nuking it too long, and it becomes runny—trust me, soft is the goal, not liquid.
- Mix the filling – In your small bowl, combine the softened cream cheese, shredded cheddar, chopped green onions, garlic powder, and black pepper. Stir until everything is evenly distributed. If you’re adding red bell pepper or other veggies, fold them in now. Taste it—you want the flavors to pop. Add a pinch of salt if your cream cheese is unsalted.
- Prepare your work surface – Lay a large flour tortilla flat on your cutting board. Make sure it’s at room temperature—cold tortillas crack when you roll them. If they’re straight from the fridge, let them sit out for a few minutes or warm them in the microwave for 5 seconds.
- Spread the cream cheese mixture – Using your spatula or butter knife, spread about 3 tablespoons of the mixture evenly across the entire surface of the tortilla. Go all the way to the edges—this creates the moisture barrier that keeps everything from getting soggy. A thin, even layer is what you’re after.
- Layer the turkey – Place your turkey slices over the cream cheese mixture, overlapping them slightly. You want complete coverage without huge gaps. For a standard 10-inch tortilla, about 4-5 slices should do it. If your turkey is shaved, you might need a few more—just make sure it’s an even layer.
- Roll it up tight – Starting at one edge, begin rolling the tortilla as tightly as you can without tearing it. Use your fingers to keep the filling tucked in as you go. Once you reach the end, place it seam-side down. The cream cheese acts like glue, so it should stay closed on its own.
- Wrap and chill – Tightly wrap each rolled tortilla in plastic wrap. Twist the ends like a candy wrapper to keep it snug. Place the wrapped rolls on a baking sheet or plate and refrigerate for at least 30 minutes. This step is crucial—the chilling time allows the cream cheese to firm up, which makes slicing much cleaner. I’ve skipped this before, and the pinwheels came out messy and squished. Don’t be like me.
- Slice and serve – After chilling, unwrap each roll and place it on your cutting board. Using your sharp serrated knife, slice off the uneven ends first (those are the cook’s snack!). Then cut the remaining roll into 1-inch thick pieces. A gentle sawing motion works better than pressing straight down. You should get about 6-8 pinwheels per tortilla.
- Pack or serve immediately – Arrange the pinwheels in your lunchbox or serving platter. They’re delicious cold or at room temperature. If packing for later, place them in a single layer in an airtight container with a paper towel on top to absorb any excess moisture.
Your pinwheels should look like neat little spirals with distinct layers of cream cheese, turkey, and tortilla. The edges should be clean, not squished. If they look a little messy, don’t worry—they’ll still taste amazing. And honestly, the imperfect ones are always the first to disappear!
Cooking Tips & Techniques
Over the dozens of times I’ve made these, I’ve picked up a few tricks that make a real difference. Here are the things I wish someone had told me when I first started making pinwheel wraps:
Don’t overfill your tortillas. It’s tempting to pile on the turkey and cheese, but too much filling makes rolling difficult and causes everything to squish out the sides. A thin, even layer is your friend. Think of it as a delicate balance—you want flavor in every bite without the structural failure.
Temperature matters more than you think. Cold tortillas crack. Cold cream cheese tears the tortilla. Cold turkey doesn’t roll smoothly. Let everything come to room temperature before you start. I learned this after ruining three tortillas in a row and wanting to throw the whole project in the trash. Now I set everything out 15 minutes before I start, and it makes all the difference.
Use a gentle sawing motion when slicing. Pressing straight down with a dull knife will squish your beautiful pinwheels flat. A serrated knife with a gentle back-and-forth motion glides through without crushing the layers. If you don’t have a serrated knife, try the dental floss trick I mentioned earlier—it really works.
Chill time is non-negotiable. I know, I know, you’re busy and you want to eat them now. But the 30-minute chill is what transforms these from messy rolls into neat, portable pinwheels. The cream cheese firms up and holds everything together. If you’re really in a rush, pop them in the freezer for 10 minutes instead. Just don’t forget about them!
Make a double batch. These freeze beautifully, so I always make extra. Wrap the uncut rolls tightly in plastic wrap and then foil, and freeze for up to 3 months. When you’re ready to use them, thaw overnight in the fridge and slice as usual. It’s a lifesaver for busy mornings when you realize you forgot to pack lunch.
Variations & Adaptations
One of the best things about this recipe is how adaptable it is. I’ve tried dozens of variations over the years, and here are some of my favorites:
Mediterranean Style – Swap the turkey for sliced roast beef or leave it out entirely. Use feta cheese instead of cheddar, and add chopped Kalamata olives, sun-dried tomatoes, and a sprinkle of oregano. These are fantastic for a grown-up lunch or picnic.
Veggie Lover’s Version – Skip the turkey and load up on thinly sliced cucumber, shredded carrots, bell peppers, and spinach leaves. The cream cheese holds everything together beautifully, and you get a crunchy, colorful pinwheel that’s perfect for meatless Mondays.
Spicy Southwest Style – Add a tablespoon of chopped pickled jalapeños to the cream cheese mixture, use pepper jack cheese instead of cheddar, and swap the turkey for sliced ham. These have a nice kick without being overwhelming. I love pairing these with a side of Texas cowboy caviar for a complete lunch.
Breakfast Pinwheels – Use the same technique but fill with scrambled eggs, crumbled bacon or sausage, and shredded cheddar. These make a great grab-and-go breakfast for busy mornings. Just make sure the eggs are completely cool before spreading, or they’ll make the tortilla soggy.
Gluten-Free Option – Use large gluten-free tortillas. They’re a bit more fragile, so handle them gently and don’t overfill. I’ve found that warming them slightly before rolling helps prevent cracking. The results are just as delicious, and celiac friends can enjoy them too.
I once made a batch with leftover creamy Tuscan chicken shredded and mixed into the cream cheese. It was an experiment born from leftovers, and honestly, it was one of the best pinwheel variations I’ve ever made. Don’t be afraid to get creative with what you have on hand!
Serving & Storage Suggestions
These turkey and cheese pinwheel wraps are incredibly versatile when it comes to serving and storing. Here’s everything you need to know:
Serving Temperature – They’re best enjoyed cold or at room temperature. Straight from the fridge, they’re firm and refreshing. If you’re packing them for lunch, they’ll come to room temperature naturally by the time lunch rolls around. I actually prefer them slightly chilled—the cream cheese has a nice firm texture that holds everything together.
Presentation Ideas – Arrange the pinwheels on a platter with the cut sides facing up so the spirals are visible. Garnish with fresh herbs like parsley or chives for a pop of color. For lunchboxes, place them in a single layer in a container with a small dipping cup of ranch dressing or honey mustard on the side. Kids love the dippable aspect!
What to Serve With Them – These pair beautifully with a simple side salad, fresh fruit, or veggie sticks. I often pack them alongside creamy dill cucumber salad for a light and satisfying lunch. For a heartier meal, serve with a cup of soup or some crunchy chips.
Storage Instructions – Store assembled pinwheels in an airtight container in the refrigerator for up to 4 days. Place a paper towel on top to absorb any condensation—this keeps them from getting soggy. For longer storage, freeze the uncut rolls as I mentioned earlier. They’ll keep for up to 3 months.
Reheating Tips – These are best enjoyed cold, but if you prefer them warm, you can microwave them for about 10-15 seconds. Just be careful not to overheat, or the cream cheese will melt and the tortilla will get soft. I’ve also tried them in a panini press for a crispy exterior—delicious, but a different experience entirely.
Flavor Development – Interestingly, these pinwheels taste even better the next day. The flavors meld together as they sit, and the cream cheese absorbs the savory notes from the turkey. I often make them a day ahead specifically for this reason. If you can resist eating them immediately, you’ll be rewarded with even better flavor.
Nutritional Information & Benefits
These turkey and cheese pinwheel wraps are a balanced lunch option that provides protein, healthy fats, and carbohydrates to keep you energized throughout the day. Here’s a rough estimate per serving (about 6 pinwheels):
| Nutrient | Amount Per Serving |
|---|---|
| Calories | 320-380 |
| Protein | 22-26g |
| Carbohydrates | 28-32g |
| Fat | 14-18g |
| Saturated Fat | 8-10g |
| Fiber | 2-3g |
| Sodium | 650-750mg |
The turkey provides lean protein that supports muscle health and keeps you full longer. Cream cheese offers calcium for bone health, and the whole wheat tortillas (if you choose them) add fiber for digestive health. If you’re watching your sodium, look for low-sodium deli turkey and reduced-fat cream cheese.
These pinwheels are naturally nut-free, making them a safe option for school lunchboxes with allergy restrictions. They’re also easy to adapt for gluten-free or dairy-free diets as mentioned in the variations section. For a lower-carb option, use low-carb tortillas or large lettuce leaves instead.
I love that this recipe allows me to pack a satisfying lunch without resorting to processed snacks or expensive pre-made options. It’s real food, made simply, that actually tastes good and keeps my family happy. That’s a win in my book.
Conclusion
These easy turkey and cheese pinwheel wraps have genuinely changed my lunch-packing game. They’re simple enough for a busy weekday morning, yet impressive enough to serve at a playdate or picnic. The best part? They actually taste amazing, and my kids eat them without complaint—which, let’s be honest, is the real victory here.
I hope you give these a try and make them your own. Add your favorite veggies, swap in different meats and cheeses, or experiment with flavored tortillas. The possibilities are endless, and that’s what makes this recipe so fun. I’d love to hear how yours turn out—leave a comment below and let me know what variations you tried. Did your kids love them? Did you discover a new favorite combination? Share your pinwheel adventures with me!
Thanks for stopping by, and happy rolling. Your lunchboxes are about to get a whole lot more exciting.
Frequently Asked Questions
Can I make these pinwheels the night before?
Absolutely! In fact, they taste even better the next day. Assemble the rolls, wrap them tightly in plastic wrap, and refrigerate overnight. Slice them in the morning before packing. The flavors meld together beautifully, and the cream cheese firms up perfectly for clean slicing.
How do I keep the pinwheels from getting soggy?
The cream cheese layer acts as a moisture barrier that protects the tortilla from the turkey and any veggies. Make sure you spread it all the way to the edges. Also, pat dry any vegetables like bell peppers or cucumbers before adding them. And always store with a paper towel on top to absorb condensation.
Can I freeze these pinwheels?
Yes! Freeze the uncut rolls wrapped tightly in plastic wrap and then foil for up to 3 months. Thaw overnight in the refrigerator before slicing. I don’t recommend freezing them after slicing, as the texture can become a bit watery upon thawing.
What other meats can I use instead of turkey?
Ham, roast beef, chicken, or even salami all work beautifully. For a vegetarian option, skip the meat entirely and load up on veggies like cucumber, shredded carrots, bell peppers, and spinach. The cream cheese holds everything together no matter what you use.
How long do these pinwheels last in the fridge?
Stored in an airtight container, they’ll stay fresh for up to 4 days. I recommend placing a paper towel on top to absorb any moisture and changing it out if it gets wet. After day 4, the tortillas can start to get a bit soft, so try to eat them within that window for the best texture.
Pin This Recipe!
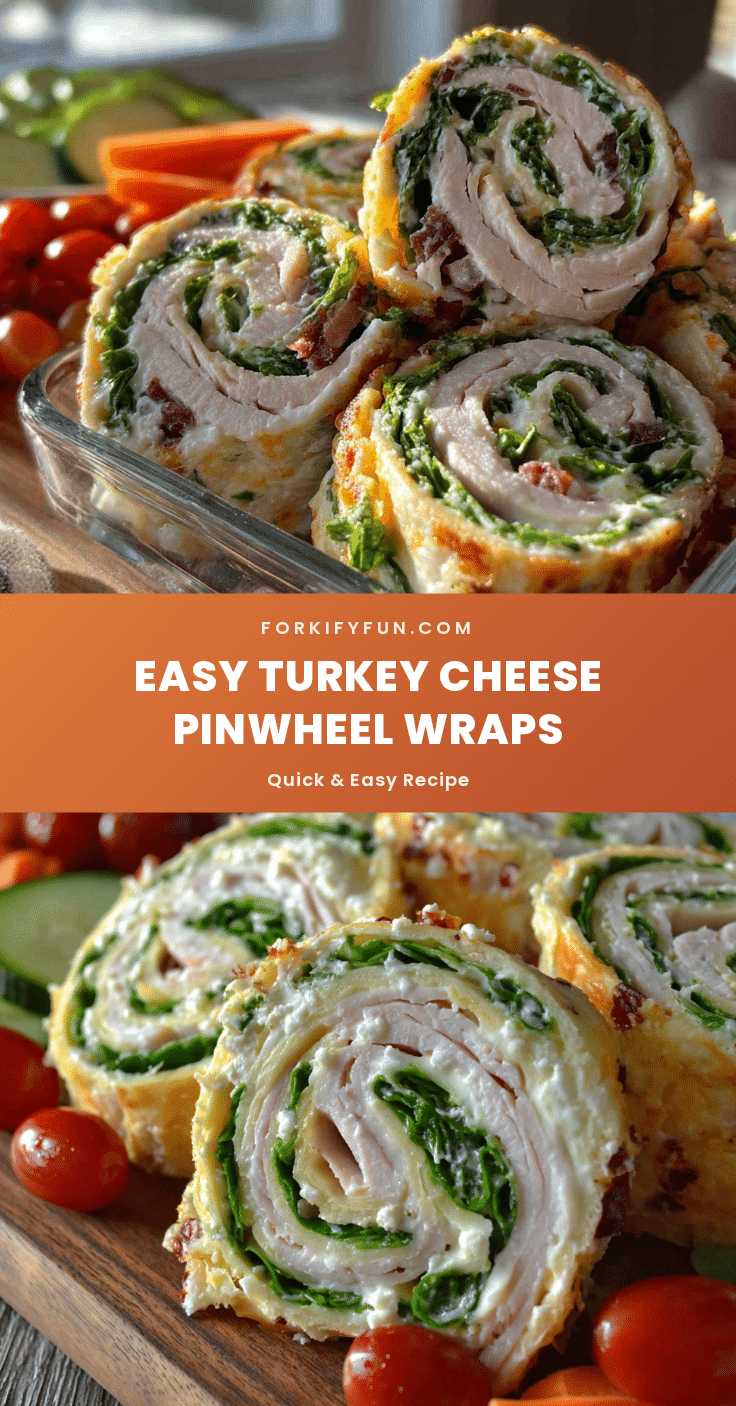
Easy Turkey and Cheese Pinwheel Wraps: Best Lunch Idea

These easy turkey and cheese pinwheel wraps are the perfect lunchbox hero—ready in 10 minutes with simple ingredients. Cream cheese holds everything together beautifully, making them a crowd-pleaser that stays fresh and doesn’t get soggy.
- Prep Time: 10 minutes
- Cook Time: 0 minutes
- Total Time: 40 minutes (including 30 minutes chilling)
- Yield: 4 servings (about 6 pinwheels per serving) 1x
- Category: Lunch
- Cuisine: American
Ingredients
- 4 large flour tortillas (10-inch)
- 8 ounces cream cheese, softened
- 1/2 cup shredded cheddar cheese
- 1/2 pound thinly sliced deli turkey
- 1/4 cup finely chopped green onions
- 1/4 teaspoon garlic powder
- 1/4 teaspoon black pepper
- Optional: 1/4 cup finely chopped red bell pepper
Instructions
- Soften the cream cheese: Take cream cheese out of the fridge about 20 minutes before starting. If in a hurry, microwave on low for 10-15 seconds until soft but not melted.
- Mix the filling: In a small bowl, combine softened cream cheese, shredded cheddar, chopped green onions, garlic powder, and black pepper. Stir until evenly distributed. If using red bell pepper, fold it in now. Taste and add a pinch of salt if needed.
- Prepare work surface: Lay a large flour tortilla flat on a cutting board. Ensure it’s at room temperature to prevent cracking.
- Spread cream cheese mixture: Using a spatula or butter knife, spread about 3 tablespoons of the mixture evenly across the entire surface of the tortilla, going all the way to the edges.
- Layer the turkey: Place turkey slices over the cream cheese mixture, overlapping slightly for complete coverage. About 4-5 slices for a 10-inch tortilla.
- Roll it up tight: Starting at one edge, roll the tortilla as tightly as possible without tearing. Use fingers to keep filling tucked in. Place seam-side down.
- Wrap and chill: Tightly wrap each rolled tortilla in plastic wrap, twisting the ends like a candy wrapper. Refrigerate for at least 30 minutes to firm up the cream cheese for cleaner slicing.
- Slice and serve: After chilling, unwrap each roll and place on a cutting board. Slice off uneven ends (cook’s snack), then cut remaining roll into 1-inch thick pieces using a gentle sawing motion with a sharp serrated knife. You should get about 6-8 pinwheels per tortilla.
- Pack or serve immediately: Arrange pinwheels in a lunchbox or serving platter. They are delicious cold or at room temperature. For later, store in a single layer in an airtight container with a paper towel on top to absorb moisture.
Notes
For best results, let all ingredients come to room temperature before assembling. Chilling time is non-negotiable for clean slices. These freeze beautifully: wrap uncut rolls tightly in plastic wrap and foil, freeze for up to 3 months, thaw overnight in fridge before slicing. The cream cheese acts as a moisture barrier to prevent sogginess.
Nutrition
- Serving Size: 6 pinwheels
- Calories: 320380
- Sugar: 24
- Sodium: 650750
- Fat: 1418
- Saturated Fat: 810
- Carbohydrates: 2832
- Fiber: 23
- Protein: 2226
Keywords: turkey pinwheels, cheese pinwheels, lunchbox ideas, easy lunch, no-cook lunch, kid-friendly lunch, meal prep